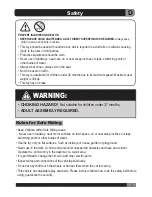
background image

• 

Suitable age for 3+ Years

 Maximum user weight: 30kg

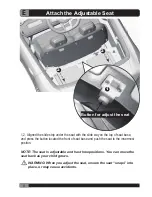
 Adult assembly required

Read and understand this entire manual before using!
Please keep this manual for future reference as it contains important information.
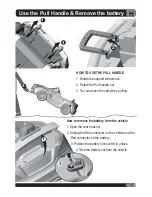
Before first time use, charge the battery for at least 8-12 hours.

Styles and colo(u)rs may vary

OWNER’S MANUAL

with Assembly Instructions

Содержание Mercedes Benz SL65 AMG Ride On Car

Страница 1: ...d Read and understand this entire manual before using Please keep this manual for future reference as it contains important information Before first time use charge the battery for at least 8 12 hours...

Страница 2: ...Y PCS REMARK Vehicle body Driving wheel Normal wheel 10 washer Lock nut Wheel cover View mirror Windshield Seat 4x12 screw Steering wheel M5X45 machine screw 5 nut Charger Remote controller Spanner Pa...

Страница 3: ...3 14 15 16 1 2 3 4 5 6 9 10 12 13 7 7 8 11 10 C NOTE Some parts shown are assembled on both sides of vehicle Parts Diagram...

Страница 4: ...ground Never use in the dark A child could encounter unexpected obstacles and have an accident Operate the vehicle only in the daytime or a well lit area It is prohibited to change the circuit or add...

Страница 5: ...the end of the rear axle with a spanner 4 Fit the wheel cover to the wheel 5 Slide a 10 washer onto the rear axle from other side 6 Slide a normal wheel onto the rear axle 7 Slide the other 10 washer...

Страница 6: ...ep the driving wheel match with the gear box 2 Slide the 10 washer onto the rear axle 3 Tighten a lock nut to the end of the rear axle with a spanner Repeat for the other driving wheel 4 Fit the wheel...

Страница 7: ...the front axle 2 Slide the Front wheel onto the front axle 3 Slide the 10 washer onto the front axle 4 Tighten a lock nut to the end of the front axle with a spanner 5 Fit the wheel cover to the whee...

Страница 8: ...steering column 3 Line up the holes in the steering wheel with the hole in the steering column insert the M5x45 machine screw 4 Fasten a nut on the opposite end of the screw with a screwdriver 5 Fit...

Страница 9: ...2 9 E 1 Connect the Power Supply 1 Open the rear trunk lid 2 Plug the Red power connector on the battery into the blue connector on the vehicle Red power connector Red vehicle connector...

Страница 10: ...10 E Attach the Normal Seat 1 Fit the seat to the vehicle body 2 Tighten two 4x12 flat head screws to secure the seat to the vehicle HINT If you want to use the Adjustable Seat see the next page plea...

Страница 11: ...t base and press the button located the front of seat base and push the seat to the innermost postion NOTE The seat is adjustable and has three positions You can move the seat back as your child grows...

Страница 12: ...g press for decreasing the volume G Change the audio input This button worked while you inserted two audio input devices H Display screen It displays the power level of the battery when the vehicle is...

Страница 13: ...ormation on page 1 NOTE 1 Connection button Long press the Connection button for 2 4 seconds first Then turn on the power button located on the vehicle dashboard console when the status indicator flas...

Страница 14: ...he rear trunk lid 2 Unplug the Red connector on the vehicle and the Red connector on the battery 3 Position the battery lock switch to unlock 4 Take the battery out from the vehicle HOW TO USE THE PUL...

Страница 15: ...ters Plastic parts may melt Recharge the battery after each use Only an adult can handle the battery Recharge the battery at least once a month when the vehicle Raider is not being used Do not wash th...

Страница 16: ...livered to the terminal connection and the vehicle needs repair Contact your distributor please Attempting to shift while the vehicle is motion Completely stop the vehicle and shift see Use Your New V...

Страница 17: ...be recycled or disposed of in an environmen tally sound manner Do not dispose of your lead acid battery in a fire The battery may explode or leak Do not dispose of a lead acid battery in your regular...

Отзывы: