background image

6

2

3

A

1

Quick Installation

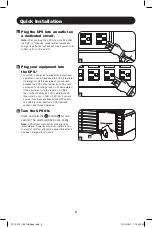
1


Plug the UPS into an outlet on 

a dedicated circuit.

 Note: 

After you plug the UPS into a live AC outlet, 

the UPS (in “Standby” mode) will automatically 
charge its batteries, but will not supply power to its 

outlets until it is turned ON.

2


Plug your equipment into  

the UPS.*


*  Your UPS is designed to support only electronic 

equipment. You will overload the UPS if the total 

VA ratings for all the equipment you connect 
exceeds the UPS Output Capacity. To find your 

equipment’s VA ratings, look on its nameplates. 

If the equipment is listed in amps, multiply 
the number of amps by 120 to determine VA. 

(Example: 1 amp × 120 = 120 VA) If you are 
unsure if you have overloaded the UPS outlets, 

see LOAD icon description in 

LCD Interface


section under

 Basic Operation

.

3

 Turn the UPS ON.


Press and hold the 

 button 

A

 for one 

second. The alarm will beep once briefly.

 Note: 

UPS system will function properly upon 

initial startup, however, maximum runtime and a 
successful self-test will only be accessible after it 
has been charged for 24 hours.

21-10-012 - 933148-Book.indb   6

21-10-012 - 933148-Book.indb   6

10/14/2021   1:10:24 PM

10/14/2021   1:10:24 PM

Содержание SM1500RMXL2UTAA

Страница 1: ...RT1000RMXL2U AG 0011 AG 02F9 Not suitable for mobile applications WARRANTY REGISTRATION Register your product today and be automatically entered to win an ISOBAR surge protector in our monthly drawing...

Страница 2: ...AC power outlet Do not modify the UPS plug in a way that would eliminate the UPS connection to ground Do not use adapters that eliminate the UPS connection to ground Do not plug the UPS into itself th...

Страница 3: ...ite com support battery index cfm to locate the specific replacement battery for your UPS The RBC Type can also be found on the label affixed to the Battery Retention Plate During hot swap battery rep...

Страница 4: ...unit labels to confirm that the shelves are level in all directions Note The support ledge of each shelf must face inward 2 Secure the shelves B to the mounting rails permanently using the included s...

Страница 5: ...ll mount orientation make sure the LCD Screen panel is at the top of the UPS not at the bottom Note To mount the UPS in an upright tower position 2 9USTAND is required sold separately Rotate the LCD S...

Страница 6: ...o find your equipment s VA ratings look on its nameplates If the equipment is listed in amps multiply the number of amps by 120 to determine VA Example 1 amp 120 120 VA If you are unsure if you have o...

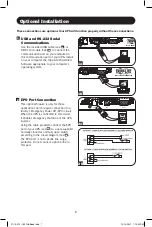
Страница 7: ...t Software appropriate to your computer s operating system 2 EPO Port Connection This optional feature is only for those applications which require connection to a facility s Emergency Power Off EPO c...

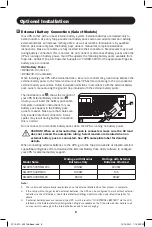
Страница 8: ...ation instructions for your battery pack appear in the battery pack owner s manual Make sure that cables are fully inserted into their connectors Small sparks may result during battery connection this...

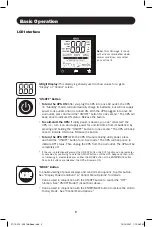
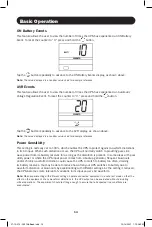
Страница 9: ...status Release the button To turn the UPS OFF With the UPS ON and receiving utility power press and hold the ON OFF button for 2 5 seconds The UPS will beep once to indicate OFF status Then unplug the...

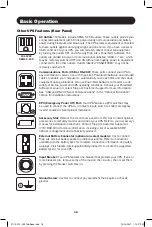
Страница 10: ...e EVENTS icon to indicate On Battery events Replace Battery Icon In the event that UPS batteries expire and require replacement this icon and the warning icon will flash This icon will also flash afte...

Страница 11: ...1 Displayed in conjunction with RUNTIME icon and 3 digit value to indicate battery runtime in minutes 2 Displayed in conjunction with the 3 digit value reporting LCD to indicate the minimum brightnes...

Страница 12: ...ltage In 2 Voltage Out 3 Estimated Runtime in minutes 4 Load 5 Load Wattage 6 KWH Day 7 Battery Capacity Load Wattage is displayed in watts up to 999 and then will be displayed in Kilowatts The Kilowa...

Страница 13: ...e UPS switches to battery to test the capacity with a load Upon completion of the test the display will indicate PAS or BAD pass or bad for 20 seconds and then return to the home screen Connected equi...

Страница 14: ...ch to providing pure sine wave power from its battery reserves for as long as the distortion is present In some areas with poor utility power or where the UPS input power comes from a backup generator...

Страница 15: ...for information on configuring the UPS for external battery operation using the External Battery Utility software Tap the button repeatedly to advance to the External Battery display as shown above To...

Страница 16: ...stomer Support for more information See USB and RS 232 Serial Communications in the Optional Installation section for installation instructions EPO Emergency Power Off Port Your UPS features a EPO por...

Страница 17: ...ing of the instructions 2 If the problem continues do not contact or return the product to the dealer Instead visit tripplite com support 3 If the problem requires service visit tripplite com support...

Страница 18: ...service personnel may wish to put the UPS in the OFF mode and disconnect equipment before proceeding Note Refer to the label on the battery retention plate for the R B C part number SMART1500RMXL2UA...

Страница 19: ...w Batteries 6 Connect Batteries Attach both sets of connectors as shown black to black and red to red 7 Replace Battery Retention Plate 8 Replace Front Panel 21 10 012 933148 Book indb 19 21 10 012 93...

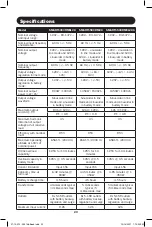
Страница 20: ...utput current P F 8 3A 120V 12A 120V 12A 120V P F 0 9 P F 0 9 P F 0 9 Maximum harmonic distortion of output voltage at full resistive load 3 3 3 Efficiency with nominal load 95 95 95 Maximum operating...

Страница 21: ...Lite could void the user s authority to operate this equipment Regulatory Compliance Identification Numbers For the purpose of regulatory compliance certifications and identification your Tripp Lite...

Страница 22: ...ie AG 0007 AG 02F8 SMART1000RMXL2U n mero de serie AG 0011 AG 02F9 No adecuado para aplicaciones m viles 1111 W 35th Street Chicago IL 60609 USA tripplite com support Instrucciones de Seguridad Import...

Страница 23: ...acorriente CA adecuadamente conectado a tierra No modifique el enchufe del UPS de alguna forma que elimine la conexi n a tierra del UPS No utilice adaptadores que eliminen la conexi n a tierra del UPS...

Страница 24: ...bater a de reemplazo espec fica para su UPS El tipo RBC tambi n puede encontrarse en la etiqueta fina en la placa de sujeci n de la bater a Cuando reemplaza la bater a mientras el UPS est encendido st...

Страница 25: ...n su lugar Despu s de instalar los pasadores expanda cada entrepa o para que coincidan con la profundidad de los rieles del rack Los pasadores pasar n a trav s de los orificios cuadrados en los rieles...

Страница 26: ...i rese de que la orientaci n del panel de la pantalla LCD est en la parte superior del UPS no en la inferior Nota Para instalar el UPS en una posici n vertical torre se requiere el accesorio 2 9USTAND...

Страница 27: ...Si el equipo est numerado en amperes multiplique el n mero de amperes por 120 para determinar el VA Ejemplo 1 amp 120 120 VA Si no est seguro de haber sobrecargado los tomacorrientes del UPS consulte...

Страница 28: ...ema operativo instalado 2 Conexi n de Puerto EPO Esta funci n opcional es s lo para aquellas aplicaciones que requieren conexi n a un circuito de Apagado de Emergencia EPO de la instalaci n Cuando el...

Страница 29: ...laci n completas para el m dulo de bater as se incluyen en el manual del propietario del m dulo de bater as Aseg rese de que los cables est n completamente insertados en los conectores Pueden provocar...

Страница 30: ...l UPS emitir un bip para indicar el estado de encendido Suelte el bot n Para APAGAR el UPS Con el UPS encendido y recibiendo alimentaci n oprima y sostenga por 2 5 segundos el bot n ON OFF El UPS sona...

Страница 31: ...taci n por Bater a se usa tambi n junto con el icono EVENTS para indicar eventos sobre la bater a Icono de Reemplazo de Bater a En caso de que expiren las bater as del UPS y requieran reemplazo este i...

Страница 32: ...ue el UPS est realizando un autodiagn stico Icono RUNTIME Mostrado junto con el icono de MIN y el valor de 3 d gitos para indicar el tiempo de autonom a en minutos Icono MIN Indica unidades de minutos...

Страница 33: ...escribir mejor la grafica de barras de la capacidad de la bater a Operaci n B sica Desplegado de las Condiciones de Energ a Use el bot n para avanzar a trav s de las condiciones de energ a 1 Voltaje d...

Страница 34: ...co durar aproximadamente 10 segundos a medida que el UPS cambia a bater a para probar la capacidad con una carga Una vez terminado el diagn stico la pantalla indicar PAS o BAD Aprobado o Malo por 20 s...

Страница 35: ...soidal pura de las reservas de la bater a durante el tiempo en que la distorsi n est presente En algunas reas con alimentaci n de servicio p blico muy deficiente o donde la alimentaci n de entrada del...

Страница 36: ...aci n con bater a usando el software de Bater a Externa consulte la secci n de Instalaci n Opcional Toque repetidamente el bot n para avanzar hasta la pantalla de Bater a Externa como se mostr anterio...

Страница 37: ...nicaciones seriales USB y RS 232 en la secci n Instalaci n opcional para obtener instrucciones de instalaci n Puerto EPO Apagado de Emergencia Su UPS cuenta con un puerto EPO que puede utilizarse para...

Страница 38: ...Si el problema contin a no se comunique ni devuelva el producto al distribuidor En su lugar visite tripplite com support 3 Si el problema requiere servicio visite tripplite com support y haga clic en...

Страница 39: ...r el UPS en modo APAGADO y desconectar el equipo antes de continuar Nota Consulte la etiqueta en la placa de sujeci n de la bater a para ver el n mero de parte R B C Procedimiento de reemplazo RBC93 2...

Страница 40: ...resionando hacia adelante y enganch ndolas 6 Conecte las Bater as Acople ambos juegos de conectores como se muestra negro con negro y rojo con rojo 7 Vuelva a Colocar la Placa de Sujeci n de la Bater...

Страница 41: ...bater a Corriente m xima de salida F P 8 3A 120 V 12A 120 V 12A 120 V F P 0 9 F P 0 9 F P 0 9 Distorsi n arm nica m xima del voltaje de salida a plena carga resistiva 3 3 3 Eficiencia con carga nomina...

Страница 42: ...e producto siempre haga referencia al n mero de serie El n mero de serie no debe confundirse con el nombre de marca o el n mero de modelo del producto Tripp Lite tiene la pol tica de mejora continua L...

Страница 43: ...is 63 English 1 Espa ol 22 Copyright 2021 Tripp Lite Tous droits r serv s SmartPro est une marque de commerce enregistr e de Tripp Lite Syst mes d ASC 2U intelligents en attente active mont s en b ti...

Страница 44: ...la terre de la connexion de l ASC Ne pas brancher l ASC sur elle m me cela endommagera l ASC et annulera la garantie Si l ASC est branch e sur une g n ratrice c a aliment e par un moteur celle ci doit...

Страница 45: ...ue votre ASC Le type R B C se trouve galement sur l tiquette appos e sur la plaque de r tention de la batterie Lors du remplacement de la batterie sous tension l ASC ne fournira pas d alimentation de...

Страница 46: ...et chaque support arri re poss de 3 trous Les chevilles cliqueront en place Apr s avoir install les chevilles prolonger chaque tablette afin qu elle corresponde la profondeur des rails du b ti Les che...

Страница 47: ...d alimentation sans coupure UPS dans une tour ou sur un mur assurez vous que le panneau de l cran ACL se trouve au haut de l appareil et non au bas Remarque Pour monter l ASC en position verticale tou...

Страница 48: ...ment voyez la plaque signal tique Si la charge de l quipement est identifi e en amp res multiplier le nombre d amp res par 120 pour calculer la puissance en VA Exemple 1 amp re x 120 120 VA Si vous n...

Страница 49: ...syst me d exploitation de votre ordinateur 2 Connexion au port EPO Ce dispositif en option est seulement pour les applications qui n cessitent une connexion un circuit de mise hors tension d urgence...

Страница 50: ...de piles se trouvent dans le manuel de l utilisateur du bloc de piles S assurer que les c bles sont enti rement ins r s dans leurs connecteurs Il peut se produire de petites tincelles pendant la conne...

Страница 51: ...at actif ON Rel chez le bouton Pour mettre l ASC hors tension Avec l ASC sous tension et aliment e par le courant de secteur appuyer sur le bouton ON OFF et le maintenir pendant 2 5 secondes L ASC met...

Страница 52: ...ndulateur L ic ne d entr e de la batterie est galement utilis e en conjonction avec l ic ne EVENTS v nements pour indiquer les v nements sur la batterie Remplacer l ic ne de la batterie Dans le cas o...

Страница 53: ...ne valeur de 3 chiffres indique le de la capacit des batteries 2 L ic ne BATT est affich e avec l ic ne TEST pour indiquer le mode d autotest ou le mode de contr le Ic ne Indique des unit s de Ic ne T...

Страница 54: ...mod les Affich e uniquement lorsque la COMMANDE DE R GLAGE DE BATTERIE EXTERNE est active Ic ne BATTERY CAPACITY capacit de la batterie Utilis e pour mieux d crire le graphique barres de la capacit d...

Страница 55: ...sser l affichage TEST BATT Appuyer sur le bouton pour initier le test Le test durera environ 10 secondes alors que l ASC passera en mode batterie pour tester la capacit avec une charge Une fois le tes...

Страница 56: ...telle distorsion se produit l ASC basculera normalement vers l alimentation de batterie pour fournir de la puissance sinuso dale pure tant que la distorsion persiste Dans certaines zones o le courant...

Страница 57: ...nctionnement des batteries externes en utilisant le logiciel utilitaire des batteries externes Taper le bouton plusieurs reprises pour avancer l affichage External Battery batterie externe tel qu illu...

Страница 58: ...ien au client de Tripp Lite pour plus de renseignements Consulter Ports de communication de s rie USB et RS 232 dans la section Installation en option pour des directives d installation Port EPO Mise...

Страница 59: ...acter ou retourner le produit au d taillant Visiter plut t tripplite com support 3 Si le probl me requiert de l entretien veuillez visiter tripplite com support et cliquez sur la liaison Product Retur...

Страница 60: ...imentation sans coupure UPS au mode OFF ARR T et d brancher l quipement avant de proc der au remplacement Remarque Se reporter l tiquette sur la plaque de r tention de la batterie pour le num ro de pi...

Страница 61: ...ins rant les pressant vers l avant et les enfichant en place 6 Branchez les batteries Fixez les deux ensembles de connecteurs tel qu indiqu noir noir et rouge rouge 7 Remontez la plaque de fixation d...

Страница 62: ...F 8 3A 120V 12A 120V 12A 120V P F 0 9 P F 0 9 P F 0 9 La distorsion harmonique maximale de la tension de sortie pleine charge r sistive 3 3 3 Efficacit avec la charge nominale 95 95 95 Altitude de fo...

Страница 63: ...conformit pour ce produit utiliser toujours le num ro de s rie Le num ro de s rie ne doit pas tre confondu avec le nom de la marque ou le num ro de mod le du produit La politique de Tripp Lite en est...

Страница 64: ...64 21 10 012 933148_RevG 1111 W 35th Street Chicago IL 60609 USA tripplite com support 21 10 012 933148 Book indb 64 21 10 012 933148 Book indb 64 10 14 2021 1 10 48 PM 10 14 2021 1 10 48 PM...

Отзывы: