manualshive.com logo in svg
background image

1

Owner’s Manual

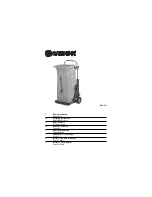
Heavy-Duty Rolling TV/Monitor Cart 

with Crank Handle 

Model: DMCS60100XXCK

1111 W. 35th Street, Chicago, IL 60609 USA • tripplite.com/support

Copyright © 2021 Tripp Lite. All rights reserved.

WARRANTY REGISTRATION

Register your product today and be  

automatically entered to win an ISOBAR

®


surge protector in our monthly drawing!

tripplite.com/warranty

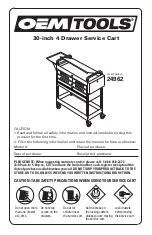
CAUTION: DO NOT EXCEED MAXIMUM LISTED WEIGHT CAPACITY. SERIOUS INJURY OR  PROPERTY DAMAGE MAY OCCUR!

200 x 200 / 300 x 300

400 x 200 / 400 x 400
600 x 400 / 800 x 400
800 x 600 / 1000 x 600

100

"

MAX

TV

TV

220 lb./100 kg

220 lb./100 kg

MAX

MAX

DVD

DVD

11 lb./5 kg (x2)

11 lb./5 kg (x2)

MAX

MAX

CAMERA

CAMERA

11 lb./5 kg

11 lb./5 kg

MAX

MAX

Español 12 • Français 23 • 

Русский

 34 • Deutsch 45

Содержание DMCS60100XXCK

Страница 1: ...automatically entered to win an ISOBAR surge protector in our monthly drawing tripplite com warranty CAUTION DO NOT EXCEED MAXIMUM LISTED WEIGHT CAPACITY SERIOUS INJURY OR PROPERTY DAMAGE MAY OCCUR 2...

Страница 2: ...t period Seller will repair or replace the product in its sole discretion THIS WARRANTY DOES NOT APPLY TO NORMAL WEAR OR TO DAMAGE RESULTING FROM ACCIDENT MISUSE ABUSE OR NEGLECT SELLER MAKES NO EXPRE...

Страница 3: ...Cover x1 S Connecting Plate x1 E Right Cover x1 J Left Column x1 M Left Adapter Bracket x1 Q Upper DVD Shelf x1 T Connecting Bar x1 N Right Adapter Bracket x1 R Lower DVD Shelf x1 G Plastic Cover x2...

Страница 4: ...tighten the casters Note Tighten the screws after installing the connecting bar T CAUTION Hold the inner column when loosening screws to adjust height Adjust to the desired height then tighten the sc...

Страница 5: ...5 Assembly 3 4 F O Y G A1 L U CAUTION After assembling the universal plate F to the columns as shown tighten the screws Z Note Adjust the height with the crank handle L then tighten the screw U...

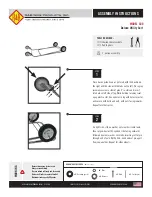
Страница 6: ...6 Assembly 5 R Q A1 A1...

Страница 7: ...M E M G M G M F M D M C N M Note Choose the appropriate screws washers and spacers if needed according to the type of screen Screw the adapter brackets onto the display CAUTION Tighten all screws but...

Страница 8: ...unterclockwise To unlock rotate the bottom screws clockwise Note Use a padlock not included to protect the display from tampering or theft CAUTION Be sure the display is correctly mounted and the scre...

Страница 9: ...9 Assembly S P W X 8...

Страница 10: ...nts Prior to any arm movement fully remove the Allen key Note DO NOT over tighten screw 9 Note Loosen the screw as shown Use the handle to adjust the column to the desired height then tighten the scre...

Страница 11: ...s at least every three months For any additional questions visit tripplite com support Note To adjust the DVD shelf to the desired height loosen the screws on both support blocks then tighten all scre...

Страница 12: ...s los derechos reservados PRECAUCI N NO EXCEDA LA CAPACIDAD DE CARGA M XIMA INDICADA PUEDEN OCURRIR LESIONES SEVERAS O DA OS A LA PROPIEDAD 200 x 200 300 x 300 400 x 200 400 x 400 600 x 400 800 x 400...

Страница 13: ...est libre de defectos en cuanto a materiales y mano de obra por un per odo de 5 a os a partir de la fecha de compra inicial Si el producto resultara defectuoso en cuanto a materiales o mano de obra d...

Страница 14: ...ha x1 O Cubierta Superior x1 S Placa de Conexi n x1 E Cubierta Derecha x1 J Columna Izquierda x1 M Soporte Adaptador Izquierdo x1 Q Repisa Superior para DVD x1 T Barra de Conexi n x1 N Soporte Adaptad...

Страница 15: ...Nota Apriete los tornillos despu s de instalar la barra de conexi n T PRECAUCI N Sujete la columna interna cuando afloje los tornillos para ajustar la altura Ajuste a la altura deseada luego apriete...

Страница 16: ...Ensamble 3 4 F O Y G A1 L U PRECAUCI N despu s de ensamblar la placa universal F a las columnas como se muestra apriete los tornillos Z Nota Ajuste la altura con la manivela L luego apriete el tornill...

Страница 17: ...17 Ensamble 5 R Q A1 A1...

Страница 18: ...C N M Nota Elija los tornillos arandelas y espaciadores si fueran necesarios apropiados de acuerdo con el tipo de pantalla Atornille los soportes adaptadores a la pantalla PRECAUCI N Apriete todos lo...

Страница 19: ...ra desbloquear gire los tornillos inferiores en sentido de las manecillas del reloj Nota Use un candado no incluido para proteger la pantalla contra manipulaci n indebida o robo PRECAUCI N Aseg rese d...

Страница 20: ...20 Ensamble S P W X 8...

Страница 21: ...ovimiento del brazo retire completamente la llave Allen Nota NO apriete excesivamente el tornillo 9 Nota Afloje el tornillo como se muestra Use la manija para ajustar la columna a la altura deseada lu...

Страница 22: ...sea seguro para usarse Para cualquier pregunta adicional visite tripplite com support Nota Para ajustar el entrepa o de DVD a la altura deseada afloje los tornillos en ambos bloques de soporte despu...

Страница 23: ...ts r serv s MISE EN GARDE NE PAS EXC DER LA CAPACIT POND RALE MAXIMUM INDIQU E CELA RISQUERAIT DE CAUSER DES BLESSURES GRAVES OU DES DOMMAGES MAT RIELS 200 x 200 300 x 300 400 x 200 400 x 400 600 x 40...

Страница 24: ...ur une p riode de 5 ans partir de la date d achat initiale Si le produit s av re d fectueux en raison d un vice de mat riaux ou de fabrication au cours de cette p riode le vendeur s engage r parer ou...

Страница 25: ...uvercle sup rieur x1 S Plaque de connexion x1 E Couvercle droit x1 J Colonne de gauche x1 M Support d adaptateur gauche x1 Q tag re sup rieure pour DVD x1 T Barre de connexion x1 N Support d adaptateu...

Страница 26: ...ettes Remarque Serrer les vis apr s avoir install la barre de connexion T MISE EN GARDE Tenir la colonne int rieure tout en desserrant les vis pour r gler la hauteur Ajuster la hauteur d sir e puis se...

Страница 27: ...ssemblage 3 4 F O O G A1 L U MISE EN GARDE Apr s avoir mont la plaque universelle F sur les colonnes comme illustr serrer les vis Z Remarque R gler la hauteur avec la manivelle main L puis serrer la v...

Страница 28: ...28 Assemblage 5 R Q A1 A1...

Страница 29: ...e Choisir les vis les rondelles et les entretoises appropri es le cas ch ant en fonction du type d cran Visser les supports d adaptateur sur l cran MISE EN GARDE Serrer toutes les vis mais sans trop s...

Страница 30: ...d une montre Pour d verrouiller tourner les vis inf rieures dans le sens des aiguilles d une montre Remarque Utiliser un cadenas non inclus pour prot ger l cran contre l alt ration ou le vol MISE EN...

Страница 31: ...31 Assemblage S P l X 8...

Страница 32: ...ement du bras retirer compl tement la cl Allen Remarque NE PAS trop serrer la vis 9 Remarque Desserrer la vis comme illustr Utiliser la poign e pour ajuster la colonne la hauteur d sir e puis serrer l...

Страница 33: ...tous les trois mois Pour toute question suppl mentaire visiter tripplite com support Remarque Pour ajuster l tag re DVD la hauteur d sir e desserrer les vis sur les deux blocs de support puis serrer...

Страница 34: ...th Street Chicago IL 60609 USA tripplite com support 2021Tripp Lite 200 x 200 300 x 300 400 x 200 400 x 400 600 x 400 800 x 400 800 x 600 1000 x 600 100 100 100 DVD DVD 5 2 5 2 5 5 English 1 Espa ol 1...

Страница 35: ...35 tripplite com support 5 5 C CT E Tripp Lite B...

Страница 36: ...1 S 1 E 1 J 1 M 1 Q DVD 1 T 1 N 1 R DVD 1 G 2 L 1 P 1 H 2 I 4 A 1 M A M5x14 4 M E M8x50 4 M B M6x14 4 M F D5 D8 4 M C M6x30 4 M D M8x30 4 M G 15x 8x5 8 M H 15x 8x15 8 Z M8x25 12 U M5x40 1 A1 M6x8 12 V...

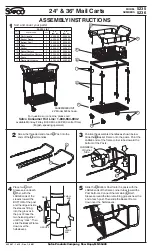
Страница 37: ...37 1 2 C A I B C1 B1 V H J K T D Z E C1 T Z...

Страница 38: ...38 3 4 F O Y G A1 L U F Z L U...

Страница 39: ...39 5 R Q A1 A1...

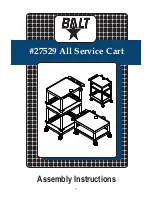
Страница 40: ...40 6 M F M F M F M H M H M A M B M E M G M G M F M D M C N M...

Страница 41: ...41 7...

Страница 42: ...42 S P W X 8...

Страница 43: ...43 9 1200 1250 1300 1350 1400 1450 1500 1550 1600 1650...

Страница 44: ...44 10 tripplite com support DVD 1111W 35th Street Chicago IL 60609 USA tripplite com support 21 06 299 932F2F_RevA...

Страница 45: ...ACHTUNG DIE ANGEBENE MAXIMALE NUTZLAST DARF NICHT BERSCHRITTEN WERDEN EINE BERSCHREITUNG KANN ZU SCHWEREN VERLETZUNGEN UND ERHEBLICHEN SACHSCH DEN F HREN 200 x 200 300 x 300 400 x 200 400 x 400 600 x...

Страница 46: ...em aller zutreffenden Anweisungen verwendet wird Wenn das Produkt in diesem Zeitraum Material oder Herstellungsfehler aufweist kann der Verk ufer diese Fehler nach eigenem Ermessen beheben oder das Pr...

Страница 47: ...Obere Abdeckung x1 S Verbindungsplatte 1 x E Abdeckung rechts 1 x J S ule links 1 x M Adapterwinkel links x1 Q Oberes DVD Regal x1 T Anschlussschiene x1 N Adapterwinkel rechts 1 x R Unteres DVD Regal...

Страница 48: ...Ziehen Sie die Schrauben fest nachdem Sie die Verbindungsleiste T installiert haben ACHTUNG Halten Sie die innere S ule fest wenn Sie die Schrauben l sen um die H he anzupassen Stellen Sie die gew nsc...

Страница 49: ...J G A1 L U ACHTUNG Nachdem Sie die Universalplatte F wie gezeigt an den S ulen befestigt haben ziehen Sie die Schrauben Z fest Hinweis Stellen Sie die H he mit dem Kurbelgriff L ein und ziehen Sie di...

Страница 50: ...50 Montage 5 R Q A1 A1...

Страница 51: ...C N M Hinweis Verwenden Sie f r diesen Bildschirmtyp geeignete Schrauben Beilagscheiben und Abstandhalter falls erforderlich Schrauben Sie die Adapterhalterungen am Bildschirm fest ACHTUNG Ziehen Sie...

Страница 52: ...die unteren Schrauben im Uhrzeigersinn Hinweis Verwenden Sie ein Vorh ngeschloss nicht im Lieferumfang enthalten um zu verhindern dass der Bildschirm manipuliert oder gestohlen wird ACHTUNG Stellen Si...

Страница 53: ...53 Montage S P W X 8...

Страница 54: ...nbusschl ssel vollst ndig Hinweis Ziehen Sie die Schraube NICHT zu fest an 9 Hinweis L sen Sie die Schraube wie gezeigt Verwenden Sie den Griff um die S ule auf die gew nschte H he einzustellen und zi...

Страница 55: ...angebracht ist Weitere Informationen erhalten Sie auf www tripplite com support Hinweis Um das DVD Regal auf die gew nschte H he einzustellen l sen Sie die Schrauben an beiden St tzbl cken und ziehen...

Отзывы: