6
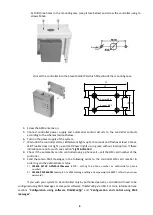
b) Drill three holes in the mounting case (see picture below) and screw the controller using to
screws M3x6.
c) Insert the controller into the plastic holder PH which fitted inside the mounting case.
72
5
0
3
0
50
4 holes Ø3,5
4 count. Ø6,5
4.
Screw the GSM antenna on.
5.
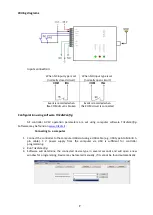
Connect controller power supply and automatics control circuits to the controller contacts
according to the schemes laid out below.
6.
Turn on the power supply of the system.
7.
Wait until the controller starts, LED
Network
lights up for 5 seconds and flashes at least 3 times,
LED
Trouble
does not light up and LED
Power
lights up in green without interruption. If these
indications are not as such, see section “
Light indication
“.
8.
Check if the automatics can be controlled using a phone call – call the SIM card number of the
controller.
9.
Send these two SMS messages in the following order to the controller SIM card number in
order to gain the
administrator
status:
1)
123456 SETAP APNR1:+370xxxxxx
(+370... setting the phone number as administrator phone
number)
2)
123456 PSW 654321
(example of a SMS message setting a new password. 654321 refers to your new
password)
If you wish your system to be controlled only by authorised persons, controller will need to be
configured using SMS messages or computer software
TrikdisConfig
via USB. For more information see
sections “
Configuration using software
TrikdisConfig
“ and “
Configuration and control using SMS
messages
“.

