background image

EC 878

_4

ENGLISH

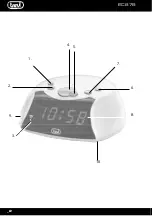
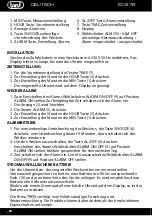
1. Minute set button
2. Hour set button
3. Alarm on indicator
4. Snooze button
5. Alarm on / off button
6. Alarm set button
7. Time set button
8. Digital led display

POWER SUPPLY

Plug the cord into any 230 volts 50Hz AC home outlet.  The entire display will
flash, meaning the incorrect time is being displayed.  This is a normal condition
and will stop when you set the time.

CLOCK SETTING

Press and hold the Time Set Button (7), press the Hour set button (2) and then
press and hold the Alarm Set Button (6), press the Minute Set button (1) until
the correct time is displayed.

ALARM SETTING

Press and hold the Alarm Set Button (6), press the Hour set button (2) and then
press and hold the Alarm Set Button (6), press the Minute Set button (1) until
the correct alarm time is displayed.

TO OPERATE ALARM

Press Alarm On / Off button (5) once to set alarm on.  The Alarm On Indicator
(3) will light up. Press Alarm On / Off button (5) again to set alarm off.  The
Alarm On indicator (3) will be off.

SNOOZE

When the alarm sounds, simply press the Snooze button (4) to temporarily
silence the alarm. The alarm will sound again 9 minutes later.  This can be
repeated as often you wish, for up to two hours.

BATTERY BACK-UP (Battery Not Included)

To utilize the battery back-up feature, open the Battery Compartment on the
bottom of the unit an install a 9-volt battery.  In the event of a power failure, if a
battery has been installed, this unit will automatically switch to a battery
stand-by circuit.  Under battery operation, the clock will keep the time running
and the alarm will sound at the preset time.  Only the clock display will not
light to save battery energy.  If you have a long power failure you may need to
make a slight adjustment to the clock time after AC power returns.  The clock
uses an internal battery powered clock circuit that is less accurate than the
power line frequency.  Just follow Time Setting instructions, the alarm time will
remain correct.

Содержание EC 878

Страница 1: ...EC 878 Guida d uso User guide OROLOGIO CON DISPLAY DIGITALE ALARM CLOCK WITH DIGITAL DISPLAY ...

Страница 2: ...EC 878 _2 1 2 3 4 5 6 7 8 9 10 ...

Страница 3: ...o HOUR 2 per impostare l ora 4 Premere in sequenza il tasto MIN 1 per impostare i minuti All ora impostata l allarme si attiva USO DELL ALLARME SNOOZE 1 È possibile spegnere momentaneamente l allarme più volte tramite il tasto SNOOZE 4 dopo 9 minuti l allarme riprende a suonare 2 Disattivare l allarme premendo il tasto AL OFF 6 Con il selettore ALARM ON OFF 9 in posizione ON l allarme rimarrà memo...

Страница 4: ...tor 3 will light up Press Alarm On Off button 5 again to set alarm off The Alarm On indicator 3 will be off SNOOZE When the alarm sounds simply press the Snooze button 4 to temporarily silence the alarm The alarm will sound again 9 minutes later This can be repeated as often you wish for up to two hours BATTERY BACK UP Battery Not Included To utilize the battery back up feature open the Battery Co...

Страница 5: ...R 2 pour régler l heure 4 Appuyer sur la touche MIN 1 pour régler les minutes ARRÊT DU RÉVEIL 1 Si vous désirez arrêter momentanément le réveil appuyer sur la touche SNOOZE 4 l arrêt dure 9 minutes passé ce délai le réveil s active à nouveau 2 Pour désactiver le réveil appuyer sur la touche AL OFF 6 Le sélecteur ALARM ON OFF 9 sur la position ON le rèveil restera en mémoire pour le jour suivant 3 ...

Страница 6: ...ARM 5 drücken 3 Zur Einstellung der Stunden die HOUR Taste 2 drücken 4 Zur Einstellung der Minuten die MIN Taste 1 drücken ALARMBETRIEB 1 Für eine zeitweilige Unterbrechung des Weckers die Taste SNOOZE 4 drücken eine Unterbrechung dauert 9 Minuten dann schaltet sich der Wecker wieder ein 2 Um den Wecker auszuschalten die Taste AL OFF 6 drücken Einschalten des Alarms Wählschalter ALARM ON OFF 9 auf...

Страница 7: ...la MIN 1 para regular los minutos USO DE LA ALARMA 1 Si desea apagar momentáneamente el despertador presione el pulsador SNOOZE 4 la interrupción dura 9 minutos transcurridos los cuales el despertador se enciende de nuevo 2 Para desactivar el despertador presione la tecla AL OFF 6 Con el selector ALARM ON OFF 9 en posición ON seguirá siendo memorizados para el día siguiente 3 Para desactivar la al...

Страница 8: ...otão HOUR 2 para regular as horas 4 Carregar no botão MIN 1 para regular os minutos UTILIZAÇÃO DO ALARME 1 Caso se deseje desligar momentaneamente o despertador premir a tecla SNOOZE 4 a interrupção dura 9 minutos após esse período de tempo o despertador se reacenderá 2 Para desinserir o despertador premir a tecla AL OFF 6 O selector ALARM ON OFF 9 na posição ON permanecerá memorizada para o próxi...

Страница 9: ...ktro ALARM 5 3 kai pieste to plhktro HOUR 2 gia na ruJmisete thn wra 4 kai to plhktro MIN 1 gia na ruJmisete ta lepta CRHSH TOU XUPNHTHRIOU CRHSH TOU XUPNHTHRIOU CRHSH TOU XUPNHTHRIOU CRHSH TOU XUPNHTHRIOU CRHSH TOU XUPNHTHRIOU 1 Ean epiqume te na sb sete proswrin to xupnht ri pišste to pl ktro SNOOZE 4 h diakop diarke 9 lept met apÒ ta opo a to xupnht ri an bei p li 2 Gia na apenergopoi sete to x...

Страница 10: ...EEVENTUALOPERAÇÃODE SERVIÇO DIRIGIR SEAUM CENTRODEASSISTÊNCIAAUTORIZADOTREVI ATTENTION DANGER DE DECHARGES ELECTRIQUES NE PAS EXPOSER A LA PLUIE NI A L HUMIDITE ATTENTION NE PAS OUVRIR L APPAREIL SON INTERIEUR NE CONTIENT AUCUNE COMMANDE DESTINEE A L UTILISATEUR NI DE PIECES DE RECHANGE POUR TOUTE OPERATION D ASSISTANCE CONTACTER UN CENTRE D ASSISTANCE AGREE TREVI ACHTUNG GEFAHRELEKTRISCHER SCHLÄG...

Страница 11: ... l appareil GARANTIEBESTIMMUNGEN 1 Das Gerät hat eine Garantie von 24 Monaten ab dem Herstellungsdatum Das Herstellungsdatum ist auf der am Produkt angebrachten Etikette angegeben 2 Die Garantie gilt nur für Geräte an denen nicht selbst ausgeführte Reparaturen erfolgt sind sondern die von TREVI Kundendienststellen durchgeführt wurden Die Garantie umfaßt die Reparatur von Bauteilen wenn diese auf H...

Страница 12: ...TREVIS p A ViaAusa173 47853Coriano RN Italy Tel 0541 756420 Fax 0541 756430 E mail info trevi it www trevi it MADEINP R C ...

Отзывы: