


© Copyright 2019 TRENDnet. All Rights Reserved.
28
TRENDnet User’s Guide
TWG-431BR
Firewall & security settings
Virtual server/Port forwarding
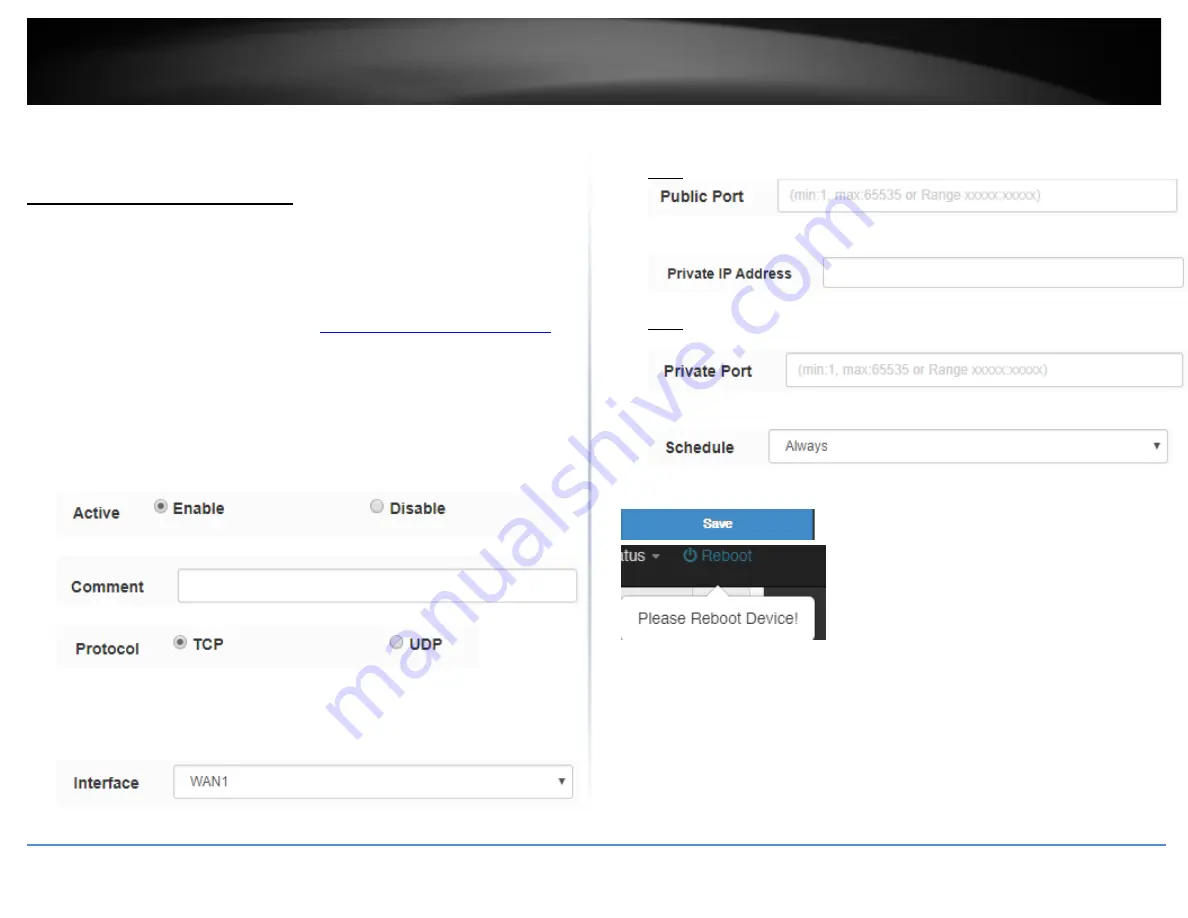
Advanced > Virtual Server
Virtual Server/Port forwarding rules allow to create inbound rules from the WAN
interfaces/Internet to your internal computers or devices for specific services/protocols
such as a file server (FTP), IP camera, web server (HTTP/HTTPS), or remote access, etc.
1. Log into your router management page (see “
Access your router management page
on page 7).
2. Click on
Advanced
and click on
Virtual Server
.
3. Review the settings below. Click
Edit
to on the new entry in the list and click
Save
.
•
Active
–
Select
Enable
to enable the virtual server/port forwarding rule.
•
Comment
–
Enter a name or description for the virtual server/port forwarding rule.
•
Protocol
–
Select the protocol for the port or service
TCP
or
UDP.
•
Interface
–
Click the drop-down list to select the external WAN interface(s) to allow:
ALL WAN, WAN1/2/3/4, WAN
. For example, choosing WAN1 will only allow the
port forward to work on inbound connection requests on WAN1 only and inbound
connections requests on WAN2 will be denied. Choosing ALL WAN will allow will
enable the rule on all WAN interfaces.
•
Public Port
–
Enter the external/public port number for the service to allow.
Note:
You can also enter a consecutive range of ports in the following format: 80:90
•
Private IP address
–
Enter the local/internal IP address of the device to forward the
port/protocol service.
•
Private Port
–
Enter the internal/private port number for the service to allow.
Note:
You can also enter a consecutive range of ports in the following format: 80:90
Typically, the internal port or port range is same as the external port or port range.
•
Schedule
–
Allows you to select a schedule when the port forwarding rule should be
enabled or disabled.
4. Click
Save
at the bottom. Then click
Reboot
at the top right
to commit the changes.
Содержание TWG-431BR
Страница 1: ......
Страница 8: ...Copyright 2019 TRENDnet All Rights Reserved TRENDnet User s Guide TWG 431BR 5 Applications...
Страница 93: ......