background image

CAMON LS14 Lawn Scarifier

Page 2 

LS14 Lawn Scarifier

1.0 

Introduction

1.1  Welcome

Welcome to Tracmaster and thank you for choosing CAMON.
We are confident that you will be more than happy with your machine.
Your machine is covered by a comprehensive warranty. However, the lifespan of 

your CAMON machine depends on a number of factors. It is important that you read 

this manual carefully and follow the instructions regarding operation, maintenance, 

and care.

1.2  About This Manual

It  is  crucial  that  you  read  this  manual  carefully  and  understand  it.  Reading  and 

understanding this manual should prevent you from operating the LS14 incorrectly 

and so extend the life of the machine.
This  manual  also  contains  important  safety  information  about  your  machine. 

You must observe all safety instructions at all times. CAMON machines are often 

updated and improved so models may vary due to  differences in specifications.
Any illustrations, descriptions, specifications, and technical data in this manual is 

correct at the time of printing.
For any questions relating to this manual please contact us.
During office hours (UK) we can be contacted on:
Phone: 

+44 (0)1444 247689

Email:  

[email protected]

Website: 

www.tracmaster.co.uk

      IMPORTANT!

READ THIS MANUAL 

CAREFULLY

!

Содержание Camon LS14

Страница 1: ...nd observe warning and safety instructions Manufactured by Tracmaster Ltd CAMON LS14 Lawn Scarifier ORIGINAL INSTRUCTION MANUAL Before commissioning the machine read operating instructions and observe warning and safety instructions Manufactured by Tracmaster Ltd ...

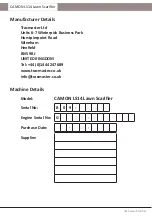
Страница 2: ...erpick Business Park Hurstpierpoint Road Wineham Henfield BN5 9BJ UNITED KINGDOM Tel 44 0 1444 247689 www tracmaster co uk info tracmaster co uk Machine Details Model CAMON LS14 Lawn Scarifier Serial No B 0 9 1 1 1 1 1 Engine Serial No G A A A A 1 1 1 1 1 1 1 Purchase Date D D M M Y Y Y Y Supplier ...

Страница 3: ...d Operating 12 6 1 To Start the Engine 12 6 2 To Stop the Engine 13 6 3 Safety Equipment 13 6 4 Operation 13 6 5 Procedure for Unexpected Shut Down 15 6 6 How to Clear Unwanted Debris from the Underside of the Machine 15 6 7 Residual Risks of the LS14 Scarifier 15 7 0 Maintenance 16 7 1 Schedule 16 7 2 Basic Maintenance 16 7 3 Advanced Maintenance 16 7 3 1 Belt 16 7 3 2 Removing Cartridge Rotor As...

Страница 4: ...ully and understand it Reading and understanding this manual should prevent you from operating the LS14 incorrectly and so extend the life of the machine This manual also contains important safety information about your machine You must observe all safety instructions at all times CAMON machines are often updated and improved so models may vary due to differences in specifications Any illustration...

Страница 5: ...rifier are designed to pass through the grass ONLY they are NOT designed to make contact with solid ground at any point during operation The machine will be damaged should blades continuously come into contact with solid ground DO NOT use the CAMON LS14 Scarifier for cutting grass or slitting the ground Both operations will result in damage to the machine Operating the machine on non grass surface...

Страница 6: ...gine Oil Capacity 0 6 litres Dry Weight 15 1kg The power rating of the engine indicated in this table is the net power output tested on a production engine for the engine model and measured in accordance with SAE J1349 at a specified rpm MACHINE Model LS14 Working Width 42cm Cartridge Types Free Swinging Fixed Spring Rake Renovation Number of Blades 30 15 30 15 Direction of Rotor Rotor rotates in ...

Страница 7: ...p of cardboard box Cut the box open by using a sharp knife to cut down through the four corners of the box Swivel the folded top part of the handlebar upwards until it locates into position extending from the lower handle bar arms Tighten the top handlebar into position using the locking knobs provided Push the machine forward safely and gently off the pallet Dispose of the cardboard box and other...

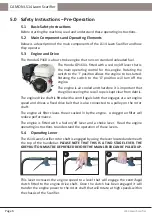
Страница 8: ...lear from debris The engine drive shaft is fitted with a centrifugal clutch that engages at a set engine speed and drives a fixed drive belt that is also connected to a pulley on the rotor shaft The engine air filter cleans the air sucked in by the engine A clogged air filter will reduce performance The engine is fitted with a fuel on off lever and a choke lever Read the engine operating instructi...

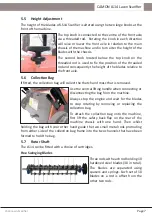
Страница 9: ...llection bag will collect the thatch and moss that is removed Use the central lifting handle when connecting or disconnecting the bag from the machine Always stop the engine and wait for the blades to stop rotating by removing or replacing the collection bag To attach the collection bag onto the machine first lift the safety back flap on the rear of the machine chassis with one hand Then whilst ho...

Страница 10: ...vels indicated in the table in section 6 1 The engine fuel tank will not contain fuel so will need filling to the recommended level before use 5 9 General Safety Instructions Be aware of all the safety requirements for the machine Visually check the machine for operational safety complete components and fixed guarding prior to each use Read and be aware of the warning and instruction signs located...

Страница 11: ...nly unleaded petrol from fuel containers designed for this purpose Refuel outdoors only and replace the fuel tank cap securely Do not mix oil with the fuel Leave one inch of space in the fuel tank during refilling Clear up any petrol spillages immediately Always start the engine in the open air Starting an engine within a confined space can lead to the inhalation of toxic substances Avoid contact ...

Страница 12: ...imum sound power level LWA Ear protection must be worn when operating the machine ALWAYS wear suitable Personal Protective Equipment PPE Ear Defenders Eye Protection Foot Protection Safety Gloves Read operating instructions before use Remove spark plug before servicing or performing maintenance Warning Keep bystanders away 1 1 2 3 2 3 ...

Страница 13: ...t that these stickers are in good condition are legible and are in the correct positions on the LS14 Lawn Scarifier If any of these stickers are missing or damaged then they must be replaced They can be obtained from Tracmaster Ltd TRACMASTER LTD Units 6 7 Winterpick Business Park Hurstpierpoint Road Wineham Henfield BN5 9BJ UK T 44 0 1444 247689 Machine Type LS14 Lawn Scarifier Weight 40kg Year I...

Страница 14: ...ram Switch the engine ignition switch to the ON position Turn the fuel tap located on the engine carburetor to the ON position If the engine is cold or has not been operated recently set the choke lever on the carburetor to the ON position Pull the engine recoil handle slowly until it engages then pull hard and fast to start the engine After the start guide the cord back into its position Do not l...

Страница 15: ...CAUSE DAMAGE TO COMPONENTS OF THE MACHINE WE RECOMMEND THE GRASS IS CUT PRIOR TO SCARIFYING Do not operate the Lawn Scarifier on wet lawns or in wet weather Do not operate the engine in a confined space where dangerous carbon monoxide fumes can collect Operate the machine only in daylight or in good artificial light Always be sure of footing on slopes Walk never run Exercise extreme caution when c...

Страница 16: ...er to engage the rotor shaft and walk at a slow steady pace pushing the machine ahead of you To turn the LS14 Scarifier 180o release the operating lever put light downwards pressure on the handlebars and rotate the machine on its rear wheels Do not work the Scarifier on slopes of more than 20o and always work across the slope not up and down it Once the collection bag has become full release the o...

Страница 17: ...top handlebar and lift the machine so that it tilts forward onto its front wheels As the underneath of the chassis becomes exposed it is possible to see and remove any unwanted debris WARNING ALWAYS TILT THE LS14 SCARIFIER FORWARDS TO AVOID OIL IN THE ENGINE FLOODING INTO AREAS WHERE IT WILL CAUSE DAMAGE 6 7 Residual Risks of the LS14 Scarifier The rotor shaft will continue to rotate for a couple ...

Страница 18: ... Maintenance Check that all guards are fitted securely Ensure the cable connecting the operating lever to the engine is securely fastened at both ends and shows no sign of wear Ensure the wheels are held securely and the fixed pin that holds the wheels onto the axles is in place Check that the wheels rotate smoothly and without hindrance 7 3 Advanced Maintenance We strongly recommend that an Autho...

Страница 19: ...he belt guard using the original cap screw bolts 7 3 2 Removing Cartridge Rotor Assembly To access the underneath of the chassis you must use a lifting hoist to lift the handlebars of the machine so that it tilts forward over its front axle Remove both the belt guard and rotor shaft guard by undoing the fastening nuts and bolts Remove the belt as instructed above in section 7 3 1 Remove the taper ...

Страница 20: ...on Check Blades that have been worn so that they have become rounded must be changed in order for the LS14 Scarifier to function properly Changing the Blades Safety glasses and gloves must be worn Remove the rotor as described in section 7 3 2 WARNING Take note of the blade layout from the diagrams Free Swinging Cartridge Remove one split pin from both ends of just one rod Slide the rod through th...

Страница 21: ...ers off the rotor shaft Once the worn blades have been removed the rotor shaft should be checked for wear and if serviceable can be reused and the new blades located The hexagonal rotor shaft allows the blades to be fitted in three orientations Each blade should be rotated by 120o so that it sits on a separate face of the rotor shaft After each blade has been fitted a spacer should be added When f...

Страница 22: ... the rod slowly and pass the rod through the springs spacers and washers in the correct order Continue this until the rod has been filled with springs spacers and washers and the rod is showing through the spider at either end Ensure that the straight end of the spring is against the rotor shaft and that the hooked end of the spring is facing out and they are all facing the same direction Renew an...

Страница 23: ...ng the blades ensure that the points of the blades are all facing the same direction see image above Once all the blades and spacers are in place fit the clamp and tighten the grubscrew Re attach rotor to the chassis as described in section 7 4 1 7 4 Engine 7 4 1 Check Engine Oil Level This is to be checked prior to each use and every 8 hours during operation Check only when the engine is off and ...

Страница 24: ... every 50 hours Open the drain plug on the engine and the filling plug and drain the oil into a suitable container or use a suction pump to remove oil through filler neck Ensure the waste oil is disposed of properly Re fit the drain plug and tighten Fill fresh engine oil through the oil filling opening Use a funnel or similar device for ease of filling Replace the oil filler plug and tighten 7 4 3...

Страница 25: ... if worn rotate or replace Incorrect blade height adjustment Check height adjustment knob and readjust if too high 7 6 2 Engine Problem Possible Cause Remedy Engine does not start Spark plug connector not connected Connect spark plug connector Choke lever is not actuated Actuate choke lever Fuel tank empty Fill fuel tank Fuel line clogged Clean fuel line Defective spark plug Clean or replace spark...

Страница 26: ...roughly prior to storage and ensure all lubrication points have been re greased For periods of long storage change the engine oil Either drain the fuel completely or fill the fuel tank and add fuel stabilizer Do not store the Lawn Scarifier in wet rooms where fertiliser is stored or in stables as heavy corrosion may occur Always store the machine in a horizontal position 8 3 Handling Do not attemp...

Страница 27: ...agrams and part numbers for the CAMON LS14 Lawn Scarifier can be found on our website or by contacting our spare parts department Spare parts can be ordered via the following methods Phone 44 0 1444 247689 option 1 Website www tracmaster co uk Email spares tracmaster co uk Or via your local Authorised Dealer ...

Страница 28: ...ut who your local Authorised Tracmaster Dealer is or check our Dealer Locator online at www tracmaster co uk Company Company Date Date Company Stamp or address authorised signature Company Stamp or address authorised signature Company Company Date Date Company Stamp or address authorised signature Company Stamp or address authorised signature Company Company Date Date Company Stamp or address auth...

Страница 29: ...ger zones being reached by the upper limbs EN 954 1 1996 Safety of machinery Safety related parts of control systems Part 1 general principles for design EN 20643 2008 A1 2012 Hand arm vibration Laboratory measurement of vibration at the grip surface of hand guided machinery general EN 12100 1 2003 EN12100 2 2003 Safety of machinery Basic concepts general principles for design parts 1 2 EN 13684 2...

Страница 30: ...will be at their cost and will not be reimbursed Expenses arising from any subsequent failure of any part due to incorrect assembly by the owner of the machine shall be borne by the owner of the machine To validate warranty the Warranty Registration Card must be completed and returned or complete the form online at www tracmaster co uk pages warranty registration form The Warranty does not cover a...

Страница 31: ...e warranty period the problem must be verfied by Tracmaster or an Authorised Tracmaster Dealer before any repair is undertaken Any other express or implied warranty is cancelled and substituted by this Warranty whose clauses can be modified in writing only This Warranty provides specific legal rights and is in addition to any statutory rights Your statutory rights are not affected by this Warranty...

Страница 32: ...its 6 7 Winterpick Business Park Hurstpierpoint Road Wineham Henfield BN5 9BJ UK Tel 44 0 1444 247689 www tracmaster co uk info tracmaster co uk CAMON LS14 Lawn Scarifier Original Instruction Manual 2020 Tracmaster Ltd ...

Отзывы: