


CAMON LS14 Lawn Scarifier
Page 18
LS14 Lawn Scarifier
7.3.3
Fitting Cartridge/Rotor Assembly
Insert the cartridge/rotor into the chassis.
Refit the pillow block bearings with the bolts to fix the pillow block bearings
to the chassis.
Locate the bottom taper lock pulley onto the end of the rotor shaft ensuring
the woodruff key is fitted. Once the pulley is situated beneath the centrifugal
clutch fix the taper lock pulley into position by tightening the 2 grub screws
evenly in the original holes when the taper lock was removed.
Re-attach the belt and belt guard as described in 7.3.1.
7.3.4 Blades
Inspection Check:
Blades that have been worn so that they have become rounded must be
changed in order for the LS14 Scarifier to function properly.
Changing the Blades:
Safety glasses and gloves must be worn.
Remove the rotor as described in section 7.3.2.
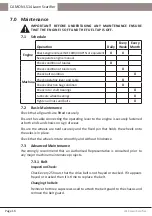
WARNING: Take note of the blade layout from the diagrams.
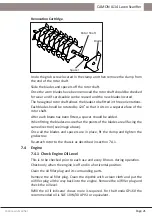
Free Swinging Cartridge
Remove one split pin from both ends of just one rod.
Slide the rod through the spiders being careful to remove the springs and
blades as the rod is removed from each section.
Once the worn blades have been removed the rod should be checked for
wear and if serviceable can be reinserted and the new blades located.
Reinsert the rod slowly and, in each section between spiders, pass the rod
through the springs and blade in the correct order.
Split
Pin
Spider
Springs
Spacer
Blade
Washer
Rod