Instruction
manual
10
Tracer 4TS FHD Crux
EN
•
Do not use the unit if it has been dropped or damaged in any way.
•
Repairs to electrical equipment should only be performed by a qualified electri
-
cian. Improper repairs may place the user at serious risk.
•
Do not use this unit for anything other than its intended use.
•
Keep the unit out of reach of children.
•
This appliance is not a toy.
•
Batteries installed shall not be exposed to excessive heat, strong sunshine, fire.
Installation of the Digital Video Recorder
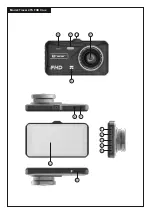
Place the Digital Video Recorder (DVR) 4TS FHD CRUX in front of the car and
secure the suction cup holder. Rear cam should be installed at the back side of the
car, close to the car plates or on the back window.
Connecting a rear camera
For automatic switch to the image from the rear camera, after using reverse gear,
please connect the red cable from the rear camera extension cord to the + 12V
terminal on the reverse lamp bulb. It is recommended that you use the services of
a qualified workshop.
Power supply
Connect the Car Charger (included) with Mini USB Port on the top of the 4TS CRUX.
Please kindly note that built-in battery is for saving the date and time, and can not
support long time operation. To power ON/OFF please hold propper button for 2sec.
DVR will record automatically when the car starts, turn off and save the last file
when the car stops.
Micro SD (TF) Card
1. Insert the Micro SD (TF) card (not included) into the card slot correctly and then
gently push it in until you hear a click-secure sound.
2. Push the Micro SD (TF) card gently, and it will pop up automatically. At this time,
you can take out the card.
Attention:
•
Please pay attention to the insert direction of the card. If it is in the wrong
side, it may damage the device and Micro SD (TF) card.
•
Device supports Micro SD (TF) card of up to 32GB.


