background image

37

Chapter 9


Guest Network

9  1   Create a Network for Guests

1  

Visit 

http://tplinkmodem.net

, and log in with the password or your TP-Link ID.

2  

Go to 

Advanced 

Guest Network

. Locate the 

Wireless 

section.

3  

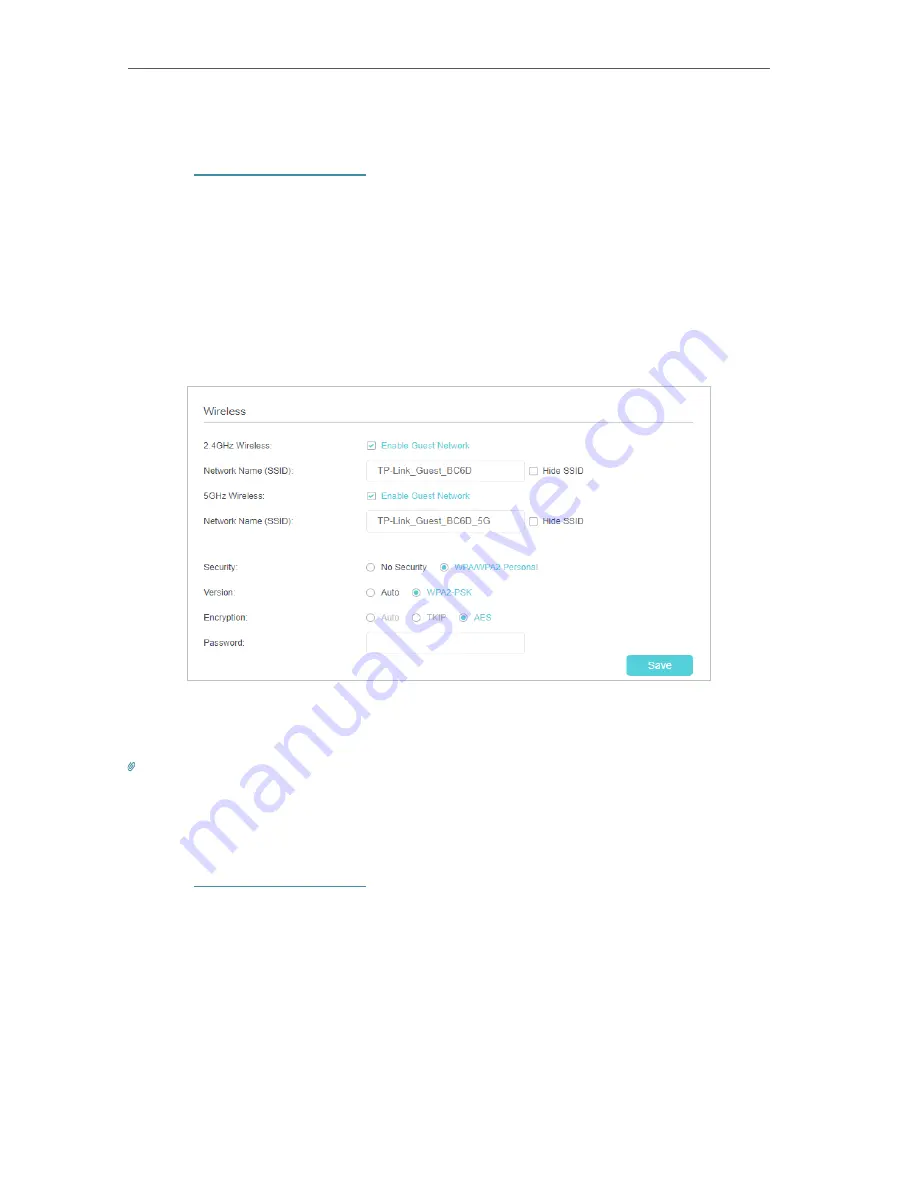
Create a 2.4GHz or 5GHz guest network according to your needs.

1 )  Enable

 2.4GHz

5GHz 

or both wireless networks.

2 )  Customize the SSID. Don‘t select

 Hide SSID 

unless you want your guests  to manually 

input the SSID for guest network access.

3 )  Set 

Security

 to 

WPA/WPA2 Personal

, keep the default 

Version

 and 

Encryption


values, and customize your own password. 

4  

Click 

Save.

 Now your guests can access your guest network using the SSID and 

password you set!

Tips:

To view guest network information, go to 

Advanced 

Status

 and locate the 

Guest Network

 section.

9  2   Customize Guest Network Options

1  

Visit 

http://tplinkmodem.net

, and log in with the password or your TP-Link ID.

2  

Go to 

Advanced

 > 

Guest Network

. Locate the 

Settings

 section.

3  

Customize guest network options according to your needs.

Содержание Archer MR600

Страница 1: ...REV1 1 0 1910012622 User Guide AC1200 4G LTE Advanced Cat6 Gigabit Router...

Страница 2: ...ter 10 Chapter 4 Set Up Internet Connections 12 4 1 Use Quick Setup Wizard 13 4 2 Create a Connection Profile 13 4 3 Set Up IPv6 Tunnel 15 4 3 1 Use the Public IPv6 Tunnel Service 6to4 15 4 3 2 Specif...

Страница 3: ...SP Information 46 11 2 PIN Management 46 11 3 Data Settings 47 11 4 LAN Settings 48 11 4 1 Change the LAN IP Address 48 11 4 2 Use the 4G LTE Router as a DHCP Server 49 11 4 3 Reserve LAN IP Addresses...

Страница 4: ...12 10 System Log 80 12 11 CWMP Settings 82 12 12 SNMP Settings 83 12 13 Monitor the Internet Traffic Statistics 85 Chapter 13 TP Link Cloud Service 86 13 1 Register a TP Link ID 87 13 2 Change Your T...

Страница 5: ...n or damage to the device Tips Indicates important information that helps you make better use of your device More Info The latest software management app and utility are available from the Download Ce...

Страница 6: ...Chapter 1 Get to Know Your 4G LTE Router This chapter introduces what the router can do and shows its appearance It contains the following sections Product Overview Panel Layout...

Страница 7: ...ith various features and functions the router is the perfect hub of your home or business network 1 2 Panel Layout 1 2 1 Top View The router s LEDs view from bottom to top are located on the front pan...

Страница 8: ...ved from the mobile internet More lit bars indicate a better signal strength Off There is no mobile internet signal Note 1 If the Internet LED is off please check your internet connection first Refer...

Страница 9: ...nnecting to a Cable FTTH VDSL ADSL device WPS To enable the WPS function press this button about 2 seconds If you have a WPS supported device you can press this button to quickly establish connection...

Страница 10: ...Chapter 2 Connect the Hardware This chapter contains the following sections Requirements for Operation Position Your 4G LTE Router Connect Your 4G LTE Router...

Страница 11: ...walls For your security and best Wi Fi performance please Do not locate the router in the place where it will be exposed to moisture or excessive heat Keep away from strong electromagnetic radiation...

Страница 12: ...to one of the LAN ports on the router via an Ethernet cable Method 2 Wirelessly Use the default SSID Wireless Network Name and Wireless Password printed on the product label of the router to connect...

Страница 13: ...ryption is WEP Please make sure the wireless function is enabled and is configured with the appropriate encryption before configuring the WPS 1 Tab the WPS icon on the device s screen 2 Immediately pr...

Страница 14: ...Chapter 3 Log In to Your 4G LTE Router...

Страница 15: ...Apple Safari Follow the steps below to log in to your router 1 If the TCP IP Protocol on your computer is set to the static fixed IP address you need to change its settings to obtain an IP address au...

Страница 16: ...p wizard It has many ISP information built in automates many of the steps and verifies that those steps have been successfully completed Furthermore you can set up IPv6 connection if your ISP provides...

Страница 17: ...rk name and password 3 Follow the on screen instructions to complete the setup Note 1 During the quick setup process you can change the preset wireless network name SSID and wireless password Once don...

Страница 18: ...You can change the Network Mode to 4G preferred 4G Only or 3G Only according to your needs If the Auto network connection displays a wrong ISP profile you can select a correct network manually 1 Chang...

Страница 19: ...e the IPv6 Tunnel settings every time you reboot the router Make sure the desired WAN connection is connected before the configuration 4 3 1 Use the Public IPv6 Tunnel Service 6to4 The 6to4 tunnel is...

Страница 20: ...tunneling mechanism and select a WAN connection from the drop down list 4 According to the parameters provided by your ISP choose Auto or Manual More parameters are needed if you choose Manual 5 Click...

Страница 21: ...nnections 1 Visit http tplinkmodem net and log in with the password or your TP Link ID 2 Go to Advanced System Tools Diagnostics page 3 Click Start to test the internet connectivity and you will see t...

Страница 22: ...Chapter 5 QoS This chapter introduces how to create a QoS Quality of Service rule to specify prioritization of traffic and minimize the impact caused when the connection is under heavy load...

Страница 23: ...1 Visit http tplinkmodem net and log in with the password or your TP Link ID 2 Go to Advanced QoS Settings 3 Select Enable QoS Note Qos and NAT Boost cannot be enabled at the same time 4 Input the max...

Страница 24: ...evice and then click Scan 3 Choose the respective device from the list 4 Click Save Note If you want to delete a QoS rule click to remove the responding rule from the list Done Now QoS is implemented...

Страница 25: ...an protect your home network against DoS Denial of Service attacks from flooding your network with server requests using DoS Protection block or allow specific client devices to access your network us...

Страница 26: ...t the same time To enable Traffic Statistics go to Advanced System Tools Traffic Monitor and toggle on Traffic Monitor 5 Set the level Low Middle or High of protection for ICMP FLOOD Attack Filtering...

Страница 27: ...and log in with the password or your TP Link ID 2 Go to Advanced Security Service Filtering and enable Service Filtering 3 Click Add 4 Select a service type from the drop down list and the following...

Страница 28: ...at 1 Visit http tplinkmodem net and log in with the password or your TP Link ID 2 Go to Advanced Security Access Control and enable Access Control 3 Select the access mode to either block recommended...

Страница 29: ...6 4 IP MAC Binding IP MAC Binding namely ARP Address Resolution Protocol Binding is used to bind network device s IP address to its MAC address This will prevent ARP spoofing and other ARP attacks by...

Страница 30: ...ou want to bind 3 Select the checkbox to enable the entry and click Save Done Now you don t need to worry about ARP spoofing and other ARP attacks 6 5 IPv6 Firewall IPv6 Firewall protects your IPv6 ne...

Страница 31: ...atically populate the Port field with an appropriate port number It is recommended to keep the default Port if you are unsure about which one to use If the service is not listed manually enter the Ser...

Страница 32: ...Chapter 7 Parental Controls This function allows you to block inappropriate explicit and malicious websites and control access to specified websites at specified time...

Страница 33: ...they can visit For example I want to allow my children s devices e g a computer or a tablet to access only www tp link com and wikipedia org from 18 00 6PM to 22 00 10PM on weekdays only How can I do...

Страница 34: ...Blacklist selected the controlled devices cannot access any websites containing the specified keywords during the Effective Time period 2 With Whitelist selected the controlled devices can only access...

Страница 35: ...r 7 Parental Controls 2 If you wish to block all internet browsing access do not add any keyword to the Whitelist 10 Click Save Done Now you can control your children s internet access according to yo...

Страница 36: ...and write messages keep drafts and specify the message center number You can easily monitor your data usage by sending a message to your carrier This chapter includes the following sections View Messa...

Страница 37: ...8 2 Edit and Send a New Message 1 Visit http tplinkmodem net and log in with the password or your TP Link ID 2 Go to Advanced SMS New Message page 3 Enter the receiver s phone number in the Phone Num...

Страница 38: ...anced SMS Drafts page All the unsent messages are listed in the Drafts table Tips You can click to edit and forward the message 8 5 SMS Settings SMS Settings allows you to configure the Message Center...

Страница 39: ...35 Chapter 8 SMS 3 The Message Center Number is auto populated Change it according to your needs 4 Click Save to apply your settings...

Страница 40: ...n network When you have guests in your house apartment or workplace you can create a guest network for them In addition you can customize guest network options to ensure network security privacy and f...

Страница 41: ...ally input the SSID for guest network access 3 Set Security to WPA WPA2 Personal keep the default Version and Encryption values and customize your own password 4 Click Save Now your guests can access...

Страница 42: ...ts on your guest network to communicate with the devices connected to your router s LAN ports or main network via methods such as network neighbors Samba Ping and FTP Enable QoS for Guest Network Sele...

Страница 43: ...router can penetrate the isolation of NAT and allows the external hosts on the internet to initiatively communicate with the devices in the local network thus to realize some special functions TP Lin...

Страница 44: ...s used in HTTP service port 21 in FTP service port 25 in SMTP service and port 110 in POP3 service Please verify the service port number before the configuration I want to SharemypersonalwebsiteI vebu...

Страница 45: ...al Port cannot be overlapped Done Users in the internet can enter http WAN IP in this example enter http 218 18 232 154 to visit your personal website Note 1 WAN IP should be a public IP address For t...

Страница 46: ...k ID 2 Go to Advanced NAT Forwarding Port Triggering and click Add 3 Click View Existing Applications and select the desired application The triggering port and protocol the external port and protocol...

Страница 47: ...d to the internet which may bring some potential safety hazard If DMZ is not in use please disable it in time I want to Make the home PC join the internet online game without port restriction For exam...

Страница 48: ...c Tips 1 UPnP is enabled by default in this router 2 Only the application supporting UPnP protocol can use this feature 3 UPnP feature needs the support of operating system e g Windows Vista Windows 7...

Страница 49: ...adjust the basic configuration of the router using the web based management page This chapter contains the following sections Upgrade Your ISP Information PIN Management Data Settings LAN Settings Wi...

Страница 50: ...and select the latest file 5 Click Upgrade Note 1 If you fail to dial up Internet access after upgrading to the latest version please contact the technical support 2 If your ISP settings are still not...

Страница 51: ...enter the PUK after 3 incorrect login attempts of PIN Contact your service provider if you do not know the PUK It consists of 8 digits New PIN Enter 4 8 digits to reset the PIN of your SIM card Remain...

Страница 52: ...a statistics when the next billing cycle starts 7 Enter the start date of the billing cycle in the Start Date field 8 Click Save to save the settings 11 4 LAN Settings 11 4 1 Change the LAN IP Address...

Страница 53: ...the DHCP function and select DHCP Server 4 Specify the IP Address Pool the start address and end address must be on the same subnet with LAN IP The router will assign addresses within this specified r...

Страница 54: ...n the LAN that device will always receive the same IP address each time when it accesses the DHCP server If there are some devices in the LAN that require permanent IP addresses please configure Addre...

Страница 55: ...or 5GHz Wireless Network If you don t want to use the wireless function just uncheck the box If you disable the wireless function all the wireless settings won t be effective To enable Smart Connect f...

Страница 56: ...of 802 11b 802 11g and 802 11n wireless clients can connect to the router 802 11ac n mixed 5GHz Select if you are using both 802 11ac and 802 11n wireless clients 802 11a n ac mixed 5GHz Select if yo...

Страница 57: ...tup Button Use this method if your client device has a Wi Fi Protected Setup button 1 Press the WPS RESET button on the back panel of the router for 1 second Note You can also use the Push button on t...

Страница 58: ...1 Visit http tplinkmodem net and log in with the password or your TP Link ID 2 Go to Advanced Wireless WPS page 3 Take a note of the Current PIN of the router You can also click the Generate button t...

Страница 59: ...le feature 4 Set the wireless off time Select From and To time and click Save to make the settings effective You can repeat the schedule every day or just certain days in a week Note 1 Please make sur...

Страница 60: ...its connected wireless band and security option as well as the packets transmitted Tips You can also see the wrieless details by clicking the wireless clients icon on Basic Network Map 11 5 5 Advance...

Страница 61: ...1ac mode It is strongly recommended to enable WMM Short GI This feature is enabled by default and recommended to increase the data capacity by reducing the Guard Interval GI time AP Isolation Select t...

Страница 62: ...ng Go to register Note To enjoy TP Link s DDNS service you have to log in with a TP Link ID If you have not logged in with one click Log in 4 Click Register in the Domain Name List if you have selecte...

Страница 63: ...es not require this setting to be configured I want to Visit multiple networks and multiple servers at the same time For example in a small office my PC can surf the internet but I also want to visit...

Страница 64: ...AN IP or LAN IP of the router In the example the IP address of the company network is the destination IP address so here enters 172 30 30 1 Subnet Mask Determines the destination network with the dest...

Страница 65: ...rs on the internet 11 8 1 Use IPSec VPN to Access Your Home Network The VPN Virtual Private Network technology is developed and used to establish the private network through the public network which c...

Страница 66: ...How can I do that 1 Make sure of the topology you want to build and record site A local network and site B remote network s LAN IP and WAN IP 2 Configuration on site A local network 1 Visit http tpli...

Страница 67: ...rthePre SharedKeyforIKEauthentication ThenkeepPerfectForwardSecrecy enabled Note Make sure Site A and Site B use the same key 9 Leave the Advanced Settings as default value Then click Save 3 Configure...

Страница 68: ...order to re establish the IPSec tunnel 11 8 2 Use OpenVPN to Access Your Home Network In the OpenVPN connection the home network can act as a server and the remote device can access the server throug...

Страница 69: ...TCP 4 Enter a VPN Service Port to which a VPN device connects and the port number should be between 1024 and 65535 5 In the VPN Subnet Netmask fields enter the range of IP addresses that can be leased...

Страница 70: ...fig on Windows The path depends on where the OpenVPN client utility is installed 3 Run the OpenVPN client utility and connect it to OpenVPN Server 11 8 3 Use PPTP VPN to Access Your Home Network PPTP...

Страница 71: ...PTP VPN Connection on Your Remote Device The remote device can use the Windows built in PPTP software or a third party PPTP software to connect to PPTP Server Here we use the Windows built in PPTP sof...

Страница 72: ...68 Chapter 11 Specify Your Network Settings 4 Select Use my Internet connection VPN...

Страница 73: ...nternet IP address of the router for example 218 18 1 73 in the Internet address field Click Next 6 Enter the User name and Password you have set for the PPTP VPN server on your router and click Conne...

Страница 74: ...vice provider s computer You can query service data on this page Follow the steps below to get service data 1 Visit http tplinkmodem net and log in with the password or your TP Link ID 2 Go to Advance...

Страница 75: ...apter contains the following sections Set System Time Control LEDs Test the Network Connectivity Update the Firmware Back up and Restore Configuration Settings Set the Router to Reboot Regularly Chang...

Страница 76: ...ols Time Settings page 3 Configure the system time using the following methods Manually Select your time zone and enter your local time Get from PC Click this button if you want to use the current man...

Страница 77: ...k ID 2 Go to Advanced System Tools LED Control page 3 Tick the Night Mode checkbox 4 Specify a time period in the LED Off Time as needed and the LEDs will be off during this period Note Once Night Mod...

Страница 78: ...router before the firmware upgrade to prevent data loss 3 Back up your router configuration before upgrading the firmware 4 Do NOT turn off the router during the firmware upgrade 12 4 1 Online Upgrad...

Страница 79: ...oaded new firmware file and click Upgrade 6 Wait a few moments for the upgrading and rebooting 12 5 Back up and Restore Configuration Settings The configuration settings are stored as a configuration...

Страница 80: ...http tplinkmodem net and log in with the password or your TP Link ID 2 Click Advanced System Tools Backup Restore page 3 Click Factory Restore to reset the router 4 Wait for the resetting and then the...

Страница 81: ...Advanced System Tools Reboot page 3 Enable Reboot Schedule 4 Set when and how often the router reboots by specifying the parameters in the Reboot Time and Repeat fields 5 Click Save 12 7 Change the A...

Страница 82: ...ocal management 1 Visit http tplinkmodem net and log in with the password or your TP Link ID 2 Go to Advanced System Tools Administration page Locate the Local Management section 3 Enable Local Manage...

Страница 83: ...Remote Management and then disable Remote Management via HTTPS if you only want to allow Remote Management via HTTP 4 Keep the Port as the default setting 5 If you only want to allow one specific devi...

Страница 84: ...assword or your TP Link ID 2 Click Advanced System Tools System Log page To view the system logs 1 Select the log Type Select ALL to view all kinds of logs or select DHCPD or IGMP to view the specific...

Страница 85: ...gs will be shown in the table in descending order on the System Log page Save Remotely Select this option to send the system log to a remote server select the minimum level of system log to be saved f...

Страница 86: ...le CWMP Toggle On to enable the CWMP CPE WAN Management Protocol feature Inform Enable this feature to send an Inform message to the ACS Auto Configuration Server periodically Inform Interval Enter th...

Страница 87: ...e computer networks currently which is used for ensuring the transmission of the management information between two nodes In this way network administrators can easily search and modify the informatio...

Страница 88: ...thorized changes System Name Displays the administratively assigned name for this managed device System Description Displays the textual description of the managed device This value should include the...

Страница 89: ...received packets allowing you to monitor the volume of internet traffic statistics 1 Visit http tplinkmodem net and log in with the password or your TP Link ID 2 Go to Advanced System Tools Traffic M...

Страница 90: ...P Link Cloud will notify you when an important firmware upgrade is avaliable Surely you can also manage multiple TP Link Cloud devices with a single TP Link ID This chapter introduces how to register...

Страница 91: ...k ID you need to log in to the router with the TP Link ID Once you have registered a TP Link ID on the web management page you can only register another TP Link ID via the Tether APP Please refer to M...

Страница 92: ...TP Link ID used to log in to the router for the first time will be automatically bound as the Admin account An admin account can add or remove other TP Link IDs to or from the same router as Users Al...

Страница 93: ...you need another TP Link ID please register a new one via the Tether app Please refer to Manage the Router via the TP Link Tether App to install the app and register a new TP Link ID 4 The new TP Lin...

Страница 94: ...all the app OR 2 Connect your device to the router s wireless network 3 Launch the Tether app select the model of your router and log in with your TP Link ID or the password your set for the router 4...

Страница 95: ...Chapter 14 OneMesh with Seamless Roaming This chapter introduces the TP Link OneMeshTM feature Set Up a OneMesh Network Manage Devices in the OneMesh Network...

Страница 96: ...name password access control settings and more Seamless Roaming Devices automatically switch between your router and extenders as you move through your home for the fastest possible speeds Easy Setup...

Страница 97: ...t is recommended to enable Smart Connect feature on Wireless Wireless Settings to enjoy a seamless connection between dual band networks With Smart Connect enabled the router s 2 4GHz and 5GHz share t...

Страница 98: ...s web page To view all mesh devices and clients in the OneMesh network 1 Visit http tplinkmodem net and log in with your TP Link ID or the password you set for the router 2 Go to Basic Network Map 3 C...

Страница 99: ...u set for the router 2 Go to Basic OneMesh or Advanced OneMesh 3 Click a OneMesh device to view the device information or click number Clients to view the clients connected to this device On the Devic...

Страница 100: ...ault settings and then create a new password using 1 32 characters Wireless network password 1 The default Wireless Password PIN is printed on the product label of the router 2 If the default wireless...

Страница 101: ...Network and Internet and click View network status and tasks 2 Click Internet Options on the bottom left 3 Click Connections and select Never dial a connection 4 Click LAN settings deselect the follow...

Страница 102: ...ernet once the router is reset Q4 What can I do if I cannot access the internet 1 Verify that your SIM card is an LTE or WCDMA card 2 Verify that your SIM card is in your ISP s service area 3 Verify t...

Страница 103: ...ent page 2 Go to Advanced Network Internet to verify that Mobile Data is enabled If not toggle it On to access the internet 9 Check the Data Roaming 1 Confirm with your ISP if you are in a roaming ser...

Страница 104: ...p tplinkmodem net and log in with password you set for the router 3 Go to Advanced Operation Mode page 4 Select the Wireless Router Mode option and click Save to make the settings effective Note 1 In...

Страница 105: ...installed successfully and the wireless adapter is enabled On Windows 7 1 If you see the message No connections are available it is usually because the wireless function is disabled or blocked somehow...

Страница 106: ...select Manage to open Computer Management window 4 Expand Services and Applications Services find and locate Wireless Zero Configuration in the Services list on the right side 5 Select Wireless Zero C...

Страница 107: ...far away 3 Go to Advanced Wireless Advanced Settings page and check the wireless router settings Double check your Wireless Network Name and make sure the SSID is not hided 4 Connect to wireless netw...

Страница 108: ...instead and then type in the Network Security Key Wireless Password 3 If it continues saying network security key mismatch it is suggested to confirm the wireless password on your wireless router mode...

Страница 109: ...Check the wireless signal strength of your network if it is weak 1 3 bars please move the router closer and try again 2 Change the wireless Channel of the router to 1 6 or 11 to reduce interference fr...

Страница 110: ...s are trademarks or registered trademarks of their respective holders No part of the specifications may be reproduced in any form or by any means or used to make any derivative such as translation tra...

Страница 111: ...U 2009 125 EC 2011 65 EU and EU 2015 863 The original EU declaration of conformity may be found at https www tp link com en ce RF Exposure Information This device meets the EU requirements 2014 53 EU...

Страница 112: ...108 4 7 9 1 4 7 9 2 BSMI Notice Pb Cd Hg CrVI PBB PBDE PCB 1 0 1 wt 0 01 wt 2 3...

Страница 113: ...contact us Please read and follow the above safety information when operating the device We cannot guarantee that no accidents or damage will occur due to improper use of the device Please use this pr...

Отзывы: