TP-Link Archer AX1500 Скачать руководство пользователя страница 29

25

Chapter 5


TP-Link Cloud Service

from the same router as 

User

s. All accounts can monitor and manage the router locally 

or remotely, but user accounts cannot:
•  Reset the router to its factory default settings either on the web management page 

or in the Tether app.

•  Add/remove other TP-Link IDs to/from the router.

5. 3. 1.  Add TP-Link ID to Manage the Router

1. Visit 

http://tplinkwifi.net

, and log in with your TP-Link ID.

2. Go to 

Advanced

 > 

TP-Link ID

, and focus on the 

Bound Accounts

 section.

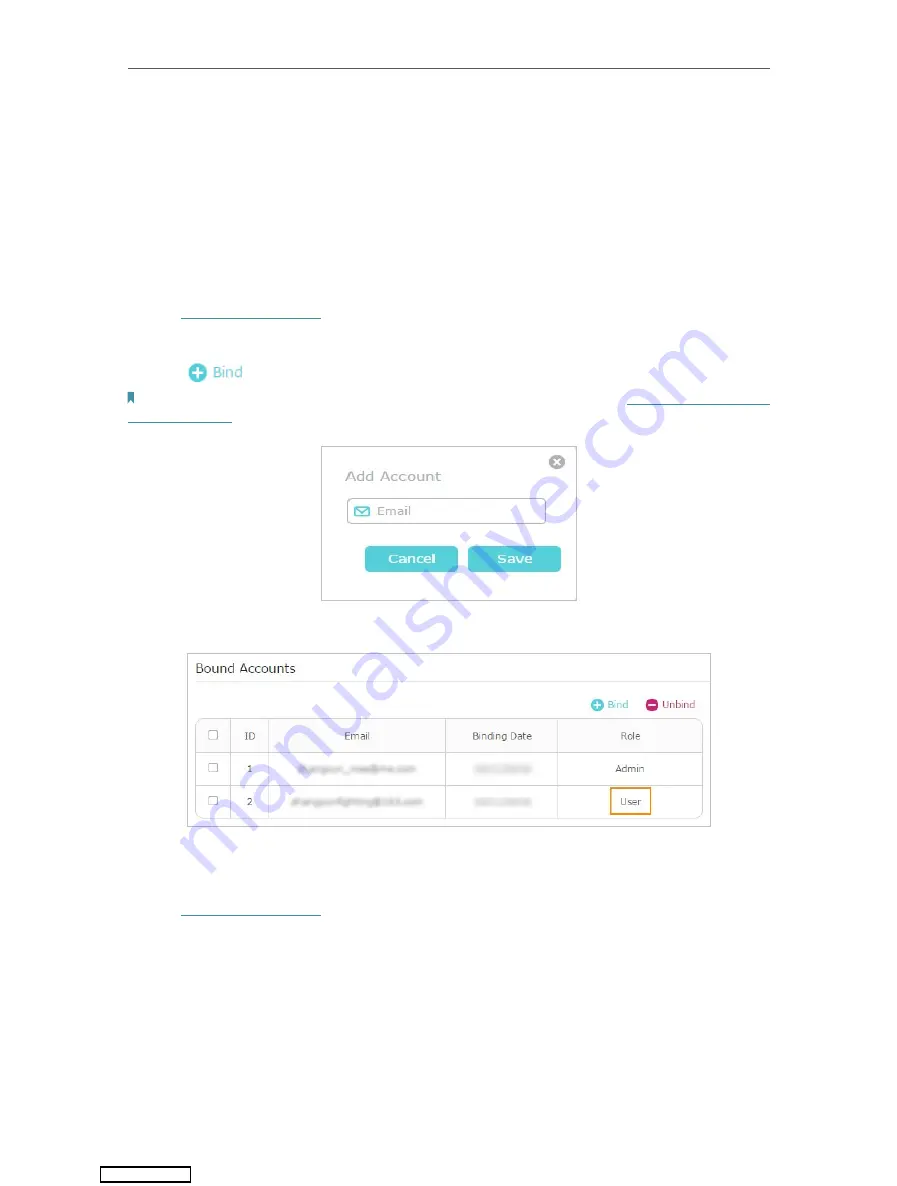
3. Click 

, enter another TP-Link ID as needed and click 

Save

.

Note:

 If you need another TP-Link ID, please register a new one via the Tether app. Refer t

Manage the Router via the 

TP-Link Tether App

 to install the app and register a new TP-Link ID.

4. The new TP-Link ID will be displayed in the Bound Accounts table as a 

User

.

5. 3. 2.  Remove TP-Link ID(s) from Managing the Router

1. Visit 

http://tplinkwifi.net

, and log in with your TP-Link ID.

2. Go to 

Advanced

 > 

TP-Link ID

, and focus on the 

Bound Accounts

 section.

3. Tick the checkbox(es) of the TP-Link ID(s) you want to remove and click 

Unbind

.


Downloaded from 

ManualsNet.com

 search engine

Содержание Archer AX1500

Страница 1: ...REV1 0 0 1910012597 User Guide AX1500 Wi Fi 6 Router 2020 TP Link Downloaded from ManualsNet com search engine...

Страница 2: ...ernet Connection 15 4 4 Set Up the Router as an Access Point 18 4 5 Set Up an IPv6 Internet Connection 18 Chapter 5 TP Link Cloud Service 22 5 1 Register a TP Link ID 23 5 2 Change Your TP Link ID Inf...

Страница 3: ...Network 52 Chapter 12 Customize Your Network Settings 58 12 1 Change the LAN Settings 59 12 2 Configure to Support IPTV Service 59 12 3 Specify DHCP Server Settings 61 12 4 Set Up a Dynamic DNS Servic...

Страница 4: ...gement 76 13 6 Remote Management 78 13 7 System Log 79 13 8 Test the Network Connectivity 81 13 9 Set Up System Time 83 13 10 Set the Router to Reboot Regularly 85 13 11 Control the LED 86 FAQ 87 Down...

Страница 5: ...the MAC Filtering function page is under the Wireless menu that is located in the Advanced tab Note Ignoring this type of note might result in a malfunction or damage to the device Tips Indicates impo...

Страница 6: ...k com TP Link Community is provided for you to discuss our products at https community tp link com Our Technical Support contact information can be found at the Contact Technical Support page at https...

Страница 7: ...to Know About Your Router This chapter introduces what the router can do and shows its appearance It chapter contains the following sections Product Overview Appearance Downloaded from ManualsNet com...

Страница 8: ...c Moreover it is simple and convenient to set up and use the TP Link router due to its intuitive web interface and the powerful Tether app 1 2 Appearance 1 2 1 Top Panel The router s LEDs view from le...

Страница 9: ...Ethernet On At least one powered on device is connected to the router s LAN port Off No powered on device is connected to the router s LAN port WPS On Off This light remains on for 5 minutes when a WP...

Страница 10: ...1 second and immediately press the WPS button on your client to start the WPS process Press and hold the button for 2 seconds to turn on or off the wireless function of your router Reset Button Press...

Страница 11: ...Chapter 2 Connect the Hardware This chapter contains the following sections Position Your Router Connect Your Router Downloaded from ManualsNet com search engine...

Страница 12: ...f your modem if any and remove the backup battery if it has one And place the router horizontally and orient the antennas vertically Follow the steps below to connect your router If your internet conn...

Страница 13: ...ection TP Link_XXXX TP Link_XXXX_5G Connect automatically Connect Wi Fi Wi Fi TP Link_XXXX TP Link_XXXX_5G CHOOSE A NETWORK Other Settings OR Smart Device Computer Method 3 Use the WPS button Wireless...

Страница 14: ...10 Chapter 2 Connect the Hardware WLAN On TP Link MyHome David HomeNetwork TP Link_Home TP Link_Router Test close to Downloaded from ManualsNet com search engine...

Страница 15: ...Chapter 3 Log In to Your Router Downloaded from ManualsNet com search engine...

Страница 16: ...Set up the TCP IP Protocol in Obtain an IP address automatically mode on your computer 2 Visit http tplinkwifi net and create a login password for secure management purposes Then click Let s Get Star...

Страница 17: ...any of the steps and verifies that those steps have been successfully completed Furthermore you can also set up an IPv6 connection if your ISP provides IPv6 service It contains the following sections...

Страница 18: ...Link remote management TP Link DDNS and more log in with your TP Link ID or click Sign Up Now to get one Then follow the instructions to bind the cloud router to your TP Link ID Note To learn more abo...

Страница 19: ...an also modify the settings according to the service information provided by your ISP Follow the steps below to check or modify your internet connection settings 1 Visit http tplinkwifi net and log in...

Страница 20: ...choose Static IP enter the information provided by your ISP in the corresponding fields 3 If you choose PPPoE enter the username and password provided by your ISP PPPoE users usually have DSL cable mo...

Страница 21: ...sword and choose the Secondary Connection provided by your ISP Different parameters are needed according to the Secondary Connection you have chosen 5 Click Save Tips If you use Dynamic IP and PPPoE a...

Страница 22: ...the web management page http tplinkwifi net and go to Advanced Quick Setup 5 Configure your wireless settings and click Next 6 Confirm the information and click Save Now you can enjoy Wi Fi Tips Func...

Страница 23: ...ided by your ISP 4 Fill in information as required by different connection types 1 Static IP Fill in blanks and click Save 2 Dynamic IP SLAAC DHCPv6 Click Advanced to input further information if your...

Страница 24: ...sword for the IPv6 connection 4 6to4 Tunnel An IPv4 internet connection type is a prerequisite for this connection type Manually Set Up Your Internet Connection Click Advanced to input further informa...

Страница 25: ...ended to choose from the first two types Fill in Address Prefix provided by your ISP and click Save 6 Click Status to check whether you have successfully set up an IPv6 connection Tips Visit the FAQ s...

Страница 26: ...mportant firmware upgrade is available Surely you can also manage multiple TP Link Cloud devices with a single TP Link ID This chapter introduces how to register a new TP Link ID bind or unbind TP Lin...

Страница 27: ...your TP Link ID you need to log in to the router with the TP Link ID Once you have registered a TP Link ID on the web management page you can only register another TP Link ID via the Tether APP Pleas...

Страница 28: ...rent password then a new password twice And click Save 5 3 Manage the User TP Link IDs The TP Link ID used to log in to the router for the first time will be automatically bound as the Admin account A...

Страница 29: ...n the Bound Accounts section 3 Click enter another TP Link ID as needed and click Save Note If you need another TP Link ID please register a new one via the Tether app Refer to Manage the Router via t...

Страница 30: ...your device to the router s wireless network 3 Launch the Tether app select the model of your router and log in with your TP Link ID or the password you set for the router 4 Manage your router as need...

Страница 31: ...you have guests in your house apartment or workplace you can create a guest network for them In addition you can customize guest network options to ensure network security and privacy It contains the...

Страница 32: ...you want your guests to manually input the SSID for guest network access 3 Select the Security type If No security is selected no password is needed to access your guest network If WAP WPA2 Personal i...

Страница 33: ...r Tick this checkbox if you want to allow the wireless clients on your guest network to communicate with each other via methods such as network neighbors and Ping Allow guests to access your local net...

Страница 34: ...to block inappropriate explicit and malicious websites and control access to specified websites at specified time It contains the following sections Setting Up Access Restrictions Monitoring Internet...

Страница 35: ...ck to create a profile for a family member 4 Add basic profile information 1 Enter a Name for the profile to make it easier to identify 2 Under Devices click 3 Select the devices that belong to this f...

Страница 36: ...le www facebook com All websites containing the keywords will be blocked 2 Click Next 6 Set time restrictions on internet access 1 Enable Time Limits on Monday to Friday and Saturday Sunday then set t...

Страница 37: ...can I do that 1 Visit http tplinkwifi net and log in with your TP Link ID or the password you set for the router 2 Go to Advanced Parental Controls 3 Find the correct profile and click in the Insights...

Страница 38: ...34 Chapter 7 Parental Controls Done You can now check up on your child s online activities Downloaded from ManualsNet com search engine...

Страница 39: ...s chapter introduces how to create a QoS Quality of Service rule to specify prioritization of traffic and minimize the impact caused when the connection is under heavy load Downloaded from ManualsNet...

Страница 40: ...in with your TP Link ID or the password you set for the router 2 Go to Advanced QoS Global Settings 3 Tick to enable QoS 4 Input the maximum upload and download bandwidth provided by your internet se...

Страница 41: ...rity functions You can protect your home network from cyber attacks block or allow specific client devices to access your network using Access Control or you can prevent ARP spoofing and ARP attacks u...

Страница 42: ...ol Access Control is used to block or allow specific client devices to access your network via wired or wireless based on a list of blocked devices Blacklist or a list of allowed devices Whitelist I w...

Страница 43: ...ces have been successfully added to the blacklist To allow specific device s 1 Select Whitelist and click SAVE 2 Your own device is in the whitelist by default and cannot be deleted Click to add other...

Страница 44: ...een which means the device has been successfully added to the whitelist Done Now you can block or allow specific client devices to access your network via wired or wireless using the Blacklist or Whit...

Страница 45: ...he router 2 Go to Advanced Security IP MAC Binding 3 Enable IP MAC Binding 4 Bind your device s according to your need To bind the connected device s 1 Click in the Binding List section 2 Click VIEW C...

Страница 46: ...unconnected device 1 Click in the Binding List section 2 Enter the MAC Address and IP Address that you want to bind 3 Click SAVE Done Now you don t need to worry about ARP spoofing and ARP attacks Dow...

Страница 47: ...uter can penetrate the isolation of NAT and allows devices on the internet to initiatively communicate with devices on the local network thus realizing some special functions The TP Link router suppor...

Страница 48: ...21 in FTP service port 25 in SMTP service and port 110 in POP3 service Please verify the service port number before the configuration I want to SharemypersonalwebsiteI vebuiltinlocalnetworkwithmyfrie...

Страница 49: ...fault settings of Internal Port and Protocol if you are not clear about which port and protocol to use If the service you want to use is not in the common services list you can enter the corresponding...

Страница 50: ...the external ports will be opened for subsequent connections The router can record the IP address of the host When the data from the internet return to the external ports the router can forward them t...

Страница 51: ...ealize the unlimited bidirectional communication between internal hosts and external hosts The DMZ host becomes a virtual server with all ports opened When you are not clear about which ports to open...

Страница 52: ...y find the front end NAT device and send request to it to open the corresponding ports With UPnP enabled the applications or host devices on the local network and the internet can freely communicate w...

Страница 53: ...ox online games without a hitch Internet If necessary you can follow the steps to change the status of UPnP 1 Visit http tplinkwifi net and log in with your TP Link ID or the password you set for the...

Страница 54: ...table for restricted environment such as campus network and company intranet PPTP VPN is more easily used and its speed is faster it s compatible with most operating systems and also supports mobile d...

Страница 55: ...or the password you set for the router 2 Go to Advanced VPN Server OpenVPN and tick the Enable box of OpenVPN Note Before you enable VPN Server we recommend you configure Dynamic DNS Service recommen...

Страница 56: ...install the OpenVPN client utility on each device that you plan to apply the VPN function to access your router Mobile devices should download a third party app from Google Play or Apple App Store 2...

Страница 57: ...server 4 Set the PPTP connection permission according to your needs Select Allow Samba Network Place access to allow your VPN device to access your local Samba server Select Allow NetBIOS passthrough...

Страница 58: ...PPTP software or a third party PPTP software to connect to PPTP Server Here we use the Windows built in PPTP software as an example 1 Go to Start Control Panel Network and Internet Network and Sharing...

Страница 59: ...11 VPN Server 4 Select Use my Internet connection VPN 5 Enter the internet IP address of the router for example 218 18 1 73 in the Internet address field Click Next Downloaded from ManualsNet com sea...

Страница 60: ...VPN Server 6 Enter the User name and Password you have set for the PPTP VPN server on your router and click Connect 7 The PPTP VPN connection is created and ready to use Downloaded from ManualsNet com...

Страница 61: ...57 Chapter 11 VPN Server Downloaded from ManualsNet com search engine...

Страница 62: ...e following sections Change the LAN Settings Configure to Support IPTV Service Specify DHCP Server Settings Set Up a Dynamic DNS Service Account Create Static Routes Specify Wireless Settings Schedule...

Страница 63: ...ve the Subnet Mask as the default settings 4 Click SAVE Note If you have set the Port Forwarding DMZ or DHCP address reservation and the new LAN IP address is not in the same subnet with the old one t...

Страница 64: ...and no other parameters are required Select Custom if your ISP is not listed but provides necessary parameters 3 After you have selected a mode the necessary parameters including the LAN port for IPT...

Страница 65: ...devices 1 Visit http tplinkwifi net and log in with your TP Link ID or the password you set for the router 2 Go to Advanced Network DHCP Server To specify the IP address that the router assigns 1 Tic...

Страница 66: ...uter and local servers FTP HTTP etc using a domain name without checking and remembering the IP address Note DDNS does not work if the ISP assigns a private WAN IP address such as 192 168 1 x to the r...

Страница 67: ...S account please click Logout first and then log in with a new account 12 5 Create Static Routes Static routing is a form of routing that is configured manually by a network administrator or a user by...

Страница 68: ...the internet and visit my company s network at the same time I need to configure the static routing Company s server PC Router B Router A Switch LAN 192 168 0 1 192 168 0 100 LAN 192 168 0 2 WAN 172...

Страница 69: ...xample the data packets will be sent to the LAN port of Router B and then to the Server so the default gateway should be 192 168 0 2 Interface Determined by the port WAN LAN that sends out data packet...

Страница 70: ...s Settings 2 Select Hide SSID and your SSID won t display when you scan for local wireless networks on your wireless device and you need to manually join the network To use the Smart Connect function...

Страница 71: ...ide a faster more efficient Wi Fi network for multiusers Note Devices supporting 5GHz wireless band can enjoy the MU MIMO service 1 Go to Advanced Wireless Wireless Settings 2 Locate the 5GHz network...

Страница 72: ...oach to set up a security protected Wi Fi connection 1 Visit http tplinkwifi net and log in with your TP Link ID or the password you set for the router 2 Make sure the Wi Fi of your router is on and g...

Страница 73: ...ress the router s WPS button Within two minutes enable WPS on your personal device Success will appear on the screen and the WPS LED of the router should change from flashing to solid on indicating su...

Страница 74: ...Enter a value between 40 and 1000 in milliseconds to determine the duration between beacon packets that are broadcasted by the router to synchronize the wireless network The default value is 100 milli...

Страница 75: ...ions Upgrade the Firmware Backup and Restore Configuration Settings Change the Login Password Backup and Restore Configuration Settings Password Recovery Local Management Remote Management System Log...

Страница 76: ...e router during the firmware upgrade 13 1 1 Online Upgrade 1 Visit http tplinkwifi net and log in with your TP Link ID or the password you set for the router 2 When the latest firmware is available fo...

Страница 77: ...w minutes for the upgrade and reboot to complete Note If you fail to upgrade the firmware for the router please contact our Technical Support 13 2 Backup and Restore Configuration Settings The configu...

Страница 78: ...ept your login password and TP Link ID 1 In the Factory Default Restore section click RESTORE 2 Wait a few minutes for the resetting and rebooting Note During the resetting process do not turn off the...

Страница 79: ...ice both case sensitive Click SAVE 4 Use the new password for future logins 13 4 Password Recovery This feature allows you to recover the login password you set for you router in case you forget it No...

Страница 80: ...a new password 13 5 Local Management This feature allows you to limit the number of client devices on your LAN from accessing the router by using the MAC address based authentication 1 Visit http tpli...

Страница 81: ...AN connected devices to manage the router Select All Devices for Local Managers Allow specific devices to manage the router 1 Select All Devices for Local Managers and click SAVE 2 Click Add Device Do...

Страница 82: ...net and log in with your TP Link ID or the password you set for the router 2 Go to Advanced System Administration and complete the settings in Remote Management section as needed Forbid all devices to...

Страница 83: ...t as default settings recommended or enter a value between 1024 and 65535 3 Select Specified Device for Remote Managers 4 In the Only this IP Address field enter the IP address of the remote device to...

Страница 84: ...at a fixed time For example I want to check my router s working status at a fixed time every day however it s too troublesome to log in to the web management page every time I want to go checking It...

Страница 85: ...available for users in most webmail systems For example the SMTP server address of Hotmail is smtp mail outlook com 6 Email To Enter the recipient s email address which can be the same as or differen...

Страница 86: ...route path your router has passed to reach the tested host and measure transit delays of packets across an Internet Protocol network 2 Enter the IP Address or Domain Name of the tested host 3 Modify...

Страница 87: ...ntrols You can choose the way to obtain the system time as needed 1 Visit http tplinkwifi net and log in with your TP Link ID or the password you set for the router 2 Go to Advanced System Time Langua...

Страница 88: ...ld select Get from Managing Device 2 The time of your computer will then be displayed and click SAVE To manually set the date and time 1 In the Set Time field select Manually 2 Set the current Date In...

Страница 89: ...the Router to Reboot Regularly The Scheduled Reboot feature cleans the cache to enhance the running performance of the router 1 Visit http tplinkwifi net and log in with your TP Link ID or the passwor...

Страница 90: ...e to specify a time period during which the LED is off 1 Visit http tplinkwifi net and log in with your TP Link ID or the password you set for the router 2 Go to Advanced System LED Control 3 Enable N...

Страница 91: ...gin password Note Please refer to Password Recovery to learn how to configure Password Recovery You ll need to reconfigure the router to surf the internet once the router is reset and please mark down...

Страница 92: ...88 4 Click LAN settings and deselect the following three options and click OK 5 Go to Advanced Restore advanced settings click OK to save the settings Downloaded from ManualsNet com search engine...

Страница 93: ...ration is finished 1 Visit http tplinkwifi net and log in with your TP Link ID or the password you set for the router 2 Go to Advanced Network Status to check internet status If IP Address is a valid...

Страница 94: ...ccess Reset the router to factory default settings and reconfigure the router Upgrade the firmware of the router Check the TCP IP settings on the particular device if all other devices can get interne...

Страница 95: ...ter The MAC addresses of a computer in wired connection and wireless connection are different Modify the LAN IP address of the router Note Most TP Link routers use 192 168 0 1 192 168 1 1 as their def...

Страница 96: ...rk Internet 4 Select your Internet Connection Type and fill in other parameters 5 Click Save 6 Restart the modem and the router again Please upgrade the firmware of the router If you ve tried every me...

Страница 97: ...k on My Computer on desktop select Manage to open Computer Management window 4 Expand Services and Applications Services find and locate Wireless Zero Configuration in the Services list on the right s...

Страница 98: ...d it on the label of your router 2 If you cannot find the PIN or PIN failed you may choose Connecting using a security key instead and then type in the Wireless Password Network Security Key 3 If it c...

Страница 99: ...3 bars please move the router closer and try again Change the wireless Channel of the router to 1 6 or 11 to reduce interference from other networks Re install or update the driver for your wireless...

Страница 100: ...is no guarantee that interference will not occur in a particular installation If this equipment does cause harmful interference to radio or television reception which can be determined by turning the...

Страница 101: ...nt is properly maintained and operated Issue Date 2019 08 30 FCC compliance information statement Product Name I T E Power Supply Model Number AMS159A 1201000FU Responsible party TP Link USA Corporati...

Страница 102: ...rmful interference 2 This device must accept any interference received including interference that may cause undesired operation Any changes or modifications not expressly approved by the party respon...

Страница 103: ...ticle 3 1a on the limitation of exposure of the general public to electromagnetic fields by way of health protection The device complies with RF specifications when the device used at 20 cm from your...

Страница 104: ...onctionnantdanslabande5150 5250MHzestr serv uniquement pour une utilisation l int rieur afin de r duire les risques de brouillage pr judiciable aux syst mes de satellites mobiles utilisant les m mes c...

Страница 105: ...4 7 9 1 4 7 9 2 Pb Cd Hg CrVI PBB PBDE PCB 1 0 1 wt 0 01 wt 2 3 Downloaded from ManualsNet com search engine...

Страница 106: ...ow the above safety information when operating the device We cannot guarantee that no accidents or damage will occur due to improper use of the device Please use this product with care and operate at...

Отзывы: