background image

Warranty Registration and Inquiry 
For product warranty registration, TOTO U.S.A. Inc. recommends online warranty registration. Please visit  
our web site http://www.totousa.com. If you have questions regarding warranty policy or coverage, please con-
tact TOTO U.S.A. Inc., Customer Service Department, 1155 Southern Road, Morrow, GA 30260  
(888) 295-8134 or (678) 466-1300 when calling from outside of U.S.A.

Installation Manual
Manual de Instrucciones 
Manuel D’Installation

CST442

Содержание CST442

Страница 1: ...visit our web site http www totousa com If you have questions regarding warranty policy or coverage please con tact TOTO U S A Inc Customer Service Department 1155 Southern Road Morrow GA 30260 888 29...

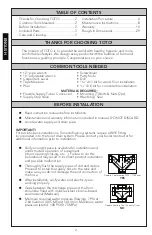
Страница 2: ...information included in manual DO NOT DISCARD Locate water supply and drain pipe Verify enough space is available for installation and unobstructed operation of equipment doors opening closing etc Fa...

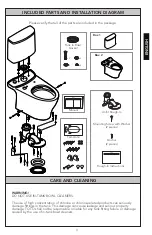
Страница 3: ...IN TANK BOWL CLEANERS The use of high concentration of chlorine or chlorine related products can seriously damage fittings in the tank This damage can cause leakage and serious property damage TOTO sh...

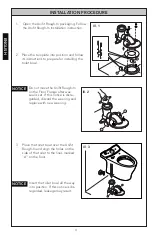
Страница 4: ...e for installing the toilet bowl Do not move the Unifit Rough In on the Floor Flange after wax seal is set If this notice is disre garded discard the wax ring and replace with new wax ring 3 Place the...

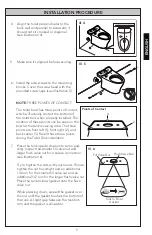
Страница 5: ...The location of these points can be seen on the bowl at the tank receiving area The three points are front left 1 front right 2 and back center 3 Recall these three points during the Toilet Tank inst...

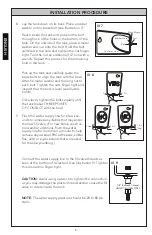
Страница 6: ...d the long nut to each bolt Tighten the nuts finger tight and inspect that the tank is level see Illustra tion 8 Once level tighten the bolts equally until the tank makes THREE POINTS OF CONTACT with...

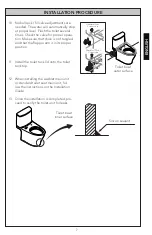
Страница 7: ...proper level Flush the toilet several times Check the valve for proper opera tion Make sure that chain is not tangled and that the flapper arm is in its proper position 11 Install the toilet tank lid...

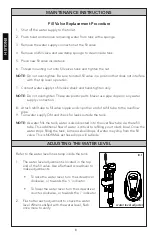
Страница 8: ...lip other end of refill tube to the overflow pipe 9 Turn water supply ON and check for leaks outside the tank NO TE As water fills the tank water is also directed into the overflow tube via the refill...

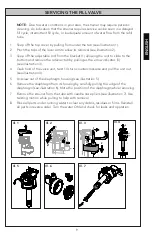
Страница 9: ...ng by carefully pulling the edge of the diaphragm see illustration 6 Note the position of the diaphragm while removing 7 Remove the strainer from the tube with needle nose pliers see illustration 7 Us...

Страница 10: ...ase is required TOTO encourages war ranty registration upon purchase to create a record of Product ownership at http www totousa com Product registration is completely voluntary and failure to registe...

Страница 11: ...11 ENGLISH NOTES...

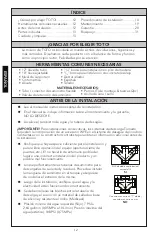
Страница 12: ...istro de agua y la tuber a de desag e Verifique que haya espacio suficiente para la instalaci n y para la libre operaci n del equipo apertura cierre de puertas etc El no hacerlo de antemano podr a dar...

Страница 13: ...NTRO DE LA TAZA DEL TANQUE El uso de productos clorados o con alta concentraci n de cloro puede da ar gravemente los accesorios en el tanque Estos da os pueden causar fugas y aver as graves de mate ri...

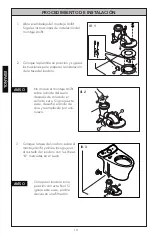
Страница 14: ...arar la instalaci n de la taza del inodoro No mueva el montaje Unifit sobre la brida del suelo despu s de colocado el sello de cera Si ignora este aviso deseche el anillo de cera y reempl celo por uno...

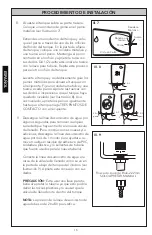
Страница 15: ...iente donde debe ir el tanque Los tres puntos son delantero izquierdo 1 delantero derecho 2 y tracero central 3 Recuerde estos tres puntos cuando est instalando el tanque en la parte del recipiente do...

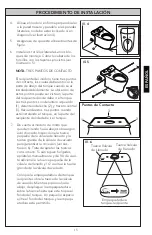
Страница 16: ...da perno Apriete las tuercas con sus dedos e inspeccione que el tanque haya quedado nivelado ver Ilustraci n 8 Una vez nivelado apriete los pernos igualmente hasta que el tanque haga TRES PUNTOS DE CO...

Страница 17: ...la posici n correcta 11 Instale la tapa del tanque en el in odoro 12 Cuando instale la unidad principal Washlet o la unidad principal del asiento para inodoro est ndar siga las instrucciones de la Gu...

Страница 18: ...da para limpiar el orificio del tanque 5 Coloque la v lvula de llenado nueva en el orificio del tanque 6 Enrosque la tuerca de montaje en el v stago de la v lvula de llnado y ajuste la tuerca NO TA No...

Страница 19: ...aci n 5 6 Retire la diafragma desde la cubierta tirando con cuidado del borde del diafragma ver ilustraci n 6 Tenga en cuenta la posici n del diafragma mientras lo extrae 7 Retire el colador desde el...

Страница 20: ...ucto es totalmente voluntario y la falta a registrar no disminuir sus derechas de garant a limitada 5 ESTA GARANT A LE DA DERECHOS LEGALES ESPEC FICOS USTED PODR ATENER OTROS DERECHOS QUE PUEDEN VARIA...

Страница 21: ...21 ESPA OL NOTAS...

Страница 22: ...ment sans obstacles de l quipement portes ouverture fer meture etc Si vous n effectuez pas cette v rifiction l avance il se peut que vous installiez le produit incorrectement et qu il ne fonctionne pa...

Страница 23: ...tion lev e de chlore ou de produits contenant du chlore ris que d endommager s rieusement les l ments dans le r servoir Ces dommages peuvent provoquer des fuites ainsi que des d g ts mat riels importa...

Страница 24: ...pr parer installer la cuvette Ne d placez pas l unitaire brut sur la bride de sol une fois le joint de cire est fix Si vous ignorez cet avis jetez l anneau en cire et remplacez le par un nouvel an nea...

Страница 25: ...rvoir Ces points sont situ s 1 avant gauche 2 avant droit et 3 arri re centre R p rez ces trois points pendant l installation du r servoir Joint R servoir Cuvette Ecrou du Robinet de Remplissage Ecrou...

Страница 26: ...ur chaque boulon Bien serrer les crous la main et v rifiez que le r servoir est niv l voir Illustration 8 Une fois niv l fixez les boulons jusqu ce que le r servoir ait TROIS POINTS DE CONTACT avec la...

Страница 27: ...ras du clapet est dans sa position ad quate 11 Installer le couvercle du r servoir des toilettes 12 Lors de l installation de l unite principale du Washlet ou du siege de foilette suivez les instructi...

Страница 28: ...umide pour nettoyer l orifice du r servoir 5 Placer le robinet de remplissage neuf dans l orifice du r servoir 6 Visser l crou de fixation sur la tige du robinet de remplissage et serrer l crou REMARQ...

Страница 29: ...du diaphragme voir illustration 5 6 Retirez le diaphragme tirant d licatement le bord du diaphragme voir illustration 6 Notez la position du diaphragme pendant le retrait 7 Retirez le filtre avec des...

Страница 30: ...t au site http www totousa com L enregistrement du produit est compl tement volontaire et d faut de l enregistrement ne va pas limiter votre droit au garantie limit e 5 CETTE GARANTIE DONNE DES DROITS...

Страница 31: ...31 ROUGH IN DIMENSIONS BOSQUEJO ROBINETTERIE BRUTE...

Страница 32: ...ry For product warranty registration TOTO U S A Inc recommends online warranty registration Please visit our web site http www totousa com If you have questions regarding warranty policy or coverage p...

Отзывы: