background image

Message Center

Creating LCD Messages

Strata DK PC Attendant Console     5/00

89

Creating LCD Messages

You can use the console to send or receive messages to LCD telephone users.

Your system can have up to 40 messages. You can temporarily add to or change any of 
the preprogrammed messages. Each console may record and save up to 10 personal 
messages. This option is enabled in system programming.

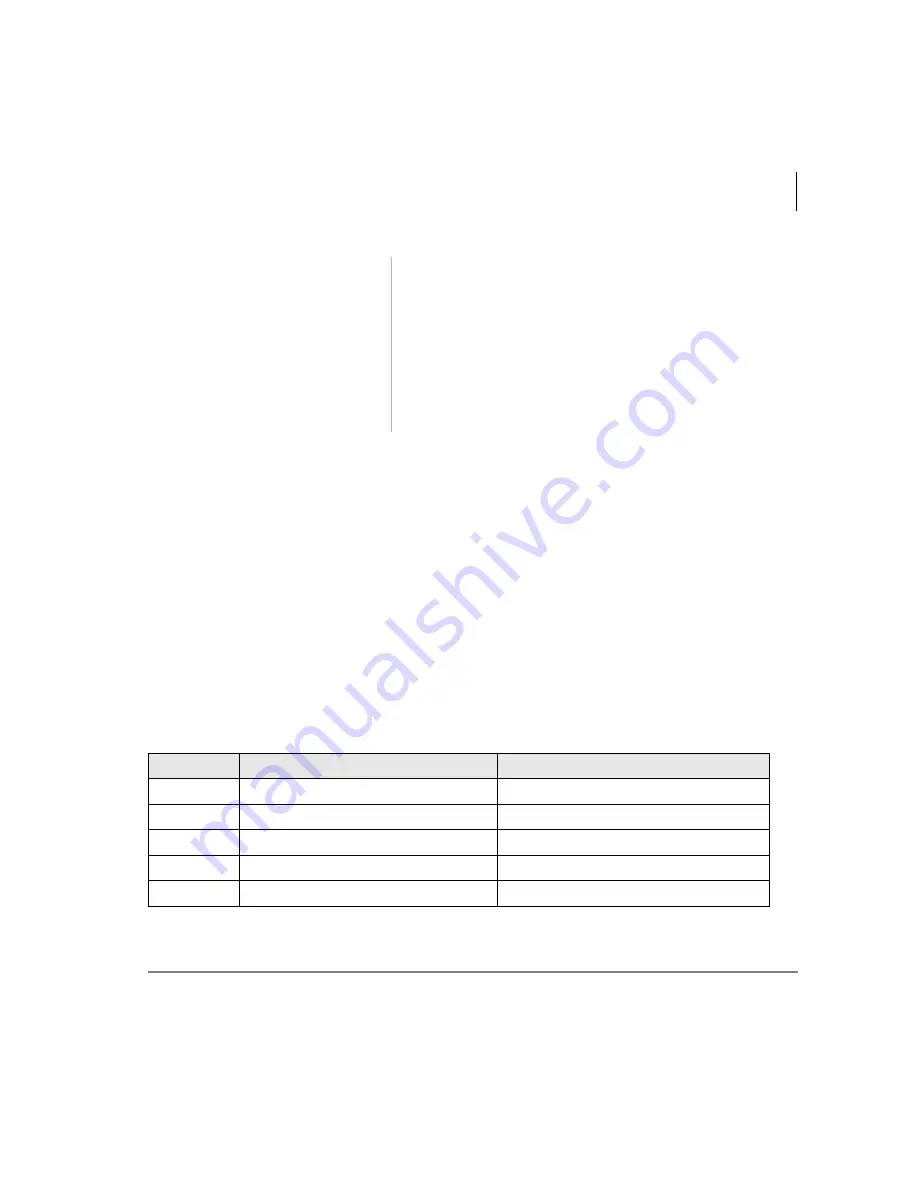
Preprogrammed Messages

System messages can only be programmed or permanently changed at Attendant 
Consoles or the system administrator’s telephone. Five preprogrammed messages are 
automatically stored in memory when the Alphanumeric Messaging with LCD feature 
is initialized. You can input additional information (up to a total of 32 characters for 
each message). Some system messages expect you to add more information. For 
example:

3. Select the Dial 

button.

The screen returns to the Main screen and the Active 
Call Window displays “[DN] MESSAGE WAITING 
CANCEL.”

4. Select the Release 

button.

The currently displayed message is canceled.

5. Repeat 1~4 for each 

MW signal set on 
your position.

Msg No.

Preprogrammed Information

Entry Information

60

Out To Lunch

61

In A Meeting

62

Call ______________________

(station or telephone number)

63

Back At ___________________

(time you will return)

64

Return On _________________

(date you will return)

Содержание Strata DK PC Attendant Console

Страница 1: ...Telecommunication Systems Division May 2000 Digital Business Telephone Systems PC Attendant Console User Guide ...

Страница 2: ...design or components as engineering or manufacturing methods may warrant D42 UG PC ATTVB Version B 1 May 2000 Version B November 1998 Version A March 1997 Copyright 2000 Toshiba America Information Systems Inc Telecommunication Systems Division All rights reserved No part of this manual covered by the copyrights hereon may be reproduced in any form or by any means graphic electronic or mechanical ...

Страница 3: ... and Media xi Chapter 1 The Grand Tour Function Keys 2 Special Function Keys 2 Numeric Keypad 2 Main Screen 3 Console ID Area 4 Menu Bar 4 Feature Toolbar 5 Status Bar 9 Incoming Call Display 9 Active Call Area 9 Loop Hold Display 10 User Buttons 10 DSS BLF Station Directory 10 Keyboard Navigation 11 Mouse Navigation 12 On line Help 12 ...

Страница 4: ...ne Group Restrictions 24 Timed Reminders 25 Date and Time 26 Volume Control 27 Chapter 3 Basic Calling Incoming Calls 30 Incoming Call Types 31 Answered Call Options 32 Transferring Calls 34 Taking Notes About a Call 38 Using Department Search with Call Transfer 39 Voice Mail 40 Placing Calls 42 Voluntary Account Codes 44 Calling Options 45 Setting or Cancelling Automatic Callback 46 Busy Override...

Страница 5: ...ed Dial Special Function Codes 59 Using Speed Dial Numbers 60 Paging 61 Emergency Page 62 Opening Door Locks 62 Using Door Phones 63 Last Number Redial 64 Saved Number Redial 65 Call Pickup 66 Call Park 67 Call Park and Page 68 Auto Park Page 70 Setting Auto Park 71 Abandoned Calls 72 Alarm Reset 73 Chapter 5 Directory Adding Deleting Entries into the Directory 76 Directory Settings 78 Directory F...

Страница 6: ... Settings Options 101 Automatic Dialing 101 Activate On Incoming 101 Multiple Attendants 101 Automatic Hold 101 ANI Display On 102 Default Transfer 102 Changing Console Settings 102 Set an Account Code Length 103 Assign a DN for Voice Mail and Quick Messages 103 Storing Voice Mail ID codes 104 CO Line Names 104 Changing CO Line and Line Group Names 104 Setting a Default Line or Line Group 106 User...

Страница 7: ...ation User Name 117 Door Phone Button Labels 118 Door Unlock Button Labels 118 Paging Button Labels 119 Printer Setup 120 Appendix 121 Windows Operations 121 Windows Controls 123 Change the Screen Colors 123 Setup Easy Application Switching 123 Change the Keyboard Repeat Speed 123 Change the Mouse Speed 123 Index 127 ...

Страница 8: ...Contents Chapter 8 Administration vi Strata DK PC Attendant Console 5 00 ...

Страница 9: ...nization This guide is divided as follows Chapter 1 The Grand Tour includes information on the PC Attendant Console keyboard the Main Menu and how to navigate through the menus and dialog boxes It also describes the Feature Toolbar Chapter 2 Console Controls provides descriptions and instructions for each of the console settings These settings include the console mode time and date and general set...

Страница 10: ... Message Center shows the various features available for taking memos and sending messages and message notifications Chapter 7 View Menu provides instructions for displaying the Toolbar and Status Bar viewing and printing Call Statistics Chapter 8 Administration describes various administrative features which affect the console s capabilities Appendix contains instructions for setting those Window...

Страница 11: ...ot followed closely WARNING Alerts you when the given task could cause personal injury or death P Represents any Directory Number button also known as an extension or intercom number PDN Represents any Primary Directory Number button the extension number for the telephone SDN Represents any Secondary appearance of a PDN A PDN that appears on another telephone is considered an SDN PhDN Represents a...

Страница 12: ...equential entry Example 5 Tilde Means through Example 350 640 Hz frequency range Denotes the step in a one step procedure Denotes a procedure See Figure 10 Grey words within the printed text denote cross references In the electronic version of this document Strata DK Library CD ROM or FYI Internet download cross references appear in blue hypertext 1 Actions you perform appear in this column They c...

Страница 13: ...Information on the back of the document s title page The following documents and CD ROMS can be used to reference further information about the Strata DK systems Strata DK Programming Manual Strata DK Installation Maintenance Manual Strata DK Library CD ROM Strata DK280 Installation and Maintenance Manual For authorized users Internet site FYI http fyi tsd toshiba com contains all current Strata D...

Страница 14: ...Introduction Related Documents and Media xii Strata DK PC Attendant Console 5 00 ...

Страница 15: ...nstructions for navigating through the main screen and the dialog boxes See the figure below and the following text Tone INSERT F2 F3 F4 F5 F6 F7 F8 F9 F10 F11 F12 Join HOME Retrieve Pg Up Del Num Lock 7 Home 8 9 Pg Up Answer Incoming Dial DELETE Split Switch End Conf Trns Pg Dn Answer Hold Release Enter 1 End Ins 2 0 3 Pg Dn 4 5 6 F1 Help Vol Up Vol Dn ...

Страница 16: ...he top row of eight user buttons You can also access these user buttons by clicking them with the mouse on the screen F11 for Volume Up F12 for Volume Down Special Function Keys There are six special function keys Voice Mail Tone Join Conf Trns Retrieve and Split Switch Numeric Keypad The numeric keypad is kept in the Num Lock ON position so that it is a hot dial pad Answer Incoming Answer Hold an...

Страница 17: ...on incoming calls calls on hold available line groups station status and displays a Directory that can be used to transfer calls quickly Incoming Call Display Feature Toolbar Menu Bar Soft Keys Console ID Area Active Call Window Loop Hold Display Volume Control Buttons Notes Field 16 User Buttons Programmable Feature Buttons DSS BLF Station Directory Status Bar ...

Страница 18: ...nd of your shift Features Assists you in handling calls such as Call Pickup Page Retrieve etc Directory Where you enter names and phone numbers for the on line directory You can also enter titles departments and schedules of individuals The directory contains a search feature You can choose what information is displayed and the order in which it is shown in the Directory Display field Messages Ena...

Страница 19: ...n page 12 Feature Toolbar The Feature Toolbar shown below provides quick access to console controls You will probably access these control features at the beginning and end of your shift These controls include setting the console for Night Transfer turning call overflow and background music settings ON and OFF putting the console into position busy mode etc The Feature Toolbar displays across the ...

Страница 20: ...dant Position Busy ON OFF Setup Night Transfer and Auto Night Transfer Toggle the Attendant Overflow ON OFF Toggle the Privacy Button ON OFF Toggle the Background Music ON OFF Reset Alarm Setup Call Forward Toggle Call Forward Fixed ON OFF Set Timed Reminders Set Line Group Restrictions and view Busy Idle Status ...

Страница 21: ... Main Screen Strata DK PC Attendant Console 5 00 7 Messaging Icons Directory Icons Click To Get to the Message Center Send LCD Messages Message Waiting Light Click To View Add Directory Entries Find a Directory Entry ...

Страница 22: ...ata DK PC Attendant Console 5 00 Feature Icons Click To Access Paging Options Use Call Pickup To Unlock a Door Cancel Callback Privacy Release Cancel Busy Redial Redial Call in ANI List Redial Last Call or Saved Number Set Speed Dial ...

Страница 23: ...oming Calls shows the number of calls waiting to be answered Incoming Call Type displays each type of incoming call waiting to be answered Call types are shown with black letters except emergency calls which are shown in red Answer Incoming Button automatically answers the next ringing call of the type selected If none are selected it answers a call from the type at the top of the list Active Call...

Страница 24: ... DNs Primary DNs and Phantom DNs distributed hunt group pilots ACD group numbers always starting with A and their associated names Clicking on a display entry automatically dials the number Directory Direct Selection feature Serves as the Busy Lamp Field BLF Double clicking on a display entry dials the number and blind transfers the call automatically Red Emergency Call Green Consultation Hold Blu...

Страница 25: ...em selects that item Tab Moves from section to section or button to button in screens and dialog boxes Shift Tab Moves from section to section or button to button in the screens and dialog boxes in reverse direction Alt Tab Moves between open application windows Windows feature Arrow keys Highlights one of several items from a drop down box for selection Also moves from selection to selection or b...

Страница 26: ...mouse instructions Click any underlined green words to jump to instructions for that item Definitions of individual terms green letters marked with a dashed underline While working with a feature within a dialog box pressing Help displays the step by step procedures for performing that particular feature The on line Help provides the most appropriate information for the current calling conditions ...

Страница 27: ...l Forward destination night time call handling volume controls etc Console control features are generally those that you set at the beginning and end of your shift There are icons for each of these controls just under the Menu Bar at the top of your screen Console controls are also found under Console on the Menu Bar as shown in this figure ...

Страница 28: ...four Tenants In most cases there is one Tenant one company being handled by a single console To set Night Transfer 1 From the Menu Bar select Console then Night Transfer 2 From the Night Transfer dialog box select a Night Mode from the Tenant 1 drop down box Either two or three settings are allowed Day Day2 Night depending on the Telephony Setup parameter for Night Modes 3 If there is more than on...

Страница 29: ...00 15 4 Optional To control Night Transfer automatically toggle Enable Automatic ON X in the box To control Night Transfer manually toggle Enable Automatic OFF No X in the box 5 Select the OK button The DK is now in the new Night Mode setting for the selected tenants ...

Страница 30: ...tic Night Transfer 1 From the Menu Bar select Console then Night Transfer 2 Set Enable Automatic to ON make sure box has an X 3 From the Night Transfer dialog box select the Add button to enter new settings and the Delete button to remove unwanted entries 4 If you selected the Add button set up schedules from the Add Night Transfer dialog box Select the Mode Day Day2 Night Select Time two digits 2...

Страница 31: ...the entire group is considered Unattended Consoles should then set Call Forward and or Night Transfer so that incoming calls are rerouted to another destination Night Bell an alternate answer position etc The console is placed in a Position Busy Pending state if you are talking to a party making an outgoing call holding calls or if you are in ring transfer mode During this state the console cannot...

Страница 32: ...Menu Bar select Console Toggle Position Busy ON check mark or OFF no check mark A pop up window alerts you when Position Busy is ON 2 Clear the Position Busy alert pop up window by pressing the OK button Optional Leaving this displayed provides a clear visual indication of Position Busy status From the Menu Bar select Console Toggle Console Overflow ON check mark or OFF no check mark OVERFLOW ON o...

Страница 33: ...ed for the Privacy feature you can block station users with Privacy Override from entering CO line calls The Privacy feature does not block Busy Override or Executive Override 1 From the Menu Bar choose Console 2 Toggle Background Music ON check mark or OFF no check mark When toggled on music plays over the external paging system BGM ON or BGM OFF displays in the active call window depending on th...

Страница 34: ...d selections are available No Call Forward disables this feature All Calls forwards all calls immediately The PC Attendant Console does not ring Busy forwards calls immediately if you are in Position Busy mode No Answer forwards calls if you do not answer in the specified time Busy No Answer forwards calls immediately when you are in Position Busy mode Forwards when not answered within the specifi...

Страница 35: ...onsole then Call Forward 2 From the Call Forward Voice Mail dialog box click an X into the desired Call Forwarding box 3 Choose Destination and enter a number or select a number from the Fixed Destination drop down box Optional Select No Answer Time in Seconds and enter the seconds the call rings before forwarding 4 Select OK ...

Страница 36: ...odes can be set simultaneously while Call Forward External is ON 1 From the Menu Bar select Console then Call Forward 2 From the Call Forward Voice Mail box enter the destination telephone number outside the system into the External Call Forwarding box 3 Click an X into the External Set box 4 If the Call Forward destination is over a tie or CO line place the CO line access code in front of the ext...

Страница 37: ...tion in Call Forward mode to a fixed station For example the station may be programmed to forward to the attendant station or a voice mail system Note If this item cannot be selected a Fixed Destination was not entered From the Menu Bar select Console then Call Forward Fixed To change the Call Forward destination follow the Internal Call Forward steps on Page 20 and record a telephone number in th...

Страница 38: ...y hours Once a line group is restricted station users cannot access the group on an outgoing basis except through LCR and or an Attendant Access an Outside Line for a Station Three Way Calling Four Party Conference Executive Override Hold Pickup etc This restriction affects all stations equally 1 From the Menu Bar choose Console then Line Group Restriction 2 From the Restricted row in the Line Gro...

Страница 39: ...3 1 From the Menu Bar select Console then Timed Reminders 2 From the Timed Reminders dialog box enter the time Use the 24 hour format e g 2 p m is 14 00 Leaving the Time box blank deactivates the feature 3 Select a message from the drop down list 4 If you want to send the message daily click an X in the Daily box 5 Repeat Steps 2 4 for any additional reminders you wish to set 6 Select the OK butto...

Страница 40: ...n in the dialog box so that you can make sure that they are set for the same time Also if there is more than one console you can set the time from one PC Attendant Console then send the time to the DK and then send the DK time to the second PC Attendant Console 1 From the menu bar select Console then Date and Time 2 Update the PC date time or the DK date time Select the OK button to update either ...

Страница 41: ...ger Volume To adjust Handset Volume While the console is idle click the up down icons or press the Vol Up Vol Dn keys Each click increments the volume Holding down the Vol Up Vol Dn keys to make precise volume settings may be difficult if they are programmed to fast repeat See Windows Controls on Page 123 While on a call click the up down icons or press the Vol Up Vol Dn keys See above comments on...

Страница 42: ...Console Controls Volume Control 28 Strata DK PC Attendant Console 5 00 ...

Страница 43: ...ls Voluntary Account Codes Calling Options Dialing for Others Conference Calls Call Splitting Split Switch Trunk to trunk Connections Call Supervision Many of the calling features in this chapter take advantage of the hot keyboard As soon as you begin typing the name or extension number of an individual the PC Attendant Console searches for a match and highlights that person in the directory ...

Страница 44: ...set in system programming To answer Calls by Priority To select which Incoming Call to answer Select the Answer button See Answered Call Options on Page 32 for more call handling options Calls coming into the console are prioritized in the queue according to their answer priority Emergency calls are always highest priority 1 Highlight the call type to answer from the incoming call display such as ...

Страница 45: ...LL ORBIT 900 Park Recalls alert the console after the Park Recall timer expires Transfer Recall LINE 1 RECALL FROM 206 206 RECALL Transferred calls not answered at the destination station before the ring transfer timer expires Hold Recall LINE 1 RECALL 206 RECALL Hold recalls that alert the console after the Hold Recall timer expires Transfer LINE 1 TRANSFERRED FROM 206 Incoming line calls transfe...

Страница 46: ...all on Hold Option Page Option Page To place a call on Hold 32 Dialing a Number for a Caller 48 To use Automatic Hold 33 Performing Through Dialing for a User 49 To transfer a call to an individual 34 Trunk to trunk Connections 54 Taking Notes About a Call 38 To make a trunk to trunk connection 54 To transfer to a PBX or Centrex system 36 Call Park and Page 66 Using Department Search with Call Tra...

Страница 47: ...lighted always selects the call at the top of the list While on a call select the Answer Incoming button to hold the existing call and make a new call The call is put on hold and answers the next call 1 When two calls are on hold highlight the held call in the Loop box or select the held call The Held Call moves to the Active Call Area and the active call moves into the Hold List If Automatic Hold...

Страница 48: ...u can better respond to callers In addition to the basic conference transfer features the PC Attendant provides you with a variety of transfer options To transfer a call to an individual 1 While connected to the current call type a name first or last or an extension number When you begin typing the Conference Transfer dialog box opens If the dialed party is busy an X appears in the Busy box 2 If A...

Страница 49: ...ansfer The call immediately rings the called party If they do not answer within a certain time set in system programming the call will ring back to your console click on the name or number in the directory If the console is set for Default Transfer the call will transfer immediately If it is not set you can announce the call see the following procedure For more information see Default Transfer on ...

Страница 50: ...ransfer dialog box by selecting Cancel or press the Esc key The operator maintains a path with the original party until a selection button is chosen 1 While connected to the current call select the Conf Trn button or enter the name first or last of the desired party When you begin typing the Conference Transfer dialog box opens for name or number entry 2 Select the Flash button 3 Wait for an answe...

Страница 51: ...ry BLF field but displays in the drop down list 2 If no directory entry exists enter the outside number in the Number field 3 Select the line line group or LCR after closing the drop down Number field by clicking on the arrow to the right of the field 4 Click on Conference Current call holds on a loop 5 Click on the soft key Join The operator and two lines are joined 6 Click Exit to leave the two ...

Страница 52: ...have the Take Note button it has not been assigned to your console 2 In the Line Note dialog box enter a short Note 16 charactersmaximum to attach to the call You can use the note to record information about the call The note shows in the Hold window or in the Notes window when a call is recalled to the console 3 Select Save or press Enter to save the note The note displays with the line number in...

Страница 53: ...button is not displayed and available it has not been assigned to your console 2 From the Department Transfer dialog box select the desired name or enter the department name You have the following options To transfer select the Transfer button To announce the call select the Conference button announce the call then select the Transfer button To supervise the call select the Supervised button ...

Страница 54: ...tion or to answer your calls when you are busy or not available To call or transfer a call to a voice mailbox 1 When you are on a call select the Voice Mail button or press the Transfer VM button in the Conference Transfer dialog box or Dialing dialo 2 From the Voice Mail Number dialog box select a name from the directory or type a name or number Go to the directory to select the person whose mail...

Страница 55: ...r and prefix digits programmed in the Trans VM Settings section 4 When the voice mail answers and you can hear the opening greeting click on the Transfer button The PC Attendant Console uses the mail box for the extension found in the directory 1 Dial the Voice Mail code 2 From the Main Screen press the Tone button from the keyboard and dial to the voice mail 3 To close the out Dialing Dialog box ...

Страница 56: ...display on the bottom of the screen The BLF display may show station number or names plus station numbers Selecting any name or number causes that station to be called 1 Type the name or number of the party to call or select the on screen Dial button then select a name from the directory The Dialing dialog box appears when you begin typing When the program finds a match in the directory that name ...

Страница 57: ...lling tracking and line restriction Account Codes are entered before Dialing or Forced or during Manual a call The Station Message Detail Report SMDR contains account code call information which can be printed Optional If you are dialing an outside number enter or select a Line Line Group or LCR X is selected PDN is the default selection Optional Enter a toll restriction override code select the T...

Страница 58: ...ng a call which you originated or received Your conversation is not interrupted when you enter an Account Code 1 After accessing a CO line or during a call select the Account Code button 2 Enter the Account Code and select the OK button You hear a half second tone for a valid code or three short tones for an invalid code The last code entered is recorded To re enter a code repeat Steps 1 2 ...

Страница 59: ...er To change from Voice First to Ring First select the Voice soft key This changes the default setting so that the called party s telephone rings To Hang Up select the Release button Select the Exec Override button This enables you to barge in to an existing call Select the DND Override button This overrides the Do Not Disturb DND by sending a tone to the called telephone to alert them that a call...

Страница 60: ... you back when a line becomes available To set or cancel Automatic Callback To set Automatic Busy Redial ABR To cancel a callback or ABR Select the Callback user button then select Release This procedure toggles the feature on off If the Callback button is not visible after reaching a busy or DND station the console has not been assigned this button Select the ABR button or select Conf Trns enter ...

Страница 61: ...that there is another call waiting Off hook Call Announce lets you call and speak through the speaker of an off hook busy digital or electronic telephone The called telephone must be equipped for OCA Release 3 systems also allow Call Announce through the handset Select the Busy Override button If the phone is configured for Off Hook Call Announce announce the call ...

Страница 62: ...umber to be dialed while talking to the caller To dial a number for an internal caller To connect parties if originating call is on a CO Line When connected to the calling party Enter the number to be dialed including the trunk access code if needed The call dials out with the call transferring and the console releases or 1 select Transfer 2 Enter the number to be dialed 3 Select or enter any requ...

Страница 63: ...ct the parties together then release the console from the call 1 When connected to a station select the Conf Trns button Some callers may be restricted from calling certain numbers and may need you to select a line for them so that they can make their call 2 Select the Line or Line Group entry Choose a line for the call to be placed 3 Select Transfer Dial tone is transferred to the caller ...

Страница 64: ...an connect any call in the Loop box with another call using the Join feature Rather than transferring the call Join temporarily creates a three way conference from which you can drop out Example When a caller asks you to have a party paged you put the first caller on hold then page the other party When the paged party calls you you can use Join to connect the held and paged parties 1 While on a ca...

Страница 65: ...and destination party s station numbers 4 Select the Exit button The console exits the conference The source and destination parties remain joined 1 Select the Conf Trns button The current call is placed on hold You hear internal dial tone If connected to two CO Lines both will display in the Loop box 2 Enter the number to dial or dial by name using the directory The Conference Transfer dialog box...

Страница 66: ...r to dial Select the line or group to use for the call if an access code was not entered as part of the number The Conference Transfer dialog box provides an entry for dialing choosing a line entering account codes or toll restriction override codes if needed 3 Select the Dial button If you do not receive an answer select the Return button Listen for a busy or no answer so that you can return to t...

Страница 67: ...ty 2 To alternate between the parties select Switch The source party is placed on hold and the connection is made with the destination party Each time the key is pressed the call alternates between the source and the destination parties 3 Options you can disconnect the party that you are connected to by selecting the Release button or After you press Release the current party is dropped and you ar...

Страница 68: ...line call select the Conf Trns button The CO line call is placed in the Loop box You hear internal dial tone The Conference Transfer dialog box displays 2 Select the line or line group or enter an access code and enter the number to dial Select Conference or Supervise Choose the line to place the call and enter the telephone number to dial You must supervise monitor the call for lines without CO p...

Страница 69: ...CO lines 2 Select the Exit button if they are still talking or You exit the conversation but the two outside parties remain connected 3 select the Release button if the parties have hung up CAUTION When you press Release the call is dropped and all parties are disconnected Listen to the connection and determine if the call is or is not in progress before deciding to release or keep the call ...

Страница 70: ...l select the Conf Trns button The Conference Transfer dialog box displays 2 Enter the number to dial or dial by name using the directory The Conference Transfer dialog box provides an entry for dialing 3 Select Supervise 4 After the destination party answers select the Transfer soft key 1 Highlight the supervised call in the Loop box You are connected to both parties in a three way conference Syst...

Страница 71: ...Strata DK PC Attendant Console 5 00 57 Advanced Calling 4 This chapter explains how to use advanced features which are accessed from the Features menu shown below located on the Menu Bar ...

Страница 72: ...ed Dial numbers 1 From the Menu Bar select Features Then select Speed Dial 2 From the Speed Dialing dialog box choose the entry to add or change Select the Modify button The Attendant Console personal speed dial numbers are 10 49 system speed dial numbers are 600 699 or 200 999 depending on your processor Dial codes shaded in grey are not available for entry from this console 3 Enter a name the te...

Страница 73: ...09 or system Speed Dial numbers 600 699 to system Speed Dial codes 690 699 or 990 999 4 Select the Save button Saving system speed dial numbers changes the number for all users in the Strata DK system 5 Select the Close button when you are done Press To Store F Hook Flash P Pause 1 5 or 3 second pause depending on system programming L Long Pause 10 second pause I PDN Pressing DN button H Hold C Co...

Страница 74: ...a Line Line Group or LCR if required You can also enter a trunk access code before Step 1 to select an outside line or line group 4 Select the on screen Dial button The system dials the telephone number selected If outside line or line group is busy set Auto Callback by pressing the Callback soft key or set Auto Busy Redial by pressing the ABR user button If this key is not visible then it has not...

Страница 75: ...5 00 61 Paging 1 From the Menu Bar select Features Then select Paging 2 From the Paging dialog box select the button representing the page group zone needed Note The labels on these buttons can be changed in Setup 3 Select the Close button when you are done ...

Страница 76: ...y Page 1 Select the Emergency Page button 2 Make your announcement select the Release button Opening Door Locks A signal can be sent to a control device which can operate the latch for a door or gate 1 From the Menu Bar select Features Then select a Door button 2 From the Door Lock dialog box click the button for the door control to be operated The control for the door selected operates for three ...

Страница 77: ...ed for listening or as an intercom to talk with someone at the Door 1 From the Menu Bar select Features Then select Door Phones 2 From the Door Phones dialog box click the button for the door phone to be called The connection is made without a warning tone to allow quiet monitoring of activity in the door phone area Note The labels on these buttons can be changed in Setup ...

Страница 78: ...ttendant Console automatically stores the last complete number dialed by the console The number remains stored until a new number is dialed 1 From the Menu Bar select Features Then select Number Redial 2 From the Redial dialog box select the Redial Last button The console dials the last number dialed ...

Страница 79: ... that number with the touch of a button To save a Number To redial the Saved Number Select the Save Last user button After dialing a number and before hanging up on a call the number can be saved for redialing at a later time 1 From the Menu Bar select Features Then select Number Redial 2 From the Redial dialog box select the Dial Saved button The console dials the saved number ...

Страница 80: ...ct Call Pickup 2 From the Call Pick Up dialog box select the type of pickup to perform using the mouse or these keys Alt R for Ringing CO Alt P for Telephone Page Alt W for own group Alt 1 4 for Tenant Select an entry box using the mouse or these keys Alt S for Station DN Alt G for Group number Alt C for Held CO Line 3 Enter the number of the station group no or CO line press Enter ...

Страница 81: ... any station 1 Select the Park user button 999 is the AutoPark orbit number 2 From the Call Park dialog box enter the orbit number or 999 to have the system assign an orbit Calls can be parked on any PDN number programmed in the Strata DK system or 20 general Park Orbits numbers 900 919 3 Select the Park button The call is parked in an orbit and the display shows which orbit is used 4 Select the R...

Страница 82: ...N number programmed in the Strata DK system or 20 general Park Orbit numbers 900 919 3 Select the button for type of page and enter the zone if necessary Select a paging option to announce the call Page options are Alt A All phones Alt G Groups of phones Alt E External Page Zones Alt C All phones and Ext Page 4 Select the Park and Page button and announce the call including the orbit number The ca...

Страница 83: ...retrieve a parked call 1 Select the Park Retrieve soft key 2 From the Recall Park dialog box highlight the parked call in the List box or enter the orbit number or select an orbit number from the drop down box 3 Select the Recall button The parked call is connected to the console ...

Страница 84: ...unce the orbit number where the call is parked The paged party can then pick up the call from any station If a parked call remains in orbit long enough for the timer to expire the parked call automatically recalls your console To use Auto Park and Page 1 Select the Park Page soft key The Strata DK system automatically assigns the call to one of the general park orbits 2 Announce the call including...

Страница 85: ...________ 12 Group B ___________________________ 13 Group C ___________________________ 14 Group D ___________________________ 15 Group E ___________________________ 16 Group F ___________________________ 17 Group G ___________________________ 18 Group H ___________________________ 5 or 51Zone A ___________________________ 6 or 52Zone B ___________________________ 7 or 53Zone C ____________________...

Страница 86: ...ed call 1 From the Menu Bar select Features Then select Abandoned Calls 2 In the Abandoned Calls dialog box highlight the desired call 3 Select the Dial button The console dials the abandoned call 1 From the Menu Bar select Features Then select Abandoned Calls The Abandoned Calls dialog box shows a list of the calls 2 Select the desired call 3 Select the Delete button The abandoned call is deleted...

Страница 87: ...s produce a startling tone when this alarm is activated Stations or consoles with an Alarm Reset button can reset the alarm by pressing the button The console does not receive the alarm tone but the console can turn OFF alarm tone if heard on other phones From the Menu Bar select Features Then select Alarm Reset The alarm given throughout the system turns OFF ...

Страница 88: ...Advanced Calling Alarm Reset 74 Strata DK PC Attendant Console 5 00 ...

Страница 89: ...tory how to change the order of display and how to use the Find function The Directory Display lists employees and their assigned internal Directory Numbers DN as well as ACD group numbers The directory includes Primary and Phantom Directory Numbers PDNs and PhDNs It serves three purposes a directory listing a Busy Lamp Field BLF and it provides Direct Station Selection ...

Страница 90: ...e It can contain people on Centrex or another PBX system while automating call redirection using Flash and their extension number You can search through the directory for First Names Last Names DNs Directory Extension Numbers Departments Adding Deleting Entries into the Directory Use Directory Entries to input information about each assigned internal DN distributed hunt group pilot and ACD group n...

Страница 91: ... a blank Directory entry or a selected entry to modify or delete appears An alternative would be to use Directory Find to go to an existing entry to modify or delete 3 Type the entry information in each field To enter an ACD Group enter AXX xx 01 16 Note Up to eight digits are allowed for the Phone entry 4 Select the Save button when all entries or modifications are made 5 Select the OK button ...

Страница 92: ...how the names and numbers appear in each column For example last name first followed by the first name and PDN To change the directory display columns 1 From the Menu Bar select Directory Then select Settings 2 For each column open the drop down box and choose one First First Last Last Last First PDN Columns 2 and 3 can be left blank 3 Enter a column width ...

Страница 93: ...ange the Directory Display font select the Font button Then choose a font style and size 5 When you are done with the Font dialog box select the OK button 6 To exit the Directory Settings dialog box and activate your changes select the OK button The Sample box shows the selected font style and size 1 From the Menu Bar select Directory Then select Find 2 In the Find dialog box enter the name of the...

Страница 94: ...Directory Directory Settings 80 Strata DK PC Attendant Console 5 00 ...

Страница 95: ...thin the Strata DK System from the Message Center Message Waiting lights turn on automatically but you can also set them manually when only a call back is needed You can send Silent Messages to LCD telephones Silent messages turn ON the Message Waiting light but they do not recall the console You can also post an Advisory Message on each telephone both LCD and non LCD phones This feature lets you ...

Страница 96: ...ough the Message Dialing dialog box later to finish writing it 1 From the Menu Bar select Messages Then select Message Center The entire directory can be viewed by scrolling It may include people who do not have a phone on the system 2 Select a name from the directory for the message 3 Select the New Msg button 4 From the Message Dialog box tab from box to box and type entries where you wish ...

Страница 97: ...Strata DK PC Attendant Console 5 00 83 5 Select the Save Send button or Select Save Only if you need to return and complete the message later The console automatically sets a message light at the station that the message was taken for ...

Страница 98: ...ay shows that you Attendant called You can access and read the messages when the station user is connected to you To reconnect to the holding party 1 Select the Return soft button to take the call back 2 Select the Message Center button 3 From the Find dialog box select the name and press OK A recalling station will automatically be selected Press OK and continue 4 In the Message Dialog box enter ...

Страница 99: ...individual From the Message Center you can display print and delete messages 1 Select the Message Center 2 Enter the items into the pad as needed The date time is already entered 3 Select the Save button 1 From the Menu Bar select Messages Then select Message Center or select Edit Msg User Key 2 Select a name from the Incomplete Messages list 3 Select Edit Msg The date time is already entered 4 Co...

Страница 100: ...ld be highlighted 4 Select the View Msg button The message note pad shows the message taken earlier 5 From the Messaging Dialog box you have the following options Delete the message by selecting the Delete button Individual messages may be deleted after being read back to the person To save the message select the Cancel button or go to the next message By not deleting the message it will remain in...

Страница 101: ...ants and station users can leave Message Waiting signals Up to four Message Waiting indications can be left at a station at one time One of the indications is reserved for the designated Message Center set in system programming To turn ON Message Waiting lights at a station 1 From the Menu Bar select Messages Then select Set View MW A waiting indication is given as the system polls the DK System f...

Страница 102: ... is given as the system polls the DK System for MW Sent signals 2 From the Set or View Sent Messages dialog box select the station number from the list to turn OFF A list of stations including the directory names is shown for all MW signals sent by the console 3 Select the Cancel Msg button The selected item is deleted from the list and the MW Off signal is sent to that station From the Menu Bar s...

Страница 103: ...messages are automatically stored in memory when the Alphanumeric Messaging with LCD feature is initialized You can input additional information up to a total of 32 characters for each message Some system messages expect you to add more information For example 3 Select the Dial button The screen returns to the Main screen and the Active Call Window displays DN MESSAGE WAITING CANCEL 4 Select the R...

Страница 104: ...essage list Personal 10 19 or system messages 60 99 The current message if any displays 3 Select the Modify Message button The console goes into the edit mode 4 Wait for the console to retrieve the current message from the DK System 5 Edit an existing message or enter a new message 6 Select the Save Message button The message is stored in system memory 7 Wait for the updated new message to be stor...

Страница 105: ...to be viewed Personal 10 19 or system messages 60 99 3 Select the Retrieve Msg button The console gets the current LCD message from the DK System 1 From the Menu Bar select Messages Then select LCD Messages The Messages dialog box displays 2 Enter or use the Drop Box to select from the Directory a location to send the message Enter the station or console number if it is to be sent to a single loca...

Страница 106: ...1 Select the Message button The LCD Message dialog box opens showing a list of messages 2 From the LCD Message dialog box select the message to be sent Select the message to be sent and choose the type of message for the situation 3 Select Alert Station or Station There are two types of LCD messages one sends the message directly to the busy phone alerting the user of a message The second sends a ...

Страница 107: ...r console To set an Advisory Message for another station 1 From the Menu Bar select Messages Then select LCD Messages The Messages dialog box displays 2 Select the message to be displayed Personal 10 19 or system messages 60 99 This step can be skipped if clearing your advisory message 3 Select the Set or Clear button LCD stations calling your console will display the set advisory message 1 From t...

Страница 108: ...Message Center Creating LCD Messages 94 Strata DK PC Attendant Console 5 00 ...

Страница 109: ...Strata DK PC Attendant Console 5 00 95 View Menu 7 This chapter provides instructions on using the features available from the View Menu as displayed here ...

Страница 110: ...mum number of calls in queue each 15 minute interval printing call statistics for a specific day displaying today s call statistics for a specific hour The top of the display report indicates the time frame used to compile the information From the Menu Bar select View Toolbar The toolbar toggles ON OFF from a visible to a non visible status A check next to the menu item indicates it is activated F...

Страница 111: ...r a specific hour 1 Click View Call Statistics from the Menu Bar 2 From the Call Statistics dialog box select the box for entering the Hour The cursor appears in the Hour window 3 Enter the hour number for which you want statistics Valid entries are 00 23 The statistics for that hour display in the window ...

Страница 112: ...tatistics for a Specific Day 1 From the Menu Bar select View Then select Call Statistics 2 From the Call Statistics dialog box enter the month two digits to be printed 3 Select Day and enter the day two digits to be printed 4 Select Print The selected day s statistics are sent to the printer ...

Страница 113: ... This chapter discusses the features of the PC Attendant console that apply to the Administrator The Administrator can add and delete user buttons and set certain codes Most of the settings should not be changed so a password may be required to access them ...

Страница 114: ... required If not required the OK button is highlighted 3 Select the OK button after entering your password The Setup Parameters menu appears 1 From the Menu Bar select Setup then select Settings The password can be changed from the Password dialog box If there is an existing password you must enter that then select OK 2 Select the Change button and enter your new password A new dialog box appears ...

Страница 115: ...ttendant Console automatically switches back to Attendant Console mode to handle a ringing call If inactive you can switch back using Windows PC operation i e Alt Tab to switch between applications Multiple Attendants When set this allows multiple attendant operation by activating the Position Busy function This should be OFF for single attendant operation to avoid the chance of putting the consol...

Страница 116: ...er and release when you press Enter When OFF on conference calls you must wait for a station response then the operator must press Release Changing Console Settings The name you enter maximum of 16 characters uploads into the Strata DK System and displays on all display phones when they call your position 1 From the Menu Bar select Setup and then Settings 2 Enter a password if needed 3 From the Co...

Страница 117: ...on Toggle settings ON with an X or OFF blank Turn Default Transfer ON if you want all transfers to go to their destination without a voice announcement Set the Busy Lamp Field BLF refresh rate in seconds for each hundreds group This setting affects how often the hundreds group display is updated to show the status busy idle of Directory Numbers in the Strata DK System The possible settings are 2 9...

Страница 118: ...gs dialog box select the Call Fwd Code box and enter the Voice Mail ID code for forwarding unanswered calls to your mailbox 2 Select the MW Code box and enter the code for retrieving your messages CO Line Names You can customize the names of lines and line groups as described below Line Group Names are displayed on the Lines dialog as the Incoming Call type Changing CO Line and Line Group Names Yo...

Страница 119: ... From the menu bar select Setup Settings and OK to access the System Settings dialog box Then select Default Line Settings 2 From the Lines dialog box highlight the Line or Line Group to be changed 3 Select the corresponding edit box and enter a new name 4 Repeat for all lines or line groups that change names ...

Страница 120: ...ic line To Set a Default Line or Line Group 1 From the System Settings dialog box select Default Line Settings 2 From the Lines dialog box highlight the Line or Line Group to be changed 3 Select the corresponding Use by Default to mark the setting User Buttons This section discusses the procedures to name and assign user buttons You can program the 16 user buttons that display on the Main Screen w...

Страница 121: ...ed to a preset standard 3 Select either Autodial or Feature to change the button 4 Enter a feature code for the list by selecting from the pull down list or selecting the Digits box and entering a number 5 Select Label to change if necessary 6 Select the next button to change and repeat the process 7 Select the OK button when all changes have been made 1 From the System Settings dialog box select ...

Страница 122: ...llow them to be displayed for protection CAUTION All changes to system codes download to the Strata DK DISA Security Code CAUTION If the DISA Security Code is canceled outgoing access of CO lines on DISA calls are allowed without the security code 2 From the User Buttons dialog box select the button to be changed A default button exists to allow all buttons to be assigned to a preset standard 3 Se...

Страница 123: ...om the Menu Bar select Setup Settings Console Settings and enter password optional 2 From the System Settings dialog box select System Code Settings 3 From the System Codes dialog box select the DISA Code box 4 Enter the new DK System code and select the OK button The DISA security code can be 1 15 digits ...

Страница 124: ...ss Codes that can be changed by the System Administrator 1 Select Setup Settings and OK in the Console Settings Password dialog box 2 From the System Settings dialog box select System Code Settings 3 Select the Traveling Class Code to be changed 4 Enter the new code and select the OK button to change the code in the DK System ...

Страница 125: ...s except the RCTUE F processor which allows up to 500 however only the first 300 codes can be changed by the System Administrator Each code numbered 000 299 is set in System Programming and can be from 4 to 15 digits in length The number of verified digits can be less than the number of digits required to be entered by the system For example the system can be set for six digit account codes with o...

Страница 126: ... for another Verified Account Code Answer Prompts Answer Prompts help you identify outside calls You can write your own answer prompts for CO lines or Dialed Number Identification Service DNIS numbers When a call comes in on one of those lines the Answer Prompt appears in the Notes Field in the center of the main screen To create an Answer Prompt 1 Write the prompt 2 Link the prompt to the CO line...

Страница 127: ...ch those entered into the Strata DK System by your service representative in Program 71 5 so that the answering prompt is correctly displayed for each type of call 2 From the Answer Prompt dialog select the Prompts button 3 Select the New button 4 Type in a new prompt message in the Prompt box Answer prompts can be up to 110 characters The number of characters that display depends upon where lines...

Страница 128: ...t the DNIS Text button 3 From the DNIS Text dialog box select the Add button 4 Type in the Name Tag as entered in Strata DK System system programming 5 Select the Add button to enter another prompt or the OK button to save those entered 1 From the System Settings dialog box select Answer Prompt Any prompt can be deleted from the list by selecting it first and then pressing the delete button ...

Страница 129: ...ng answer prompts 2 Select either the Prompts or DNIS Text button 3 Highlight the prompt to remove from a List of Prompts 4 Select the Delete button 5 Repeat as necessary or select the OK button to return to Answer Prompts dialog box 1 From the Menu Bar select Setup Settings 2 From the System Settings dialog box select Answer Prompt 3 From the Answer Prompts dialog box select the Line or DNIS radi...

Страница 130: ...lighted CO Line or DNIS number is linked to the selected prompt 6 Repeat to create as many links as required 7 Select the OK button when done Whenever that line or DNIS number receives a new incoming call the appropriate prompt displays in the center of the console s main screen 1 From the Menu Bar select Setup Settings OK 2 From the System Settings dialog box select Answer Prompt 3 Select the Pro...

Страница 131: ... LCD display phones and the console screen You can edit or add telephone user names from the console 1 From the System Settings dialog box select Change Station User Name 2 Enter station number for name change entry 3 Select the Display button to view the current name in the system 4 Select the Modify button to edit the LCD name 5 Enter the new name or change the existing name 6 Select the Save bu...

Страница 132: ...Warehouse Door Unlock Button Labels All buttons used for Door Unlock can be customized with the desired names as needed To provide an accelerator key for keyboard entry enter a character preceding the character to use as the quick access key Example Change Door 1 can be changed to Front Gate by entering Front Gate 1 Fom the System Settings dialog box select Door Phone Button Labels or select Door ...

Страница 133: ...yboard entry enter a character preceding the character to use as the quick access key Example Change All Groups Zones can be changed to All Page by entering All Page 1 From the System Settings dialog box select Paging Button Labels 2 From the Paging Button Names dialog box select the Paging button to change 3 Enter a new button name 4 Select another new button and repeat or select the OK button to...

Страница 134: ...ese settings apply to all Windows print functions 1 From the System Settings dialog box select Printer Setup 2 From the Print Setup dialog box select either the Windows default printer or a specific printer 3 Select the orientation portrait or landscape 4 Select the paper size from the drop down menu 5 Select paper source from the drop down menu 6 Select paper source from the drop down menu 7 opti...

Страница 135: ... Dialog box Press F1 Fast Switch to displays a list of all open applications Press Alt Tab Size Command displays a four headed arrow so you can size the active window with the arrow keys After the pointer changes to the four headed arrow This command is unavailable if you maximize the window Drag the size bars at the corners or edges of the window Press an Arrow key to move the pointer to the bord...

Страница 136: ...e PC Attendant window to an icon Click the minimize icon on the title bar Press Alt F9 Maximize enlarges the active window to fill the available space Click the maximize icon on the title bar or double click the title bar Press Ctrl F10 to enlarge a document window Close the active window or dialog box Double click on this icon or choose the Close button Press Ctrl F4 to close a document window or...

Страница 137: ...voke the screen saver Toshiba recommends using a screen saver to protect the video monitor When calls come into the PC Attendant when the screen saver remains ON a ringing indication will be heard but the screen saver is not removed until you press a key or click the mouse Activate on Incoming does not affect the screen saver Change the Keyboard Repeat Speed Two controls can be used on the keyboar...

Страница 138: ...ou can select the following To change screen colors choose the colors icon Then select a color setting from the list A dialog box showing the current color settings and samples of other colors To set Alt Tab so that you can use it to switch between applications from Applications select enable Fast Alt Tab with an X Then choose a screen saver pattern and delay time Cntrl Esc in Windows 95 A number ...

Страница 139: ...he Keyboard Choose the Delay before Repeat and Repeat Rate speed desired Two speed settings are possible using slide controls This controls the rate of change for the Vol Up Dn keys The slower the repetition the easier it is to distinguish the level change This rate also affects how fast you scroll through lists such as the directory when using the Arrow keys Toshiba recommends starting at mid poi...

Страница 140: ...Appendix Windows Controls 126 Strata DK PC Attendant Console 5 00 ...

Страница 141: ... area 4 console overflow 18 console screen active call area 9 console ID area 3 console settings 101 D date and time 26 dial button 43 directory change settings 78 entries 76 icons 3 settings 78 directory icons 3 DISA Security Code 108 settings voice mail 103 DNIS prompts 113 door phone button labels 118 door unlock button labels 118 DSS BLF station directory 3 E external call forward 22 F feature...

Страница 142: ...y 3 10 M menu bar 3 4 messaging icons 3 mouse navigation 12 mouse speed 123 N navigation keyboard 11 mouse 12 night transfer 14 P paging button labels 119 password 100 position busy 17 print call statistics 98 printer setup 120 privacy feature 19 privacy release 20 R ringer volume 27 S select 35 settings account code 103 answer prompts 112 console 101 default line names 104 directory settings 78 D...

Страница 143: ... 56 T timed reminders 25 toll restriction override code 111 toolbar 96 traveling class code 110 U user buttons 3 106 V verified account codes 111 view menu 95 call statistics 96 voice mail 103 104 voice mail ID codes 104 volume control 27 W windows 121 application switching 123 change colors 123 keyboard repeat speed 123 mouse speed 123 Windows 95 125 ...

Страница 144: ...Index W W 130 Strata DK PC Attendant Console 5 00 ...

Отзывы: