background image

1.

Go to 

 (Settings)

 and click 

Devices -> Bluetooth & other devices

-> Add Bluetooth or other device

.

2.

Click 

Wireless display or dock

. Your computer starts searching for

the wireless display device.

3.

After the wireless display device is searched, follow the on-screen
instructions to finish connection.

After the connection is established, the name of the wireless display device
appears under 

Projectors

.

To disconnect the Wireless display device, click the wireless display device
name and then click 

Remove device

.

Security lock

A security lock enables you to anchor your computer to a desk or other
heavy object in order to help prevent unauthorized removal or theft. The
computer has a security lock slot into which you can attach one end of the
security cable, while the other end attaches to a desk or similar object. The
methods used for attaching security cables differ from product to product.
Refer to the instructions for the product you are using for more information.

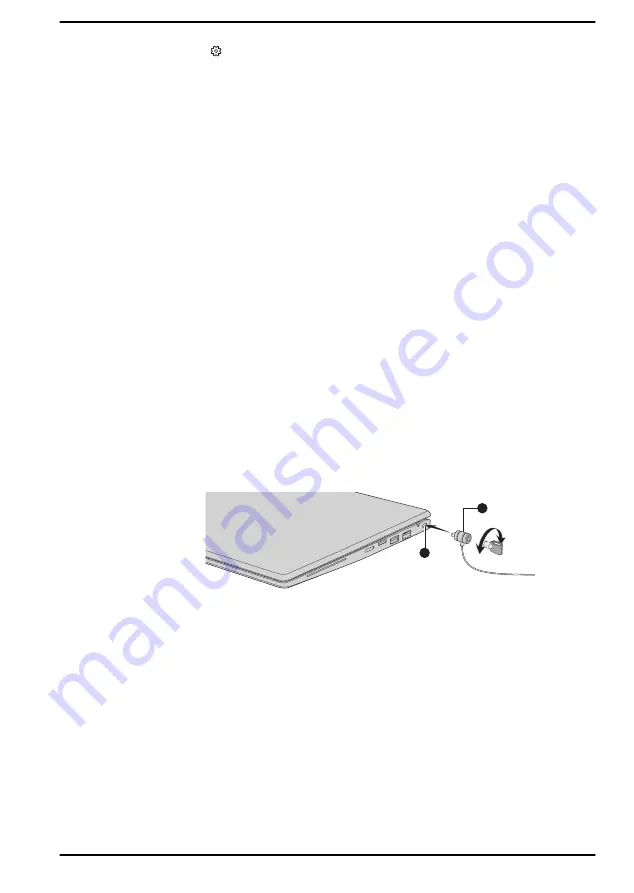
Connecting the security lock

To connect a security cable to the computer, do the following:
1.

Turn the computer so the security lock slot faces you.

2.

Align the security cable with the lock slot and secure it in place.

Figure 4-15 Security lock

2

1

1. Security lock slot

2. Security lock

Product appearance depends on the model you purchased.

Optional Accessories

To make your computer even more powerful and convenient to use, you
can add a number of options and accessories. For reference, the following
list details some of the items that are available from your reseller or
Dynabook dealer:

User's Manual

4-27

Содержание Satellite Pro A40-J

Страница 1: ...User s Manual TECRA A40 J A50 J SATELLITE PRO A40 J A50 J ...

Страница 2: ...checklist 2 1 Conventions 2 1 Using your computer for the first time 2 2 Getting to know Windows 2 6 Turning off the power 2 8 System Recovery 2 12 Chapter 3 The Grand Tour Front with the display closed 3 1 Left side 3 1 Right side 3 3 Back 3 5 Underside 3 5 Front with the display open 3 7 Internal Hardware Components 3 10 Power Condition Descriptions 3 10 Chapter 4 Operating Basics Using the Touc...

Страница 3: ...dvanced Usage Utilities and Applications 5 1 Special features 5 8 Chapter 6 Troubleshooting Problem solving process 6 1 Hardware and system checklist 6 4 Technical support 6 16 Chapter 7 Appendix Specifications 7 1 AC Power Cord and Connectors 7 2 Information for Wireless Devices 7 3 Information about Intel AMT 7 17 Accessibility 7 20 Ease of Access for Dynabook notebook 7 20 Legal Footnotes 7 23 ...

Страница 4: ...on on a network without the permission of the copyright owner is a violation of copyright or author s rights and is subject to civil damages or criminal action Comply with copyright laws in making any reproduction from this manual Disclaimer This manual has been validated and reviewed for accuracy The instructions and descriptions it contains are accurate for your computer at the time of this manu...

Страница 5: ...rovide reasonable protection against harmful interference in a residential installation This equipment generates uses and can radiate radio frequency energy and if not installed and used in accordance with the instructions may cause harmful interference to radio communications However there is no guarantee that interference will not occur in a particular installation If this equipment does cause h...

Страница 6: ... California Avenue Suite 100 Irvine California USA 92617 Telephone 949 583 3000 This information is only applicable for the countries regions where it is required California Prop 65 Warning This product contains chemicals including lead known to the State of California to cause cancer and birth defects or other reproductive harm Wash hands after handling For the state of California only Export Adm...

Страница 7: ...bserve the applicable EMC Electromagnetic Compatibility standards However Dynabook cannot guarantee that this product still observes these EMC standards if accessories or cables not produced by Dynabook are connected or implemented In this case the persons who have connected implemented those accessories cables have to provide assurance that the system PC plus options cables still fulfils the requ...

Страница 8: ... この装置は クラスB情報技術装置です この装置は 家庭環境で使 用することを目的としていますが この装置がラジオやテレビジョン 受信機に近接して使用されると 受信障害を引き起こすことがあります 取扱説明書に従って正しい取り扱いをしてください VCCI B Canadian regulatory information Canada only This digital apparatus does not exceed the Class B limits for radio noise emissions from digital apparatus as set out in the Radio Interference Regulation of the Canadian Department of Communications Note that Canadian Departme...

Страница 9: ...range FCC requires this product to be used indoors for frequency range 5 15 GHz to 5 25 GHz to reduce the potential for harmful interference to co channel Mobile Satellite systems High power radars are allocated as primary users of the 5 25 GHz to 5 35 GHz and 5 65 GHz to 5 85 GHz bands These radar stations can cause interference with and or damage this device Les dispositifs fonctionnant dans la ...

Страница 10: ...and disposed of separately from household waste Integrated batteries and accumulators can be disposed of with the product They will be separated at the recycling centres The black bar indicates that the product was placed on the market after August 13 2005 By participating in the separate collection of products and batteries you will help to assure the proper disposal of products and batteries and...

Страница 11: ...disposal ensuring that the terminal contacts are covered by non conductive tape For more detailed information about the collection and recycling programmes available in your country please visit our website http emea dynabook com environment or contact your local council office or the retail outlet where you purchased the product These symbols might not stick depending on the country and region wh...

Страница 12: ...rine getirmektedir The number of possible pixel failures of your display is defined according to ISO 9241 307 standards If the number of pixel failures is less than this standard they will not be counted as defect or failure Battery is a consumption product since the battery time depends on the usage of your computer If the battery can not be charged at all then it is a defect or failure The chang...

Страница 13: ... style Open Source licenses In case of any license issues related to OpenSSL please contact openssl core openssl org OpenSSL License Copyright c 1998 2019 The OpenSSL Project All rights reserved Redistribution and use in source and binary forms with or without modification are permitted provided that the following conditions are met 1 Redistributions of source code must retain the above copyright ...

Страница 14: ...NEGLIGENCE OR OTHERWISE ARISING IN ANY WAY OUT OF THE USE OF THIS SOFTWARE EVEN IF ADVISED OF THE POSSIBILITY OF SUCH DAMAGE This product includes cryptographic software written by Eric Young eay cryptsoft com This product includes software written by Tim Hudson tjh cryptsoft com Original SSLeay License Copyright C 1995 1998 Eric Young eay cryptsoft com All rights reserved This package is an SSL i...

Страница 15: ... thereof from the apps directory application code you must include an acknowledgement This product includes software written by Tim Hudson tjh cryptsoft com THIS SOFTWARE IS PROVIDED BY ERIC YOUNG AS IS AND ANY EXPRESS OR IMPLIED WARRANTIES INCLUDING BUT NOT LIMITED TO THE IMPLIED WARRANTIES OF MERCHANTABILITY AND FITNESS FOR A PARTICULAR PURPOSE ARE DISCLAIMED IN NO EVENT SHALL THE AUTHOR OR CONT...

Страница 16: ... You can use this software for whatever you want in parts or full form without having to pay us royalty free usage You may not pretend that you wrote this software If you use it or only parts of it in a program you must acknowledge somewhere in your documentation that you have used the FreeType code credits We specifically permit and encourage the inclusion of this software with or without modific...

Страница 17: ...HT HOLDERS BE LIABLE FOR ANY DAMAGES CAUSED BY THE USE OR THE INABILITY TO USE OF THE FREETYPE PROJECT 2 Redistribution This license grants a worldwide royalty free perpetual and irrevocable right and license to use execute perform compile display copy create derivative works of distribute and sublicense the FreeType Project in both source and object code forms and derivative works thereof for any...

Страница 18: ...s license or another one contracted with the authors grants you the right to use distribute and modify it Therefore by using distributing or modifying the FreeType Project you indicate that you understand and accept all the terms of this license 4 Contacts There are two mailing lists related to FreeType freetype nongnu org Discusses general use and applications of FreeType as well as future and wa...

Страница 19: ...e computer from Sleep Mode by pressing the power button Your ENERGY STAR certified computer should be set by default to enter a low power sleep mode after a period of inactivity Simply touching the mouse or keyboard wakes the computer in seconds These sleep features can save you up to 23 per year 200 kWh per year in electricity and prevent up to 300 pounds of greenhouse gas emissions annually To l...

Страница 20: ...er or block the air vents including those at the base of the computer Always operate your computer on a hard flat surface Using your computer on a carpet or other soft material can block the vents Always provide sufficient space around the computer Overheating your computer or AC adaptor could cause system failure computer or AC adaptor damage or a fire possibly resulting in serious injury Creatin...

Страница 21: ... the AC adaptor disconnect it and let it cool before moving it Do not lay the AC adaptor on a material that is sensitive to heat as the material could become damaged Pressure or impact damage Do not apply heavy pressure to the computer or subject it to any form of strong impact as this can damage the computer s components or otherwise cause it to malfunction Cleaning the computer To help ensure lo...

Страница 22: ... could result in damage to computer computer failure or loss of data Never transport your computer with any cards inserted This might damage either the computer and or the card resulting in computer failure Always use a suitable carry case when transporting the computer When carrying your computer be sure to hold it securely so that it does not fall or hit anything Do not carry your computer by ho...

Страница 23: ...o not follow instructions A caution informs you that improper use of equipment or failure to follow instructions might cause data loss equipment damage or might result in minor or moderate injury Please read A note is a hint or advice that helps you make best use of your equipment User s Manual 1 20 ...

Страница 24: ...e to save the box and packaging materials for future use Hardware Check to make sure that you have all the following items Portable Personal Computer USB C to HDMI VGA Travel Adapter Type C to RGB Adapter provided with some models and varies depending on the model you purchased AC adaptor and power cord 2 pin plug or 3 pin plug Documentation Quickstart Instruction Manual for Safety and Comfort War...

Страница 25: ...r use of this computer It is intended to help you be more comfortable and productive while using a notebook computer By following the recommendations in it you can reduce your chance of developing a painful or disabling injury to your hand arms shoulders or neck This section provides basic information to start using your computer It covers the following topics Connecting the AC adaptor Opening the...

Страница 26: ... correspond to both the voltage range and the frequency specified on the regulatory label of the unit Failure to do so might result in a fire or electric shock possibly resulting in serious injury Always use or purchase power cables that comply with the legal voltage and frequency specifications and requirements in the country of use Failure to do so might result in a fire or electric shock possib...

Страница 27: ...tor to the DC IN 19V jack on your computer Figure 2 3 Connecting the DC output plug to the computer 2 1 1 DC IN 19V jack 2 DC output plug Product appearance depends on the model you purchased 3 Plug the power cord into a live wall outlet The DC IN Battery indicator glows Opening the display The display panel can be opened to a wide range of angles up to 180 degrees for optimal viewing To open the ...

Страница 28: ...lay panel Do not close the computer with pens or any other objects left in between the display panel and the keyboard When opening or closing the display panel place one hand on the palm rest to hold the computer in place and use the other hand to slowly open or close the display panel Do not use excessive force when opening or closing the display panel Do not press or push with excessive force on...

Страница 29: ...he power To install the operating system properly follow the on screen instructions on each screen When it is displayed be sure to read the license terms and license agreement carefully Getting to know Windows For detailed information on what is new and how to operate Windows refer to Tips in the Start menu Start menu The Start menu is the launching pad for everything you can do in the Windows ope...

Страница 30: ...internet connection is available it also shows you the best search result from the internet The personal assistant called Cortana may be available depending on your country region You can ask questions or talk to Cortana in your natural voice and Cortana answers your questions using information from the internet To talk with Cortana an internal or external microphone is required Action Center You ...

Страница 31: ...fore you can set up Windows Hello Face and Windows Hello Fingerprint Sign in options Windows offers a number of sign in options including Password PIN Fingerprint Face and Picture password authentication to prevent from unauthorized access If you have multiple sign in methods set for a user account you can select an option on the Windows login screen by clicking sign in options It is highly recomm...

Страница 32: ...t Press CTRL ALT and DEL simultaneously once to display the menu window and then select Restart by clicking the power icon in the lower right corner Before restarting the computer be sure to save your data Sleep Mode If you have to interrupt your work you are able to turn off the power without exiting from your software by placing the computer into Sleep Mode In this mode data is maintained in the...

Страница 33: ... disable Sleep Mode within the Power Options Benefits of Sleep Mode The Sleep Mode feature provides the following benefits Restores the previous working environment more rapidly than the Hibernation Mode feature Saves power by shutting down the system when the computer receives no input or hardware access for the time period set by the System Sleep Mode feature Allows the use of the panel power of...

Страница 34: ... media such as USB devices memory media or other external memory devices Benefits of Hibernation Mode The Hibernation Mode feature provides the following benefits Saves data to the internal storage drive when the computer automatically shuts down because of a low battery condition You can return to your previous working environment immediately when you turn on the computer Saves power by shutting ...

Страница 35: ...mmediately Wait a moment to let all capacitors fully discharge System Recovery There is a hidden partition allocated on the internal storage drive for the System Recovery Options in the event of a problem You can also create recovery media and restore the system The following items are described in this section Creating Recovery Media Restoring the pre installed software from your created Recovery...

Страница 36: ... on the internal storage drive and can be copied to either disc media or USB Flash Memory by using the following steps 1 Select either blank disc or USB Flash Memory The application allows you to choose from a variety of different media onto which the recovery image can be copied including disc media and USB Flash Memory Some of the disc media might not be compatible with the optical disc drive co...

Страница 37: ... be registered after the reinstallation 1 Load the Recovery Media into the external optical disc drive or insert the recovery USB Flash Memory into one available USB port 2 Click Start Power and then select Restart 3 Hold down the F12 key and then release this key just after the computer is powered on 4 Use the up and down cursor key to select the appropriate option from the menu according to your...

Страница 38: ...cess Do not close the display panel during the restoring process When you reinstall the Windows operating system the internal storage drive will be reformatted and all data will be lost If your model has fingerprint function before you reinstall the Windows operating system delete the registered fingerprints Otherwise the same fingerprints cannot be registered after the reinstallation 1 Click Star...

Страница 39: ...your computer carefully to avoid scratching or damaging the surface Front with the display closed The following figure shows the front of the computer with the display panel in the closed position Figure 3 1 Front of the computer with display panel closed 1 1 1 Stereo speakers Stereo speakers The speakers emit sound generated by your software as well as audio alarms such as low battery condition g...

Страница 40: ... Thunderbolt 4 and USB4 are provided on the left side of the computer This port supports USB data transmission Video output audio stream can be included and USB Power Delivery Note that it is not possible to confirm the operation of all functions of all Thunderbolt devices USB devices that are available Some functions associated with a specific device might not operate properly Before removing a U...

Страница 41: ...evice that you want to remove Keep foreign metal objects such as screws staples and paper clips out of the USB port Foreign metal objects can create a short circuit which can cause damage and fire possibly resulting in serious injury Headphone Microphone jack A 3 5 mm mini headphone microphone jack enables connection of a monaural microphone stereo headphones or a headset DC IN Battery indicator T...

Страница 42: ...ffice Refer to the Wireless WAN device section for more information Some models are equipped with the SIM card slot Memory media slot This slot lets you insert a micro SD SDHC SDXC memory card Refer to the Memory media section for more information Keep foreign metal objects such as screws staples and paper clips out of the Memory media slot Foreign metal objects can create a short circuit which ca...

Страница 43: ...ther than a LAN cable to the LAN jack It might cause damage or malfunction Security lock slot A security cable can be attached to this slot and then connected to a desk or other large object in order to deter theft of the computer Back The following figure shows the back of the computer Figure 3 4 The back of the computer Underside The following figures show the underside of the computer Ensure th...

Страница 44: ...which can cause damage and fire possibly resulting in serious injury Carefully clean the dust on the surface of the cooling vents using a soft cloth Memory module cover Some models are equipped with the memory module cover The memory module slot under this cover allows for the installation replacement and removal of additional memory module 4 GB 8 GB or 16 GB memory modules can be installed in the...

Страница 45: ...3 11 12 2 3 4 6 8 14 14 1 7 9 10 5 13 12 6 8 14 14 2 3 4 11 1 Infrared LED 8 Display hinge 2 Web Camera 9 Power button 3 Web Camera Shutter 10 Keyboard 4 Web Camera LED 11 Touch Pad 5 Microphones 12 Touch Pad control buttons 6 Wireless communication antennas Wireless LAN not shown 13 Fingerprint Sensor 7 Display screen 14 Wireless communication antennas Wireless WAN not shown Provided with some mo...

Страница 46: ...to use Windows Hello Face indoors Operating outdoors might cause enrollment sign in failure due to the possible sunlight affection When enrolling your face to Windows Hello please make sure that there is no other face in preview of Windows Hello setup dialog While web camera is capturing your face make sure that your face is in front of the web camera and you look directly at it Web Camera Shutter...

Страница 47: ...ws the display panel to be positioned at a variety of easy to view angles Power button Press this button to turn the computer s power on or off Keyboard The keyboard contains character keys control keys function keys and special Windows key providing all the functionality of a full size keyboard Refer to the The Keyboard section for details Touch Pad The Touch Pad located in the palm rest is used ...

Страница 48: ...varies depending on the model Note that part of the internal storage drive overall capacity is reserved as administration space Your computer is equipped with a Solid State Drive SSD In this manual the word internal storage drive refers to SSD unless otherwise stated SSD is a large capacity storage device which uses Solid State Memory in place of a magnetic disk of the hard disk Under certain unus...

Страница 49: ...C adaptor After that press the power button If it still does not operate properly you should contact your reseller or dealer No light Under any other conditions the indicator does not light If the battery pack becomes too hot while it is being charged the charge stops and the DC IN Battery indicator goes out When the temperature of the battery pack falls to a normal range charging will resume This...

Страница 50: ...ss and hold Press your finger down and leave it there for a few seconds This shows information to help you learn more about an item or opens a menu specific to what you are doing Pinch or stretch Touch the screen or an item with two fingers and then move the fingers toward each other pinch or away from each other stretch This shows different levels of information or visually zooms in or out Rotate...

Страница 51: ...ch or damage the surface Do not use a protecting sheet for the touch screen as it might decrease its sensitivity to gestures Do not touch the screen with gloves wet hands or the tip of your fingernails as it might decrease the sensitivity The touch screen might not work correctly if part of the surface is slightly wet or covered with an object Using the Touch Pad The Touch Pad on the palm rest mig...

Страница 52: ...ce on the Touch Pad with four fingers together to open the Action Center Four Finger Scroll Place four fingers down and slide them vertically or horizontally from anywhere on the Touch Pad Slide towards left right switches between virtual desktops Slide up views all your open apps in task view Slide down shows the desktop Do not put items on the Touch Pad surface to prevent abnormal action Some of...

Страница 53: ...d When the NUM LOCK indicator glows the ten key allows you to enter numbers Figure 4 1 Keyboard indicators 1 1 2 1 CAPS LOCK indicator 2 NUM LOCK indicator Product appearance depends on the model you purchased CAPS LOCK This indicator glows green when letter keys are locked into their uppercase format NUM LOCK When the NUM LOCK indicator glows you can use the number keys on the keyboard for number...

Страница 54: ...idual steps FN F7 Increases the brightness of the display panel in individual steps FN F8 Turns the Airplane mode on or off FN F9 Enables or disables the Touch Pad FN F10 Turns on Arrow Mode FN F11 Turns on Numeric Mode FN F12 Locks the cursor on a specific line FN ESC Turns the playback sound on or off FN 1 Reduces the icon size on the desktop or the font sizes within one of the supported applica...

Страница 55: ...ey The keyboard provides the key that has special functions in Windows This Windows logo key activates the Windows Start menu Using the Fingerprint Sensor Some models are equipped with the fingerprint sensor for the purpose of enrolling and recognizing fingerprints Lightly touch and rest your finger on the fingerprint sensor to recognize fingerprints During enrollment you might need to touch and l...

Страница 56: ...sor strongly Do not touch the sensor with a wet finger or any wet objects Keep the sensor surface dry and free from water vapor Do not touch the sensor with a soiled or dirty finger as minute foreign particles of dust and dirt might scratch it Do not paste stickers or write on the sensor Do not touch the sensor with a finger or any other object which might have a build up of static electricity on ...

Страница 57: ...nly the registered or enrolled fingerprint or fingerprints are used for identification The fingerprint sensor compares and analyzes the unique characteristics in a fingerprint However there might be instances where certain users are unable to register their fingerprints due to insufficient unique characteristics in their fingerprints The recognition success rate might differ from user to user Batt...

Страница 58: ...scharged Procedures To recharge a battery pack connect the AC adaptor to the DC IN 19V jack and plug the other end into a working outlet The DC IN Battery indicator glows amber while the battery is being charged Charging Time The following table shows the approximate time required to charge an exhausted battery fully Battery type Power off Power on Battery pack 53 Wh 4 cell about 3 hours about 3 1...

Страница 59: ...scharged and been left in the computer for a long time In such cases do the following 1 Fully discharge the battery by leaving it in the computer with the power on until the system automatically turns itself off 2 Connect the AC adaptor to the DC IN 19V jack on the computer and to a wall outlet that is supplying power 3 Charge the battery until the DC IN Battery indicator glows white Repeat these ...

Страница 60: ...l devices such as a USB device to which the battery supplies power Where you store your programs and data Whether you close the display panel when you are not using the keyboard closing the display saves power The environmental temperature operating time decreases at low temperatures System Sleep Mode System Hibernation Mode Display power off period Whether you enable Sleep Mode which can conserve...

Страница 61: ... and the power cord 5 Charge the battery pack until the DC IN Battery indicator glows white Memory media The computer is equipped with a memory media slot that can accommodate some kinds of memory media with various memory capacities so that you can easily transfer data from devices such as digital cameras and Personal Digital Assistants Keep foreign objects out of the memory media slot Never allo...

Страница 62: ...must obtain an appropriate application that applies the copy protection system Media care Observe the following precautions when handling the card Do not twist or bend cards Do not expose cards to liquids or store in humid areas or lay media close to containers of liquid Do not touch the metal part of a card or expose it to liquids or let it get dirty After using card return it to its case The car...

Страница 63: ...static electricity which can destroy data Do not turn off the computer or switch to Sleep Mode or Hibernation Mode while files are being copied Failure to do so might cause data loss Removing memory media The following instructions apply to all types of supported media devices To remove memory media do the following 1 Click the Safely Remove Hardware and Eject Media icon on the Windows taskbar 2 S...

Страница 64: ...e the computer is turned on To insert a Smart Card do the following 1 Insert the Smart Card into the Smart Card slot with the metal connectors facing up 2 Press the Smart Card gently to ensure a firm connection is made When inserting a Smart Card into the Smart Card slot make sure to confirm that the card is oriented correctly before inserting Insert the Smart Card until it reaches the end of the ...

Страница 65: ...eep or Hibernation Mode c The wireless communication function is on d Power Off and Charge function is enabled Be careful not to let screws or other foreign matter fall into the computer It might cause malfunction or electric shock Additional memory module is a precision electronic component that might be fatally damaged by static electricity Since the human body can carry static electricity it is...

Страница 66: ...ps to enter the computer Foreign metal objects can create a short circuit which can cause computer damage and fire possibly resulting in serious injury Do not touch the connectors on the memory module or on the computer Debris on the connectors might cause memory access problems Align the grooves along the edges of the memory module with the locking tabs on the connector and insert the module into...

Страница 67: ...tor all cables and peripherals connected to the computer 3 Close the display panel and turn the computer upside down 4 Loosen the screw securing the memory module cover in place Note that the screw is attached to the cover in order to prevent it from being lost 5 Slide your fingernail or a thin object under the cover and lift it off 6 Push the latches away from the module in order to release it A ...

Страница 68: ...ce enables a high speed connection to the internet corporate intranet and your email while you are away from the office Installing a SIM card To install a SIM card do the following 1 Click Start Power and then select Shut down and ensure that the Power indicator is off 2 Remove the AC adaptor and all cables and peripherals connected to the computer 3 Locate the SIM card slot 4 To pop the SIM card ...

Страница 69: ...ors might cause access problems If you can see Internet and attach at APN type when creating APN information please make sure to select Internet and attach as the APN type Removing a SIM Card To remove the SIM card do the following 1 Shut down the computer Make sure the Power indicator is off 2 To pop the SIM card tray partially open insert a slender object about 10 mm diameter 0 8 mm such as a st...

Страница 70: ...age cables Bad weather such as heavy rain or snow HDMI out port HDMI High Definition Multimedia Interface out port digitally transfers both video and audio data without reducing the quality HDMI compatible external display devices including televisions can be connected via the HDMI out port As the port operation of all external monitors have not been confirmed some display devices might not functi...

Страница 71: ... displayed Be sure to select the display device or audio device before starting to play video Do not change the display device or audio device while playing video Do not change the display device under the following conditions While data is being read or written While communication is being carried out LAN The computer has built in support for Ethernet LAN 10 megabits per second 10BASE T Fast Ethe...

Страница 72: ...cond 100BASE TX be sure to connect with a CAT5 cable or higher You cannot use a CAT3 cable If you are using Ethernet LAN 10 megabits per second 10BASE T you can connect with a CAT3 or higher cable Connecting the LAN cable To connect the LAN cable do the following Connect the AC adaptor before connecting the LAN cable The AC adaptor must remain connected during LAN use If you disconnect the AC Adap...

Страница 73: ...gently grasp the LAN cable while pressing the latch and then slowly lift it up to remove it USB Type C Adapters Your computer capabilities can be enhanced by connecting external devices such as RGB monitor to the Thunderbolt 4 USB Type C port via USB Type C adapters Depending on the model you purchased one of the following USB Type C adapters might be provided Always use the USB Type C adapter tha...

Страница 74: ...harging 3 HDMI out port The output resolution of HDMI out port on this adapter is up to 3840 x 2160 30Hz and output resolution of RGB monitor port on this adapter is up to 1920 x 1200 60Hz Do not use the HDMI out port and RGB monitor port simultaneously The USB Type C port Power Delivery Charging on this adapter is used for connecting an AC adaptor only USB data transmission is not supported by th...

Страница 75: ...e In this case read the manual of the monitor and set the suitable supporting display mode at the monitor Then it will be displayed in suitable size with correct aspect ratio Wireless display Your computer might support wireless display a wireless technology which utilizes Wi Fi to allow the computer to be wirelessly connected to external displays including TVs as extended screens With wireless di...

Страница 76: ... lock slot into which you can attach one end of the security cable while the other end attaches to a desk or similar object The methods used for attaching security cables differ from product to product Refer to the instructions for the product you are using for more information Connecting the security lock To connect a security cable to the computer do the following 1 Turn the computer so the secu...

Страница 77: ...nables you to connect your computer peripherals through one USB Type C cable to selected Dynabook computers Refer to dynabook USB C Dock s User s Manual for more details Not all the accessories are available in your region Contact your reseller or Dynabook dealer for more information Sound System and Video mode This section describes some of the audio control functions Volume Mixer The Volume Mixe...

Страница 78: ...ng is provided with some models To access the utility click Start DTS Audio Processing When the eco Mode is activated or the CPU is in high usage noise may occur during video or music playback If noise occurs we recommend that you disable the eco Mode or exit applications that affect computer operation Realtek Audio Console You can confirm and change the audio configuration using the Realtek Audio...

Страница 79: ...on off the multi stream function under Playback Device in this tab To use multi stream function do the following 1 Select Make internal and external output devices playback two different audio streams simultaneously 2 Click Start Settings System Sound 3 Click App volume and device preferences under Advanced sound options 4 Choose different devices from the drop down list Information This tab shows...

Страница 80: ...ng system To run dynabook Settings click Start dynabook Settings This utility allows you to configure your computer settings by the following tabs Home Allows you to view the current BIOS EC version or change certain settings back to their default values eco Utility Allows you to manage the power consumption of your computer USB Charge Allows you to manage USB Charge features Keyboard Allows you t...

Страница 81: ... You can use the Power Off and Charge function to charge certain USB compatible external devices such as mobile phones or portable digital music players Your computer can supply USB bus power DC5V to the compatible port even when the computer is powered off Power Off includes Hibernation Mode or Shutdown state To set the Power Off and Charge feature click Start dynabook Settings USB Charge Move th...

Страница 82: ...n is disabled Metal paper clips or hair pins clips can generate heat if they come into contact with USB ports Do not allow USB ports to come into contact with metal products for example when carrying the computer in your bag Your PC has multiple charging modes so that many different USB devices can be supported for Power Off and Charge function Auto Mode Default is suitable for a wide range of dig...

Страница 83: ... Disabled Conventional USB battery charge while PC is powered On The System ON CDP Charge Mode might not work with certain external devices even if they are compliant with the USB specifications In those cases use a USB port without Power Off and Charge function or disable System ON CDP Charge Mode It is recommended that the AC adaptor be connected to the computer while supplying USB bus power DC5...

Страница 84: ...on ensure that the registered password is correct by outputting the character string to the password file When entering a password do not enter any non alphanumeric characters for example or Delete button Click this button to delete a registered password Before you can delete a password you must first enter the current password correctly Change button Click this button to change a registered passw...

Страница 85: ... the computer automatically Wake up on LAN Task Scheduler etc might not work You must turn the computer back on to retry password entry Pre Boot Authentication You can also enable disable Pre Boot Authentication function that allows you to authenticate by scanning fingerprints instead of inputting a password before Windows boots up and Single Sign On function that allows you to sign on using a fin...

Страница 86: ...r sending data logs dynabook Screen Rotation Utility dynabook Screen Rotation Utility rotates the screen orientation between landscape normal and landscape flipped by using the Ctrl Alt Up arrow Down arrow keys To access this utility click Start dynabook Screen Rotation Utility The following options might be provided Screen Rotation Rotate the screen orientation by using the Ctrl Alt Up arrow Down...

Страница 87: ...lick Troubleshoot dynabook Maintenance Utility If you select the deletion method and continue with the operation you will lose all data including the operating system and recovery partition on the internal storage drives Make sure that you have already created recovery media if you want to use the computer after erasing your hard disk drive s Special features The following features are either uniq...

Страница 88: ...e computer off when the display panel is closed and turns it back on when the display panel is opened This can be specified in the Power Options Low battery automatic Hibernation Mode 1 When battery power is exhausted to the point that computer operation cannot be continued the system automatically enters Hibernation Mode and shuts itself down This can be specified in the Power Options Hibernation...

Страница 89: ...n if necessary lowering the processor speed or by lowering the processor speed first then if necessary turning on the fan Both of these functions are controlled through the Power Options When the processor s temperature falls within normal range the fan and the processor operation return to their standard speed If the processor s temperature reaches an unacceptably high level with either setting t...

Страница 90: ...n this chapter are meant only as a guide they are not definitive problem solving techniques In reality many problems can be solved simply but a few might require help from Technical Support If you find you need to consult others be prepared to describe the problem in as much detail as possible Preliminary checklist You should always consider the simplest solution first The items detailed in this c...

Страница 91: ...racters Make a screenshot of the current display and if possible look up the messages in the documentation included with the computer software or operating system Check that all connecting cables are correctly and firmly attached as loose cables can cause erroneous or intermittent signals Do any indicators light if so which ones what color are they and do they stay on or blink Write down what you ...

Страница 92: ...econds before turning on the power again by pressing the power button Your program stops responding If you are working with a program that suddenly freezes all operations chances are the program has stopped responding You can exit the failed program without shutting down the operating system or closing other programs To close a program that has stopped responding 1 Press CTRL ALT and DEL simultane...

Страница 93: ...instead of desired advanced options do the following 1 Click Start Power and then select Restart 2 Hold down the corresponding key and then release this key just after the computer is powered on 3 Follow the on screen instructions to proceed Hardware and system checklist This section discusses problems caused by your computer s hardware or attached peripherals Basic problems might occur in the fol...

Страница 94: ...e power cord adaptor is firmly connected to the computer and a working power outlet Check the condition of the cord and terminals If the cord is frayed or damaged it should be replaced while if the terminals are soiled they should be cleaned with a clean cotton cloth If the AC adaptor still does not power the computer you should contact Technical Support Battery If you suspect a problem with the b...

Страница 95: ...he System Date field 3 Set the time in the System Time field 4 Follow the on screen instructions to proceed BIOS Problem Procedure The computer cannot be powered on Disconnect the AC adaptor for several seconds and then reconnect the AC adaptor After that press the power button If it does not work press the power button twice again If it still does not work press and hold the power button for 18 s...

Страница 96: ...ear on the computer s display panel These marks might have come from contact with the keyboard and Touch Pad while the display panel has been closed Try to remove the marks by gently wiping the display panel with a clean dry cloth or if this fails with a good quality LCD screen cleaner In this latter instance you should always follow the instructions with the screen cleaner and always ensure that ...

Страница 97: ...ormation refer to Operating Basics Problem Procedure Memory media card error occurs Remove the memory media card from the computer and then reinsert it to ensure that it is firmly connected If the problem persists then you should refer to the documentation supplied with your memory media card for further information You cannot read a file Check to ensure that the required file is actually on the m...

Страница 98: ...The mouse pointer moves too fast or too slow In this instance you should initially try changing the cursor speed within the Touch Pad settings To access it click Start Settings Devices Touchpad The reaction of Touch Pad is either too sensitive or not sensitive enough Adjust the touch sensitivity To access it click Start Settings Devices Touchpad If you are still unable to resolve the problem conta...

Страница 99: ...low In this instance you should initially try changing the speed setting within the Mouse Control utility 1 To access this utility click Start Windows System Control Panel Hardware and Sound Mouse 2 Within the Mouse Properties window click the Pointer Options tab 3 Set the mouse pointer speed as required and click OK The mouse pointer moves erratically The elements of the mouse responsible for det...

Страница 100: ...at 7 To save the changes and exit the utility press the F10 key and proceed by selecting Yes or select Exit Exit Saving Changes Yes The computer restarts immediately USB device In addition to the information in this section also refer to the documentation supplied with your USB device Problem Procedure USB device does not work Remove the USB device from the computer and then reconnect it to a free...

Страница 101: ...owing methods Turn OFF the computer while external devices are connected Connect external devices after turning OFF of the computer If this function can still not be used change the setting to disable the function and stop using this function The battery depletes quickly even when I turned OFF the power of the computer If Power Off and Charge function is enabled the computer s battery discharges d...

Страница 102: ...e or decrease volume Check the software volume settings Check to see if Mute is turned to Off Check to make sure that the headphone connection is secure Check within the Windows Device Manager application to ensure that the sound device is enabled and that the device is properly working Annoying sound is heard In this instance you might be experiencing feedback from either the internal microphone ...

Страница 103: ...t disconnect the external monitor while the computer is in Sleep or Hibernation Mode Remember to turn off the computer before disconnecting the external monitor When the display panel and an external monitor are set to Clone Mode and they are turned off by the timer the display panel or the external monitor might not display when turned on again If this occurs press the function key to reset the d...

Страница 104: ...lems persist contact your LAN administrator Bluetooth Problem Procedure Cannot access Bluetooth device Check to ensure that the wireless communication function of the computer is on Check to ensure that power to the external Bluetooth device is turned on Check to ensure that no optional Bluetooth Adaptor is installed in the computer The built in Bluetooth hardware cannot operate simultaneously wit...

Страница 105: ...ed with your software and or peripheral devices If a problem occurs when you are running software applications consult the software documentation for troubleshooting suggestions and consider calling the software company s technical support department for assistance Consult the reseller or dealer from where you purchased your computer and or software they are your best resource for current informat...

Страница 106: ...358 2 w x 236 9 d x 19 9 h millimeters not including parts that extend beyond the main body Environmental Requirements Conditions Ambient temperature Relative humidity Operating 5 C 41 F to 35 C 95 F 20 to 80 noncondensing Non operating 20 C 4 F to 60 C 140 F 10 to 90 noncondensing Wet bulb temperature 29 C maximum Conditions Altitude from sea level Operating 60 to 3 000 meters Non operating 60 to...

Страница 107: ...VT or SPT 2 Australia AS Japan DENANHO Europe Austria OVE Italy IMQ Belgium CEBEC The Netherlands KEMA Denmark DEMKO Norway NEMKO Finland FIMKO Sweden SEMKO France LCIE Switzerland SEV Germany VDE United Kingdom BSI In Europe two conductors power cord must be VDE type H05VVH2 F or H03VVH2 F and for three conductors power cord must be VDE type H05VV F For the United States and Canada two pin plug c...

Страница 108: ...Approved by the appropriate agency Canada CSA approved China CCC approved State of Israel SII approved Africa Approved by the appropriate agency Switzerland Approved by the appropriate agency Italy Approved by the appropriate agency Information for Wireless Devices Wireless Technology Interoperability The Wireless LAN is compatible with other LAN systems with Direct Sequence Spread Spectrum DSSS O...

Страница 109: ...ny such problem immediately turn off either one of your Bluetooth or Wireless LAN Wireless devices and your health Wireless products like other radio devices emit radio frequency electromagnetic energy The level of energy emitted by wireless products however is far much less than the electromagnetic energy emitted by wireless devices like for example mobile phones Because wireless products operate...

Страница 110: ...ear automatic control equipment or appliances such as automatic doors or fire detectors Radio waves can cause malfunction of such equipment possibly resulting in serious injury It might not be possible to make a network connection to a specified network name using the ad hoc network function If this occurs the new network has to be configured for all computers connected to the same network in orde...

Страница 111: ...s also impacted due to obstacles in the signal path of the radio that might either absorb or reflect the radio signal Radio Frequency Interference Requirements This device is restricted to indoor use due to its operation in the 5 15 to 5 25 GHz frequency range High power radars are allocated as primary users i e priority users of the bands 5 25 to 5 35 GHz and 5 65 to 5 85 GHz and that these radar...

Страница 112: ...tained even if the devices are not within a line of sight of each other Radio Regulatory Information The Wireless device must be installed and used in strict accordance with the manufacturer s instructions as described in the user documentation that comes with the product This product complies with the following radio frequency and safety standards Europe Restrictions for Use of 2400 0 2483 5MHz F...

Страница 113: ... with the following conditions Permitted to use SRD for outdoor applications without restriction on installation height only for purposes of gathering telemetry information for automated monitoring and resources accounting systems Permitted to use SRD for other purposes for outdoor applications only when the installation height is not exceeding 10m above the ground surface 3 Maximum 100mW 20dBm EI...

Страница 114: ...rmitted to use with the following condition It is permitted to use SRD for outdoor applications only for purposes of gathering telemetry information for automated monitoring and resources accounting systems or security systems 3 Maximum EIRP density is 10mW MHz Maximum 100mW 20dBm EIRP Indoor applications is permitted to use Ukraine Limited implementation EIRP 100mW 20dBm with built in antenna s m...

Страница 115: ...in Sweden Limited implementation This product is for indoor use only Restrictions for Use of 5725 5875MHz Frequencies in Europe Russian Federation Limited implementation When duty cycle is 0 1 or using LBT Listen Before Talk technology Antenna height should not exceed 5m with maximum EIRP 25mW 13 98dBm is permitted to use Software Version and Maximum Power Output of the Wireless Module Europe mode...

Страница 116: ...wing versions SAR Value 0 45W kg 10g A40 J 0 30W kg 10g A50 J Maximum Power Output 2400 2483 5 MHz IEEE802 11 b g n ax mode Bluetooth Maximum 100mW 20dBm EIRP 2400 2483 5 MHz BLE Maximum 10mW 10dBm EIRP 5150 5725 MHz IEEE802 11 a n ac ax mode Maximum 200mW 23dBm EIRP The low band 5 15 5 35 GHz is for indoor use only 5745 5875 MHz IEEE802 11 a n ac ax mode Maximum 25mW 14dBm EIRP Europe model EM756...

Страница 117: ...Version SWI9X30C_02 xx SAR Value 0 542 W kg 10g A40 J 0 674 W kg 10g A50 J Band Frequencies Conducted Tx Transmit power tolerances LTE frequency band support Band 1 2100 MHz Tx 1 920 1 980 MHz 23 dBm 1 dB Rx 2 110 2 170 MHz Band 3 1800 MHz Tx 1 710 1 785 MHz 23 dBm 1 dB Rx 1 805 1 880 MHz Band 7 2600 MHz Tx 2 500 2 570 MHz 22 dBm 1 dB Rx 2 620 2 690 MHz Band 8 900 MHz Tx 880 915 MHz 23 dBm 1 dB Rx...

Страница 118: ...m 2 dB Rx 2 620 2 690 MHz Band 28 700 MHz Tx 703 748 MHz 23 dBm 2 dB Rx 758 803 MHz WCDMA frequency band support Band 1 WCDMA 2100 Tx 1 920 1 980 MHz 24 dBm 1 3 dB Rx 2 110 2 170 MHz Band 8 WCDMA 900 Tx 880 915 MHz 23 dBm 1 dB Rx 925 960 MHz To remain in conformance with European spectrum usage laws for Wireless LAN operation the above 2 4 GHz and 5 GHz channel limitations apply for outdoor usage ...

Страница 119: ...s radars pourraient causer du brouillage et ou des dommages aux dispositifs LAN EL The term IC before the equipment certification number only signifies that the Industry Canada technical specifications were met USA Federal Communications Commission FCC This equipment has been tested and found to comply with the limits for a Class B digital device pursuant to Part 15 of FCC Rules These limits are d...

Страница 120: ...communications means radio communications is operated in compliance with the Telecommunications Act The low power radio frequency devices must be susceptible with the interference from legal communications or ISM radio wave radiated devices Australia and New Zealand regulatory compliance This equipment incorporates a radio transmitting device in normal use a separation distance of 20cm will ensure...

Страница 121: ...his equipment uses a frequency of 2 4 GHz 2 DS This equipment uses DS SS modulation 3 OF This equipment uses OFDM modulation 4 4 The interference range of this equipment is less than 40 m 5 This equipment uses a frequency bandwidth from 2 400 MHz to 2 483 5 MHz It is possible to avoid the band of mobile object identification systems 3 Indication for Bluetooth The indication shown below appears on ...

Страница 122: ... the model you purchased Using built in platform capabilities and popular third party management and security applications Intel AMT allows IT to better discover repair and protect their networked computing assets Consult with your system administrator about configurations of the AMT function before connecting to a network Disable the AMT function Intel AMT function is enabled by default and in a ...

Страница 123: ...ust contain at least one number 0 1 9 Must contain a mix of lower case a b z etc and upper case A B Z etc letters Must contain at least one special character of the following Underscore _ is considered the same as Roman alphabet characters and is not counted as a special character Key input is based on the US keyboard layout The following table shows examples of the special characters in US keyboa...

Страница 124: ...Management Engine ME firmware after the RTC lasting time runs out the system will automatically reset itself during setup This is the function of AMT configurations and is not an error Enabling the AMT function might cause the network LAN Enable Disable items to be no longer changeable in dynabook Setup Utility Consult with your system administrator about details AMT function cannot be operated us...

Страница 125: ...ndows key I scroll up to the word Settings then press Enter Then select Ease of Access from the Windows Settings screen Ease of Access for Dynabook notebook Ease of access options provides those with learning vision hearing mobility and other impairments with the following features categories Vision Display To change of text similar to zoom in or out in browser or using the magnifying glass option...

Страница 126: ...dio portion of a video TV show or Movie that supports Closed Caption technology You can select the settings you want and see how they appear in Preview Click here for more information about making your device easier to hear or use with these visual alternatives to sound Interaction Speech Talk instead of type Press the Windows key H to start dictation or select the microphone button on the touch k...

Страница 127: ...eys the Windows special key and the keypad overlay Refer to The Keyboard section for more information Fingerprint Sensor Some notebooks configuration have fingerprint sensor for enrolling and recognizing fingerprints Refer to Using the Fingerprint Sensor section for more information Battery When the AC adaptor is not connected the main power source of the computer is the main battery Refer to the ...

Страница 128: ...ion dynabook Setup Utility and dynabook Maintenance Utility Refer to Utilities and Advanced Usage section for more information You might have all the software listed depending on the model you purchased Special features If your computer may come pre installed with several special features such as Display automatic power off Internal storage drive automatic power off System automatic Sleep Hibernat...

Страница 129: ... to design configuration Under some conditions your computer product might automatically shut down This is a normal protective feature designed to reduce the risk of lost data or damage to the product when used outside recommended conditions To avoid risk of lost data always make back up copies of data by periodically storing it on an external storage medium For optimum performance use your comput...

Страница 130: ... 741 824 bytes and therefore shows less storage capacity Available storage capacity will also be less if the product includes one or more pre installed operating systems such as Microsoft Operating System and or pre installed software applications or media content Actual formatted capacity might vary LCD Over a period of time and depending on the usage of the computer the brightness of the LCD scr...

Страница 131: ...r off 5 8 screen 3 9 Documentation list 2 1 Dual Pointing Device Touch Pad 6 8 E Equipment checklist 2 1 External monitor problems 6 14 H Hard disk drive automatic power off 5 8 K Keyboard function keys 4 4 Function keys F1 F12 4 4 problems 6 6 Windows special key 4 6 L LAN cable types 4 23 connecting 4 23 LAN jack 4 22 M Media care Card care 4 13 Memory installing 4 16 removing 4 18 Memory media ...

Страница 132: ...tor 6 13 Hardware and system checklist 6 4 HDD 6 7 6 8 Internal display panel 6 7 Keyboard 6 6 Memory Media Card 6 8 Overheating power down 6 5 Power 6 4 Real Time Clock 6 6 Sound system 6 13 Technical support 6 16 Touch Pad 6 8 USB device 6 11 USB mouse 6 9 R Recovery hard disk drive 2 14 Recovery Media 2 14 S SD SDHC SDXC Card formatting 4 13 Security lock 4 27 SIM Card installing 4 19 removing ...

Страница 133: ...W Web Camera 3 8 Wireless communication 7 5 User s Manual Index 3 ...

Отзывы: