


4.11 CPU
4 Replacement Procedures
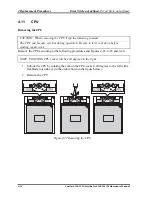
Installing the CPU
Install the CPU according to the following procedures and Figures 4-22, 4-23, 4-24.
1.
Check that the triangle on the cam is in the unlock position.
2.
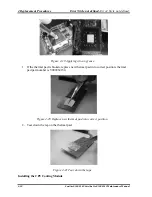
Attach the CPU to the correct position in the CPU socket. Align the CPU with the CPU
socket by using the triangle as a guide.
3.
Secure the CPU by rotating the cam 120 degrees to the right with a flat-blade screwdriver.
4.
NOTE: FOXCONN CPU socket will be 180 degrees to the left.
Figure 4-23 Installing the CPU
CAUTION: Seat the CPU by aligning the triangle with the shaded area.
Satellite E100/E105/ Satellite ProE100/E105
Maintenance Manual 4-33
Содержание Satellite E100 Series
Страница 13: ...Chapter 1 Hardware Overview i Satellite E100 E105 Maintenance Manual ...
Страница 14: ...1 Hardware Overview ii Satellite E100 E105 Maintenance Manual ...
Страница 23: ...1 1 Features 1 Hardware Overview Figure 1 2 Computer Block Diagram Satellite E100 E105 Maintenance Manual 7 ...
Страница 35: ...2 Troubleshooting 2 i Satellite E100 E105 Maintenance Manual 2 概要 Chapter 2 Troubleshooting ...
Страница 63: ...2 13Cooling Module 2 Troubleshooting Satellite E100 E105 Maintenance Manual 2 25 ...
Страница 64: ...Chapter 3 Diagnostic Programs ...
Страница 67: ......
Страница 106: ...3 5 System Test 3 Diagnostic Programs Satellite E100 Maintenance Manual 39 ...
Страница 125: ...3 Diagnostic Programs 3 8 Video 58 Satellite E100 Maintenance Manual ...
Страница 137: ...Chapter 4 Replacement Procedures 4 1 ...
Страница 138: ...4 Replacement Procedures 4 ii Satellite E100 E105 Satellite ProE100 E105 Maintenance Manual ...
Страница 191: ......
Страница 196: ...6000 1 次 Appendices ...