


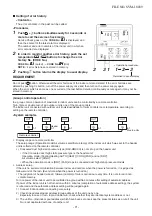


[3] Writing the setting data to EEPROM
The settings stored in the EEPROM of the P.C. board for indoor unit servicing are the factory-set values.
Step 1
Push
SET
,
CL
and
TEST
buttons on the remote controller simultaneously for more than 4 seconds.
∗
In the group control operation, the unit No. displayed for the first time is the header unit No.
At this time, the CODE No. (DN) shows “
10
10
10
10
10
”. Also, the fan of the indoor unit selected starts its operation
and the swing operation starts if it has the louvers.
(The unit No. “
” is displayed if the auto-address setting mode is interrupted in [2] step 2 a)
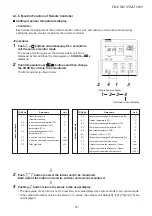
Step 2
Every time when
UNIT LOUVER
button is pushed, the indoor unit No. in the group control operation are displayed
in order.
(The settings stored in the EEPROM of the P.C. board for indoor unit servicing are the factory-set values.)
Specify the indoor unit No. with its P.C. board replaced to the P.C. board for indoor unit servicing.
(You cannot perform this operation if “
” is displayed.)
Step 3
Select the CODE No. (DN) can be selected by pushing the
/
button for the temperature setting.
• Set the indoor unit type and capacity.
The factory-set values shall be written to the EEPROM by changing
the type and capacity.
1. Set the CODE No. (DN) to “
10
10
10
10
10
”. (without change)
2. Select the type by pushing / buttons for the timer setting.
(For example, Concealed Duct standard type is set to “
0004
”.
Refer to table 2)
3. Push
SET
button.
(The operation completes if the setting data is displayed.)
4. Change the CODE No. (DN) to “
11
11
11
11
11
” by pushing
/
buttons for the temperature setting.
5. Select the capacity by pushing / buttons for the timer setting.
(For example, 80 Type is set to “
0012
”. Refer to table 3)
6. Push
SET
button.
(The setting completes if the setting data are displayed.)
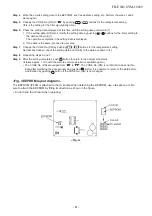
<Fig. 1 RBC-AMT32E>
NOTE: Setting Concealed Duct standard type Indoor Unit model only
7. Using the set temperature
/
buttons, set “
CE
” to the CODE No. (DN).
8. Using the timer time
/ buttons, set the data.
(0002)
9. Push
SET
buttons. ( The setting completes if the setting data are displayed.)
CAUTION
Don’t remove the materials.
No materials. The power I.C. (IC101) may break.
<Fig. 2>
10. Push the
TEST
button to return to the normal stop status.
(It takes approx. 1 min until the remote controller operation is available again.)
3 6 5 1
4 2
00 04
3- 3
10
FILE NO. SVM-18039
- 60 -
Содержание RAV-RM1101BTP Series
Страница 17: ...2 CONSTRUCTION VIEWS EXTERNAL VIEWS RAV RM561BTP RAV RM801BTP RAV RM1101BTP RAV RM1401BTP FILE NO SVM 18039 17 ...
Страница 18: ...RM56 type RM80 type RM110 RM140 type FILE NO SVM 18039 18 ...
Страница 19: ...3 WIRING DIAGRAM FILE NO SVM 18039 19 ...
Страница 34: ...5 3 Indoor Print Circuit Board MCC 1631 FILE NO SVM 18039 34 ...
Страница 89: ...11 EXPLODED VIEWS AND PARTS LIST 11 1 RAV RM561BTP E RAV RM561BTP TR FILE NO SVM 18039 89 ...
Страница 91: ...11 2 RAV RM801BTP E RAV RM801BTP TR FILE NO SVM 18039 91 ...
Страница 94: ...11 6 RAV RM1101BTP E RAV RM1101BTP TR RAV RM1401BTP E RAV RM1401BTP TR FILE NO SVM 18039 94 ...
Страница 97: ...144 9 MOO 5 BANGKADI INDUSTRIAL PARK TIVANON ROAD TAMBOL BANGKADI AMPHUR MUANG PATHUMTHANI 12000 THAILAND ...