background image

-4-

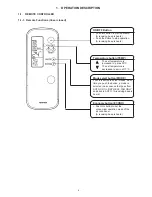
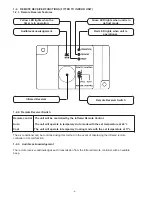
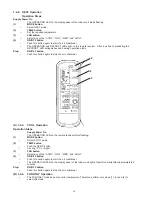
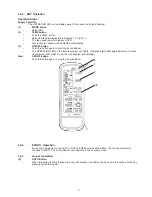
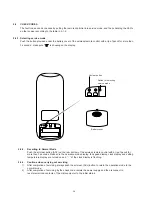
Temperature button (TEMP)

The set temperature is
increased to a max 30ºC.
The set temperature is
decreased to a min of 17ºC.

Cover closed functions

•   Push this button to show functions
    as with the cover closed.

Function lock button (LOCK)

•   Push this button to lock settings.
•   Push this button again to cancel
    lock function.

Infrared signal transmitter

Transmits the signal to the indoor unit

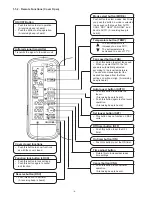
ON/OFF Button

•   Push this button to start operation.
    (A receiving beep is heard)
•   Push the button to stop operation.
    (A receiving beep is heard)

Fan speed button (FAN)

•   Push this button to select fan speed.
•   When you select AUTO, the fan
speed is automatically adjusted
according to the room temperature.
You can also manually select the
desired fan speed from the three
settings. Low, Med, High. (A receiving
beep is heard).

Auto louver button (AUTO)

•   Push this button to operate the
    louver.
    (A receiving beep is heard).
•   Push this button again to stop louver
    operation.
    (A receiving beep is heard).

Set louver button (SET)

•   This button has no function on RAV
    units.

Off timer button (OFF)

•   Push this button to set the OFF
    timer.

On timer button (ON)

•   Push this button to set the ON timer.

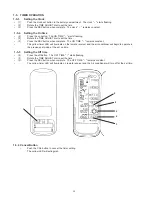
Time adjust button

•   Rotate this to increase/decrease
    time settings.

Cancel button (CNL)

•   Push this button to cancel timer
    operation.
    (A receiving beep is heard).

Reserve button (RSV)

•   Push this button to set timer

.

    (A receiving beep is heard).

Mode select button (MODE)

Push button to select modes. Each time
you push the button, a mode is selected
in a sequence that goes from AUTO,
COOL, DRY, HEAT, FAN ONLY, and
back to AUTO. (A receiving beep is
heard).

1-1-2.  Remote Functions (Cover Open)

Содержание RAV Heat

Страница 1: ...FILE NO A90 9714 AIR CONDITIONER RAV HEAT PUMP RANGE Printed in UK Aug 1997 s SERVICE MANUAL INFRARED REMOTE CONTROL ...

Страница 2: ...nforms with the protection requirements of European Directives 89 336 EEC Electromagnetic Compatibility and 73 23 EEC Low Voltage CONTENTS 1 OPERATION DESCRIPTION 3 2 TROUBLESHOOTING 12 3 CONSTRUCTION VIEWS AND PARTS LIST 17 4 SPECIFICATIONS OF ELECTRICAL PARTS 17 ...

Страница 3: ...creased to a min of 17ºC Mode select button MODE Push this button to select modes Each time you push the button a mode is selected in a sequence that goes from AUTO COOL DRY HEAT FAN ONLY and back to AUTO A receiving beep is heard Economy button ECONO Push this button to set the economical operation mode of the air conditioner A receiving beep is heard 1 OPERATION DESCRIPTION 1 1 REMOTE CONTROLLER...

Страница 4: ...select the desired fan speed from the three settings Low Med High A receiving beep is heard Auto louver button AUTO Push this button to operate the louver A receiving beep is heard Push this button again to stop louver operation A receiving beep is heard Set louver button SET This button has no function on RAV units Off timer button OFF Push this button to set the OFF timer On timer button ON Push...

Страница 5: ... Shows if the Lock function is enabled MODE display Shows the current mode of the unit AUTO COOL DRY HEAT or FAN ONLY TEMP display Shows the temperature setting of the unit ECONOMY display Shows if the economy mode is in operation FAN display Shows the units current fan speed setting AUTO LOW MED or HIGH CLOCK display Shows the current time TIMER display Shows the current timer ON and OFF settings...

Страница 6: ...using this method in the event of misplacing the Infrared remote controller or its malfunction 1 2 3 Audible acknowledgement The remote receiver acknowledges each transmission from the Infrared remote controller with an audible beep 1 2 REMOTE RECEIVER FUNCTIONS FITTED TO INDOOR UNIT 1 2 1 Remote Receiver Features Audible acknowledgement Remote Receiver Switch Infrared Receiver Yellow LED lights w...

Страница 7: ...cket A mounting bracket is supplied with the remote controller 1 Installing the mounting bracket Install the bracket for the remote controller where the unit can be operated with the remote in the bracket 2 Fitting and removing the remote controller To mount hold the remote controller parallel to the mounting bracket and push it in fully To remove slide the remote controller upwards and out from t...

Страница 8: ...s LR03 AAA size 1 Remove the cover of the battery compartment at the back of the remote controller by sliding it out in the direction of the arrow Remove used batteries and dispose of responsibly then insert new batteries 2 Reset the remote controller by pressing the ACL button in the battery compartment with a pointed object 3 Replace the cover of the battery compartment 4 If remote controller fa...

Страница 9: ...eiver lights The operating mode is selected in accordance with the room temperature and operation starts after approximately 3 minutes Stop ON OFF button Push this button again to stop the air conditioner Note If the AUTO mode is uncomfortable you can select the desired conditions manually When you select the AUTO mode you do not have to set the fan speed The FAN speed display will show AUTO and t...

Страница 10: ...ush this button again to stop the air conditioner B 1 4 4 FAN ONLY Operation The FAN ONLY mode does not control temperature Therefore perform only steps 1 3 and 4 to select this mode 3 2 1 4 A 1 4 3 COOL Operation Operation Steps Supply Power On The OPERATION LED on the remote receiver starts flashing 1 MODE button Select COOL mode 2 TEMP button Push the TEMP button Cooling 17 C or higher 3 FAN bu...

Страница 11: ...oner The OPERATION LED on the remote receiver unit lights Operation starts after approximately 3 minutes If you select FAN ONLY mode the unit will start immediately Stop ON OFF button Push this button again to stop the air conditioner 2 1 3 1 4 6 ECONO Operation Econo can be selected in the AUTO COOL and HEAT modes of operation The fan speed selector changes to AUTO The air conditioner now operate...

Страница 12: ...lete The ON TIME remains constant The yellow timer LED will Iluminate on the remote receiver and the air conditioner will begin to operate in the previous set mode at the set on time 1 5 3 Setting the Off time 5 Press the off Button The OFF TIME starts flashing 2 Rotate the TIME ADJUST dial to set the time 3 Press the RSV button when complete The OFF TIME remains constant The yellow timer LED will...

Страница 13: ...Louver motor control Control of the indoor fan motor operation Control of the LED display Control of the outdoor unit compressor and the outdoor fan motor 2 1 FAULT FINDING The L E D s on the receiver can display check code information Power Failure When power on Service Mode Selected Service Mode Check code High pressure Switch Fault Operation LED Flash 1Hz Timer LED Flash 5Hz Defrost LED Flash 5...

Страница 14: ...ing out servicing 1 After completion of servicing always push the all clear ACL button to return the operation mode to the normal mode 2 After completion of servicing by the check code isolate the power supply and then reconnect to reset memorized contents of the microcomputer to the initial status 2 2 CHECK CODES The fault codes can be checked by putting the remote controller into service mode an...

Страница 15: ...des RETURN SIGNAL NOT COMING TO INDOOR ROOM TEMP SENSOR TA INDOOR HEAT EXCHANGER SENSOR TC Out of place break short circuit 1 Wrong wiring in connecting cable serial signal 4 WAY VALVE SYSTEM 1 Indoor heat exchanger temperature rises after starting cooling operation 2 Indoor heat exchanger temperature drops after starting heating operation SYMPTON 1 Check the indoor temp sensor 2 Check the indoor ...

Страница 16: ...ting operation 2 When transmitting instruction for stopping compressor by freeze preventing control 1 Check the high pressure switch 2 Check the outdoor PC board 1 Check the outdoor heat exchanger sensor 2 Check the outdoor PC board Full stop Full stop High pressure switch does not reset 5 sec in cooling 30 sec in heating WRONG WIRING OF REMOTE CONTROL UNIT Indoor unit does not operate at all Out ...

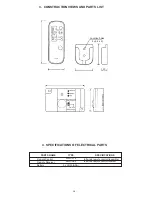
Страница 17: ... TYPE WH C2YE XWS DS5 2 x LR03 AAA SPECIFICATIONS Infrared remote control transmitter Infrared remote control receiver 1 5v PARTS NAME Remote Control Remote Receiver Battery Remote Holder Remote controller 62 Part Number 43069666 43063253 43A69009 Description Remote controller Holder Remote Remote Receiver Remote Receiver 30 60 ...

Страница 18: ...NSTRUCTION VIEWS AND PARTS LIST 4 SPECIFICATIONS OF ELECTRICAL PARTS TYPE WH C2YE XWS DS5 2 x LR03 AAA SPECIFICATIONS Infra red remote control transmitter Infra red remote control receiver PARTS NAME Remote Control Remote Receiver Battery ...

Страница 19: ...PORSHAM CLOSE BELLIVER INDUSTRIAL ESTATE PLYMOUTH PL6 7DB UK ...

Отзывы: