


– 39 –
10-1-5. Installation Steps
Fig. 10-1-1
Fig. 10-1-2
Fig. 10-1-3
Fig. 10-1-4
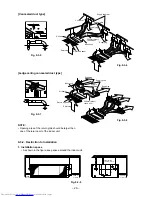
1) Unfasten a set screw on the side of the indoor unit. Hook the drain hose holder
to the screw and fasten it
together with the fitting. Make sure the drain hose is free from a trap, sag, etc. near the drain hose holder
.
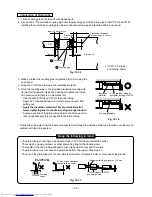
2) The joint for the drain hose port packaged with the indoor unit should be connected with the insulated pipe
.
3) Insert the pipe snugly into the drain hose port of the drain-up kit
.
(as deep into the port as the O-ring of the drain hose reaches the groove of the drain hose port)
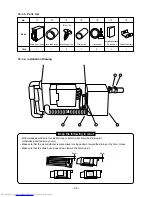
4) Using two setscrews
, secure the drain-up kit
to the indoor unit.
5) Remove the short pin connector (2P, blue) arranged behind the electrical parts box of the indoor unit.
The 2P- and 3P- connectors arranged behind the electrical parts box of the indoor unit should be connected
with the others appropriately.
Drain hose
Drain hose holder
7
Drain-up
kit body
1
Mounting screw
3
Insulated pipe
2
Drain hose
Drain hose port
Convex part
O-ring
Insulated pipe
2
Drain pump connector
(3P, red)
Float switch connector
(2P, blue)
Short pin connector
(2P, blue)
Содержание RAS-M10YDCV-E
Страница 62: ......