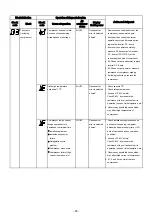


12-
1
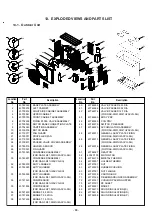
. Outdoor Unit
No. Part name
Procedure
Remarks
①
Common
procedure
Never forget to put on the gloves at working time;
otherwise an injury will be caused by the parts etc.
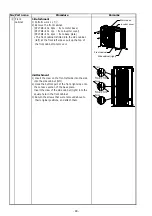
1.Detachment
1) Stop operation of the air conditioner,
and turn off the main switch of the
breaker for air conditioner.
2) Remove the valve cover.
(ST1TØ4×10L 5pcs.)
• After removing screw, remove the
valve cover pulling it downward.
3) Remove the upper cabinet.
(ST1TØ4×10L 5pcs.)
• After removing screws, remove the
upper cabinet pulling it upward.
4) Remove the terminal cover.
(ST1TØ4×10L 2pcs.)
5) Remove the cord clamp.
(ST
2
TØ4×10L 2pcs.)
6) Remove the power supply cord and the indoor/
outdoor connecting cable from terminal.
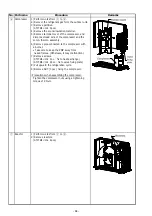
2.Attachment
1) Attach the power supply cord and the indoor/
outdoor connecting cable to terminal.
2) Attach the cord clamp.
(ST
2
TØ4×10L 2pcs.)
3) Attach the terminal cover.
(ST1TØ4×10L 2pcs.)
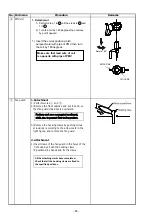
4) Attach the water-p
r
oof cover.
The water-proof cover must be attached without
fail in order to prevent rain water, etc. from
entering inside the
out
door unit.
5) Attach the upper cabinet.
(ST1TØ4×10L 5pcs.)
6)
Attach
the valve cover.
(ST1TØ4×10L 5pcs.)
・
Set hook claws of the valve cover to square
holes (at 3 positions) of the main unit, and
attach it pushing upward.
How
to
mount
the
water
‐
proof
cover
12.
HOW TO REPLACE THE MAIN PARTS
- 79 -
Содержание RAS-2M21U2ACVG-SG
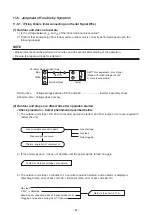
Страница 24: ...Outdoor Unit 4 CONSTRUCTION VIEWS Unit mm RAS 3M31U2ACVG SG RAS 3M41U2ACVG SG RAS 2M21U2ACVG SG 24 ...
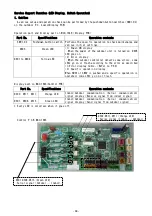
Страница 25: ...5 WIRING DIAGRAM Outdoor Unit RAS 2M21U2ACVG SG t t t t t t 25 ...
Страница 91: ...144 9 MOO 5 BANGKADI INDUSTRIAL PARK TIVANON ROAD TAMBOL BANGKADI AMPHUR MUANG PATHUMTHANI 12000 THAILAND ...