background image

5 Printing from Windows

242    Printing with Extended Print Functionality

Printing with Extended Print Functionality

In this section, procedures are given to print various types of print jobs, using the layout and fin-
ishing options.

Printing Various Print Job Types

The printer drivers provide various ways to handle such jobs as Scheduled Print, Private Print, 
Proof Print, Overlay Image file, and Store to e-Filing.

Printing Scheduled Print Jobs

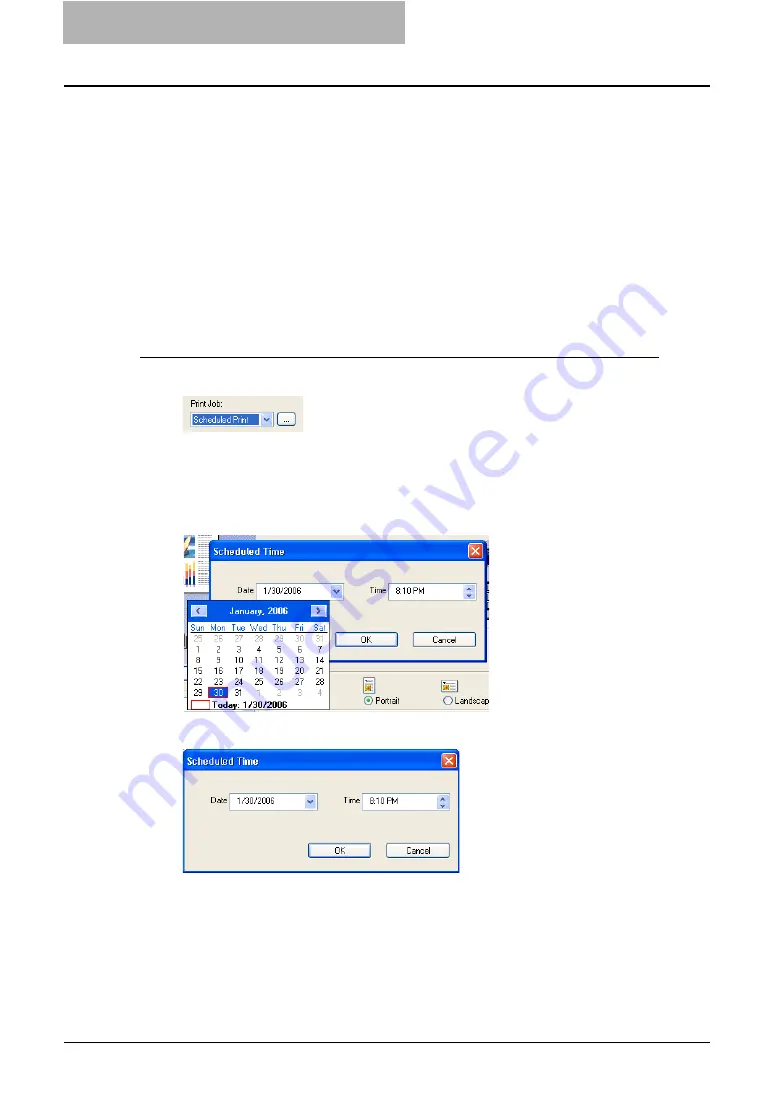
The Print Scheduling feature allows you to specify the date and time to print your job. This can 
be especially useful for delaying printing until off-peak hours.

Printing on a specified date and time

1

Select “Scheduled Print” in the “Print Job” drop down menu.

2

Click [...].

y

The Scheduled Time dialog box appears.

3

Click the arrow button at the “Date” drop down menu to display the 
Calendar window, and select the desired date for your print job.

4

Select the Time field and click the spin button to change the time.

y

To change the hour, select the hour number and click the spin button.

y

To change the time, select the time number and click the spin button.

5

Click [OK].

y

The specified date and time is displayed in the Time field.

6

Set any other print options you require and click [OK].

Содержание e-studio202L

Страница 1: ...MULTIFUNCTIONAL DIGITAL SYSTEMS Printing Guide ...

Страница 2: ......

Страница 3: ...gle System and may not copy the Software for any reason except as neces sary to use the Software on a single System Any copies of the Software shall be subject to the conditions of this Agreement You may not nor cause or permit any third party to modify adapt merge translate reverse compile reverse assemble or reverse engineer the Software You may not use the Software except in accordance with thi...

Страница 4: ...e rent assign or transfer this license or the Software Any attempt to sublicense lease rent assign or transfer any of the rights duties or obligations hereunder is void You agree that you do not intend to and will not ship transmit directly or indirectly the Software including any copies of the Software or any technical data contained in the Software or its media or any direct product thereof to a...

Страница 5: ...her Microsoft products are trademarks of Microsoft Corporation in the US and other countries y Apple AppleTalk Macintosh Mac TrueType and LaserWriter are trademarks of Apple Inc in the US and other countries y PostScript is a trademark of Adobe Systems Incorporated y Netscape is a trademark of Netscape Communications Corporation y IBM AT and AIX are trademarks of International Business Machines Co...

Страница 6: ...soft ware or your network see the manuals that accompany those products Conventions y The term this equipment in this manual refers to the e STUDIO452 Series e STUDIO453 Series e STUDIO282 Series or e STUDIO283 Series y The term e Filing in this manual is an abbreviation of electronic filing Lineup of Our Manuals Thank you for purchasing the TOSHIBA multifunctional digital systems e STUDIO452 Seri...

Страница 7: ...function and job management using the TopAccess Web based utility from client computers Network Administration Guide This Network Administration Guide explains the guidelines for setting up network servers to provide various network services and troubleshoot ing for network administrators Printing Guide This Printing Guide explains how to install the client software for printing from Microsoft Win...

Страница 8: ...rated e Filing Guide This e Filing Guide explains how to operate the e Filing function using the TWAIN driver File Downloader and e Filing web utility Network Fax Guide This Network Fax Guide explains how to use the network fax function that enable users to operate fax and internet fax sending from a client computer via network User Management Guide This User Management Guide describes how to mana...

Страница 9: ...icates a potentially hazardous situation which if not avoided could result in death serious injury or serious damage or fire in the equipment or sur rounding assets Indicates a potentially hazardous situation which if not avoided may result in minor or moderate injury partial damage of the equipment or surrounding assets or loss of data Indicates a procedure you should follow to ensure the optimal...

Страница 10: ......

Страница 11: ... Printer Wizard 50 Installing Client Software for SMB Printing 64 Installation for SMB Printing Using the Installer 65 Installation for SMB Printing by Point and Print 71 Installation for SMB Printing by Add Printer Wizard 75 Installing Client Software for IPP Printing 93 Installation for IPP Printing by Add Printer Wizard 93 Installing Client Software for Novell Printing 107 Installation for Nove...

Страница 12: ...IX Filters 171 Setting Up the CUPS 180 About CUPS 180 Configuring UNIX Printing Using CUPS 180 Installing Client Software from TopAccess 196 Chapter 5 Printing from Windows Before Using the Printer Driver 200 Configuring the Options 200 Setting the Department Code 204 Copying the PPD File for Windows 206 Printing from Application 207 Considerations and Limitations 207 How to Print 208 Setting Up P...

Страница 13: ...Options 315 General Options 315 PCL5e Specific Options 326 Chapter 8 Other Printing Methods FTP Printing 332 Email Printing 334 Chapter 9 Troubleshooting When Printing cannot be Performed 336 Printer Driver Errors 337 Printer Driver Installation Error Messages 337 Printer Driver General Errors 338 Chapter 10 Appendix Managing Fonts with Font Manager 342 Installing Font Manager 342 Searching Fonts ...

Страница 14: ...12 INDEX 349 ...

Страница 15: ...1 Overview This section describes the overview of the printing functions Features and Functions 14 About the Client CD ROM 15 For Windows 15 For Macintosh 17 For UNIX 17 ...

Страница 16: ...t you can choose to sort group fold and staple your documents including saddle stitching and punch binding holes Sophisticated Document Layout and Assembly Options You can choose whether to print your document as you have set it up in the application or to impose printer driven document layout options such as printing in Book Format or printing Multi ple Pages per Sheet Additionally the printer dr...

Страница 17: ...stall the PSL3 printer driver on the Windows 98 Me for each language version by Add Printer Wizard or Plug and Play y Client Utilities CD ROM Client Drivers PS NT language This includes the setup files to install the PSL3 printer driver on the Windows NT 4 0 for each language version by Add Printer Wizard y Client Utilities CD ROM Client Drivers PS W2K_XP_VISTA language This includes the setup fil...

Страница 18: ...ent Utilities CD ROM Client PandP language This includes the compressed zip files that contain the setup files to install each printer driver for each language version Further information about user software for Windows is described in next chapter P 20 About Client Software for Windows ...

Страница 19: ...ient Utilities CD ROM Solaris Filter y Client Utilities CD ROM Admin SolarisFilter Usa This includes the Tar file for Solaris v2 6 2 7 7 8 8 9 HP UX Filter y Client Utilities CD ROM Admin HP UXFilter Usa This includes the Tar file for HP UX ver 10 20 11 x AIX Filter y Client Utilities CD ROM Admin AIXFilter Usa This includes the Tar file for AIX 4 3 3 Linux Filter y Client Utilities CD ROM Admin L...

Страница 20: ......

Страница 21: ...TCP LPR Printing by Add Printer Wizard 50 Installing Client Software for SMB Printing 64 Installation for SMB Printing Using the Installer 65 Installation for SMB Printing by Point and Print 71 Installation for SMB Printing by Add Printer Wizard 75 Installing Client Software for IPP Printing 93 Installation for IPP Printing by Add Printer Wizard 93 Installing Client Software for Novell Printing 10...

Страница 22: ...th the Printer Kit or Printer Scanner Kit Planning for Installation This section will help you to plan an installation suited to your environment Before installing the client software read this section Before Installing Client Software Before installing the client software confirm the followings to perform an appropriate installation When Same Printer Drivers Have Been Installed Previously Before ...

Страница 23: ...icable computers depend on the printing systems y Raw TCP LPR Printing Windows NT 4 0 Service Pack 6a Windows 2000 Service Pack 4 Windows XP Service Pack 1 Service Pack 2 Windows Vista Windows Server 2003 Service Pack 1 y SMB Printing Windows 98 Windows 98 Second Edition Recommended Windows Me Windows NT 4 0 Service Pack 6a Windows 2000 Service Pack 4 Windows XP Service Pack 1 Service Pack 2 Windo...

Страница 24: ...ver 2003 y SMB Printing Some of them are applicable to your environments the printing methods generally recom mended are decided by the Windows version y Windows 98 Windows Me SMB Printing y Windows NT 4 0 Windows 2000 Windows XP Windows Vista Windows Server 2003 Raw TCP LPR Printing If you have no advance instruction for an installation from your administrator check these print ing methods whethe...

Страница 25: ... configured to enable LPD Print Ser vice Ask your administrator if the LPD Print Service is enabled SMB Printing Available for Windows 98 Windows Me Windows NT 4 0 Windows 2000 Windows XP Windows Vista Windows Server 2003 This equipment can be used with an SMB printer connection that allows you to connect to this equipment using File and Printer Sharing for Microsoft Networks service SMB printing ...

Страница 26: ...is equipment over the Internet you can use IPP printing under Windows 2000 Windows XP Windows Vista and Windows Server 2003 This allows you to print to this equip ment from anywhere on the Internet P 93 Installing Client Software for IPP Printing y To print with an IPP connection this equipment must be configured to enable the IPP Print Service and must be connected to the Internet Ask your admini...

Страница 27: ...printer driver and set up the SMB printer connection to a print queue created in the NetWare server P 107 Installing Client Software for Novell Printing To print with a Novell connection the NetWare server must be configured for printing and this equipment must be configured to enable NetWare Print Service NetWare 5 1 NetWare 6 0 NetWare 6 5 Connecting with a NetWare Environment over TCP IP or IPX...

Страница 28: ...ows Server 2003 In this case install the printer driver using iPrint Client from the NetWare server P 120 Installing Client Software for Web Services Print To print with a Novell iPrint the NetWare server must be configured for iPrint and this equipment must be configured to enable NetWare Print Service NetWare 6 0 NetWare 6 5 Connecting with a Novell iPrint Environment over TCP IP Network Setting...

Страница 29: ...age the TrueType fonts on your computer To install the Font Manager you must install it from the Font CD ROM that comes with the Printer Kit or Printer Scanner Kit P 342 Installing Font Manager USB printing is not supported in Windows NT 4 0 Installation for USB Printing by Plug and Play The procedure to install the printer driver for USB printing by Plug and Play differs depending on the version ...

Страница 30: ...ck only the Include this location in the search check box Then click Browse y The Browse For Folder dialog box appears 5 Insert the Client Utilities CD ROM into the CD ROM drive y When inserting the Client Utilities CD ROM the installer may automatically start Click Exit to exit the installer and continue the operation 6 Locate the directory where the printer driver for Windows XP Vista Server 200...

Страница 31: ...lect the following folder To install the PCL6 printer driver locate CD ROM drive Client Drivers PCL6 XP_VISTA_X64 language To install the PSL3 printer driver locate CD ROM drive Client Drivers PS XP_VISTA_X64 language To install the XPS printer driver locate CD ROM drive Client Drivers XPS XP_VISTA_X64 language 7 Click Next y It starts copying files 8 Click Finish 9 The installation is completed B...

Страница 32: ...g Windows 2000 1 Power on this equipment and your computer 2 Connect the USB cable to this equipment and your computer y The Found New Hardware Wizard dialog box appears 3 Click Next 4 Select Search for a suitable driver for my device recommended and click Next 5 Insert the Client Utilities CD ROM into the CD ROM drive y When inserting the Client Utilities CD ROM the installer may automatically st...

Страница 33: ...alog box appears 8 Locate the directory where the printer driver for Windows 2000 is located select a inf file and click Open y To install the PCL6 printer driver locate CD ROM drive Client Drivers PCL6 W2K_XP_VISTA language y To install the PSL3 printer driver locate CD ROM drive Client Drivers PS W2K_XP_VISTA language 9 Click OK ...

Страница 34: ...f required on the printer driver P 200 Before Using the Printer Driver Windows Me Installing the printer driver for USB printing by Plug and Play 1 Power on this equipment and your computer 2 Insert the Client Utilities CD ROM into the CD ROM drive y When inserting the Client Utilities CD ROM the installer may automatically start Click Exit to exit the installer and continue the operation 3 Connec...

Страница 35: ...en the USB port driver is found in the Client Utilities CD ROM it automatically installs the USB port driver If the USB port driver cannot be installed automatically click Back in the displayed dia log box make sure the Client Utilities CD ROM is inserted in the CD ROM drive and then click Next to install the USB port driver again 5 Click Finish 6 Click Next ...

Страница 36: ...eck only the Specify a location check box and click Browse y The Browse for Folder dialog box appears 9 Locate the directory where the printer driver for Windows 98 Me is located and click OK y To install the PCL6 printer driver locate CD ROM drive Client Drivers PCL6 9X_ME language y To install the PSL3 printer driver locate CD ROM drive Client Drivers PS 9X_ME language ...

Страница 37: ...ient Software for USB Printing 35 10 Click Next 11 Click Next 12 Change the name if desired and click Next If any printer drivers have installed on the computer select whether using this printer as a default printer ...

Страница 38: ...click Finish y Start copying files 14 Make sure the test page is successfully printed and click Yes 15 Click Finish 16 The installation is completed Before using the printer driver for printing please configure the installed options of the equipment and department code if required on the printer driver P 200 Before Using the Printer Driver ...

Страница 39: ...ing is only available for Windows 2000 Windows XP Windows Vista and Windows Server 2003 y LPR Printing is only available for Windows NT 4 0 Windows 2000 Windows XP Windows Vista and Windows Server 2003 Installation for Raw TCP LPR Printing Using the Installer Install the client software using the installer in the Client Utilities CD ROM first then configure the Raw TCP or LPR port in each printer ...

Страница 40: ...commended Select this to install all the drivers and utilities included in the CD ROM If you select this menu skip to Step 5 Printer Driver Select this to install the printer driver only If you select this menu skip to Step 5 Custom Install Select this if you would like to pick and choose the installation components If you select this menu proceed to Step 4 In addition to the above menus the main ...

Страница 41: ...Series PCL6 TOSHIBA e STUDIO452 Series PSL3 TOSHIBA e STUDIO452 Series XPS y The XPS driver can be installed on Windows Vista computers or those of Windows XP SP2 Windows Server 2003 SP1 or later versions with XPS Essentials Pack installed y There are also scan software e Filing software and Fax software in the list For more information about each software please see the Scanning Guide the e Filin...

Страница 42: ... AddressBook Viewer and or File Downloader you can change the folder where these programs are installed Click Browse and when the Browse For Folder dialog box appears select a folder and click OK If the following message appears click Continue to proceed with the operation 6 Select Local Port option and select LPT1 in the drop down menu Then click OK y The installation starts ...

Страница 43: ...iver y If the following message appears click Continue Anyway to proceed with the instal lation 7 When the installation is complete click Finish y The main menu window is displayed The Installer may ask you to restart your computer If it does select Yes I want to restart my computer now and click Finish to restart your computer 8 Click Exit y When a message appears asking whether to finish the ins...

Страница 44: ...procedure is the same when Win dows 2000 Windows Vista or Windows Server 2003 is used For instructions on how to install the client software see the following section P 37 Installing the client software for Raw TCP LPR printing using the installer You must log into Windows as a user who has the Administrators or Power Users privilege You must log into Windows as a user who has the Administrators p...

Страница 45: ...menu y The printer driver properties dialog box appears y When using Windows Vista click the Properties in the Organize tab 3 Display the Ports tab and click Add Port y The Printer Ports dialog box appears 4 Select Standard TCP IP Port and click New Port y The Add Standard TCP IP Printer Port Wizard dialog box appears ...

Страница 46: ...er name of this equipment provided from DNS or WINS in the Printer Name or IP Address field y In the Port Name field the port name is automatically entered according to the IP address or DNS name entered in the Printer Name or IP Address field y The very first IP_ is not displayed on Windows Vista y If you are using Windows Vista skip step 7 and proceed to step 8 7 Select Standard and click Next y...

Страница 47: ...R printing follow the procedure below If you are using Windows Vista right click on the printer driver in the Printers folder select Properties and set the port with Configure Port in the Port tab page Select Custom and click Settings Select LPR at the Protocol option enter Print in the Queue Name field at the LPR Settings option and then click OK Click Next ...

Страница 48: ...and the LPD Print setting is enabled you can also configure LPR printing To configure LPR printing follow the procedure on the Tip after Step 7 10 Make sure the created Raw TCP or LPR port is checked in the Print to the following port s list and click Close Before using the printer driver for printing please configure the installed options of the equipment and department code if required on the pr...

Страница 49: ...tware see the following section P 37 Installing the client software for Raw TCP LPR printing using the installer You must log into Windows as a user who has the Administrators or Power Users privilege when using Windows NT 4 0 1 After installing the client software click Start select Settings and click Printers to open the Printers folder 2 Select the printer driver and select Properties in the Fi...

Страница 50: ...ted make sure the TCP IP Printing Service is installed on your Win dows NT 4 0 LPR Port is not listed unless the TCP IP Printing Service is installed 5 Enter the IP address of this equipment in the Name or address of server providing lpd field and Print in the Name of printer or print queue on that server field and click OK y When your network uses DNS or WINS server enter the printer name of this...

Страница 51: ...7 Make sure the created LPR port is checked in the Print to the fol lowing port s list and click OK to save settings Before using the printer driver for printing please configure the installed options of the equipment and department code if required on the printer driver P 200 Before Using the Printer Driver ...

Страница 52: ...s 2000 XP Vista Server 2003 Installing the printer driver for Raw TCP LPR printing by Add Printer Wizard The following describes an installation on Windows XP The procedure is the same when Win dows 2000 Windows Vista or Windows Server 2003 is used You must log into Windows as a user who has the Administrators or Power Users privilege You must log into Windows as a user who has the Administrators ...

Страница 53: ...on y The Add Printer Wizard dialog box appears y When using the Windows Vista Add Printer dialog box appears 3 Click Next y If you are using Windows Vista the above screen is not displayed 4 Select Local printer attached to this computer uncheck the Automatically detect and install my Plug and Play printer y When using the Windows Vista select Add a local printer ...

Страница 54: ...he IP address of this equipment in the Printer Name or IP Address field and click Next y If your network uses a DNS or WINS server enter the printer name of this equipment provided from DNS or WINS in the Printer Name or IP Address field y In the Port Name field the port name is automatically entered according to the IP address or DNS name entered in the Printer Name or IP Address field y When usi...

Страница 55: ...you can also configure LPR printing When you want to configure LPR printing follow the procedure below If you are using Windows Vista right click on the printer driver in the Printers folder select Properties and set the port with Configure Port in the Port tab page Select Custom and click Settings Select LPR at the Protocol option enter Print in the Queue Name field at the LPR Settings option and...

Страница 56: ...2 Installing Client Software for Windows 54 Installing Client Software for Raw TCP LPR Printing 9 Click Finish 10 Click Have Disk y The Install From Disk dialog box appears Click Next ...

Страница 57: ...PCL6 printer driver locate CD ROM drive Client Drivers PCL6 W2K_XP_VISTA language y To install the PSL3 printer driver locate CD ROM drive Client Drivers PS W2K_XP_VISTA language y To install the XPS printer driver locate CD ROM drive Client Drivers XPS W2K_XP_VISTA language When using Windows XP x64 or Windows Vista x64 select the following folder To install the PCL6 printer driver locate CD ROM ...

Страница 58: ...Installing Client Software for Raw TCP LPR Printing 14 Click OK 15 Select the printer driver and click Next If the same printer driver has been installed the following dialog box appears If it appears select Replace existing driver and click Next ...

Страница 59: ...ange the name if desired and click Next If any printer drivers have installed on the computer select whether using this printer as a default printer 17 Select whether this printer is shared or not and click Next 18 Select Yes to print a test page and click Next ...

Страница 60: ...ing please configure the installed options of the equipment and department code if required on the printer driver P 200 Before Using the Printer Driver Windows NT 4 0 Installing the printer driver for LPR printing by Add Printer Wizard You must log into Windows NT 4 0 as a user who has the Administrators or Power Users priv ilege 1 Click Start select Settings and click Printers to open the Print e...

Страница 61: ... My Computer and click Next 4 Click Add Port y The Printer Ports dialog box appears 5 Select LPR Port and click New Port y The Add LPR compatible printer dialog box appears If LPR Port is not listed make sure the TCP IP Printing Service is installed on your Win dows NT 4 0 LPR Port is not listed unless the TCP IP Printing Service is installed ...

Страница 62: ...er or print queue on that server field and click OK y When your network uses DNS or WINS server enter the printer name of this equip ment provided from DNS or WINS in the Name or address of server providing lpd field 7 Click Close to close the Printer Ports dialog box 8 Make sure that the created LPR Port is selected in the Available ports list and click Next 9 Click Have Disk y The Install From D...

Страница 63: ...e y When inserting the Client Utilities CD ROM the installer may automatically start Click Exit to exit the installer and continue the operation 13 Locate the directory where the printer driver for Windows NT 4 0 is located and click Open y To install the PCL6 printer driver locate CD ROM drive Client Drivers PCL6 NT language y To install the PSL3 printer driver locate CD ROM drive Client Drivers ...

Страница 64: ...er driver and click Next If the same printer driver has been installed the following dialog box appears If it appears select Replace existing driver and click Next 16 Change the name if desired and click Next If any printer drivers have installed on the computer select whether using this printer as a default printer ...

Страница 65: ...clients If you select any operating systems repeat the procedure from Step 9 to 15 to install the printer drivers for selected operating sys tems 18 Select Yes recommended to print a test page and click Finish 19 The installation is completed Before using the printer driver for printing please configure the installed options of the equipment and department code if required on the printer driver P ...

Страница 66: ...well as other client software this method is convenient P 65 Installation for SMB Printing Using the Installer y Using Point and Print You can install the printer driver by double clicking network queues on the system By this method printer drivers can be downloaded from the system so that the Client Utilities CD ROM is not required However other client software cannot be installed using this meth...

Страница 67: ... who has the Administrators or Power Users privi lege You must log into Windows as a user who has the Administrators privilege when using Windows XP Vista Server 2003 y Only users with the administrator privilege can perform this on Windows Vista For users without the administrator privilege installation on Windows Vista is possible by performing the following procedure and having the administrato...

Страница 68: ...e drivers and utilities included in the CD ROM If you select this menu skip to Step 5 Printer Driver Select this to install the printer driver only If you select this menu skip to Step 5 Custom Install Select this if you would like to pick and choose the installation components If you select this menu proceed to Step 4 In addition to the above menus the main menu window has the Scan Driver and Uti...

Страница 69: ...se of Windows XP SP2 Windows Server 2003 SP1 or later versions with XPS Essentials Pack installed y There are also scan software e Filing software and Fax software in the list For more information about each software please see the Scanning Guide the e Filing Guide and the Network Fax Guide 5 Confirm the list of the software to install and click Install y If you install AddressBook Viewer and or F...

Страница 70: ...ork the Devices on Network option is selected and the found devices are displayed in the list Select the equipment that you want to connect and click OK y The installation starts y Finding devices may take long depending on your OS or network environment y If the following message appears click Continue Anyway to proceed with the instal lation ...

Страница 71: ... the network path or queue name Finding devices may take long depending on your OS or network environment 3 The Browse for Folder dialog box appears Locate this equipment in your network select the print queue and click OK Do not select pcl6 or ps3 queue These queues only accept the print job in each emulation If you install several printer drivers and specify one of these queues the print job may...

Страница 72: ... the indicated printer driver to be the default printer driver or click No to not change the default printer driver 7 When the installation is complete click Finish y The main menu window is displayed The Installer may ask you to restart your computer If it does select Yes I want to restart my computer now and click Finish to restart your computer ...

Страница 73: ...ws Vista or Windows Server 2003 as a print server it is recommended to set up for printing via Windows print server For further information about setting up printing via a Windows print server see the Network Administration Guide The Font Manager is also available to install and manage the TrueType fonts on your computer To install the Font Manager you must install it from the Font CD ROM that com...

Страница 74: ...ck this queue to install the PSL3 printer driver The XPS printer cannot be installed using Point and Print from this equipment y When you are installing the printer driver on Windows Vista the Printers dialog box may appear in the case click Install driver y When you are installing the printer driver on Windows XP the Connect to Printers dia log box may appear In that case click Yes y When you are...

Страница 75: ...200 Before Using the Printer Driver Windows 98 Me Installing the printer drivers for SMB printing by Point and Print 1 Open this equipment in the network with Windows Explorer and double click a queue in which the printer driver should be installed see below pcl6 Double click this queue to install the PCL6 printer driver ps3 Double click this queue to install the PSL3 printer driver y The Printers...

Страница 76: ... whether printing MS DOS based programs and click Next 4 Change the name if desired select whether you are using this printer as a default printer and click Next 5 Select Yes to print a test page and click Finish 6 Make sure a test page is printed successfully and click Yes to close the dialog box ...

Страница 77: ...Vista or Windows Server 2003 as a print server it is recom mended to set up for printing via Windows print server For further information about setting up printing via a Windows print server see the Network Administration Guide The Font Manager is also available to install and manage the TrueType fonts on your computer To install the Font Manager you must install it from the Font CD ROM that comes...

Страница 78: ...elect Settings and click Printers to open the Printers folder y If you are using the Windows Vista click Start select Control Panel and click Printer under Hardware and Sound to open the Printers folder 2 Click the Add a printer in the Printer Tasks menu y When using the Windows 2000 double click Add Printer icon y The Add Printer Wizard dialog box appears y When using the Windows Vista Add Printe...

Страница 79: ...eck the Automatically detect and install my Plug and Play printer and click Next y When using the Windows Vista select Add a local printer and click Next 5 Select Create a new port and select Local Port in the Type of port drop down menu Then click Next y The Port Name dialog box appears ...

Страница 80: ...can also enter the IP address instead of the NetBIOS Name Example 10 10 70 120 print 7 Click Have Disk y The Install From Disk dialog box appears 8 Click Browse y The Locate File dialog box appears 9 Insert the Client Utilities CD ROM into the CD ROM drive y When inserting the Client Utilities CD ROM the installer may automatically start Click Exit to exit the installer and continue the operation ...

Страница 81: ...ive Client Drivers PS W2K_XP_VISTA language y To install the XPS printer driver locate CD ROM drive Client Drivers XPS W2K_XP_VISTA language When using Windows XP x64 or Windows Vista x64 select the following folder To install the PCL6 printer driver locate CD ROM drive Client Drivers PCL6 XP_VISTA_X64 language To install the PSL3 printer driver locate CD ROM drive Client Drivers PS XP_VISTA_X64 l...

Страница 82: ...river and click Next If the same printer driver has been installed the following dialog box appears If it appears select Replace existing driver and click Next 13 Change the name if desired and click Next If any printer drivers have installed on the computer select whether using this printer as a default printer ...

Страница 83: ...5 Select Yes to print a test page and click Next 16 Click Finish y Start copying files 17 The installation is completed Before using the printer driver for printing please configure the installed options of the equipment and department code if required on the printer driver P 200 Before Using the Printer Driver ...

Страница 84: ...er for SMB printing by Add Printer Wizard You must log into Windows NT 4 0 as a user who has the Administrators or Power Users priv ilege 1 Click Start select Settings and click Printers to open the Print ers folder 2 Double click the Add Printer icon y The Add Printer Wizard dialog box appears 3 Select My Computer and click Next ...

Страница 85: ...ox appears 5 Select Local Port and click New Port y The Port Name dialog box appears 6 Enter NetBIOS Name print in the field and click OK Example NetBIOS Name Mfp 04998820 Mfp 04998820 print You can also enter the IP address instead of the NetBIOS Name Example 10 10 70 120 print 7 Click Close ...

Страница 86: ...isk y The Install From Disk dialog box appears 10 Click Browse y The A is not accessible message appears 11 Click Cancel y The Locate File dialog box appears 12 Insert the Client Utilities CD ROM into the CD ROM drive y When inserting the Client Utilities CD ROM the installer may automatically start Click Exit to exit the installer and continue the operation ...

Страница 87: ...he PCL6 printer driver locate CD ROM drive Client Drivers PCL6 NT language y To install the PSL3 printer driver locate CD ROM drive Client Drivers PS NT language 14 Click OK 15 Select the printer driver and click Next If the same printer driver has been installed the following dialog box appears If it appears select Replace existing driver and click Next ...

Страница 88: ...printer as a default printer 17 Select whether this printer is shared or not and click Next When you select Shared you can also select the operating systems of printer drivers that you want to install for clients If you select any operating systems repeat the proce dure from Step 9 to 15 to install the printer drivers for selected operating systems 18 Select Yes recommended to print a test page an...

Страница 89: ...ired on the printer driver P 200 Before Using the Printer Driver Windows 98 Me Installing the printer driver for SMB printing by Add Printer Wizard The following describes an installation on Windows 98 The procedure is the same when Win dows Me is used 1 Click Start select Settings and click Printers to open the Print ers folder 2 Double click the Add Printer icon y The Add Printer Wizard dialog b...

Страница 90: ...r and click Next 5 Click Have Disk y The Install From Disk dialog box appears 6 Click Browse y The Open dialog box appears 7 Insert the Client Utilities CD ROM into the CD ROM drive y When inserting the Client Utilities CD ROM the installer may automatically start Click Exit to exit the installer and continue the operation ...

Страница 91: ...ndows 98 Me is located and click OK y To install the PCL6 printer driver locate CD ROM drive Client Drivers PCL6 9X_ME language y To install the PSL3 printer driver locate CD ROM drive Client Drivers PS 9X_ME language 9 Click OK 10 Select the printer driver and click Next 11 Select LPT1 and click Next ...

Страница 92: ...printer drivers have installed on the computer select whether using this printer as a default printer 13 Select No and click Finish y Start copying files 14 The printer driver is installed and appears in the Printers folder 15 Select the printer driver and select Properties in the File menu y The printer driver properties dialog box appears ...

Страница 93: ...dd Port dialog box appears 17 Select Other and Local Port and click OK y The Port Name dialog box appears 18 Enter NetBIOS Name print in the field and click OK Example NetBIOS Name MFP 04998820 Mfp 04998820 print You can also enter the IP address instead of the NetBIOS Name Example 10 10 70 120 print ...

Страница 94: ... for SMB Printing 19 Click OK to save settings 20 The installation is completed Before using the printer driver for printing please configure the installed options of the equipment and department code if required on the printer driver P 200 Before Using the Printer Driver ...

Страница 95: ... network and turned on The TCP IP setting is correct on this equipment and your computer y IPP Printing is only available for Windows 2000 Windows XP Windows Vista and Windows Server 2003 Installation for IPP Printing by Add Printer Wizard Windows 2000 XP Server 2003 Installing the printer driver for IPP printing by Add Printer Wizard The following describes an installation on Windows XP The proce...

Страница 96: ...talling Client Software for IPP Printing 2 Click the Add a printer in the Printer Tasks menu y When using the Windows 2000 double click Add Printer icon y The Add Printer Wizard dialog box appears 3 Click Next 4 Select Network printer and click Next ...

Страница 97: ...of this equipment provided from DNS instead of IP address Example URL mfp_00c67861 toshiba com http mfp_00c67861 toshiba com 631 Print P for Print in the IPP URL must be capitalized When you are using on Windows XP the IPP port can be created by entering print non capitalized in the IPP URL but the print job cannot be sent to the equipment In that case delete the IPP port and then cre ate the IPP ...

Страница 98: ...appears If this dialog box appears enter the user name and pass word and click OK For user name and password please ask your administrator 7 Click Have Disk y The Install From Disk dialog box appears 8 Click Browse y The Locate File dialog box appears 9 Insert the Client Utilities CD ROM into the CD ROM drive y When inserting the Client Utilities CD ROM the installer may automatically start Click ...

Страница 99: ...r Windows 2000 XP Server 2003 locate CD ROM drive Client Drivers PS W2K_XP_VISTA language y To install the XPS printer driver locate CD ROM drive Client Drivers XPS W2K_XP_VISTA language When using Windows XP x64 select the following folder To install the PCL6 printer driver locate CD ROM drive Client Drivers PCL6 XP_VISTA_X64 language To install the PSL3 printer driver locate CD ROM drive Client ...

Страница 100: ...our computer the Default Printer screen is displayed Continue to next step y If no printer driver had been installed on your computer the complete screen is dis played Skip to step 14 If the same printer driver has been installed the following dialog box appears If it appears select Replace existing driver and click Next 13 Select whether using this printer as a default printer and click Next ...

Страница 101: ...driver P 200 Before Using the Printer Driver The Font Manager is also available to install and manage the TrueType fonts on your computer To install the Font Manager you must install it from the Font CD ROM that comes with the Printer Kit or Printer Scanner Kit P 342 Installing Font Manager Windows Vista Installing the printer driver for IPP printing by Add Printer Wizard You must log into Windows...

Страница 102: ...re for Windows 100 Installing Client Software for IPP Printing 1 Click Start select Control Panel and click Printer under Hard ware and Sound to open the Printers folder 2 Click Add a printer y The Add Printer dialog box appears ...

Страница 103: ...ware for IPP Printing 101 3 Select Add a network wireless or Bluetooth printer in the screen Choose a local or network printer 4 Select The Printer that I want isn t listed in the next screen Searching for available printers ...

Страница 104: ... you connect from the Internet enter the FQDN of this equipment provided from DNS instead of IP address Example URL mfp_00c67861 toshiba com http mfp_00c67861 toshiba com 631 Print P for Print in the IPP URL must be capitalized When you are using on Windows Vista the IPP port can be created by entering print non capitalized in the IPP URL but the print job cannot be sent to the equipment In that c...

Страница 105: ...word appears If this dialog box appears enter the user name and pass word and click OK For user name and password please ask your administrator 7 Click Have Disk y The Install From Disk dialog box appears 8 Click Browse y The Locate File dialog box appears 9 Insert the Client Utilities CD ROM into the CD ROM drive y When inserting the Client Utilities CD ROM the installer may automatically start C...

Страница 106: ...L3 printer driver for Windows Vista locate CD ROM drive Client Drivers PS W2K_XP_VISTA language y To install the XPS printer driver locate CD ROM drive Client Drivers XPS W2K_XP_VISTA language When using Windows Vista x64 select the following folder To install the PCL6 printer driver locate CD ROM drive Client Drivers PCL6 XP_VISTA_X64 language To install the PSL3 printer driver locate CD ROM driv...

Страница 107: ... If the user account control is enabled the Installing device driver dialog box is dis played Click Continue to continue the installation y When the Windows Security dialog box is displayed click Install this driversoftware anyway to continue the installation 13 Select whether using this printer as a default printer and click Next If the Printer Sharing dialog box is displayed select whether to sh...

Страница 108: ...nter driver P 200 Before Using the Printer Driver y The Font Manager is also available to install and manage the TrueType fonts on your computer To install the Font Manager you must install it from the Client Utilities CD ROM separately y The Font Manager is also available to install and manage the TrueType fonts on your computer To install the Font Manager you must install it from the Font CD ROM...

Страница 109: ...er other client software cannot be installed using this method P 113 Installation for Novell Printing by Point and Print In addition to the above methods you can also install the printer driver using Add Printer Wizard The printer driver that is installed by Add Printer Wizard is set up same as Point and Print Before installing the printer driver for Novell printing check with your system administ...

Страница 110: ...ser who has the Administrators or Power Users privi lege You must log into Windows as a user who has the Administrators privilege when using Windows XP Server 2003 y If the installer does not automatically start use the Explorer to open the e STUDIO folder in the Client Utilities CD ROM and double click SetupLauncher exe 1 Insert the Client Utilities CD ROM into the CD ROM drive y If the installer...

Страница 111: ...er only If you select this menu skip to Step 5 Custom Install Select this if you would like to pick and choose the installation components If you select this menu proceed to Step 4 In addition to the above menus the main menu window has the Scan Driver and Utilities and the Fax Driver menus For more information about these drivers and utilities please see the Scanning Guide the e Filing Guide and ...

Страница 112: ...S Essentials Pack installed y There are also scan software e Filing software and Fax software in the list For more information about each software please see the Scanning Guide the e Filing Guide and the Network Fax Guide 5 Confirm the list of the software to install and click Install y If you install AddressBook Viewer and or File Downloader you can change the folder where these programs are inst...

Страница 113: ...ck OK For NDS NDPS Mode Example Root Org Context dept1 queue name mfp_queue Org mfp_queue dept1 For Bindery Mode Example NetWare file server name Nwsrv queue name mfp_queue Nwsrv mfp_queue The queue for this equipment should be set up by an administrator If you do not know the queue for this equipment ask your administrator ...

Страница 114: ...the instal lation 7 When the installation is complete click Finish y The main menu window is displayed The Installer may ask you to restart your computer If it does select Yes I want to restart my computer now and click Finish to restart your computer 8 Click Exit y When a message appears asking whether to finish the installation click OK Before using the printer driver for printing please configu...

Страница 115: ...indows NT 4 0 2000 XP Server 2003 Installing the printer drivers for Novell printing by Point and Print The following describes an installation on Windows XP The procedure is the same when Win dows NT 4 0 Windows 2000 or Windows Server 2003 is used You must log into Windows as a user who has the Administrators or Power Users privilege You must log into Windows as a user who has the Administrators ...

Страница 116: ...e in NDPS mode and the printer drivers for each Operating System are installed to a NDPS broker the printer driver is automatically installed y Unless using the NetWare in NDPS mode and printer drivers for each Operating Sys tem are installed to a NDPS broker the Add Printer Wizard dialog box appears Con tinue to the next step 2 Click OK 3 Click Have Disk y The Install From Disk dialog box appears...

Страница 117: ...00 XP Server 2003 is located and click Open y To install the PCL6 printer driver locate CD ROM drive Client Drivers PCL6 W2K_XP_VISTA language y To install the PSL3 printer driver locate CD ROM drive Client Drivers PS W2K_XP_VISTA language 7 Click OK 8 Select the printer driver and click OK 9 The installation is completed Before using the printer driver for printing please configure the installed ...

Страница 118: ...nt in the network with Windows Explorer and double click a queue When the NetWare has been set up for the Bindery mode open the NetWare file server and double click the queue for the equipment When the NetWare has been set up for the NDS or NDPS mode browse the NDS tree and context and double click the queue for the equipment y The Printers dialog box appears 2 Click Yes y The Add Printer Wizard d...

Страница 119: ... y Unless using the NetWare in NDPS mode and printer drivers for each Operating Sys tem are installed to a NDPS broker the Add Printer Wizard dialog box appears Con tinue to the next step 4 Click Have Disk y The Install From Disk dialog box appears 5 Click Browse y The Open dialog box appears 6 Insert the Client Utilities CD ROM into the CD ROM drive y When inserting the Client Utilities CD ROM th...

Страница 120: ...k OK y To install the PCL6 printer driver locate CD ROM drive Client Drivers PCL6 9X_ME language y To install the PSL3 printer driver locate CD ROM drive Client Drivers PS 9X_ME language 8 Click OK 9 Select the printer driver and click Next If the same printer driver has been installed the following dialog box appears If it appears select Replace existing driver and click Next ...

Страница 121: ...nt a test page and click Finish 12 Make sure a test page is printed successfully and click Yes to close the dialog box 13 The printer driver is installed and the print queue window appears Before using the printer driver for printing please configure the installed options of the equipment and department code if required on the printer driver P 200 Before Using the Printer Driver ...

Страница 122: ... for Web Services Scanning is automatically installed as well as the client software For more information about Web Services Scanning please see the Scanning Guide y Once the printer driver is installed from the Client Utilities CD ROM you will no longer need the CD ROM for the installation of the Web Service Print because the printer driver data will remain y For the uninstallation procedure of t...

Страница 123: ...ontrol dialog box appears y If the User account control is disabled the Network discovery and file sharing screen is displayed Go to Step 4 3 Click Continue in the User account control dialog box y The Network discovery and file sharing screen is displayed 4 Click Yes turn on network discovery and file sharing for all public networks y Connected computers and icons of the multifunction devices are...

Страница 124: ... Association is displayed on the task bar y If the User account control is disabled Found New Hardware is displayed on the task bar Go to Step 8 6 Click PnPX Device Association on the task bar y The User account control dialog box appears 7 Click Continue in the User account control dialog box y Found New Hardware is displayed on the task bar You can check the installing status by clicking Install...

Страница 125: ...ice dialog box appears If the user account control is enabled the Installing device driver dialog box is displayed Click Continue to continue the installation 10 Click Browse my computer for driver software advanced 11 Set the Client Utilities CD ROM to the CD ROM drive click Browse to specify the position of the CD ROM drive and then click Next ...

Страница 126: ...t to exit the installer and continue the operation 12 Select the printer driver each language to be installed and then click Next y When installing the PCL6 printer driver UKE CD ROM drive client drivers pcl6 w2k_xp_vista uke es4ox2 inf When the Windows Security dialog box is displayed click Install this driversoftware anyway to continue the installation 13 The installation is completed ...

Страница 127: ...6 JavaScript must be enabled on the web browser Installing the printer driver for Novell iPrint To install the printer driver for Novell iPrint on the client computer download and install the iPrint Client and printer driver from the NetWare server 1 Start the your web browser and enter the following URL in the address bar http IP address or DNS for NDPS Manager ipp y If you do not know the IP add...

Страница 128: ...our system y When using Windows Server 2003 that the Service Pack is installed the installation from TopAccess cannot be performed In that case please install the software in the other method y For instructions on how to upload the software in the equipment please refer to the TopAc cess Guide Installing client software from TopAccess for Windows 1 In TopAccess click the Install Software link at t...

Страница 129: ...rts and the InstallShield Wizard dialog box appears 5 Follow the installation procedure using the Client Utilities CD ROM described in following section P 37 Installation for Raw TCP LPR Printing Using the Installer P 65 Installation for SMB Printing Using the Installer P 108 Installation for Novell Printing Using the Installer ...

Страница 130: ... Windows XP The procedure is the same when other versions of Windows are used 1 Click Start and click Printers and Faxes to open the Printers and Faxes folder y If you are using the Windows 2000 NT 4 0 Me 98 click Start select Settings and click Printers to open the Printers folder y When using Windows Vista click Start select Control Panel and click Printer under Hardware and Sound to open the Pr...

Страница 131: ...the next step 4 Click the File menu and select Server Properties y The Print Server Properties dialog box appears y When you are using Windows Vista follow the procedure below 1 Right click in the blank area in the Printers window and click Run as administra tor and then Server Properties in the menu displayed 2 When Windows needs your permission to continue appears click Continue ...

Страница 132: ...using Windows Vista follow the procedure below after selecting Remove 1 Select Remove driver and driver package and click OK in the Remove Driver And Package dialog box 2 Click Yes in the Print Server Properties dialog box 3 When Driver package information collected appears click Delete 4 When Driver package was removed appears click OK This is the end of the procedure for Windows Vista 6 Click Ye...

Страница 133: ...for Installation 132 Installing the Printer on Mac OS X 10 2 4 to Mac OS X 10 4 x 133 Installing the Macintosh PPD File 133 Configuring the Printer on Mac OS X 10 4 x 137 Configuring the Printer on Mac OS X 10 2 4 to Mac OS X 10 3 x 149 Installing the Printer on Mac OS 8 6 9 x 160 Installing the Macintosh PPD File 160 Configuring the Printer on Mac OS 8 6 9 x 160 Installing Client Software from To...

Страница 134: ...rWriter 8 printer driver version 8 6 5 or later This Macintosh PPDs are supplied for Mac OS 8 6 to 9 x and it also supports Mac OS X 10 1 10 2 Classic mode Information within the PPD file for Mac OS X works in conjunction with the Print Center Mac OS X 10 2 4 to 10 2 8 or Printer Setup Utility Mac OS X 10 3 x to Mac OS X 10 4 x on Mac OS X 10 2 4 to Mac OS X 10 4 x Planning for Installation System...

Страница 135: ... 10 3 x is used 1 Insert the Client Utilities CD ROM into the CD ROM drive and open your language folder in the MacPPD OSX folder 2 Copy the GZIP file TOSHIBA_e ST450_453Srs dmg gz or TOSHIBA_e ST280_283Srs dmg gz to the desktop 3 Double click the GZIP file on the desktop y The Disk Image file TOSHIBA_e ST450_453Srs dmg or TOSHIBA_e ST280_283Srs dmg is extracted on the desktop y If the installer w...

Страница 136: ...e for Macintosh 134 Installing the Printer on Mac OS X 10 2 4 to Mac OS X 10 4 x 6 Click Continue y The Software License Agreement window is displayed 7 Click Continue 8 Click Agree y The Select a Destination window is displayed ...

Страница 137: ...Continue y The Easy Install window is displayed 10 Click Install or Upgrade y The Authenticate dialog box appears 11 Enter the name and password and click OK y It start copying the PPD files for each language When you install the PPD file to Mac OS 10 2 4 to 10 2 8 the Authenticate dialog box does not appear in this step ...

Страница 138: ...OS X 10 4 x 12 Click Close to close the installer window 13 Delete the GZIP files and Installer files created from the desktop 14 Continue the procedure for configuring the printer P 149 Configuring the Printer on Mac OS X 10 2 4 to Mac OS X 10 3 x P 137 Configuring the Printer on Mac OS X 10 4 x ...

Страница 139: ...inting from Macintosh computer y AppleTalk Printing When this equipment and your computer are connected over AppleTalk network you can enable AppleTalk printing from Macintosh computer y IPP Printing When this equipment and your computer are connected over TCP IP network you can enable IPP printing from Macintosh computer y Bonjour Printing When this equipment and your computer are connected over ...

Страница 140: ...450 453 Series PS or UK PS TOSHIBA e ST280 283 Series PS or UK PS y In the Name field the name that is entered in the Address field is automatically dis played y When you enter the IP address or DNS name of this equipment in the Address field the correct PPD file is automatically selected in the Print Using drop down menu If the correct PPD is not automatically selected select TOSHIBA in the Print...

Страница 141: ...elect this when the Drawer 1 is installed Drawer 1 LCF Select this when the Drawer 1 and LCF are installed Drawer 1 3 Select this when the Drawer 1 and Drawer 3 are installed Drawer 1 3 4 Select this when the Drawer 1 Drawer 3 and Drawer 4 are installed Drawer 1 2 Select this when the Drawer 1 and Drawer 2 are installed Drawer 1 2 LCF Select this when the Drawer 1 Drawer 2 and LCF are installed Dr...

Страница 142: ...Mac OS X 10 2 4 to Mac OS X 10 4 x 6 Click Continue y The printer is added to the Printer List Configuring Macintosh AppleTalk printing 1 Start the Printer Setup Utility located Applications Utilities folder in the Boot Disk y The Printer List dialog box appears 2 Click Add ...

Страница 143: ...ically dis played y When you select the equipment in the list the correct PPD file is automatically selected in the Print Using drop down menu If the correct PPD is not automatically selected select TOSHIBA in the Print Using drop down menu and select the PPD file displayed in the list 4 Click Add y The Determining Installable Options window appears 5 Click Configure while the windows is displayed...

Страница 144: ...283 Series Drawer 1 Select this when the Drawer 1 is installed Drawer 1 LCF Select this when the Drawer 1 and LCF are installed Drawer 1 3 Select this when the Drawer 1 and Drawer 3 are installed Drawer 1 3 4 Select this when the Drawer 1 Drawer 3 and Drawer 4 are installed Drawer 1 2 Select this when the Drawer 1 and Drawer 2 are installed Drawer 1 2 LCF Select this when the Drawer 1 Drawer 2 and...

Страница 145: ...tosh IPP Printing When you want to setup IPP print queue in the Mac OS X follow the procedures here 1 Start the Printer Setup Utility located Applications Utilities folder in the Boot Disk y The Printer List dialog box appears 2 Click Add y This is mandatory to show all the advanced print option in the drop down menu in the Print List window ...

Страница 146: ...PS or UK PS y In the Name field the name that is entered in the Address field is automatically dis played y When you enter the IP address or DNS name of this equipment in the Address field the correct PPD file is automatically selected in the Print Using drop down menu If the correct PPD is not automatically selected select TOSHIBA in the Print Using drop down menu and select the PPD file displaye...

Страница 147: ...alled Offset Stacker Select this when the Offset Stacker is installed y Drawers For e STUDIO452 Series and e STUDIO453 Series Not Installed Select this when no optional drawer is installed Drawer 3 Select this when the drawer 3 is installed Drawer 3 and 4 Select this when the drawer 3 and 4 are installed LCF Select this when the LCF is installed For e STUDIO282 Series and e STUDIO283 Series Drawer...

Страница 148: ...ored and perform print ing correctly y Automatic Duplexing Unit e STUDIO282 Series and e STUDIO283 Series Only Not Installed Select this when the Automatic Duplexing Unit is not installed Installed Select this when the Automatic Duplexing Unit is installed 6 Click Continue y The printer is added to the Printer List Configuring Macintosh Bonjour Printing 1 Start the Printer Setup Utility located in...

Страница 149: ...evice name that you selected in the list is automatically dis played y When you select the equipment in the list the correct PPD file is automatically selected in the Print Using drop down menu If the correct PPD is not automatically selected select TOSHIBA in the Print Using drop down menu and select the PPD file displayed in the list 4 Click Add y The Installable Options window appears ...

Страница 150: ...283 Series Drawer 1 Select this when the Drawer 1 is installed Drawer 1 LCF Select this when the Drawer 1 and LCF are installed Drawer 1 3 Select this when the Drawer 1 and Drawer 3 are installed Drawer 1 3 4 Select this when the Drawer 1 Drawer 3 and Drawer 4 are installed Drawer 1 2 Select this when the Drawer 1 and Drawer 2 are installed Drawer 1 2 LCF Select this when the Drawer 1 Drawer 2 and...

Страница 151: ...e connected over TCP IP network you can enable LPR printing from Macintosh computer y AppleTalk Printing When this equipment and your computer are connected over AppleTalk network you can enable AppleTalk printing from Macintosh computer y IPP Printing When this equipment and your computer are connected over TCP IP network you can enable IPP printing from Macintosh computer y Bonjour Printing When...

Страница 152: ...X 10 2 4 to Mac OS X 10 4 x 1 Start the Print Center for Mac OS X 10 2 4 to 10 2 8 or Printer Setup Utility for Mac OS X 10 3 x located in the Applications Utilities folder in the Boot Disk Mac OS X 10 2 4 to 10 2 8 Mac OS X 10 3 x y The Printer List dialog box appears 2 Click Add ...

Страница 153: ...me print Printer Model TOSHIBA PPD TOSHIBA e ST450 453 Series PS or UK PS TOSHIBA e ST280 283 Series PS or UK PS y For Mac OS X 10 2 4 to 10 2 8 the Printer Type drop down menu does not dis played y For Mac OS X 10 2 4 to 10 2 8 please uncheck the Use default queue on server box 4 Click Add y The printer is added to the Printer List 5 Continue the procedure to configure the installable options P 1...

Страница 154: ...lowing describes an operation on Mac OS 10 3 x The procedure is the same when Mac OS X 10 2 4 to 10 2 8 is used 1 Start the Print Center for Mac OS X 10 2 4 to 10 2 8 or Printer Setup Utility for Mac OS X 10 3 x located Applications Utilities folder in the Boot Disk Mac OS X 10 2 4 to 10 2 8 Mac OS X 10 3 x y The Printer List dialog box appears 2 Click Add ...

Страница 155: ...en select the equipment displayed in the list y If the AppleTalk network is not configured with a zone select Local AppleTalk zone 4 Select TOSHIBA at the Printer Model drop down menu and select the PPD file 5 Click Add y The printer is added to the Printer List 6 Continue the procedure to configure the installable options P 158 Configuring the installable options ...

Страница 156: ...n Mac OS 10 3 x The procedure is the same when Mac OS X 10 2 4 to 10 2 8 is used 1 Start the Print Center for Mac OS X 10 2 4 to 10 2 8 or Printer Setup Utility for Mac OS X 10 3 x located Applications Utilities folder in the Boot Disk Mac OS X 10 2 4 to 10 2 8 Mac OS X 10 3 x y The Printer List dialog box appears 2 Click Add while pressing the option button y This is mandatory to show all the adv...

Страница 157: ...TTP Device Name Any Name Device URI http IP address 631 Print Printer Model TOSHIBA PPD TOSHIBA e ST450 453 Series PS or UK PS TOSHIBA e ST280 283 Series PS or UK PS When IPP SSL is enabled specify as followings Device Internet Printing Protocol https Device URL https IP address 443 Print 4 Click Add y The printer is added to the Printer List 5 Continue the procedure to configure the installable o...

Страница 158: ...ure is the same when Mac OS X 10 2 4 to 10 2 8 is used 1 Start the Print Center for Mac OS X 10 2 4 to 10 2 8 or Printer Setup Utility for Mac OS X 10 3 x located in the Applications Utilities folder in the Boot Disk Mac OS X 10 2 4 to 10 2 8 Mac OS X 10 3 x y The Printer List dialog box appears 2 Click Add y This is mandatory to show all the advanced print option in the drop down menu in the Prin...

Страница 159: ...p ment displayed in the list In Mac OS X 10 2 4 to 10 3 x the Bonjour is named as Rendezvous 4 Select TOSHIBA at the Printer Model drop down menu and select the PPD file 5 Click Add y The printer is added to the Printer List 6 Continue the procedure to configure the installable options P 158 Configuring the installable options ...

Страница 160: ... following describes an operation on Mac OS 10 3 x The procedure is the same when Mac OS X 10 2 4 to 10 2 8 is used 1 In the Printer List dialog box select the printer and then select Show Info in the Printers menu y The Printer Info dialog box appears 2 Select Installable Options in the drop down menu y The Installable Options window is displayed ...

Страница 161: ...awer 1 is installed Drawer 1 LCF Select this when the Drawer 1 and LCF are installed Drawer 1 3 Select this when the Drawer 1 and Drawer 3 are installed Drawer 1 3 4 Select this when the Drawer 1 Drawer 3 and Drawer 4 are installed Drawer 1 2 Select this when the Drawer 1 and Drawer 2 are installed Drawer 1 2 LCF Select this when the Drawer 1 Drawer 2 and LCF are installed Drawer 1 2 3 Select this...

Страница 162: ...StuffIt documentation 3 Double click the boot drive icon and open the System Folder Extensions Printer Descriptions folder 4 Select and drag the Macintosh PPD file that you extracted to the Printer Descriptions folder 5 Continue the procedure for configuring the printer P 160 Configuring the Printer on Mac OS 8 6 9 x Configuring the Printer on Mac OS 8 6 9 x After you copy the PPD file to the Prin...

Страница 163: ... disk y The New Desktop Printer dialog box appears 2 Make sure LaserWriter 8 is selected in the With drop down menu select Printer LPR and click OK y The Macintosh LPR Printer Selection dialog box opens 3 Click Change in the PostScript Printer Description PPD File area y The Select a PostScript Printer Description File dialog box appears 4 Select the PPD file TOSHIBA_e ST450_453Srs or TOSHIBA_e ST...

Страница 164: ...ternet Printer dialog box appears 6 Enter the IP Address of this equipment in the Printer Address field and Print in the Queue field Then click OK 7 Click Create 8 Enter the Desktop Printer name and click Save y The printer is added to the desktop 9 Double click the desktop printer icon that you created y The Desktop Printer utility window opens ...

Страница 165: ...he Hanging Finisher is installed Multi Position Stapler Select this when the Finisher or Saddle Stitch Finisher is installed Multi Position Stapler and Hole Punch Select this when the Finisher or Saddle Stitch Finisher and Hole Punch unit are installed Job Separator Select this when the Job Separator is installed Offset Stacker Select this when the Offset Stacker is installed When you select Multi...

Страница 166: ...e Drawer 1 and Drawer 2 are installed Drawer 1 2 LCF Select this when the Drawer 1 Drawer 2 and LCF are installed Drawer 1 2 3 Select this when the Drawer 1 Drawer 2 and Drawer 3 are installed Drawer 1 2 3 4 Select this when the Drawer 1 Drawer2 Drawer 3 and Drawer 4 are installed LCF is not available for some countries or regions y Automatic Duplexing Unit e STUDIO282 Series and e STUDIO283 Serie...

Страница 167: ...this if a finisher is not installed Single Position Stapler Select this when the Hanging Finisher is installed Multi Position Stapler Select this when the Finisher or Saddle Stitch Finisher is installed Multi Position Stapler and Hole Punch Select this when the Finisher or Saddle Stitch Finisher and Hole Punch unit are installed Job Separator Select this when the Job Separator is installed Offset ...

Страница 168: ...r 1 and Drawer 3 are installed Drawer 1 3 4 Select this when the Drawer 1 Drawer 3 and Drawer 4 are installed Drawer 1 2 Select this when the Drawer 1 and Drawer 2 are installed Drawer 1 2 LCF Select this when the Drawer 1 Drawer 2 and LCF are installed Drawer 1 2 3 Select this when the Drawer 1 Drawer 2 and Drawer 3 are installed Drawer 1 2 3 4 Select this when the Drawer 1 Drawer2 Drawer 3 and D...

Страница 169: ...ack is installed the installation from TopAccess cannot be performed In that case please install the software in the other method y For instructions on how to upload the software in the equipment please refer to the TopAc cess Guide Installing client software from TopAccess for Macintosh 1 In TopAccess click the Install Software link at the bottom of the screen y The Install Client Software page o...

Страница 170: ...o Mac OS X 10 3 x y For e STUDIO282 Series and e STUDIO283 Series TOSHIBA_e ST280_283Srs sit Click this link to download the PPD file for Mac OS 8 6 9 x and Mac OS X 10 1 10 2 Classic mode TOSHIBAeST280_283Srs dmg gz Click this link to download the PPD file for Mac OS X 10 2 4 to Mac OS X 10 3 x 4 Download the PPD file of your Mac OS version on your desktop by following the prompts 5 After you dow...

Страница 171: ...install the client software on UNIX Setting Up the UNIX Filters 170 About UNIX Filters 170 System Requirements 171 Configuring UNIX Printing Using UNIX Filters 171 Setting Up the CUPS 180 About CUPS 180 Configuring UNIX Printing Using CUPS 180 Installing Client Software from TopAccess 196 ...

Страница 172: ...n opt toshiba tap bin A symbolic link to this file will be installed in the usr local bin directory as lptap estbwBackend AIX filter only This is an executable program that is called by the AIX qdaemon It receives the arguments from the qdaemon interrogates it for copy information etc then calls the queues copy of net_estbw to run the print This program will be installed in opt toshiba tap bin est...

Страница 173: ...heck this directory whether the Python module is installed Configuring UNIX Printing Using UNIX Filters When you want to configure the UNIX printing using the UNIX filters install the UNIX filters and configure the LPR queue Installing the UNIX Filters UNIX Filters are provided as TAR files for each Operating System You can install them by copying the TAR file into the root directory and extract t...

Страница 174: ...arisFilter Usa For HP UX CD ROM Admin HP UXFilter Usa For AIX CD ROM Admin AixFilter Usa For Linux CD ROM Admin LinuxFilter Usa For OpenUNIX CD ROM Admin OpenUnixFilter Usa 5 Change to the root directory 6 Enter the following command y For Solaris tar xvf solaris tar y For HP UX tar xvf hpux tar y For IBM AIX tar xvf aix tar y For Linux tar xvf linux tar y For OpenUNIX tar xvf openunix tar 7 The c...

Страница 175: ...d stores the printer interface file in the etc lp interfaces direc tory in a file with the same name as the print queue The configuration file is stored in the etc lp interfaces directory in a file named queue name conf y Under Linux the printtool or equivalent utility must be used to add the printer into the lp printing system after executing the est coloradd command Creating a Print Queue Manual...

Страница 176: ...eate the following file etc lp interfaces queue name conf 4 Add a line as below in the queue name conf dest IP address 5 Save the file 6 Enter the following command chmod x queue name conf 7 Enter the following command chown lp lp queue name conf 8 Enter the following command ps ef grep lpsched grep iv grep dev null 2 1 9 Enter the following command Echo 10 If 0 is outputted on the screen turn the...

Страница 177: ...Enter the following command mkque q queue name a s_statfilter usr lib lpd bsdshort a up TRUE a host IP address a rq dssc 9 Enter the following command mkquedev q queue name d dev_ queue name a backend opt toshiba tap bin estbwBackend 10 Enter the following command cp usr lib lpd pio predef net_estbw opt toshiba tap filter queue name Creating a print queue manually on Linux 1 Enter the following co...

Страница 178: ...eue name IP_ADDRESS rm opt toshiba tap bin flag_ queue name 12 Restart your lpd Creating a print queue manually on OpenUNIX 1 Log on to the root account 2 Open your Linux UNIX editor 3 Create the following file etc lp interfaces queue name conf 4 Add a line as below in the queue name conf dest IP address 5 Save the file 6 Enter the following command chmod x queue name conf 7 Enter the following co...

Страница 179: ...ameter and value y For example to change the default orientation to Landscape add the following line orient LANDSCAPE Deleting the Print Queue There are two ways to delete the print queue one is deleting a print queue using estbwrm and the other is deleting a print queue manually without using estbwrm P 177 Deleting a Print Queue Using estbwrm P 178 Deleting a Print Queue Manually Deleting a Print...

Страница 180: ...following command rm etc lp interfaces queue name conf Deleting a print queue manually on HP UX 1 Log on to the root account 2 Enter the following command ps ef grep lpsched grep iv grep dev null 2 1 3 Enter the following command Echo 4 If 0 outputted on the screen turn the scheduler OFF Enter the following command usr sbin lpshut dev null 2 1 5 Enter the following command usr sbin lpadmin x queue...

Страница 181: ...iba tap interface queue name conf 4 Enter the following command opt toshiba tap bin modPrintcap d queue name 5 Enter the following command ls opt toshiba tap bin flag_ queue name 6 If the above file exists enter the following command opt toshiba tap bin printconf_import d queue name rm opt toshiba tap bin flag_ queue name 7 Restart your lpd Deleting a print queue manually on OpenUNIX 1 Log on to t...

Страница 182: ...D file that works in conjunction with an interface like XPP KPrinter etc It can also be used on OSX in the same way that it is used on Linux but this is not recom mended Supplied Components There is one supplied component a PPD file called TOSHIBA_EST450_453_CUPS gz or TOSHIBA_EST280_283_CUPS gz It has been compressed using gzip It does not need to be uncompressed for Linux to use the PPD file and...

Страница 183: ...e displayed y When using the Red Hat Linux continue to the next step y When using other than the Red Hat Linux skip to step 10 5 When using the Red Hat Linux enter the following command usr bin redhat switch printer y The redhat switch printer dialog box appears 6 Select CUPS and click OK y The information dialog box appears 7 Click OK 8 Enter the following command service cups start If the CUPS h...

Страница 184: ...e Printer page is displayed 12 Click Add Printer y The Admin page is displayed 13 Enter the printer name location and description of the printer in each field and click Continue If a new printer name is a duplicate of a name already in the printer list the new printer will replace the original printer ...

Страница 185: ...drop down menu and click Continue 15 Enter lpd IP address Print in the Device URI field and click Continue Make sure to capitalize the P in Print for the device URI 16 Select TOSHIBA at the Make list and click Continue If you do not see TOSHIBA in the Make list restart CUPS ...

Страница 186: ...SL is enabled on the Equipment When the IPP SSL is enabled on the equipment you requires the following settings on Linux OS y OpenSSL should be installed y CUPS should be configured with enable ssl option y HTTPS symbol should be created in the usr lib cups backend directory 1 Open the console and login with root privileges Use su or sudo s to login with root privileges 2 Enter the following comma...

Страница 187: ...d IPP Printer IPP printing from Linux OS is done from the CUPS server as a backend 1 Insert the Client Utilities CD ROM into the CD ROM drive 2 Log on to the root account and create Toshiba directory in the usr share cups model directory 3 Copy the GZIP file into the usr share cups model Toshiba direc tory or enter the following command cp TOSHIBA_EST450_453_CUPS gz usr share cups model Toshiba or...

Страница 188: ...ocal host 433 in the address field to access the Common UNIX Printing System 11 Add a new https printer by clicking Add Printer Configure the parameters as Name Any Name Location Optional Description Optional Device Internet Printing Protocol http Device URL http IP address 631 Print Model Driver TOSHIBA When IPP SSL is enabled specify as followings Device Internet Printing Protocol https Device U...

Страница 189: ...tions You can set the print options that applied for the print jobs using CUPS Print option configuration 1 Click the Manage Printers link in the startup page The Printer page is displayed 2 Select this equipment and then click Configure Printer ...

Страница 190: ...unit of 6 points Select the outer margin Booklet Paper Size None Off Letter A4 Legal Statement Ledger Folio A3 A5 B4 B5 Computer 13 LG 8 5 SQ 8K 16K Select a paper size for the booklet Each two pages are printed on both side of a sheet which is then folded The booklet size will be the half size of the paper size that you specify Left to Right Page Lay out Right to Left Left to Right Select whether...

Страница 191: ...otation Long Edge Punch with 180 degree rotation Short Edge Punch with 180 degree rotation Select whether or not a print job is hole punched Stapling Off Upper Left Portrait Upper Right Landscape Middle Left Portrait Middle Top Landscape Lower Left Portrait Upper Left Landscape Upper Right Portrait Lower Right Landscape Middle Right Portrait Middle Bottom Landscape Lower Right Portrait Lower Left ...

Страница 192: ...lio Com puter 13 LG 8 5 SQ 8K 16K Select the paper size Media Source Auto Default Drawer 1 Drawer 2 LCF Drawer 3 Drawer 4 Bypass Tray Plain Thick 1 Thick 2 Thick 3 Transparency Select the paper source Continue button Determines the selected items Option Value Alternative Value Description Drawers Not Installed Drawer 3 Drawer 3 and 4 LCF Select the combination among Drawer 3 Drawer 4 and LCF Finis...

Страница 193: ...inue button Determines the selected items Option Value Alternative Value Description Department Code DC Digit 1 to Digit 5 0 to 9 Specify the 5 digit department code when Department Code of Printing Modes is enabled For the appropriate department code check with your system administrator Continue button Determines the selected items Option Value Alternative Value Description Halftone Auto Detail S...

Страница 194: ...ied Unclassified information Ending Banner none Select whether banner pages are printed after print ing documents or not If they are select among the items below classified Classified information confidential Confidential information secret Secret information standard Standard information topsecret Top secret unclassified Unclassified information Continue button Determines the selected items Optio...

Страница 195: ...Printer You can modify the printer that you create Modifying Printer You can change the location and description of the printer 1 Click the Manage Printers link in the startup page y The Printer page is displayed 2 Click Modify Printer ...

Страница 196: ...dify the location and description in each field and click Con tinue Uninstalling Printer To uninstall the printer that you create perform the following procedure Uninstalling Printer 1 Click the Manage Printers link in the startup page y The Printer page is displayed ...

Страница 197: ...etting Up the CUPS 195 2 Click Delete Printer y The printer is deleted 3 Then delete the PPD file TOSHIBA_EST450_453_CUPS gz or TOSHIBA_EST280_283_CUPS gz from the usr share cups model Toshiba directory ...

Страница 198: ...r 2003 that the Service Pack is installed the installation from TopAccess cannot be performed In that case please install the software in the other method y For instructions on how to upload the software in the equipment please refer to the TopAc cess Guide Installing client software from TopAccess for UNIX 1 In TopAccess click the Install Software link at the bottom of the screen y The Install Cl...

Страница 199: ... link that you want to install 4 Download the UNIX tar file containing the UNIX filters on your desk top by following the prompts 5 After you download the UNIX tar file refer to the installation proce dure for UNIX to set up the printer P 170 Setting Up the UNIX Filters ...

Страница 200: ......

Страница 201: ...00 Setting the Department Code 204 Copying the PPD File for Windows 206 Printing from Application 207 Considerations and Limitations 207 How to Print 208 Setting Up Print Options 210 How to Setup 210 Print Options 214 Printing with Extended Print Functionality 242 Printing Various Print Job Types 242 Printing with Various Layout and Finishing Options 249 ...

Страница 202: ...work you can con figure the options manually P 200 Configuring Options Manually y If this equipment and your computer are connected in the TCP IP network you can configure the options automatically obtaining the settings using SNMP communication P 202 Configuring the Options Automatically When the printer drivers are installed using Point and Print on Windows 98 Me you must click Update Now in the...

Страница 203: ...NMP Com munication option and set the following options Model Selection This sets the model type of the equipment Automatic Duplexing Unit This sets whether or not optional automatic duplexing unit is installed For e STUDIO282 Series and e STUDIO283 Series Only Drawer This sets whether the drawers or LCF not available for some countries or regions are installed Finisher This sets whether or not op...

Страница 204: ...d Bypass Tray Select the paper type of paper that is loaded in the Bypass Tray Override Application Paper Settings Check this to use the paper source setting in the printer driver rather than the application setting 5 Click Apply and OK to save settings Configuring the Options Automatically The following describes an instruction on Windows XP The procedure is the same when other versions of Window...

Страница 205: ... The printer driver properties dialog box appears 2 Display the Configuration tab check on Enable SNMP Communi cation and click Update Now y The printer driver starts communicating with system and obtains option settings auto matically If the connection to the equipment has not been configured correctly the message The address of your printer could not be located Would you like to find it will be ...

Страница 206: ...t members Also users can check to see who submitted the print jobs by using the Touch Panel Display and monitoring tools Please ask your administrator whether or not you should enter the Department Code When the User Management Setting is enabled on the equipment the User Management Set ting is used to manage the print jobs instead of the department code In that case the user name that is entered ...

Страница 207: ...e Enforcement is set to Print the invalid department code print job will be printed When the Department Code Enforcement is set to Delete the invalid department code print job will be deleted without printing However when using Windows NT 4 0 and configure the connection through a NetWare print server an error message for entering the invalid department code will not be displayed even if the Depar...

Страница 208: ... application copy the printer description file to the appropriate location Copying the printer description file 1 On the Client Utilities CD ROM open the folder that contains the PSL3 printer driver y For Windows 98 Me Client Utilities CD ROM Client Drivers PS 9X_ME language y For Windows NT 4 0 Client Utilities CD ROM Client Drivers PS NT language y For Windows 2000 XP Vista Server 2003 Client Ut...

Страница 209: ...e orientation may need to be set in the application or the printer driver or both The application may not set up the file properly for printing on this equipment and may also take longer to process In order to print properly from the application that you are using please see the section about printing in the applica tion s manual y When printing with the PSL3 printer driver from Adobe Acrobat the ...

Страница 210: ...ing from Windows applications The following describes an example for printing from NotePad on Windows XP 1 Open a file and select Print from the File menu of the application y The Print dialog box appears 2 Select the printer driver of the equipment to be used and Click Preferences y The Printing Preferences dialog box appears The procedures for displaying the properties dialog for the printer dri...

Страница 211: ... you want to print y Setting the print options varies depending on how you want to print a document P 214 Print Options y You can also set the print options using setting profiles P 211 Setting Print Options Using Profiles 4 Click OK to save the settings 5 Click Print to print a document ...

Страница 212: ...he Windows Start menu will establish the initial values of the options For example the paper size setting you most commonly use optional device settings user information settings etc are set tings you will not want to change every time you print It is convenient to set these options as ini tial values How to display Windows Vista 1 Click Start Control Panel Hardware and Sound and select Printer 2 ...

Страница 213: ...ck Properties Setting Print Options Using Profiles Print option settings can be saved so you can easily load specifically configured settings for a particular job There are several profiles that has been registered as default In order to print a document using profiles you should create the saved profile first P 211 Saving profile Once you save profile you can load the settings for a particular jo...

Страница 214: ... appears 3 Enter the profile name and click OK y The file name can be up to 63 characters long y If you enter the existing profile name it prompts whether overwrite the existing profile or not If you want to overwrite the existing profile click OK y You can not specify None for the profile name 4 The setting profile is saved ...

Страница 215: ...he printer options Selecting None in the Profile drop down menu cannot restore the initial settings on the printer driver To restore the initial settings after selecting a profile click Restore Defaults Deleting profile 1 Select a profile that you want to delete in the Profile drop down menu and click Delete y The Confirm Profile Delete dialog box appears ...

Страница 216: ...ontents of the selected tab The tabs displayed vary depending on the way the print proper ties are displayed Basic Tab The Basic tab contains basic print operation settings such as original paper size print paper size paper source paper type orientation number of copies and so on P 217 Basic Tab Finishing Tab The Finishing tab allows you to enable sort printing stapling and punching 2 sided print ...

Страница 217: ...vate job is saved in the private job queue on this equipment and is not printed until you activate printing from the Touch Panel Display This option is useful when you want to print a confidential document that is secured by a password The user has to enter the password to print the private job when activating printing from the Touch Panel Display Proof Print Select this to print the first copy of...

Страница 218: ...b and save it to a box by checking on the Print option When you store a document in e Filing using the printer driver the printing image not the original document in your computer will be stored in e Filing For more information about e Filing operations see e Filing Guide 4 Preview window In the Preview windows you can check the current settings in the printer driver You can change view type by cl...

Страница 219: ...o 3 and Enve lope You 4 are only available for e STUDIO282 Series and e STUDIO283 Series 2 Print Paper Size Select this to enlarge or reduce a page image to fit exactly in the selected paper size If you do not wish to enable enlarge or reduce printing select Same as Original Size Also when you want to enable Tab printing select Letter Tab or A4 Tab here When you select Letter Tab or A4 Tab the Pri...

Страница 220: ... sized document and input the text on the right side You must place the text at the exact height to fit the tab extension Also the right margin the margin between the text and right edge of the document must have more than 0 2 inch or 5 mm space because the equipment cannot print in the space Then enter the width of the tab extension as Image Shift Width Units Select the unit for the Tab Extension...

Страница 221: ...This selects the paper source Please select a paper source that correlates with the printing size Automatic Automatically selects the paper set in this equipment according to the printed document size Drawer 1 Paper is fed from the 1st Drawer Drawer 2 Paper is fed from the 2nd Drawer This cannot be selected if the Drawer 3 and 4 are not installed Drawer 3 Paper is fed from the 3rd Drawer This cann...

Страница 222: ... when printing on transparent sheets 6 Number of Copies This sets the number of printed copies You can set any integer from 1 to 999 7 Orientation This sets the paper printing direction Portrait The document is printed in the portrait direction Landscape The document is printed in the landscape direction Finishing Tab The Finishing tab allows you to enable sort printing 2 sided printing N up print...

Страница 223: ... 2 sided printed pages This option is only for printing on both sides of the paper If you want to bind the output with staples you should set the finishing option as well None Select this if you do not want to print on both sides of the paper Book Select this to print on both sides of the paper in the same direction and to bind the document along the vertical side of the paper so that the pages ca...

Страница 224: ...Booklet Details dialog box you can specify how Booklet printing is performed Output Document Layout Select the booklet size to be made A5 on A4 Select this to print a A5 size booklet Every 2 pages are printed on A4 paper to fit on half a sheet A5 A4 on A3 Select this to print a A4 size booklet Every 2 pages are printed on A3 paper to fit on half a sheet A4 B5 on B4 Select this to print a B5 size b...

Страница 225: ...de on the paper You can enter up to 1 00 inch 25 40 mm The printed images will be reduced according to the margin setting Units Select the unit for the Center Margin and Outer Margin option The default unit varies depending on the regional setting in the Windows Staple Down the Center Check this to staple double in the center Staple Down the Center is available only when A5 on A4 A4 on A3 B5 on B4...

Страница 226: ...t Center Top Select this to staple the printed document double along the top edge Middle Left Select this to staple the printed document double along the left side Center Double Select this to fold and staple the printed document double in the cen ter When you select this the pages will be printed on the sheets according to the print option settings and then simply fold and staple double in the ce...

Страница 227: ...p edge and print Middle Left Select this to create holes along the left side and print Hole punching can be selected only when a hole punch unit is installed 6 Use Custom Margin Check this to set the margin on the printed pages When this is checked click Detail to set the margins in the Custom Margin dialog box The margin range is between 5 mm and 100 mm Less than 5 mm cannot be set for the range ...

Страница 228: ...e Configuration tab y When the Finisher Type B is installed in the e STUDIO452 Series and stapling is enabled Tray 1 cannot be selected y For e STUDIO282 Series and e STUDIO283 Series Tray 1 and Tray 2 can be selected when the Hanging Finisher is installed and configured on the Configuration tab and Tray 1 can be selected when the Saddle Stitch Finisher is installed and configured on the Configura...

Страница 229: ...aper Source option selected on the Basic tab To enable back cover printing check on the box and select the location from where a back cover sheet is to be fed and the print style to be used Source Select the location from where a back cover sheet is to be fed When Auto is selected the paper is automatically selected according to the printed document size The selectable values in the Source drop do...

Страница 230: ...erted between the designated pages In that case disable the Use PostScript Passthrough option in the PostScript Settings dialog box P 237 PostScript Settings Insert Pages Page Enter the page number where the sheet is to be inserted When Blank is selected from the Print Style drop down menu the blank sheet is inserted before the entered pages When 1 Side is selected from the Print Style drop down m...

Страница 231: ...is performed the specified page is printed on the front side of the sheet and back side of the sheet will be blank y If 1 Side is selected while 2 sided printing is performed and you enter an even num bered page printed on the back side of the paper for the Pages field the specified page will be blank The page is printed on the front side of the inserted sheet and the 2 sided printing continues fr...

Страница 232: ...enabled no page is inserted after the front cover and back cover y This option cannot be set when Insert Pages option is enabled Source Select the location from where the interleaving sheet is to be fed When Auto is selected the paper is automatically selected according to the printed document size The selectable values in the Source drop down menu vary depending on the optional devices installed ...

Страница 233: ...elected the halftone is printed in detail for the texts and smoothly for the graphics Detail Select this to print halftone in detail Smooth Select this to print halftone smoothly 2 Smoothing Check this to print the texts and graphics smoothly 3 Distinguish Thin Lines Check this to print thin lines clearly 4 Use Black for All Texts Check this to print all texts in 100 black except white texts Effec...

Страница 234: ...s P 234 Add Edit Watermark Edit Select a watermark from the Watermark drop down menu and click it to edit the watermark The Watermark dialog box appears by clicking on this P 234 Add Edit Watermark Delete Select a watermark from the Watermark drop down menu and click it to delete a watermark y The default watermarks can be deleted but If deleted they cannot be restored y None cannot be deleted Pri...

Страница 235: ... rotation printing of an image 4 Mirror Check on this to perform mirror printing of an image This print option is available only for the PSL3 and XPS printer driver y The mirror printing may not be applied when the application gives priority to the applica tion s PostScript settings over the printer driver settings y When printing from Adobe Acrobat or similar applications the mirror printing does...

Страница 236: ... to 63 alphanumeric characters When you are editing a watermark the selected watermark text is displayed in the field 6 Font Name Select the font to be used for the watermark text 7 Style Select the font style for the watermark text Regular Select this to set the regular style to the text Bold Select this to set the bold style to the text Italic Select this to set the italic style to the text Bold...

Страница 237: ...ker to 100 lighter in units of 1 You can also set the brightness using the scroll bar Others Tab The Others tab contains print options such as toner saving custom paper size and so on Others Tab for PCL6 Others Tab for PSL3 1 Default Menu Setting Select the default tab that is displayed when opening the properties of printer driver 2 Toner Save Check this to print in toner save mode 1 2 5 6 3 1 2 ...

Страница 238: ...ut limitation for the entered department code the print job is stored in the invalid department code print job list without printing When you want to print the print job perform printing from the JOB STATUS button in the Control Panel by entering another department code for which the output limitation is more than the number of printed sheets How the equipment performs printing for an invalid depa...

Страница 239: ...r information page when any errors occur for printing 3 Compress Bitmap Check on this to send compress bitmaps to this equipment 4 Use PostScript Passthrough Check this for PostScript data created by the application that creates the PostScript code for printing such as Adobe Acrobat Adobe Photoshop or Adobe Illustrator to be passed through to this equipment If this option is enabled the following ...

Страница 240: ... TrueType Fonts Select this to print the document the same as the print image shown on the screen All TrueType fonts are extracted on the system for printing Always Use Printer Fonts Select this to substitute the TrueType fonts with the inter nal fonts for printing The print result may differ from the print image on the screen Use Font Substitution Table Select this to substitute the TrueType font...

Страница 241: ...e fonts 3 Run Font Manager Click this to run the Font Manager This is not available if the Font Manager is not installed The Run Font Manager button is not displayed for the PCL6 printer driver Configuration Tab The Configuration Tab allows you to configure options When any optional unit is installed in this equipment set the configuration of the machine on this tab When using Windows Vista In ord...

Страница 242: ...the optional finisher is installed The selections vary depending on the equipment model For e STUDIO452 Series and e STUDIO453 Series None Select this when finisher is not installed Hanging Finisher Select this when the Hanging Finisher is installed Finisher Type A Select this when the Finisher Type A is installed Finisher Type B Select this when the Finisher Type B is installed Saddle Stitch Fini...

Страница 243: ...ection to the equipment has not been configured correctly the message The address of your printer could not be located Would you like to find it will be displayed when you click Update Now If it is displayed click Yes and search for the equipment using the TopAccessDocMon Local Discovery dialog box After searching the equipment SNMP communication will be enabled 8 Drawer Settings Click this to set...

Страница 244: ...time to print your job This can be especially useful for delaying printing until off peak hours Printing on a specified date and time 1 Select Scheduled Print in the Print Job drop down menu 2 Click y The Scheduled Time dialog box appears 3 Click the arrow button at the Date drop down menu to display the Calendar window and select the desired date for your print job 4 Select the Time field and cli...

Страница 245: ... field and click OK y Enter a password using the alphanumeric characters and symbol characters ASCII code characters between 0x21 to 0x7E in the Password field The password must be between 1 to 63 characters y This number will be used to release the private job from the Touch Panel Display If you forget this number you can no longer print the private print job y When the user authentication is ena...

Страница 246: ...lient PC In this case jobs can be deleted but not printed y The private print job list is displayed If private print jobs are submitted using different password from the same user the pri vate print job will be stored in the user name but only the private print jobs of the entered password will be displayed after you enter the password 8 Select the job you want to print on the private print job li...

Страница 247: ...t will print all of the copies even if you set the Proof Print In that case set one copy for the number of copies for a proof print job in the printer driver and then change the number of copies from the Control Panel to print required copies of the print job Printing a proof copy 1 Select Proof Print in the Print Job drop down menu 2 Set any other print options you require and click OK 3 Click OK...

Страница 248: ...t y If the corresponding job is not displayed on the page press the Prev or Next button to switch the page 7 Press the RELEASE button y Printing starts y The printing status can be confirmed on the print job list When you want to change the number of sets When you want to change the number of sets press the EDIT button and key in the desired number Then press the RELEASE button to start printing ...

Страница 249: ...river from an application that can cre ate the PS command directly the overlay file will not be created properly In that case dis able the Use PostScript Passthrough option in the PostScript Settings dialog box P 237 PostScript Settings Printing a document as an overlay file 1 Select Print to Overlay File in the Print Job drop down menu 2 Click y The Overlay Image Name dialog box appears 3 Enter a...

Страница 250: ...igi nal document in your computer will be stored in e Filing y You can manage the files within a box from the Touch Panel Display Please refer to the Operator s Manual for Basic Functions to manage files in a box y You can also manage the files within a box using the e Filing web utility Please refer to the e Filing Guide Saving a print job to a public box 1 Select Store to e Filing in the Print J...

Страница 251: ...ore essential Also you can enable finishing options that determine how the jobs are output such as stapling and hole punching sorting and creating a booklet Sort Printing You can select how multiple copies of a document to be output such as separately for each copy grouping each page and alternating the paper direction for each copies Output each copy separately 1 Display the Basic tab and enter t...

Страница 252: ...ling 3 Set any other print options you require and click OK 4 Click OK or Print to send the print job y The print job is output separately for each page Output in a different direction for each copy Rotated Sort Copies can be enabled only when printing on Letter A4 B5 or 16K 1 Display the Basic tab and enter the number of copies to be printed at the Number of Copies field 2 Display the Finishing t...

Страница 253: ... y The document image is automatically enlarged or reduced depending on the original paper size and print paper size 2 Set any other print options you require and click OK 3 Click OK or Print to send the print job y Enlarged or reduced image is printed to fit specified paper size Printing an enlarged or reduced image by specifying the zoom ratio manually 1 Display the Basic tab and check the Manua...

Страница 254: ...s to staple the printed document double along the left side Center Double Select this to fold and staple the printed document double in the center y The selectable options vary depending on the paper size y Center Double can be selected only when the Saddle Stitch Finisher is installed and configured on the Configuration tab 2 Set any other print options you require and click OK 3 Click OK or Prin...

Страница 255: ...rint to send the print job y The print job is printed on both sides of paper in the specified direction Printing or Inserting Sheets from Different Paper Sources You can print paper for covers back covers or for insert between pages by feeding from differ ent paper sources This is useful when you want to print or insert a color cover and color sheets in front of every chapter in a document Printin...

Страница 256: ...ert Pages dialog box appears y Up to 50 pages can be inserted y When Insert Pages printing is performed using the PSL3 printer driver from an appli cation that can create the PS command directly the interleaving sheets may not be inserted between the designated pages In that case disable the Use PostScript Passthrough option in the PostScript Settings dialog box P 237 PostScript Settings 5 Enter t...

Страница 257: ... page on interleaved sheets which are inserted after the page so that you can duplicate a document 4 Set any other print options you require and click OK 5 Click OK or Print to send the print job y Sheets are interleaved between every page Printing Booklets Printing in normal booklet mode produces a document that when folded becomes a properly paginated booklet or magazine style publication You ca...

Страница 258: ...let Every 2 pages are printed on Letter paper to fit on half a sheet LT on LD Select this to print a Letter size booklet Every 2 pages are printed on Ledger paper to fit on half a sheet Letter 1 2 LG on LG Select this to print a 1 2 Legal size booklet Every 2 pages are printed on Legal paper to fit on half a sheet 1 2 Statement on Statement Select this to print a 1 2 Statement size booklet Every 2...

Страница 259: ...it on half a sheet 16K on 8K Select this to print a 16K size booklet Every 2 pages are printed on 8K paper to fit on half a sheet 5 Select the page order for booklet in the In page of the order option From Left to Right Select this to print the pages from left to right From Right to Left Select this to print the pages from right to left 6 If you want to add a margin space between facing pages ente...

Страница 260: ...ple pages per sheet 1 Display the Finishing tab 2 Select how many pages you want to print on a single sheet at the Number of pages per sheet drop down menu 2 pages Select this to print images from 2 pages arranged on one sheet 4 pages Select this to print images from 4 pages arranged on one sheet 6 pages Select this to print images from 6 pages arranged on one sheet 8 pages Select this to print im...

Страница 261: ...d watermarks or you can create and save your own custom watermarks Watermarks are text only To add graphics or other document elements use image overlays instead Printing a watermark 1 Display the Effect tab and select the watermark to be printed at the Watermark drop down menu You can create a new watermark if the watermark that you prefer is not listed in the drop down menu 2 If you want to prin...

Страница 262: ...rop down menu 5 Enter the font size in the Font Size field y You can enter any integer between 6 to 300pt in units of 1pt 6 To rotate the watermark enter the degrees in the Angle field y You can enter from 90 degrees to 90 degrees in units of 1 degree in the Angle field y You can also set the angle using the scroll bar 7 Select how the watermark text is printed from Solid Draw as Outline and Trans...

Страница 263: ...te an overlay file first P 247 Creating An Overlay File y If you use Image Overlays in combination with the N up feature the image overlay is printed once per sheet not once per page y Both the overlay file and the documents on which you superimpose the overlay image must be created at the same size and orientation y When printing with Overlay Image using the PSL3 printer driver from an applicatio...

Страница 264: ... paper before printing the next job Printing a document on tab paper 1 Create a Letter sized or A4 sized document and place the text or object that should appear on the tab extension as described below When you create a document for tab printing place the text or object that should appear on the tab extension on the right side of the document You must place the text in the height exactly to fit to...

Страница 265: ... that you use or select Custom when you use other manufactured tab paper 5 When you select Custom in the Tab Manufacturer option enter the width of tab extension in the Tab Extension field 6 Enter the width to shift the printed image in the Image Shift Width field y If you created a document as described in Step 1 enter the width of the tab extension here This equipment cannot print in the 0 2 inc...

Страница 266: ...5 Printing from Windows 264 Printing with Extended Print Functionality 9 Click OK or Print to send the print job y The print job is printed on the tab paper ...

Страница 267: ...itations 266 How to Print from Mac OS X 10 2 4 to Mac OS X 10 4 x 266 Page Setup Dialog on Mac OS X 10 2 4 to Mac OS X 10 4 x 267 Print Dialog on Mac OS X 10 3 x to Mac OS X 10 4 x 269 Print Dialog on Mac OS X 10 2 x 283 Printing from Application on Mac OS 8 6 to 9 x 297 How to Print from Mac OS 8 6 or 9 x 297 Page Setup Dialog on Mac OS 8 6 9 x 298 Print Dialog on Mac OS 8 6 9 x 300 ...

Страница 268: ...e printing is performed on Mac OS X 10 3 x to 10 4 x the printing job is displayed with a user name OSX User on the Touch Panel Display of the equipment How to Print from Mac OS X 10 2 4 to Mac OS X 10 4 x All printers are managed within the Printer Setup Utility and there is no need to switch the printer Once you add a printer to the Printer List all printers can be selected directly from Print S...

Страница 269: ... to print a document P 283 Print Dialog on Mac OS X 10 2 x 6 Click Print to print a document Page Setup Dialog on Mac OS X 10 2 4 to Mac OS X 10 4 x The Page Setup dialog boxes can be displayed by selecting the Page Setup command from the File menu of the application In the Page Setup dialog boxes you can specify the Page Attribute settings The Page Setup dialog boxes vary across applications Page...

Страница 270: ...e portrait direction Landscape 90 degree The document is printed in the landscape direction from left Landscape 270 degree The document is printed in the landscape direction from right 4 Scale This changes the size of the printed image on the page Enter the zoom ratio to enlarge or reduce an image You can set any integer from 25 to 400 for the zoom ratio Available original paper sizes are listed b...

Страница 271: ...s of the Print dialog boxes for Mac OX 10 2 x P 283 Print Dialog on Mac OS X 10 2 x The Print dialog boxes vary across applications Copies Pages In the Copies Pages menu you can set general print options such as number of copies and sort printing 1 Copies This sets the number of printed copies You can set any integer from 1 to 999 2 Collated Check this for sort printing 1 2 3 1 2 3 3 Pages This se...

Страница 272: ... when N up printing printing multiple pages on one sheet is set Across Left to Right Before Down Pages arranged horizontally from left to right and then top to bottom on one sheet Across Right to Left Before Down Pages arranged horizontally from right to left and then top to bottom on one sheet Down Before Across Left to Right Pages arranged vertically from top to down and then left to right on on...

Страница 273: ... Select this to bind along the short edge side of the paper The direction to be printed on the back side of the paper differs depending on the orientation Output Options In the Output Options menu you can save a print job as a file This menu is displayed only for Mac OS X 10 3 x 1 Save as File Check this to save a print job as a file When this is checked select the file type at the For mat drop do...

Страница 274: ...e print job to be sent from the queue on Mac OS On Hold Select this to hold a print job in the queue on Mac OS When you select this the print job will be held in the queue on Mac OS until you resume the print job to be sent from the queue on Mac OS 2 Priority Select the priority of a print job Paper Handling In the Paper Handling menu you can set Reverse page order printing and Odd or Even num ber...

Страница 275: ...ize Use documents paper size Select this to print on the same sized paper as the docu ment size Scale to fit paper size Select this to perform enlarge reduce printing When this is selected select the output paper size in the drop down menu If you do not want to enlarge the document images when larger paper size is selected check the Scale down only box ColorSync 1 Color Conversion Select the Color...

Страница 276: ...1 Print Cover Page This sets how a banner page is inserted None Select this not to print a banner page Before Document Select this to print a banner page before the document After Document Select this to print a banner page after the document 2 Cover Page Type Select the type of a banner page 3 Billing Info Enter the billing information to have it appear on the banner page You can enter up to 24 c...

Страница 277: ...r source 1 All pages from Select this option button when you want to use the same paper source for all pages When this is selected select the paper source or paper type to be used at the drop down menu 2 First page from Select this option button when you want to specify different paper sources for the first page and remaining pages When this selected select the paper source or paper type to be use...

Страница 278: ...next to the drop down menu The print job is saved in the private job queue on this equipment and not printed until you activate printing from the Touch Panel Display of this equipment This option is useful when you want to print a confiden tial document secured using a password The user has to enter the password to print the private job when activating printing from the Touch Panel Display 2 Depar...

Страница 279: ...ow halftone is printed Auto Select this to print using proper halftone depending on the contents in the docu ment automatically When this is selected the halftone is printed in detail for the texts and smoothly for the graphics Detail Select this to print halftone in detail Smooth Select this to print halftone smoothly 2 Smoothing Select whether printing the texts and graphics smoothly 3 Toner Sav...

Страница 280: ...output to the lower tray of the Job Sep arator y Depending on the type of finisher installed and destination settings stapling and hole punching may not be performed y Depending on the equipment settings the paper may be delivered to a tray that cannot carry out stapling or hole punching when Auto is selected as the Destination option y For e STUDIO452 Series and e STUDIO453 Series Tray 1 and Tray...

Страница 281: ...nt Short Edge Punch without rotation Select this to create holes on the top for the por trait document or on the right for the landscape document Long Edge Punch with 180 degree rotation Select this to create holes on the right side for the portrait document or on the bottom for the landscape document Short Edge Punch with 180 degree rotation Select this to create holes on the bot tom for the port...

Страница 282: ...he top for the landscape document Lower Left Portrait Upper Left Landscape Select this to staple in the lower left for the portrait document or in the upper left for the landscape document Upper Right Portrait Lower Right Landscape Select this to staple in the upper right for the portrait document or in the lower right for the landscape document Middle Right Portrait Middle Bottom Landscape Select...

Страница 283: ...pe Select this to staple double in the bottom for the portrait document or in the left for the landscape document Saddle Stitch Portrait Saddle Stitch Landscape Select this to staple double in the center for a booklet to be printed Select this only when booklet printing is performed y This option cannot be selected if a finisher is not installed y Saddle Stitch Portrait Saddle Stitch Landscape can...

Страница 284: ...ooklet Each two pages are printed on both side of a sheet which is then folded The booklet size will be the half size of the paper size that you specify 2 Left to Right Page Layout Check this to create a booklet can be read from left to right 3 Booklet Center Margin Select the width of space added to the center 4 Booklet Outer Margin Select the width of space added short edge side of a sheet 1 2 3...

Страница 285: ...t dialog box for Mac OX 10 3 x to 10 4 x P 269 Print Dialog on Mac OS X 10 3 x to Mac OS X 10 4 x The Print dialog boxes vary across applications Copies Pages In the Copies Pages menu the general print options such as number of copies sort printing 1 Copies This sets the number of printed copies You can set any integer from 1 to 999 2 Collated Check this for sort printing 1 2 3 1 2 3 3 Pages This ...

Страница 286: ...n one sheet This is available only when the N up print ing printing a page on multiple sheets is set Across Left to Right Before Down Pages arranged horizontally from left to right and then top to bottom on one sheet Across Right to Left Before Down Pages arranged horizontally from right to left and then top to bottom on one sheet Down Before Across Left to Right Pages arranged vertically from top...

Страница 287: ...ts the type of binding for 2 sided printed pages Off Select this when you do not want to print on both sides of the paper Long Edge Binding Select this to bind along the long edge side of paper The direc tion to be printed on the back side of the paper differs depending on the orientation Short Edge Binding Select this to bind along the short edge side of paper The direc tion to be printed on the ...

Страница 288: ...of a file to be saved PDF Select this to save a print job as a PDF file PostScript Select this to save a print job as a PS file Error Handling In the Error Handling menu you can set how to report a PostScript error 1 PostScript Errors This sets whether or not you want to print a PostScript error report No special reporting Select this if you do not want to print PostScript error informa tion Print...

Страница 289: ...er type to be used at the drop down menu 2 First page from Select the option button when you want to specify different paper source for a first page and remaining pages When this selected select the paper source or paper type to be used for a first page at the drop down menu 3 Remaining from Select the paper source or paper type to be used for remaining pages in the drop down menu This can be sele...

Страница 290: ...are not printed until you activate printing from the Touch Panel Display This option allows you to check a job s output before printing the remaining copies and thereby reduce paper waste Private Password Select this to print a private job When this is selected specify the 5 digit password in the Private Document Password menu The print job is saved in the private job queue on this equipment and n...

Страница 291: ... even if the content are blank Quality In the Quality menu you can specify various image quality features 1 Halftone This sets how halftone is printed Auto Select this to print using proper halftone depending on the contents in the docu ment automatically When this is selected the halftone is printed in detail for the texts and smoothly for the graphics Detail Select this to print halftone in deta...

Страница 292: ...sword when you select to print a private job If you do not specify the Private Document Password the private job uses default Private Document Password 00000 1 Password Digit 1 Select the first digit of the Document ID 2 Password Digit 2 Select the second digit of the Document ID 3 Password Digit 3 Select the third digit of the Document ID 4 Password Digit 4 Select the forth digit of the Document ...

Страница 293: ...tray of the Job Sep arator y Depending on the type of finisher installed and destination settings stapling and hole punching may not be performed y Depending on the equipment settings the paper may be delivered to a tray that cannot carry out stapling or hole punching when Auto is selected as the Destination option y For e STUDIO452 Series and e STUDIO453 Series Tray 1 and Tray 2 can be selected w...

Страница 294: ...dscape document Short Edge Punch without rotation Select this to create holes on the top for the por trait document or on the right for the landscape document Long Edge Punch with 180 degree rotation Select this to create holes on the right side for the portrait document or on the bottom for the landscape document Short Edge Punch with 180 degree rotation Select this to create holes on the bot tom...

Страница 295: ...e landscape document Lower Left Portrait Upper Left Landscape Select this to staple in the lower left for the portrait document or in the upper left for the landscape document Upper Right Portrait Lower Right Landscape Select this to staple in the upper right for the portrait document or in the lower right for the landscape document Middle Right Portrait Middle Bottom Landscape Select this to stap...

Страница 296: ...trait Saddle Stitch Landscape Select this to staple double in the center for a booklet to be printed Select this only when booklet printing is performed y This option cannot be selected if a finisher is not installed y Saddle Stitch Portrait Saddle Stitch Landscape can be selected only when the Sad dle Stitch Finisher is installed y Depending on the type of finisher installed and destination setti...

Страница 297: ...r mode When the Depart ment Code Enforcement is set to ON the invalid department code print job will be stored in the invalid department code print job list without printing When the Department Code Enforcement is set to Print the invalid department code print job will be printed When the Department Code Enforcement is set to Delete the invalid department code print job will be deleted without pri...

Страница 298: ...ooklet Each two pages are printed on both side of a sheet which is then folded The booklet size will be the half size of the paper size that you specify 2 Left to Right Page Layout Check this to create a booklet can be read from left to right 3 Booklet Center Margin Select the width of space added to the center 4 Booklet Outer Margin Select the width of space added short edge side of a sheet 1 2 3...

Страница 299: ...orrect PostScript Printer Description file PPD you can control the system s various printing features by specifying job settings from print dialog boxes Setting Options and Printing from Macintosh Computer In Mac OS applications print options are set from both the Page Setup dialog box and the Print dialog box Printing from Macintosh applications 1 Open a file and select Page Setup from the File m...

Страница 300: ...oxes can be displayed by selecting the Page Setup command from the File menu of the application In the Page Setup dialog boxes you can specify the Page Attribute settings and Custom Page Size settings y The Page Setup dialog boxes vary across applications y The PostScript Options window contains the setting items that are generally provided by the LaserWriter 8 printer driver For details of the Po...

Страница 301: ...rtrait The document is printed in the portrait direction Landscape The document is printed in the landscape direction 4 Scale This changes the size of the printed image on the page Enter the zoom ratio to enlarge or reduce an image You can set any integer from 25 to 400 for the zoom ratio Available original paper sizes are listed below y Letter y Ledger y Legal y Statement y Computer y 13 LG y 8 5...

Страница 302: ...an set the general print options such as number of copies sort print ing 1 Copies This sets the number of printed copies You can set any integer from 1 to 999 2 Collated Check this for sort printing 1 2 3 1 2 3 3 Pages This sets the pages to be printed All Select this to print all pages From To Select this to specify the pages to be printed Enter the page range in the From and To field 4 Paper Sou...

Страница 303: ...inting Urgent Select this to print a job immediately Normal Select this to print a job normally Print at Select this to specify the time that the print job is sent to this equipment Spec ify the time and date when this is selected Put Document on Hold Select this to hold the print job in the desktop print queue To send the print job held in the desktop print queue double click the printer icon on ...

Страница 304: ... sent with a banner page The ban ner page includes information about owner of the job job name application name date and time and printer name 1 Print Cover Page This sets how a banner page is inserted None Select this not to print a banner page Before Document Select this to print a banner page before the document When this is selected select the paper source at the Cover Page Paper Source option...

Страница 305: ...TrueType fonts 3 Always Download needed fonts Check this to always download fonts for printing 4 Never generate Type 42 format Check this not to generate the Type 42 format Job Logging In the Job Logging menu you can set the error handling and generate job logs 1 If there is PostScript error This sets whether reporting the error or not No special reporting Select this not to report an error Summar...

Страница 306: ...heet 4 Select this to print images from 4 pages arranged horizontally and printed top to bot tom on one sheet 6 Select this to print images from 6 pages arranged horizontally and printed top to bot tom on one sheet 9 Select this to print images from 9 pages arranged horizontally and printed top to bot tom on one sheet 16 Select this to print images from 16 pages arranged horizontally and printed t...

Страница 307: ... the border 4 Print on Both Sides Check this to print on both sides of the paper When checked select the binding direction at the Binding option 5 Binding This sets the type of binding for 2 sided printed pages Long Edge Binding Select this to bind along the long edge side of paper The direc tion to be printed on the back side of the paper differs depending on the orientation Short Edge Binding Se...

Страница 308: ...cted when the Hanging Finisher Finisher Type A Finisher Type B or Saddle Stitch Finisher are installed y When the Finisher Type B is installed in the e STUDIO452 Series and stapling is enabled select Tray 2 y For e STUDIO282 Series and e STUDIO283 Series Tray 1 and Tray 2 can be selected when the Hanging Finisher is installed and Tray 1 can be selected when the Saddle Stitch Finisher is installed ...

Страница 309: ...Right Landscape Select this to staple in the upper left for the portrait document or in the upper right for the landscape document Middle Left Portrait Middle Top Landscape Select this to staple double in the left for the portrait document or in the top for the landscape document Lower Left Portrait Upper Left Landscape Select this to staple in the lower left for the portrait document or in the up...

Страница 310: ...ect this to staple in the lower right for the portrait document or in the lower left for the landscape document Middle Top Portrait Middle Right Landscape Select this to staple double in the top for the portrait document or in the right for the landscape document Middle Bottom Portrait Middle Left Landscape Select this to staple double in the bottom for the portrait document or in the left for the...

Страница 311: ...to print a confidential document secured using a password The user has to enter the password to print the private job when acti vating printing from the Touch Panel Display It is recommended to specify the password when you select to print a private job If you do not specify the password the private job uses default password 00000 2 Department Code Enter a user s department code when this equipmen...

Страница 312: ...o use AppleTalk printing rather than LPR printing 2 Booklet Page Layout Select the direction to be printed Right to Left Select this to create a booklet can be read from right to left Left to Right Select this to create a booklet can be read from left to right 3 Booklet Center Margin Select the width of space added to the center If there is not a preferred width in the list enter the width by poin...

Страница 313: ...er the font size by points You can enter from 4 points to 400 points in units of 1 point 4 Watermark Text Angle Select the degree of angle for rotating the watermark text If there is not a preferred angle in the list enter the degrees from 90 to 90 degrees in units of 1 degree 5 Watermark Gray Level Select the gray level of the watermark text color If there is not preferred gray level in the list ...

Страница 314: ...ecify various image quality features 1 Halftone This sets how halftone is printed Auto Select this to print using proper halftone depending on the contents in the docu ment automatically When this is selected the halftone is printed in detail for the texts and smoothly for the graphics Detail Select this to print halftone in detail Smooth Select this to print halftone smoothly 2 Smoothing Select w...

Страница 315: ...es the instructions on how to print from UNIX workstation Printing from an Application 314 Considerations and Limitations 314 Printing Using LP Command 314 Generic lp and lptap Options 315 General Options 315 PCL5e Specific Options 326 ...

Страница 316: ... Sheet Insertion Scheduled Print Print to Overlay File Store to e Filing Use Overlay Image y Linux uses the lptap command to send a file to this equipment Since lp is not supported in all versions of Linux the lptap command should be used instead y AIX supports printing using the qdaemon This can be invoked by the user with the com mands lp lpr or qprt In order to use the filter either lp or qprt ...

Страница 317: ...ting so that it can issue the correct commands to select various options The following options are valid for the print languages All PCL5e jobs automatically send the esc k2G command to convert the line feed character into a carriage return line feed sequence If the PCL5e job contains some of its own escape sequences it may override this setting The default print language is auto Example The comma...

Страница 318: ... left corner of a portrait page and the upper left corner of a landscape page staple 4 Staple in the top right corner of a portrait page and the bottom right corner of a landscape page staple 5 Put 2 staples on the right side of a portrait page or the bottom side of a landscape page printed on long edge feed paper This command has no affect when the paper is fed from the short edge side staple 6 S...

Страница 319: ...ion is always turned on so the paper size has priority over the media type and the paper source In PCL5e the paper size always has priority over the media type and the paper source If this option is not specified the default value will be used Example The command to specify Thick1 media type is lp o mtype Thick1 filename Option Value Alternate Value Description inner Select the inner tray bin1 Sel...

Страница 320: ... be used It is not necessary to specify duplexing for Booklet Mode sduplex Setting duplexing separately can override the booklet mode setting for duplexing Example The command to specify long edge duplexing is lp o duplex filename Option Value Alternate Value Description auto source Select auto paper tray selection manual Select Bypass Tray drawer1 upper cas1 Select the 1st drawer drawer2 lower ca...

Страница 321: ...g LG Select legal size paper statement st ST Select statement size paper ledger ld LD Select ledger size paper ledgerwode ldwide LDWIDE Select ledger wide size paper folio folio japan Select folio size paper A3 a3 Select A3 size paper A5 a5 Select A5 size paper A6 a6 Select A6 size paper B4 b4 b4 jis B4 JIS Select JIS B4 size paper B5 b5 b5 jis B5 JIS Select JIS B5 size paper computer co CO Select...

Страница 322: ...rt ment Code Enforcement is set to ON the invalid department code print job will be stored in the invalid department code print job list without printing When the Department Code Enforcement is set to Print the invalid department code print job will be printed When the Department Code Enforcement is set to Delete the invalid department code print job will be deleted without printing Smoothing The ...

Страница 323: ... following option Example The command to set the toner save mode is lp o tonersave on filename Option Value Alternate Value Description thinlinelimit on ON Set the thin line limit mode thinlinelimit off OFF Cancel the thin line limit mode Option Value Alternate Value Description blankpage 0 Set the blank page mode disable Do not Print Blank Pages blankpage 1 Cancel the blank page mode enable Do no...

Страница 324: ...e Option Value Alternate Value Description booklet letter lt LT Select letter size paper for booklet printing mode booklet A4 a4 Select A4 size paper for booklet printing mode booklet legal lg LG Select legal size paper for booklet printing mode booklet statement st ST Select statement size paper for booklet printing mode booklet ledger ld LD Select ledger size paper for booklet printing mode book...

Страница 325: ...lternate Value Description left2right off OFF Select right to left page layout for booklet printing mode This value decides the layout of the pages in the book let If this value is OFF then the layout of pages is Right to Left as shown in the figure below left2right on ON Select left to right page layout for booklet printing mode This is the default setting If the value is ON then the layout of th...

Страница 326: ...hen the pitch is changed the font size will automatically be scaled to the appropriate size If this option is not specified the default pitch and font will be used Example The command to specify 8 characters per inch is lp o pitch 8 filename Option Value Alternate Value Description outermargin value Select the outer margin value for booklet printing mode This value specifies in pixels the Outer Ma...

Страница 327: ...ed the PJL command will not be sent so the printer s default value will be used The minimum page length allowable is 5 If value is less than 5 page length is set to 5 The command to specify 66 lines per page is lp o pl 66 filename Halftone The halftone can be selected using the following options Example The command to set the auto halftone for the print job is lp o halftone AUTO filename Option Va...

Страница 328: ... The command to set the left margin to five columns is lp o lm 5 filename Right Margin The right margin position can be specified with the following option If the right margin is set to the left of the left margin or if it is set to a position wider than the logi cal page it will be ignored The right margin is specified in columns from the left margin A nega tive value will be ignored If this opti...

Страница 329: ...e Text Length The text length can be specified using the following options If the text length is set too high the part of the text may not appear due to the printer s unprint able area The text length will be ignored if it is set to a value greater than the printer s logical page length minus the top margin The text length is specified in rows from the top margin Set ting this value may affect the...

Страница 330: ...ut bin as requested by the o parameter or the printer default value y 6 lines per inch y Auto wrap on y Automatic carriage return when a line feed is sent y The banner page is designed to fit the paper y The default is that the banner page is printed before the job so that it is in the correct stack ing order y When the language is set to raw the banner is always disabled y The paper source and th...

Страница 331: ...lue will be used to print the banner page The command to specify that the banner page should print on a colored media type is lp o bmtype Plain1 filename Option Value Alternate Value Description bauto source Select the auto paper tray selection bdrawer1 bupper bcas1 Select the 1st drawer bdrawer2 blower bcas2 Select the 2nd drawer bdrawer3 bpedupper bcas3 Select the 3rd drawer bdrawer4 bpedlower b...

Страница 332: ......

Страница 333: ...8 Other Printing Methods This equipment also supports following printing methods FTP Printing 332 Email Printing 334 ...

Страница 334: ...menu in the Print dialog box to print For more informa tion about printing to a file refer to the Macintosh documentation Printing a file using the FTP command The procedure below describes the example of printing using the FTP command with the MS DOS Prompt 1 Launch the MS DOS Prompt 2 Change the current directory to where the print file is located 3 Type following command and press the Enter key...

Страница 335: ... Printing 333 6 Type the following command and press the Enter key put file name For example of the print file name is sample ps put sample ps 7 The file is sent to this equipment and spooled in the queue ...

Страница 336: ...image is printed on the largest paper if its length exceeds the paper printing area When RX Reduction Printing is ON it will be vertically reduced to fit on the paper if the print image is longer than the paper When the print image cannot fit in the paper even if the print image is reduced the print image is printed on the largest paper When RX Reduction Printing is OFF the print image is printed ...

Страница 337: ...ing This section describes about troubleshooting for printing features When Printing cannot be Performed 336 Printer Driver Errors 337 Printer Driver Installation Error Messages 337 Printer Driver General Errors 338 ...

Страница 338: ...t Job page in the Job Status tab and Print Log page in the Logs tab No Check Yes No For Instruction Go To 1 Have you ever printed success fully from this client workstation Next Step Ø Ö P 338 Driver Mapped to Wrong Port 2 Do you set up the printer driver other than a SMB connection End Ö P 339 Cannot Print a Job Using SMB No Check Yes No For Instruction Go To 1 Is this equipment you created selec...

Страница 339: ...cate the driver click Have Disk 3 Select Use Existing Driver to add another copy of an existing driver or browse to the subdi rectory that contains the appropriate inf file File DRV on Client CD Not Be Found Problem Description When adding a new printer driver the user did not choose the Have Disk option but selected the printer name from the Add Printer list Corrective Action 1 Cancel the Add Pri...

Страница 340: ...e distribution CD ROM or download it from this equipment Printer Driver General Errors Driver Mapped to Wrong Port Problem Description If the printer driver on a client workstation points to the wrong network port jobs do not appear in the current jobs queue or print out Corrective Action 1 Open the Printers folder from the Control Panel 2 Right click the printer driver icon 3 Select Properties fr...

Страница 341: ...so they can enter it to retrieve their jobs from the Touch Panel Display Retrieval of Printer Configuration Failed Problem Description When accessing the printer properties the system displayed Retrieval of printer configuration failed Corrective Action If the printer driver cannot communicate with this equipment Verify that the system is running If not turn it on Connect to this equipment via Top...

Страница 342: ...in the PostScript Settings dialog box and print a docu ment Cannot Change Settings on Fonts Tab and Configuration Tab Problem Description The Fonts tab and Configuration tab are grayed out and they cannot be modified Corrective Action Users who do not have the privilege to change the printer driver setting cannot change the options in the Fonts tab and Configuration tab Please log in with Administ...

Страница 343: ...ling Font Manager 342 Searching Fonts 342 Installing Fonts in Windows 343 Uninstalling Fonts in Windows 343 Removing Fonts from the Computer 343 Displaying Font Preview 344 Creating a Font Group 344 Sorting Fonts in the List 345 Internal Fonts List 346 Internal PCL Fonts List 346 Internal PS Fonts List 347 ...

Страница 344: ...omatically Before installing a font in Windows you have to search the available fonts that can be installed by Font Manager 2000 Searching fonts 1 Click the Fonts menu and select Search for Fonts y The Find Fonts dialog box appears 2 Select which drive you want to search for fonts Selected Drives Select this to choose one of the drives when searching for fonts All Drives Select this to search on a...

Страница 345: ...The fonts are uninstalled from Windows The uninstalled fonts are added to the Available Fonts List Removing Fonts from the Computer You can remove from your computer the fonts that no longer be required Even if you uninstall the fonts from Windows the source files of the uninstalled fonts are not deleted from the hard drive You can remove the sources of the uninstalled fonts from your computer by ...

Страница 346: ...ce on the dialog box All Styles When this is selected the font is displayed in all of its available font faces in the dialog box Creating a Font Group You can create a group of fonts and give a descriptive name to the group The created group can be used to install or uninstall the fonts in Windows This function can be used to configure the different working scenarios of the fonts for each user Cre...

Страница 347: ...nd click Sort by Name The fonts are listed alphabetically by the font family name Sorting by Font Type Click the Sort menu and click Sort by Font Type The fonts are grouped according to their technology type TrueType Type 1 or screen bitmap and within each group the names will be listed alphabetically Inverting the Alphabetical Order The lists can be inverted by clicking on the Sort menu and Inver...

Страница 348: ... ITC Bookman DemiItalic 17 Univers Medium Condensed Italic 57 NewCenturySchlbk Roman 18 Univers Condensed Bold Italic 58 NewCenturySchlbk Bold 19 Antique Olive 59 NewCenturySchlbk Italic 20 Antique Olive Bold 60 NewCenturySchlbk BoldItalic 21 Antique Olive Italic 61 Times Roman 22 Garamond Antiqua 62 Times Bold 23 Garamond Halbfett 63 Times Italic 24 Garamond Kursiv 64 Times BoldItalic 25 Garamond...

Страница 349: ...vetica Oblique Bodoni BoldItalic Helvetica Bold Bodoni Poster Helvetica BoldOblique Bodoni PosterCompressed Helvetica Condensed Bookman Light Helvetica Condensed Oblique Bookman LightItalic Helvetica Condensed Bold Bookman Demi Helvetica Condensed BoldObl Bookman DemiItalic Helvetica Narrow Candid Helvetica Narrow Oblique Chicago Helvetica Narrow Bold Clarendon Light Helvetica Narrow BoldOblique C...

Страница 350: ...gbats NewCenturySchlbk Bold NewCenturySchlbk BoldItalic NewYork Optima Optima Italic Optima Bold Optima BoldItalic Oxford Palatino Roman Palatino Italic Palatino Bold Palatino BoldItalic StempelGaramond Roman StempelGaramond Italic StempelGaramond Bold StempelGaramond BoldItalic Symbol Taffy Times Roman Times Italic Times Bold Times BoldItalic TimesNewRomanPSMT TimesNewRomanPS ItalicMT TimesNewRom...

Страница 351: ...78 291 306 Destination Paper Size 273 Direction of print 223 258 Distinguish Thin Lines 231 276 289 Do not Print Blank Pages 236 276 289 310 Draw as Outline 235 260 Draw Borders Around Pages 224 259 Drawer 201 Drawers 240 Duplicate 230 255 E Effect Tab 215 Enable SNMP Communication 240 F Features 14 Filter 17 Finisher 201 240 Finishing Tab 214 First page from 275 287 Font Manager 20 342 Font Name ...

Страница 352: ...lor 301 Print Cover Page 274 302 Print Document 272 Print Error Information 237 Print in 301 Print Job 215 309 Print Job Status Messages 336 Print Mode 276 288 Print on Both Sides 285 305 Print on First Page Only 232 259 Print Options 210 Print over the document 233 Print Paper Size 217 251 263 Print to Overlay File 215 247 printer description file 206 Printer Drivers 15 20 Printer Name 214 Printe...

Страница 353: ... 227 254 Use Black for All Texts 231 Use Custom Margin 225 Use Front Cover 226 253 Use PostScript Passthrough 237 V Version Information 236 241 W Watermark 232 259 Watermark Font 311 Watermark Gray Level 311 Watermark Outline 312 Watermark Position 311 Watermark Text 311 Watermark Text Angle 311 Watermark Text Size 311 Watermarking 311 X X Position 234 Y Y Position 234 ...

Страница 354: ......

Страница 355: ...DP 3540 4540 DP 2050 2340 2840 OME050105D0 ...

Страница 356: ...2 17 2 HIGASHIGOTANDA SHINAGAWA KU TOKYO 141 8664 JAPAN MULTIFUNCTIONAL DIGITAL SYSTEMS Printing Guide 2005 TOSHIBA TEC CORPORATION All rights reserved R05092093204 TTEC Ver04 2007 10 ...

Отзывы: