background image

Chapter  BASIC OPERATION

0

Basic e-Filing Operation

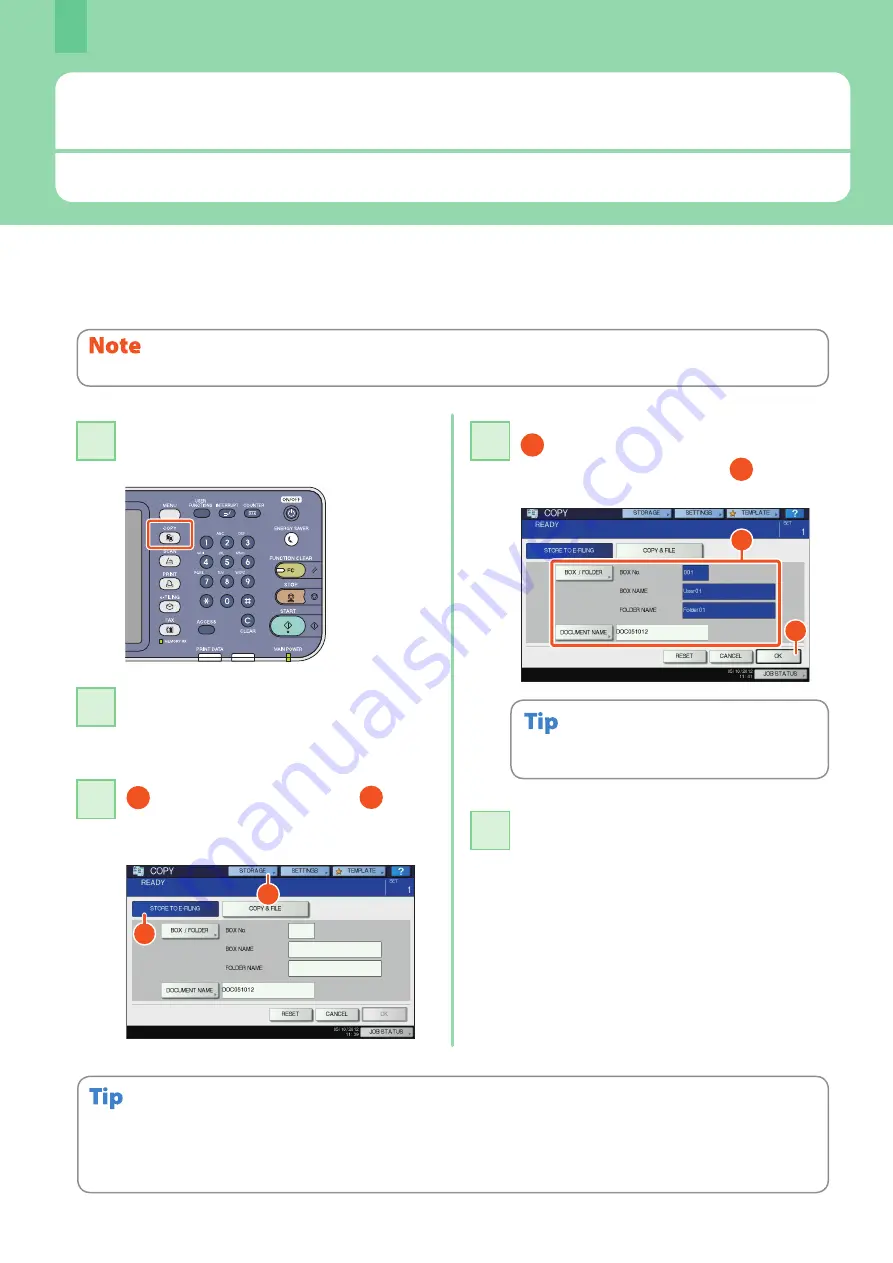
e-Filing is a function to store documents in the hard disk of the equipment, they can then be printed as required.

Press the [COPY] button on the control 

panel.

11

Storing documents

The originals are stored as e-Filing documents in the equipment.

1

 Press [STORAGE] and then 

2


[STORE TO E-FILING] on the touch 

panel.

33

You can store documents not only by copying them but also by scanning them or using the printer driver. For details, refer to the 
following guides:

&


Scanning Guide

 (PDF): “Chapter 2: BASIC OPERATION” - “Scan to e-Filing”

&


Printing Guide

 (PDF): “Chapter 2: PRINTING FROM WINDOWS” - “Printing with the Best Functions for Your Needs”

1

2

Press the [START] button on the control 

panel to store the documents.

55

When “Print this document?” appears, press [YES] if 
you want to do this as well as store it.

1

 Specify the box to be stored and the 

document name, and then 

2

 press 

[OK].

44

2

1

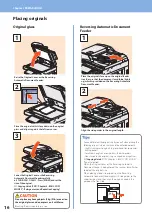
Place the original(s).

&

 P.16 “Placing originals” in this manual

22

This operation is available only when the hard disk is installed in the equipment.

Содержание E studio 2010C

Страница 1: ...MULTIFUNCTIONAL DIGITAL COLOR SYSTEMS Quick Start Guide ...

Страница 2: ...ation DVD and double click Setup exe If the menu is not displayed use the explorer to open the Manuals folder in the Client Utilities User Documentation DVD and double click index html How to use the Client Utilities User Documentation DVD Windows 1 Set the Client Utilities User Documentation DVD in the DVD ROM drive on your computer Software Installer starts automatically 2 Select I agree to the ...

Страница 3: ...Troubleshooting Guide This Troubleshooting Guide describes how to deal with problems such as paper misfeeds as well as how to react to messages displayed on the touch panel Network Fax Guide This Network Fax Guide describes the operations of the N W Fax Driver The N W Fax driver enables you to send electronic documents as faxes or Internet faxes from your computer High Security Mode Management Gui...

Страница 4: ...scription of original paper direction Paper or originals of A4 or B5 LT size can be placed either in a portrait direction or in a landscape direction In this manual R is added to this paper size when this size of paper or original is placed in a landscape direction Example A4 LT size original on the original glass Placed in a portrait direction A4 LT Placed in a landscape direction A4 R LT R Paper...

Страница 5: ...ling Operation 30 Basic Printing Operation 32 Basic Menu Operation 34 Chapter 3 MAINTENANCE Replacing Toner Cartridge 36 Replacing Waste Toner Box 37 Replacing Staple Cartridge 38 Regular Cleaning 42 Chapter 4 TROUBLESHOOTING Troubleshooting 46 Chapter 5 ADVANCED FUNCTIONS Advanced Functions 50 Chapter 6 INFORMATION ABOUT EQUIPMENT Items Included in This Product 60 Client Utilities User Documentat...

Страница 6: ...ation Other company and product names given in this manual or displayed in this software may be the trademarks of their respective companies To assure optimal printing performance we recommend that you use only genuine TOSHIBA toner cartridges If you use a TOSHIBA recommended toner cartridge you can utilize the following three functions of this equipment Cartridge detecting function This function ...

Страница 7: ...Description of Each Component 6 Turning Power ON OFF 12 Placing Paper and Originals 15 Installing Client Software 17 Chapter 1 PREPARATIONS ...

Страница 8: ...this to perform printing on special media types such as OHP film etc P 23 Bypass copying in this manual 8 Paper holding lever Use this to place paper on the bypass tray 9 Paper feed cover of the equipment Open this cover when releasing paper misfed in the drawer feeding area 10 Paper feed cover Open this cover when releasing paper misfed in the Paper Feed Pedestal or Large Capacity Feeder 11 Paper...

Страница 9: ...e main chargers according to the following procedures P 43 Cleaning the main chargers and LED print heads in this manual 8 LED print head cleaner If unevenness occurs on the copied or printed paper clean the LED print head according to the following procedures P 43 Cleaning the main chargers and LED print heads in this manual 9 Exit tray Printed paper exits into this tray 10 Paper exit stopper Use...

Страница 10: ...such as the number of copies telephone numbers or passwords 10 FUNCTION CLEAR button When this button is pressed all selected functions are cleared and returned to the default settings If the default setting is changed on the control panel and then copying scanning faxing or similar is performed the lamp of this button orange blinks 11 STOP button Use this button to stop any scanning and copying o...

Страница 11: ...ing in this equipment 22 Touch panel Use this panel for the various settings of the copying scanning and Fax functions This also displays messages such as when paper runs out or paper misfeeds occur Adjusting the angle of the control panel The angle of the control panel is adjustable at any angle between 7 and 90 degrees from the horizontal position When changing the angle of the control panel be ...

Страница 12: ... jobs and also allows you to view their performance history 4 Date and time The present date and time are displayed 5 Alert message indication area This shows alert messages such as when the toner cartridges must be replaced 6 Message indication area The explanation of each operation or the current status is displayed in message form Message displayed The following information appears on the touch...

Страница 13: ...r entry Basic Press this to access the basic keys Symbol Press this to access the symbol keys Other Press this to access the special keys Caps Lock Press this to switch capital letters and small letters Shift Press this to enter capital letters Space Press this to enter a space Press these to move the cursor Back Space Press this to delete the letter before the cursor Clear Press this to delete al...

Страница 14: ...bout 35 seconds and READY appears When you turn the power of the equipment OFF be sure also to shut it down by pressing the POWER button on the control panel Do not simply turn the main power switch OFF For details see the following page P 13 Turning the power OFF Shutdown in this manual When ERASING DATA appears This message appears when the Data Overwrite Enabler has been installed It appears im...

Страница 15: ...h panel screen is still ON do not simply press the main power switch to turn the power OFF The stored data may be lost or the hard disk may be damaged If a job in process exists when the POWER button of the control panel is pressed Processing job will be deleted Are you sure you want to shutdown appears When the equipment is not used for a long period of time Press the POWER button on the control ...

Страница 16: ...MAIN POWER lamp green lights When the POWER button is pressed when print or fax data are received through a wired LAN or when the time set for Scheduled Print has come 1 The default value set at the factory shipment is 1 minute 2 Any of the START ENERGY SAVER COPY e FILING SCAN PRINT and FAX buttons 3 ENERGY SAVER button on the control panel 4 The default value set at the factory shipment is 1 min...

Страница 17: ...r size 2 1 4 Set the side guides so that they match the paper size 5 Push in the drawer Be sure that the height of the stacked paper does not exceed the MAX line indicated on the side guides Placing paper Be careful not to catch your fingers when pushing the drawer back This could injure you For paper available for the equipment see the following page P 70 Specifications of Equipment in this manua...

Страница 18: ...ides to the original length Do not place any heavy objects 4 kg 9 lb or over on the original glass and do not press on it with force Breaking the glass could injure you A4 R LT R B4 LD You need to select the original size by yourself when placing the following originals whose sizes cannot be detected correctly Highly transparent originals e g overhead transparencies tracing paper Totally dark orig...

Страница 19: ... power ON and confirm that READY appears on the touch panel P 12 Turning Power ON OFF in this manual 1 1 Insert the Client Utilities User Documentation DVD in the DVD ROM drive of a Windows computer 2 2 To install the client software log onto Windows with a user account which enables the installation such as Administrators Select I agree to the terms of the License Agreement and click Next 3 3 Cli...

Страница 20: ...nstallation refer to the following guide Software Installation Guide PDF Chapter 2 RECOMMENDED INSTALLATION Setting the printer driver Before using the printer driver you must configure the options installed in the equipment Select Devices and Printers in the Start menu 1 1 Select TOSHIBA Universal Printer 2 right click and then click Printer properties 2 2 The configuration data of the options ca...

Страница 21: ...Chapter 2 BASIC OPERATION Basic Copying Operation 20 Basic Fax Operation 24 Basic Scanning Operation 28 Basic e Filing Operation 30 Basic Printing Operation 32 Basic Menu Operation 34 ...

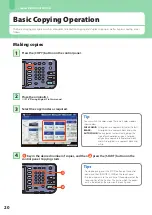
Страница 22: ...OP button on the control panel and then MEMORY CLEAR on the touch panel Printed paper exits to the exit tray of the equipment or the receiving tray of the Finisher The tray to which the paper exits is indicated by the arrow on the touch panel Select the copy modes as required 3 3 2 1 You can switch the color mode There are 3 color modes as shown below FULL COLOR All originals are copied in full co...

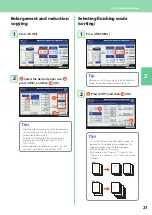
Страница 23: ...n copying a set of originals whose sizes and directions are different press MIXED SIZE Selecting finishing mode sorting Press FINISHING 1 1 1 Press SORT and then 2 OK 2 2 To set the staple and the hole punch mode the optional finishing devices are needed For the necessary options see the following page P 64 Options in this manual For example when Original 1 Original 2 and Original 3 are copied in ...

Страница 24: ...ded original to 2 sided copy Setting original mode Press ORIGINAL MODE 1 1 1 Select the desired original mode and then 2 press OK 2 2 The selectable original mode differs depending on the color mode In the full color mode you can choose from 5 types For example the following settings can be made Originals with text and photographs mixed 1 2 1 2 e STUDIO2051C 2551C This mode is available only when ...

Страница 25: ...ypass copying 1 Move the paper holding lever toward the outside and then 2 place paper face down on the bypass tray 1 1 1 1 Press PAPER TYPE if the type of the paper you placed on the bypass tray is other than plain paper 1 Press the button corresponding to the size of paper set on the bypass tray and then 2 OK 3 3 Press the START button Bypass copying starts 4 4 2 1 2 1 Align the side guides to t...

Страница 26: ...ress BACK SPACE on the touch panel to delete them one by one Or press the CLEAR button on the control panel or CLEAR on the touch panel to delete all the numbers you entered Alternatively you can press the START button on the control panel to send a fax Key in the fax number of the recipient by pressing INPUT FAX No on the touch panel or the digital keys on the control panel 3 3 Press SEND on the ...

Страница 27: ...ax icon Confirming recipients Press DESTINATION 1 1 The recipient list screen is displayed 2 2 Select the recipient you want to delete and then press DELETE 2 1 Specifying recipients in groups 1 Press GROUP tab to display the list of the groups and then 2 the group name You can specify up to a total of 400 recipients single and group To cancel a selected recipient press it again 2 1 ...

Страница 28: ...r to switch the pages 2 2 Press JOB STATUS 1 1 RESOLUTION Set the resolution based on the fineness of the original ORIGINAL SIZE Set the scan size of the original After each item is set press OK 3 3 1 Press FAX 2 select the reserved transmission you want to delete and then 3 press DELETE 2 2 2 3 1 Press DELETE on the confirmation screen The reserved transmission is deleted 3 3 ...

Страница 29: ... send or receive log and then press ENTRY Press RECEIVE to check the fax reception log Registering recipients 1 2 Press the USER FUNCTIONS button on the control panel and then ADDRESS on the touch panel 1 1 1 Press an open button to create a new recipient and then 2 ENTRY 2 2 1 Press each button on the touch panel to enter the following recipient information and then 2 OK to register it 3 3 1 2 2 ...

Страница 30: ...s the SCAN button on the control panel 1 1 Press FILE on the touch panel 3 3 Storing the scanned data in a shared folder 1 Set FILE NAME 2 FILE FORMAT etc and then 3 press OK 4 4 3 1 2 Place the original s P 16 Placing originals in this manual 2 2 Press SCAN on the touch panel Scanning starts 6 6 Change the scan settings as required 5 5 This operation is available only when the hard disk is instal...

Страница 31: ...hen the IP address of the equipment is 172 16 16 110 enter 172 16 16 110 file_share in the address bar of Windows Explorer 2 2 Store the scanned data in a Windows computer 3 3 For the IP address of the equipment ask your network administrator It is convenient to make a shortcut of the file_share folder since step 2 can be omitted The scanned data stored in the shared folder will be automatically d...

Страница 32: ...anning them or using the printer driver For details refer to the following guides Scanning Guide PDF Chapter 2 BASIC OPERATION Scan to e Filing Printing Guide PDF Chapter 2 PRINTING FROM WINDOWS Printing with the Best Functions for Your Needs 1 2 Press the START button on the control panel to store the documents 5 5 When Print this document appears press YES if you want to do this as well as store...

Страница 33: ...n be deleted from e Filing This enables you to make print settings such as selecting the duplex printing mode or adding page numbers Specified pages of the document can be printed for confirmation 1 Select the document you want to print and then 2 press PRINT Printing starts 3 3 2 1 Select the box on the touch panel that contains the document you want to print 2 2 This operation is available only ...

Страница 34: ...and click OK 3 3 1 Select the printer driver of the equipment and then 2 click Preferences Properties 2 2 Click Print OK Printing starts 4 4 To install the printer driver in a Windows computer refer to the following guide P 17 Installing Client Software in this manual Software Installation Guide PDF Chapter 3 INSTALLING PRINTER DRIVERS FOR WINDOWS To install the printer driver in a Macintosh compu...

Страница 35: ...ling tab To adjust Image Quality Click the Image Quality tab To print with character strings or graphics on the background of the paper Click the Effect tab To set not to print blank pages Click the Others tab To print with templates Click the Templates tab To specify paper size or number of copy sets Click the Basic tab To specify 2 sided printing or N up printing Click the Finishing tab If the F...

Страница 36: ...logging in is displayed Available printing numbers are displayed depending on the settings of the equipment 5 USER button The shortcut which a user logging in can employ is displayed 6 PUBLIC button The shortcut which all users can employ is displayed 7 Shortcut display area The shortcut registered in the menu screen is displayed You can create a template with several functions that are frequently...

Страница 37: ...Replacing Toner Cartridge 36 Replacing Waste Toner Box 37 Replacing Staple Cartridge 38 Regular Cleaning 42 Chapter 3 MAINTENANCE ...

Страница 38: ...or toner cartridge you want to replace 10 3 Shake the new toner cartridge well to loosen the toner inside 4 Pull the seal straight out in the direction of the arrow 5 Insert the new toner cartridge straight along the guide until it stops 6 Close the front cover pressing both edges Never attempt to incinerate toner cartridges Dispose of used toner cartridges and waste toner boxes in accordance with...

Страница 39: ...rs Repeat this 3 times for each one of the 4 colors When you finish cleaning the LED print head return the 4 green levers located under the toner cartridges and attach the cleaner to the inside of the cover 6 Be sure to push the waste toner box until the top latches click Then close the front cover by pressing both edges Never attempt to incinerate waste toner boxes Dispose of used toner cartridge...

Страница 40: ...ge according to the following procedures 38 1 Open the front cover of the Finisher Take off the staple cartridge Take the empty staple case out of the staple cartridge 4 Install a new staple case into the staple cartridge 5 Install the staple cartridge 6 Close the front cover of the Finisher Stapler Unit of Saddle Stitch Finisher ...

Страница 41: ...1 Open the left cover of the Finisher 2 Take off the staple cartridge 3 Pull out straight the seal bundling the staples 4 Install new staple cartridge 5 Close the left cover of the Finisher Saddle Stitch Unit of Saddle Stitch Finisher ...

Страница 42: ... 1 2 Holding the lever move the finisher to the left until it comes to a stop 2 1 3 Open the Hole Punch Unit while pushing the lever 4 Take off the staple cartridge 5 Push the buttons of both side of the cartridge to take off the staple case 6 Install a new staple case Stapler Unit of Inner Finisher ...

Страница 43: ...turn the Hole Punch Unit to its original position 9 Carefully return the finisher to its original position 10 Close the front cover of the Finisher Do not put your hand or fingers on the top of the finisher when closing it They could be caught and this could injure you ...

Страница 44: ...he shape of the surface or leave it discolored When using a chemical cleaning pad to clean it follow the instruction 1 Scanning area surface of the long rectangular glass 2 Original glass Wipe it with a soft dry cloth If there are still stains remaining wipe clean with a piece of soft cloth which has been moistened with water and then squeezed well Do not use liquids other than water such as alcoh...

Страница 45: ...ard you pushing down the top latch and then clean the LED print heads For instructions on how to clean the LED print heads see the following P 37 Replacing Waste Toner Box Steps 2 to 6 4 Close the front cover pressing both edges Cleaning the main chargers and LED print heads If the inside of the main chargers and the print heads of the LED are dirty the dirt will be transferred to the copied image...

Страница 46: ...44 MEMO ...

Страница 47: ...Troubleshooting 46 Chapter 4 TROUBLESHOOTING ...

Страница 48: ...f the equipment and the options to be opened when paper misfeeds occur are as indicated by the arrows in the following illustrations Symbols or messages of such as for paper misfeeds occasionally appear on the touch panel For details of the paper misfeed symbols refer to the following guide Troubleshooting Guide PDF Chapter 1 TROUBLESHOOTING FOR THE HARDWARE Clearing a Paper Misfeed For details of...

Страница 49: ... the arrows in the following illustrations The Saddle Stitch Finisher the Hole Punch Unit and the Bridge Unit The Inner Finisher and the Hole Punch Unit If you press on the upper right of the touch panel explanations of the functions and buttons on the screen are displayed If you press on the lower left of the Help screen supplementary information about the functions appears Using the Help functio...

Страница 50: ...ms Client Problems Hardware Problems Chapter 4 TROUBLESHOOTING FOR SCANNING Scanning Problems Chapter 5 TROUBLESHOOTING FOR e Filing e Filing Web Utility Problems Chapter 6 TROUBLESHOOTING FOR NETWORK CONNECTIONS Locating the Equipment in the Network LDAP Search and Authentication Problems Printing Problems Network Related Network Fax N W Fax Driver Problems Client Software Authentication Problems...

Страница 51: ...Chapter 5 ADVANCED FUNCTIONS Advanced Functions 50 ...

Страница 52: ... P 51 in this manual Copying or scanning originals without blank sheets 1 3 5 6 1 3 5 6 P 52 in this manual Storing data in a shared folder as well as sending a fax P 53 in this manual Registering frequently used scan settings in templates P 54 in this manual Attaching the scanned data to an E mail P 55 in this manual Adding date and time to document files YYYY MM DD 11 11 P 56 in this manual Prin...

Страница 53: ...als on the Reversing Automatic Document Feeder P 16 Placing originals in this manual 1 1 Press ZOOM on the touch panel 2 2 1 Press MIXED SIZE and then 2 OK on the touch panel 3 3 Press FINISHING on the touch panel 4 4 COPY FAX SCAN e FILING PRINT 1 Press FRONT STAPLE and then 2 OK on the touch panel 5 5 Key in 5 for the number of copy sets and then press the START button on the control panel 6 6 I...

Страница 54: ...ontrol panel Copying starts 4 4 Place the originals on the Reversing Automatic Document Feeder P 16 Placing originals in this manual 1 1 Place the originals on the Reversing Automatic Document Feeder P 16 Placing originals in this manual 1 1 COPY FAX SCAN e FILING PRINT Press SCAN SETTING and then in the basic menu for the scanning functions 2 2 Press 1 ON in the OMIT BLANK PAGE setting and then 2...

Страница 55: ...ll as sending a fax Place the original s P 16 Placing originals in this manual 1 1 Press STORAGE on the touch panel 2 2 1 Specify details such as the file name shared folder and file format and then 2 press OK 3 3 Specify the recipient and press SEND Sending a fax starts 4 4 COPY FAX SCAN e FILING PRINT 1 2 This operation is available only when the hard disk is installed in the equipment ...

Страница 56: ...ribed here COPY FAX SCAN e FILING PRINT Press FILE on the touch panel 1 1 1 Select PDF in the file format and then 2 press OK 2 2 Change the scan setting as required 3 3 Press TEMPLATE on the touch panel and then REGISTRATION tab 4 4 1 Press PUBLIC TEMPLATE GROUP on the touch panel and then 2 OPEN 5 5 Press PASSWORD enter the administrator password and press OK 6 6 1 Select an empty template butto...

Страница 57: ...cified E mail address is as follows Place the original s P 16 Placing originals in this manual 1 1 Press E MAIL and then TO on the touch panel 2 2 1 Specify the E mail address and then 2 press OK 3 3 Define the settings for the file as required and then press OK 4 4 Press SCAN on the touch panel Scanning starts 5 5 COPY FAX SCAN e FILING PRINT 1 2 ...

Страница 58: ...ime added at the bottom is as follows Select the box in which the desired document is stored 1 1 1 Select the document and then 2 press SETTINGS 2 2 Press TIME STAMP 3 3 1 Press LOWER and then 2 OK 4 4 Press PRINT on the touch panel Printing starts 5 5 COPY FAX SCAN e FILING PRINT 1 2 1 2 This operation is available only when the hard disk is installed in the equipment ...

Страница 59: ...llowing types of files are also available for printing JPEG file PRN file PS file XPS file Connect the USB device to the USB port 1 1 Press the PRINT button on the control panel 2 2 Click the pull down menu and then select USB 3 3 1 Select a PDF file to be printed and then 2 press PRINT Printing starts 4 4 COPY FAX SCAN e FILING PRINT 1 2 This operation is available only when the Front USB Cable i...

Страница 60: ...the printer driver of the equipment and then click Preferences Properties 2 2 Select Hold Print for the job type in the Basic tab menu 3 3 Click OK to return to the print dialog box and then Print OK 4 4 Press the PRINT button on the control panel of the equipment 5 5 1 Select the file to be printed and then 2 press PRINT Printing starts 8 8 2 1 COPY FAX SCAN e FILING PRINT Click the pull down men...

Страница 61: ...6 INFORMATION ABOUT EQUIPMENT Items Included in This Product 60 Client Utilities User Documentation DVD 61 Client Software 62 Options 64 Logging in 67 Specifications of Equipment 70 Specifications of Options 73 ...

Страница 62: ...security be sure to read this booklet first Quick Start Guide This manual The Quick Start Guide describes the preparations basic and advanced usage maintenance and regular cleaning of the equipment Client Utilities User Documentation DVD The Client Utilities User Documentation DVD contains the client software such as the printer drivers and the utility software It also contains pdf files of the Op...

Страница 63: ...Remote Scan driver WIA driver e Filing Backup Restore Utility For Macintosh PPD file for Mac OS X 10 4 to Mac OS X 10 6 x PPD file for Mac OS X 10 7 or later Plug in for Mac OS X 10 4 or later For UNIX Linux UNIX Linux filter Solaris HP U AIX Linux SCO CUPS For installing the client software refer to the following guide Software Installation Guide PDF Chapter 1 OVERVIEW For details of the client s...

Страница 64: ...for Macintosh This printer driver enables you to print documents from Macintosh computers Mac OS X 10 4 or later For details refer to the following guides Software Installation Guide PDF Chapter 4 INSTALLING PRINTER DRIVERS FOR MACINTOSH Printing Guide PDF Chapter 3 PRINTING FROM Macintosh UNIX Linux filter UNIX Linux filter enables you to print documents from the UNIX Linux workstation For detail...

Страница 65: ...RK FAX UTILITIES Client software for the e Filing functions TWAIN driver This driver enables you to obtain documents stored in e Filing as an image in application supporting TWAIN on Windows computers For details refer to the following guide Software Installation Guide PDF Chapter 2 RECOMMENDED INSTALLATION or Chapter 6 INSTALLING SCAN DRIVER AND UTILITIES File downloader File downloader enables y...

Страница 66: ...ional Drawer Module 8 Large Capacity Feeder KD 1031 This feeder enables you to feed up to 2000 sheets 80 g m2 or 20 lb Bond of A4 or LT paper 9 Additional Drawer Module MY 1039 This drawer can be added to the Paper Feed Pedestal 10 Saddle Stitch Finisher MJ 1037 This Finisher enables saddle stitching in addition to sort group finishing and stapling The Hole Punch Unit can be installed in this Fini...

Страница 67: ...ipment simply by holding the IC card over the e BRIDGE ID Gate Installed on the right hand side of the equipment This cannot be installed with the Work Table at the same time Data Overwrite Enabler GP 1070 This is an enabler to erase the data stored temporarily when copying printing scanning faxing Internet Fax or network Fax is performed It overwrites temporarily stored data with random data IPse...

Страница 68: ...n the right hand side of the Reversing Automatic Document Feeder to close it How to use the Accessible Arm A person in a wheelchair can close the Reversing Automatic Document Feeder using the Accessible Arm Store it near the equipment Do not store the Accessible Arm by attaching it on the equipment ...

Страница 69: ...tment code or user information input menu When they are not being used the display returns to the basic menu for the copying function The period is set at 45 seconds by default at the time of installation of the equipment To change the setting refer to the following guide MFP Management Guide PDF Chapter 2 SETTING ITEMS ADMIN Setting General Functions When connecting to equipment with department o...

Страница 70: ...32 digits using the digital keys on the control panel For details ask your administrator If you enter an invalid password several times you may not log in for a certain period since it will be regarded as an unauthorized access When User account is locked or User Name and Password are not recognized appears and logging in cannot be performed ask your administrator After the operation To prevent un...

Страница 71: ...played in LDAP instead of DOMAIN The menu for user authentication appears 1 1 If the displayed domain name or LDAP server name is not yours press to select one belonging to you Press USER NAME 2 2 Enter the user name maximum 128 letters and then press OK 3 3 Press PASSWORD 4 4 Enter the password maximum 64 letters and then press OK 5 5 Press OK 6 6 The equipment becomes being ready to perform copy...

Страница 72: ...at A3 A4 A4 R A5 R B4 B5 B5 R FOLIO LT format LD LG LT LT R ST R COMP 13 LG 8 5 SQ K format 8K 16K 16K R THICK1 106 163 g m2 29 lb Bond 90 lb Index 300 sheets Large Capacity Feeder PLAIN RECYCLED PAPER 64 105 g m2 17 28 lb Bond 2360 sheets 64 g m2 17 lb Bond 2000 sheets 80 g m2 20 lb Bond 1660 sheets 81 105 g m2 21 28 lb Bond A4 LT Bypass tray PLAIN RECYCLED PAPER 60 105 g m2 16 28 lb Bond 100 she...

Страница 73: ...TRANSPARENCY 1 2 A B format CG3700 3M LT format BG72 Folex ENVELOPE 3 Westvaco Columbian CO138 Mailwell No 553 1 Only Toshiba recommended OHP film should be used Using any other film may cause a malfunction 2 Automatic duplex copying is not available 3 Printing on the back side of an envelope is possible only when the envelope is not a self sealing envelope 1 Duplex copying is not available 2 For ...

Страница 74: ... 0 08 0 08 Printer Black and white Color Leading edge 4 2 mm 2 8 mm 1 2 mm 0 17 0 11 0 05 Trailing edge 4 2 mm 1 2 mm 2 8 mm 0 17 0 05 0 11 Both edges 4 2 2 0 mm 0 08 0 08 Reproduction ratio Actual size 100 0 5 Zoom 25 400 in 1 increments For the Reversing Automatic Document Feeder 25 200 in 1 increments Paper supply Drawer Approx 250 sheets 80 g m2 20 lb Bond Bypass Approx 100 sheets 80 g m2 20 l...

Страница 75: ...r LT Paper weight 64 105 g m2 17 28 lb Bond Maximum capacity 2000 sheets 80 g m2 20 lb Bond Height approx 110 mm or 4 3 x 2 Power source DC 5 V DC 24 V supplied from the equipment Dimensions 668 mm 26 3 W x 735 mm 28 9 D x 292 mm 11 5 H incl Stabilizer Weight Approx 26 kg 57 3 lb Paper Feed Pedestal 1 drawer type Model name KD 1032 Acceptable paper size A3 A4 A4 R A5 R B4 B5 B5 R FOLIO LD LG LT LT...

Страница 76: ...K R 175 mm 6 9 1000 175 mm 6 9 1000 Whichever of 175 mm 6 9 1000 sheets or 50 sets is reached first A3 B4 FOLIO LD LG COMP 13 LG 8K 94 mm 3 7 500 94 mm 3 7 500 Whichever of 94 mm 3 7 500 sheets or 50 sets is reached first Sort Group Staple is not available with A5 R ST R Refer to the Copying Guide for the tray loading capacity of the saddle stitch tray Copying Guide PDF Chapter 3 BASIC COPY MODES ...

Страница 77: ...A4 R B5 B5 R A5 R LT LT R ST R 8 5 SQ 16k 16K R 73 mm 2 87 500 73 mm 2 87 500 Whichever of 73 mm 2 87 500 sheets or 50 sets is reached first A3 B4 FOLIO LD LG COMP 13 LG 8K 36 mm 1 42 250 36 mm 1 42 250 Whichever of 36 mm 1 42 250 sheets or 25 sets is reached first When mixed size paper is loaded the tray loading capacity should follow the specifications for larger paper sizes in the above tables ...

Страница 78: ...and 21 mm or 2 76 and 0 83 pitch A3 A4 A4 R B4 B5 B5 R FOLIO LD LG LT LT R COMP 8 5 SQ 13 LG 8K 16K 16K R Hole Punch Unit Model name MJ 6007 Series Acceptable paper size A3 A4 A4 R B4 B5 B5 R FOLIO LD LG LT LT R COMP 8 5 SQ 13 LG 8K 16K 16K R Acceptable paper weight 60 128 g m2 16 lb Bond 34 lb Bond OHP film and specially treated paper are not available Weight Approx 3 3 kg 7 3 lb Number of punchi...

Страница 79: ... 800 26 400 24 000 21 600 19 200 16 800 14 400 12 000 9 600 7 200 4 800 2 400 bps Encoding Systems JBIG MMR MR MH Memory Capacity Transmission Reception 1 GB HDD 1 when hard disk is installed 100 MB when hard disk is not installed Unit Type Desktop type transmitting receiving dual type Applicable Network Public Switched Telephone Network PSTN 1 For hard drives MB means 1 million bytes Total HDD ac...

Страница 80: ...78 MEMO ...

Страница 81: ...acity Feeder 6 64 73 LED print head cleaner 7 M N Main charger cleaners 7 MAIN POWER lamp 8 Main power switch 7 MEMORY RX LINE lamps 8 Menu 34 MENU button 8 Message indication area 10 Network interface connector 6 O P Operator s Manual Pocket 6 Options 64 Original Cover 64 Original glass 7 Original scale 7 Paper exit stopper 7 Paper feed cover 6 Paper Feed Pedestal 6 64 73 Paper size indicator 6 P...

Страница 82: ... 2012 2013 TOSHIBA TEC CORPORATION All rights reserved Under the copyright laws this manual cannot be reproduced in any form without prior written permission of TTEC ...

Страница 83: ...Printed in China FC 2050C 2550C FC 2051C 2551C OME120002B0 ...

Страница 84: ...6LJ61558000 R120120K8303 TTEC Ver02 F 2013 07 2012 2013 TOSHIBA TEC CORPORATION All rights reserved MULTIFUNCTIONAL DIGITAL COLOR SYSTEMS Quick Start Guide 1 11 1 OSAKI SHINAGAWA KU TOKYO 141 8562 JAPAN ...

Отзывы: