background image

User’s Manual

2-6

Basic Operations & Home screen

Context Menu

The 

Context

 menu contains tools that apply to a specific item on the 

screen. You may open a context menu by clicking and holding an item on 
the screen. Not all items have context menus.

Monitoring your device’s status

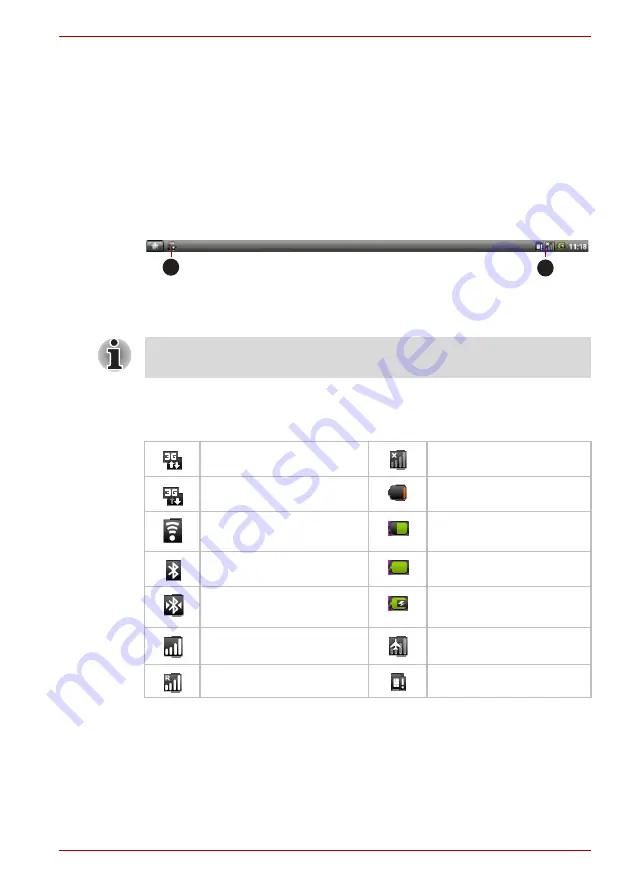
The status bar appears at the top of every screen. It displays icons 
indicating that you have received notifications (on the left) and icons 
indicating the device’s status (on the right), along with the current time.

Figure 2-4 Notification and Status icons

Status icons

The following icons indicate the status of your device. 

1. Notification Icons

2. Status Icons

1

2

The following icons are only some sample icons. Not all status icons are 
listed here.

3G connected

No signal

3G in use

Battery is very low

Connected to a Wi-Fi 
network

Battery is partially drained

Bluetooth is on

Battery is full

Connected to a Bluetooth 
device

Battery is charging

Signal strength

Airplane mode

Roaming

No SIM card installed

Содержание AC100

Страница 1: ...computers toshiba europe com User s Manual TOSHIBA AC100 ...

Страница 2: ...g the Settings screen 2 5 Working with menus 2 5 Monitoring your device s status 2 6 Managing Notifications 2 7 Locking your screen 2 8 Customizing the Home screen 2 9 Optimizing battery life 2 10 Backup restore settings and applications 2 11 Factory Reset 2 11 Chapter 3 Connecting to networks Connecting to mobile networks 3 1 Connecting to Wi Fi networks 3 3 Connecting to Bluetooth devices 3 5 Ch...

Страница 3: ...k 4 23 TOSHIBA YouTube 4 23 Chapter 5 Settings Settings 5 1 Desktop settings 5 9 Chapter 6 Hardware Options Operation Hardware 6 1 The Keyboard 6 7 Mini USB port 6 9 Optional devices 6 10 Optional accessories 6 17 Chapter 7 Troubleshooting Problem solving process 7 1 Hardware and system checklist 7 3 TOSHIBA support 7 10 Appendix A Specifications Physical Dimensions A 1 Environmental Requirements ...

Страница 4: ...User s Manual iv TOSHIBA AC100 Appendix D Legal Footnotes Glossary Index ...

Страница 5: ...accuracy The instructions and descriptions it contains are accurate for the TOSHIBA AC100 Portable device at the time of this manual s production However succeeding devices and manuals are subject to change without notice TOSHIBA assumes no liability for damages incurred directly or indirectly from errors omissions or discrepancies between the TOSHIBA AC100 device and the manual This product incor...

Страница 6: ...INED FROM A VIDEO PROVIDER LICENSED TO PROVIDE AVC VIDEO NO LICENSE IS GRANTED OR SHALL BE IMPLIED FOR ANY OTHER USE ADDITIONAL INFORMATION MAY BE OBTAINED FROM MPEG LA L L C SEE HTTP WWW MPEGLA COM EU Declaration of Conformity This product is carrying the CE Mark in accordance with the related European Directives Responsible for CE Marking is TOSHIBA Europe GmbH Hammfelddamm 8 41460 Neuss Germany...

Страница 7: ...ve mentioned Residential commercial and light industry environments For example the following environments are not approved Industrial Environments e g environments where a mains voltage of 380 V three phase is used Medical Environments Automotive Environments Aircraft Environments Any consequences resulting from the use of this product in working environments that are not approved are not the res...

Страница 8: ...help to prevent potential negative consequences for the environment and human health For more detailed information about the collection and recycling programmes available in your country please visit our website http eu computers toshiba europe com or contact your local city office or the shop where you purchased the product The crossed out wheeled dust bin symbol indicates that batteries and or a...

Страница 9: ...mation about the presence in our articles of substances included on the candidate list according to article 59 1 of Regulation EC No 1907 2006 REACH in a concentration above 0 1 weight by weight Following information is only for Turkey Compliant with EEE Regulations Toshiba meets all requirements of Turkish regulation 26891 Restriction of the use of certain hazardous substances in electrical and e...

Страница 10: ...g procedures Abbreviations On first appearance and whenever necessary for clarity abbreviations are enclosed in parentheses following their definition For example Read Only Memory ROM Acronyms are also defined in the Glossary Icons Icons identify ports dials and other parts of your device The indicator panel also uses icons to identify the components it is providing information on Keys The keyboar...

Страница 11: ...own below ABC When procedures require an action such as clicking an icon or entering text the icon s name or the text you are to type in is represented in the typeface you see to the left S ABC Names of windows or icons or text generated by the device that appear on its display screen are presented in the type face you see to the left Pay attention A caution informs you that improper use of equipm...

Страница 12: ...e ventilation and are protected from overheating when the power is turned on or when an AC adaptor is connected to a power outlet even if your device is in Suspend Mode In this condition observe the following Never cover your device or AC adaptor with any object Never place your device or AC adaptor near a heat source such as an electric blanket or heater Always operate your device on a hard flat ...

Страница 13: ...es to your hands and wrists that can be caused by extensive keyboard use Instruction Manual for Safety and Comfort also includes information on work space design posture and lighting that can help reduce physical stress Heat injury Avoid prolonged physical contact with the device If the device is used for long periods its surface can become very warm While the temperature will not feel hot to the ...

Страница 14: ... use of mobile phones can interfere with the audio system The operation of the device will not be impaired in any way but it is recommended that a minimum distance of 30cm is maintained between the device and a mobile phone that is in use Instruction Manual for Safety and Comfort All important information on the safe and proper use of this device is described in the enclosed Instruction Manual for...

Страница 15: ...ake sure you have all the following items TOSHIBA AC100 AC adaptor and power cord 2 pin plug or 3 pin plug Documentation TOSHIBA AC100 Quickstart Instruction Manual for Safety and Comfort Warranty information If any of the items are missing or damaged contact your dealer immediately Operating System The following operating system is pre installed TOSHIBA AC100 Operating System powered by Android S...

Страница 16: ...the safe and proper use of this device It is intended to help you be more comfortable and productive while using this device By following the recommendations in it you may reduce your chance of developing a painful or disabling injury to your hand arms shoulders or neck Use a virus check program and make sure it is updated regularly Never format storage media without checking its content formattin...

Страница 17: ... you need to charge the battery or you want to operate from AC power It is also the fastest way to get started because the battery pack will need to be charged before you can operate from battery power Depending on the model either a 2 pin or 3 pin adaptor power lead will be bundled with the device Do not use a 3 pin to 2 pin conversion plug The supplied power cord conforms to safety rules and reg...

Страница 18: ...he country of use Failure to do so could result in a fire or electric shock possibly resulting in serious injury The supplied power cord conforms to safety rules and regulations in the region the product is bought and should not be used outside this region For use in other regions please buy power cords that conform to safety rules and regulations in the particular region Do not use a 3 pin to 2 p...

Страница 19: ...nel Opening it vigorously or slamming it shut could damage the device Be careful not to open the display panel too far as this could put stress on the display panel s hinges and cause damage Do not press or push on the display panel Do not lift the device by the display panel Do not close the display panel with pens or any other objects left in between the display panel and the keyboard When openi...

Страница 20: ... Silent mode Airplane mode Power off and Suspend Turning off the power The power can be turned off in one of two modes either Shut Down Mode or Suspend Mode You can also turn the LCD off in order to extend the battery life Shut Down Mode When you turn off the power in Shut Down Mode no data will be saved and the device will boot to the operating system s main screen the next time it is turned on 1...

Страница 21: ...tem went into Suspend mode Resuming from Suspend Mode You can resume from Suspend Mode in one of the following ways Press the power button Press the Home key Open the LCD lid Turn the LCD off on You can turn the LCD off while the system is still on in the following ways Close the LCD lid Set the screen timeout in the Settings To turn the LCD on please follow the ways below Open the LCD lid Press a...

Страница 22: ...el in the closed position Figure 1 3 Front of the device with display panel closed Please handle your device carefully to avoid scratching or damaging the surface 1 System indicators 1 System indicators These LED indicators allow you to monitor the status of various device functions and are described in more detail within the System indicators section ...

Страница 23: ...details Microphone Headphone combo jack A 3 5 mm mini microphone headphone combo jack enables connection of a monaural microphone or a stereo headphone Notification LED The Notification LED will glow white when a new email or SMS is received You can adjust the notification patterns in the settings menu Bridge media slot This slot lets you insert an SD SDHC memory card miniSD microSD Card and Multi...

Страница 24: ...its internal batteries Please note that you should only use the model of AC adaptor supplied with the device at the time of purchase using the wrong AC adaptor can cause damage to the device Mini USB port Mini USB port allows you to connect your TOSHIBA AC100 device to other devices which can be used to transfer files Please refer to the Mini USB port section in Chapter 6 Hardware Options Operatio...

Страница 25: ... can create a short circuit which can cause damage and fire possibly resulting in serious injury Please note that it is not possible to confirm the operation of all functions of all USB devices that are available In view of this it may be noted that some functions associated with a specific device might not operate properly 1 Battery pack 1 Battery pack The battery pack provides power to the devic...

Страница 26: ...battery lock to release the battery pack ready for removal Please refer to the Replacing the battery pack section in Chapter 6 Hardware Options Operation for details on removing the battery pack Battery release latch Slide and hold this latch into its Unlock position in order to release the battery pack for removal Please refer to the Replacing the battery pack section in Chapter 6 Hardware Option...

Страница 27: ...G antennas not shown 7 Display hinges 2 Web Camera 8 Power button 3 Web Camera LED 9 Keyboard 4 Microphone 10 Touch Pad 5 Bluetooth antenna not shown 11 Touch Pad control buttons 6 Display screen 1 2 3 4 5 6 7 8 9 10 11 7 3G antennas some models are equipped with the 3G antennas Web Camera Web Camera is a device that allows you to record video or take photographs with your device Web Camera LED Th...

Страница 28: ... Press this button to turn the device s power on and off Keyboard The internal keyboard provides you with the Home key Menu key Search key Setting key and several function keys at the top Please refer to the The Keyboard section in Chapter 6 Hardware Options Operation for details Touch Pad The Touch Pad located in the palm rest is used to control the movement of the on screen pointer Touch Pad con...

Страница 29: ...ator will flash white Power The Power indicator normally glows white when the device is turned on It will flash when the device is in Suspend mode Battery The Battery indicator shows the condition of the battery s charge white indicates the battery is fully charged amber indicates the battery is charging and flashing amber indicates a low battery condition Wireless LAN 3G The Wireless LAN 3G indic...

Страница 30: ...same way as buttons on a standard mouse Press the left button to select a menu item or to manipulate text or graphics designated by the pointer and press the right button to display a menu or other function depending on the software you are using Touch Pad Scroll feature The touch pad supports scroll feature to let you scroll vertically On the screen you wish to scroll simply slide your finger upw...

Страница 31: ...prefer Figure 2 2 Home screen Some operations including Touch Pad scroll operation external mouse wheel operation and PGUP PGDN key operation depend on the executed applications 1 Notification area 4 Time 2 Signal strength 5 Launcher tab 3 Battery Status 6 Desktop Item Description Notification area Indicates a new event such as an Email received Signal strength Indicates the connection status and ...

Страница 32: ...t arrow keys on the keyboard You may also switch the view mode by clicking the icon in the lower right of the home menu Launcher tab Shows all the applications installed in your system Desktop Shows the icons of any applications widgets or folders you put on the screen Applications Alarm Clock Browser Camera Calculator Contacts Documents To Go Email FBReader fring Gallery Messaging Music Opera Mob...

Страница 33: ...ht If you have already setup a screen name a tooltip message showing the screen name such as MyHome will be displayed for 3 seconds when switching the screen automatically Small dots at the top right corner of the screen indicate which screen is currently being viewed Widgets Analog clock Music Online Manual Picture frame Power Control Search TOSHIBA Ebook TOSHIBA Memo TOSHIBA Media Player TOSHIBA...

Страница 34: ...the Settings screen where settings can be customized Press the Menu key in the Home screen and then click Settings Press the Settings key on the keyboard directly Press the Launcher tab Settings Settings Working with menus There are two kinds of menus the Options menu and the Context menu Options Menu The Options menu contains tools that apply to the activities related to the current screen or app...

Страница 35: ...tions on the left and icons indicating the device s status on the right along with the current time Figure 2 4 Notification and Status icons Status icons The following icons indicate the status of your device 1 Notification Icons 2 Status Icons 1 2 The following icons are only some sample icons Not all status icons are listed here 3G connected No signal 3G in use Battery is very low Connected to a...

Страница 36: ...s Applications that produce notifications such as Email have their own settings which you can use to configure whether and how they send notifications See the sections on those applications for details Opening the Notifications panel Click the status bar to open the notifications panel The notifications panel displays a scrolling list of your current notifications Notifications about ongoing activ...

Страница 37: ...g your screen 1 Open the Location security settings as below Click the Launcher tab Settings Settings Location security 2 Click Set unlock pattern under Screen unlock pattern The first time you open it a short tutorial about creating an unlock pattern will appear Then you re prompted to draw and redraw your own pattern You can draw an unlock pattern using the following ways Draw by keyboard The nu...

Страница 38: ...ur selection Shortcuts Add shortcuts to applications a bookmarked webpage a favorite contact a music playlist and many other items The shortcuts available depend on the applications you have installed Widgets Add any of a variety of miniature applications widgets to your Home screen including a clock a music player a picture frame the Google search bar a calendar that shows upcoming appointments a...

Страница 39: ...your finger or release the mouse Removing an item from the Home screen To remove an item from the Home screen follow the steps below 1 Click and hold the item you want to remove until its icon is magnified The Launcher tab icon changes to a Trash bin icon 2 Drag the item to the Trash bin icon 3 When the icon glows lift your finger or release the mouse Renaming a folder To rename a folder follow th...

Страница 40: ...e using TOSHIBA File Manager You should copy the following files and folders to the same location of the internal storage backup folder files and folders you want to backup 2 In the Settings screen click Privacy settings Backup restore settings and applications Restore settings and applications 3 Choose a zip file you want to restore to finish it Factory Reset The device provides you the function ...

Страница 41: ...k when you insert a SIM card and turn it on contact your carrier to obtain the details of its access point name Different locations may have different mobile networks available Initially your device is configured to use the fastest mobile network available for data You can also configure your device to access a different set of networks entirely or to behave in special ways when roaming The icons ...

Страница 42: ...ating a new access point If you and your wireless service provider determine that you need to change the settings of your current access point name APN or to create a new one you must obtain the APN and detailed settings from your provider 1 Open the Settings screen 2 Click Wireless networks Mobile networks Access Point Names 3 Click an existing APN to edit it or press the Menu key and click New A...

Страница 43: ...tus Turning Wi Fi on and connecting to a Wi Fi network You may turn on and connect to a Wi Fi network by following steps 1 Open the Settings screen 2 Click Wireless networks Wi Fi settings 3 Click Wi Fi to turn it on The device scans for available Wi Fi networks and displays the names of those it finds Secured networks are indicated with a Lock icon 4 Click a network to connect it If the network i...

Страница 44: ...settings screen check Network notification You can uncheck this option to stop receiving notifications Adding a Wi Fi network You can add a Wi Fi network so the device will remember it along with any security credentials and connect to it automatically when it is in range You must also add a Wi Fi network to connect to it if it does not broadcast its name SSID or to add a Wi Fi network when you ar...

Страница 45: ... The first time you use a new device with your device you must pair them so that they know how to connect securely to each other After that you can simply connect to a paired device Turn off Bluetooth when you re not using it to extend the life of your battery between charges You may also be required to turn Bluetooth off in some locations Bluetooth is turned off in Airplane mode The Status bar di...

Страница 46: ...r with each other If you re prompted to enter a passcode try entering 0000 or 1234 the most common passcodes or consult the documentation that came with the device to learn its passcode If the pairing is successful your TOSHIBA AC100 device connects to the device Connecting to a Bluetooth device Once paired you can connect to a Bluetooth device For example to switch devices or to reconnect after y...

Страница 47: ...uttons and the AM or PM buttons You can also click a time to type the time you want directly 4 Click Tone to select a ringtone for the alarm The ringtone plays briefly when you select it 5 Click Repeat to set the days when you want the alarm to sound If you don t set a repeat the alarm sounds only one time 6 Click Label to enter a name for the alarm 7 When you re finished click Done Changing alarm...

Страница 48: ...s displayed If you have not used Browser recently your home page will open Go to a webpage 1 Click the URL box at the top of the Browser screen If the URL box isn t visible drag the page down until the URL box comes into view 2 Enter the address URL of the webpage by using the keyboard or onscreen keyboard As you enter the address Google web search will make suggestions of webpages and queries 3 C...

Страница 49: ...ting window and click to open it Close a Browser window 1 Press the Menu key and select Windows All open windows are displayed in a scrolling list of thumbnails 2 Click the Close icon to close it View your Browser history As you browse the web Browser will keep track of the pages you visit to help you find your way back later 1 Click the bookmark icon at the top right of the screen 2 Click the His...

Страница 50: ... open a dialog where you can increase or decrease the magnification level Open pages in overview Check to show overview of newly opened webpages Text encoding Click to open a dialog where you can change the text encoding standard Block pop up windows Check to prevent websites from opening windows unless you request it Load images Check to display images on the webpages Auto fit pages Check to form...

Страница 51: ...ber what you enter in some form fields on a webpage for later usage Clear form data Click to delete all saved form data Security settings Remember passwords Check to allow the Browser to store usernames and passwords for websites Clear passwords Click to open a dialog where you can delete all saved passwords Show security warnings Check to allow the Browser to show a warning if there is a problem ...

Страница 52: ... 5 Click CLEAR to delete the last number or operator you entered Click and hold CLEAR to delete everything in the display Camera Camera is a combination camera and camcorder that you use to shoot and share pictures and videos Pictures and videos are stored in the Gallery Open Camera and take pictures videos You take pictures and shoot videos with the Camera To open the Camera click the Launcher ta...

Страница 53: ...r tab Applications Contacts All of your contacts are displayed alphabetically in a scrolling list Each contact is followed by the default phone number If you haven t added any contacts yet Contacts will display a message with hints on how to start adding contacts to your device Click a contact to view the details Entries for communicating with the contact are followed by details Click a communicat...

Страница 54: ...ts without phone numbers are displayed and check or uncheck the groups whose contacts you want to view in Contacts Display options menu You can change or add details about your contacts Click and hold the contact you want to edit The menu with following options will appear View contact Click to view the details of the selected contact Remove from favorites Click to remove the selected contact from...

Страница 55: ...ed Inbox or in the Inbox or other folders for individual accounts 1 Open the combined Inbox an account s Inbox or another folder of emails 2 Click the email to read The email opens in a screen with information about who sent it the date it was sent and related information at the top followed by the contents of the email Send an email You can send an email to your contacts or to other people To sen...

Страница 56: ...er is an e book reader It can support several e book formats oeb epub fb2 etc You can configure FBReader to read books with customized settings Colors fonts key bindings and many other properties can be changed in the Preferences dialog There are several ways to start and add a book into FBReader library Copy a book file into the directory storage Books or any its subdirectory FBReader will add th...

Страница 57: ...2 Click and hold the video to view the playback controls for pausing resuming and skipping backward and forward Work with pictures videos After selecting one folder you can multiselect pictures videos slideshow and make slideshow settings by pressing the Menu key The following option are provided Capture picture Click to open the Camera and ready to take pictures Capture video Click to open the Ca...

Страница 58: ... number You can also enter the name of a contact with a mobile number 3 Click the composition text box to start entering your message 4 Click Send The message window opens with your message after your name Responses appear in the window As you view and send additional messages a message thread is created Respond to messages you receive If you re working in a message window messages that you receiv...

Страница 59: ...end Notification settings Notifications Check to receive a notification whenever you receive a new message Select ringtone Click to open a dialog where you can select the ringtone to sound when you receive new message notifications Music You can use Music to organize and listen to music and other audio files that are in your device SD card or memory card Music supports a wide variety of audio file...

Страница 60: ... to add to the new playlist 2 Click Add to playlist 3 Click New 4 Enter a name and click Save The new playlist is added to the Playlist library You can add other songs that are playing in the Playback screen in a playlist by pressing the Menu key and clicking Add to playlist You can also click Save as playlist to save all the songs in an album that you re playing as a playlist You can remove songs...

Страница 61: ...e Tabs button on the navigation bar at the bottom of the screen You can add a new tab by clicking the empty tab to the right and close a tab by clicking the red X in the top right corner of a tab Add sites to your speed Dial Add web sites to your Speed Dial by clicking and holding on an empty dial Choose Assign and type a web address or select one from the list You can also delete and edit your Sp...

Страница 62: ...ba singleclickconnect com 2 Install the Windows application in your Windows system Follow the on screen instructions to finish the installation SingleClick is now installed and set up for you to connect and share your network 1 Click SingleClick Connect in your TOSHIBA AC100 device 2 Enter the username and password you created when you installed the SingleClick application on your computer 3 Now y...

Страница 63: ...g 3 Open the Music screen Select My recordings from the Playlists tab 4 Click your recordings to play them Click and hold your recordings to open a menu where you can edit them TOSHIBA Ebook TOSHIBA Ebook is a widget to launch FBReader It will display the cover pages in your library Clicking My Library enables you to choose books from a list sorted by By author By tag or Recent Choose one book and...

Страница 64: ...nables you multiselect copy cut and delete selected files or folders There are six options Select All Deselect All Cancel Copy Cut and Delete Select All Click to select all the folders and files in the current path Deselect All Click to deselect all the folders and files in the current path Cancel Click to cancel file operation and return to file browsering window Copy Click to copy the selected f...

Страница 65: ... be shown to let users input a new folder name Click OK to continue For detailed information please refer to the TOSHIBA File Manager Help file Storage Structure The following table describes the meaning of the device icons in TOSHIBA File Manager Icon Name Description Internal Storage It shows all the contents in the device s flash memory except the system files and files in SD card USB storage a...

Страница 66: ...Capture Photo Start the Camera application in photo mode Capture Video Start the Camera application in movie mode For detailed information please refer to the TOSHIBA Media Player Help file TOSHIBA Memo TOSHIBA Memo is a widget to display a memo on the screen You can quickly add or delete memos Click the icon to add a memo and click the icon to delete a memo You can also switch the view mode betwe...

Страница 67: ...ormation Header This section runs along the top of the screen and contains basic information about your system such as the version of the OS the device part number and serial number Buttons Buttons are displayed on the left side of the screen These buttons will change depending on what actions you have available on the current screen Information The main part of the screen displays information suc...

Страница 68: ...stem update System updates require that your device be rebooted during the update Downloading a system update is the same as an application update Installing a system update is similar to an application update but you will be reminded that the device will be rebooted during the installation process Make sure to close any other applications and save all work prior to installing a system update Note...

Страница 69: ...s can join networks organized by workplace school or college Twitter is a social networking and microblogging service that enables you to send and read messages known as tweets Tweets are text based posts of up to 140 characters displayed on the author s profile page and delivered to the author s subscribers who are known as followers TOSHIBA YouTube TOSHIBA YouTube is a widget which enables you t...

Страница 70: ...e mode See Chapter 3 Connecting to networks for detailed information Airplane mode Check this option to disable all wireless radios Wi Fi Check this option to turn on Wi Fi so you can connect to Wi Fi networks Wi Fi settings Click to set up and manage wireless access points Wi Fi Check this option to turn on Wi Fi so you can connect to Wi Fi networks Network notification Check this option to recei...

Страница 71: ...s set device name discoverability Bluetooth Check this option to turn on Bluetooth so you can connect to Bluetooth devices Device name Open a dialog where you can give your device name that is visible on some Bluetooth devices when you pair them The current name would be displayed Discoverable Check this option to make your device discoverable by other Bluetooth devices for 120 seconds Scan for de...

Страница 72: ...Consult your carrier to understand the billing implications of selecting another carrier Sound display You can use Sound display settings to configure many aspects of notification ringtones music and other audio as well as the brightness and other screen settings Sound settings Sound settings contains the following options Notification Tone Click to open a dialog where you can set the default noti...

Страница 73: ...through drawing a screen unlock pattern as described in the Locking your screen section in Chapter 2 Basic Operations Home screen If you have already recorded your own pattern the option will be displayed as Change unlock pattern Click to open a set of screens that guide you through changing your own pattern Require pattern Uncheck this option to stop requiring an unlock pattern to unlock your scr...

Страница 74: ...ecure credential storage Your password must have at least 8 characters Clear storage Click to delete all secure certificates and related credentials and erases the secure storage s own password after prompting you to confirm that you want to do this Applications You can use the Applications settings to view details about the applications installed on your device to manage their data and force them...

Страница 75: ...ta reset Click to erase all user data in the internal storage Follow the on screen instructions to reset it Please note that data in the removable media won t be erased See Factory Reset section in Chapter 2 Basic Operations Home screen for details Backup restore settings and applications Click to open a screen where you can backup and restore system settings application settings and user installe...

Страница 76: ... include in searches Web search Web search contains the following option Google search settings Click to open a screen where you can set your preferences for whether Google search on the web makes suggestions You can also open the Google web search history settings page in Browser Quick Search Box Quick search box contains the following option Searchable items Click to open a screen where you can ...

Страница 77: ...r time format for example 13 00 rather than 1 00 pm Select date format Click to open a dialog where you can select the format for displaying dates About device About device includes information about your device Status Click to open the Status screen with a long list of information about your battery mobile network connection and other details Battery use Click to open a list of the applications a...

Страница 78: ... setting is Suspend the system When I close the Lid Click to open a screen where you can set the behavior when you close the LCD Lid as Suspend the system or Turn LCD backlight off The default setting is Suspend the system Turn off USB Root Hub Check to enable the system to turn off the USB root hub to save power The default status is disabled Desktop settings You can use Desktop settings to custo...

Страница 79: ...The actual specifications may vary depending on the model you purchased Processor Memory Please handle your device carefully to avoid scratching or damaging the surface CPU Your device is equipped with an nVIDIA T20 processor Memory on board This device is equipped with a 512MB memory on board The actual amount of useable system memory will be less than the installed memory modules This device doe...

Страница 80: ... comes with a detachable power cord which will either have a 2 pin or 3 pin plug enclosure As the AC adaptor is universal it can receive a range of AC voltages from 100 to 240 volts however you should note that the output current varies among different models Using the wrong adaptor can damage your device Display panel 25 7cm 10 1 LCD screen 16 million colors configured with the following resoluti...

Страница 81: ...ice Real Time Clock RTC battery The Real Time Clock RTC battery provides power for the internal real time clock and calendar function and also maintains the system configuration while the device is turned off Bluetooth Some models have Bluetooth wireless communication function which eliminates the need for cables between electronic devices such as computers printers and mobile phones When it is en...

Страница 82: ...ck to rupture Keep the battery pack out of reach of infants and children It can cause injury The battery pack are lithium ion batteries which can explode if not replaced used handled or disposed of properly Dispose of the battery as required by local ordinances or regulations Use only batteries recommended by TOSHIBA as replacements The device s RTC battery is a Ni MH battery and should be replace...

Страница 83: ...on until the system automatically turns itself off 2 Connect the AC adaptor to the DC IN 19V jack of the device and to a wall outlet that is supplying power 3 Charge the battery until the Battery indicator glows white Repeat these steps two or three times until the battery recovers normal capacity Retaining data with power off Refer to User Information Guide about Retaining time Replacing the batt...

Страница 84: ... into its unlock position 6 Slide and hold the battery release latch to disengage the battery pack and then remove it from the device Figure 6 1 Releasing the battery pack Installing the battery pack To install a battery pack follow the steps as detailed below 1 Insert the battery pack as far as it will go into the device 2 Ensure that the battery pack is securely in place and the battery lock is ...

Страница 85: ...ertain features of the device ESC Back Press to turn back to the previous screen or action Previous Press to go to the previous media files Play Pause Press to start or pause the playback in the media player Stop Press to stop playbacking the media files Next Press to go to the next media files Display out Press to switch the display to external monitor Brightness Down Press to decrease the device...

Страница 86: ...me Down Press to decrease the media volume Volume Up Press to increase the media volume Mute Press to turn the sound on or off Screen Capture Press to launch the screen capture utility Mail Press to launch the mail application Web Press to launch the web browser Settings Press to launch the Settings menu The preview window of screen capture will be displayed behind if some topmost window is displa...

Страница 87: ...ble into the Mini USB port on your TOSHIBA AC100 device 2 Plug the other end of the USB cable into the USB port on the computer 3 Click the USB connected notification in the notifications panel and then click the Mount button Then the TOSHIBA AC100 device becomes a removable USB mass storage device and you can access its content from the computer To remove TOSHIBA AC100 device from the computer cl...

Страница 88: ...ce s capabilities and its versatility This section describes the connection or installation of the following devices Cards Bridge media slot Secure Digital SD Card SD memory card SDHC memory card miniSD Card microSD Card MultiMediaCard Peripheral devices USB device HDMI device Other Security lock 1 Mini USB port 2 Mini USB connector 1 2 ...

Страница 89: ...imple explanation for distinguishing SD memory cards from SDHC memory cards SD and SDHC memory cards appear the same externally However the logo on SD and SDHC memory cards is different so pay careful attention to the logo when purchasing Keep foreign objects out of the Bridge media slot Never allow metal objects such as screws staples and paper clips to enter the device or Keyboard Foreign metal ...

Страница 90: ...ia care Observe the following precautions when handling the card Card care Do not twist or bend cards Do not expose cards to liquids or store in humid areas or lay media close to containers of liquid Do not touch the metal part of a card or expose it to liquids or let it get dirty After using card return it to its case The card is designed so that it can be inserted only one way Do not try to forc...

Страница 91: ...HC memory card Inserting a memory media The following instructions apply to all types of supported media devices To insert a memory media follow the steps as detailed below 1 Turn the memory media so that the contacts metal areas are face down 2 Insert the memory media into the Bridge media slot on the left side of the device 3 Push the memory media gently to ensure a firm connection is made The m...

Страница 92: ...nted properly before you insert it If you insert the media in wrong direction you may not be able to remove it When inserting memory media do not touch the metal contacts You could expose the storage area to static electricity which can destroy data Do not turn the device off or switch to Suspend Mode while files are being copied doing so may cause data to be lost 1 Bridge media slot 2 Memory medi...

Страница 93: ...8 Connecting a USB device Make sure the connector is properly aligned with the socket Do not try to force the connection doing so can damage the connecting pins As the port operation of all USB devices has not been confirmed some USB devices may not function properly 1 USB port 2 USB connector 1 2 This device does not support a printer connected to the USB port This device only support external US...

Страница 94: ...vices follow the steps as detailed below 1 Plug one end of the HDMI cable into the HDMI port of the HDMI device 2 Plug the other end of the HDMI cable into the HDMI out port on your device Figure 6 9 Connecting a HDMI cable As the port operation of all HDMI High Definition Multimedia Interface monitors has not been confirmed some HDMI monitors may not function properly 1 HDMI out port 2 HDMI cable...

Страница 95: ...the device follow the steps as detailed below 1 Turn the device so its right side faces you 2 Align the security cable with the lock slot and secure it in place Figure 6 10 Security lock Optional accessories You are able to add a number of options and accessories in order to make your device even more powerful and convenient to use For reference the following list details some of the items that ar...

Страница 96: ...n you recognize a problem exists as taking further action may result in data loss or damage or you may destroy valuable problem related information that can help solve the problem Observe what is happening write down what the system is doing and what actions you performed immediately before the problem occurred Please also be aware that the questions and procedures described in this chapter are me...

Страница 97: ...ibe your problems to your reseller dealer or service provider In addition if a problem recurs the log you have made will help to identify the problem faster Analyzing the problem Sometimes the device will give you clues that can help you identify why it is malfunctioning In view of this you should keep the following questions in mind Which part of the device is not operating properly keyboard disp...

Страница 98: ...t be corrupted in these instances try loading another copy of the software if possible If an error message appears while you are using a software package you should refer to the documentation supplied with it as this will usually include a problem solving section or a summary of error messages Next you should check any error messages against the operating system documentation Hardware If you canno...

Страница 99: ...blinking If the device has reached room temperature and it still does not start or if it starts but shuts down quickly contact your reseller dealer or service provider The device shuts down and its DC IN indicator is flashing white This indicates a problem with the heat dispersal system you should contact your reseller dealer or service provider Problem Procedure AC adaptor doesn t power the devic...

Страница 100: ...y again Unplug the AC adaptor and remove the battery to make sure its connecting terminals are clean if necessary wipe them with a soft dry cloth lightly dipped in alcohol Connect the AC adaptor and replace the battery taking care to ensure that it is securely seated in the device Check the Battery indicator if it does not glow allow the device to charge the battery for at least twenty minutes If ...

Страница 101: ...ove the marks by gently wiping the display panel with a clean dry cloth or if this fails with a good quality LCD screen cleaner In this latter instance you should always follow the instructions with the screen cleaner and always ensure you let the display panel dry properly before closing it Problems above remain unresolved or other problems occur You should initially refer to the documentation su...

Страница 102: ...rom the device and then reinsert it in order to ensure it is firmly connected If the problem persists then you should refer to the documentation supplied with your MultiMediaCard for further information You cannot write to a MultiMediaCard Remove the MultiMediaCard from the device and check to ensure that it is not write protected You cannot read a file Check to ensure the required file is actuall...

Страница 103: ...reen pointer moves erratically The elements of the mouse responsible for detecting movement might be dirty please refer to the documentation supplied with the mouse for instructions on how to clean it If you are still unable to resolve the problem contact your reseller dealer or service provider Problem Procedure USB device does not work Remove the USB device from the device and then reconnect it ...

Страница 104: ...ected to the monitor and to a working power outlet No display Try adjusting the contrast and brightness controls on the external monitor Display error occurs Check that the cable connecting the external monitor to the device is firmly attached If you are still unable to resolve the problem contact your reseller dealer or service provider Problem Procedure Cannot access Wireless LAN Make sure the d...

Страница 105: ...ions in the documentation supplied with your software and or peripheral devices If a problem occurs when you are running software applications consult the software documentation for troubleshooting suggestions and consider calling the software company s technical support department for assistance Consult the reseller or dealer from where you purchased your device and or software they are your best...

Страница 106: ...irements Power Requirements Conditions Ambient temperature Relative humidity Operating 5 C 41 F to 35 C 95 F 20 to 80 noncondensing Non operating 20 C 4 F to 65 C 149 F 10 to 90 noncondensing Wet bulb temperature 26 C maximum Conditions Altitude from sea level Operating 0 to 3 000 meters Non operating 0 to 10 000 meters maximum AC adaptor 100 240 volts AC 50 or 60 hertz cycles per second device 19...

Страница 107: ...nd running with a minimum of parameters Card Specifications Form Factor USB Compatibility IEEE 802 11 Standard for Wireless LANs Wi Fi Wireless Fidelity certified by the Wi Fi Alliance The Wi Fi CERTIFIED logo is a certification mark of the Wi Fi Alliance Media Access Protocol CSMA CA Collision Avoidance with Acknowledgment ACK ...

Страница 108: ... wireless communication equipment The range of the wireless signal is related to the transmit rate of the wireless communication Communications at lower transmit range may travel larger distances The range of your wireless devices can be affected when the antennas are placed near metal surfaces and solid high density materials Range is also impacted due to obstacles in the signal path of the radio...

Страница 109: ...ed wireless LAN module And the approved channels on using are different at each country or region The channel configuration is managed as follows For wireless clients that operate in a Wireless LAN Infrastructure the Wireless LAN module will automatically start operation at the channel identified by the Wireless LAN Access Point When roaming between different access points the station can dynamica...

Страница 110: ...ng the Wireless LAN Access Point device 5GHz Band Channels Sets Wireless IEEE 802 11 Revision a and n Frequency Range Channel ID 5150 5850 MHz 34 5170 2 36 5180 2 38 5190 2 40 5200 2 42 5210 2 44 5220 2 46 5230 2 48 5240 2 52 5260 2 56 5280 2 60 5300 2 64 5320 2 100 5500 2 104 5520 2 108 5540 2 112 5560 2 116 5580 2 120 5600 2 124 5620 2 128 5640 2 132 5660 2 136 5680 2 140 5700 2 149 5745 2 153 5...

Страница 111: ...ly start operation at the channel identified by the Wireless LAN Access Point When roaming between different access points the station can dynamically switch to another channel if required For Wireless LAN modules installed in wireless clients that operating in a peer to peer mode the module will use the default channel 10 In a Wireless LAN Access Point the Wireless LAN module will use the factory...

Страница 112: ...wing specifications Certification agencies Length Minimum 1 7 meters Wire size Minimum 0 75 mm2 Current rating Minimum 2 5 amperes Voltage rating 125 or 250 VAC depending on country region s power standards China CQC CEMC U S and Canada UL listed and CSA certified No 18 AWG Type SVT or SPT 2 Australia AS Japan DENANHO Europe Austria OVE Italy IMQ Belgium CEBEC The Netherlands KEMA Denmark DEMKO No...

Страница 113: ...2 15P 250V or 1 15P 125V and three pin plug configuration must be 6 15P 250V or 5 15P 125V as designated in the U S National Electrical code handbook and the Canadian Electrical Code Part II The following illustrations show the plug shapes for the U S A and Canada the United Kingdom Australia Europe and China USA United Kingdom Australia Europe Canada China UL approved BS approved AS approved Appr...

Страница 114: ...will deteriorate This is an intrinsic characteristic of LCD technology Maximum brightness is only available when operating in AC power mode Screen will dim when the device is operated on battery power and you may not be able to increase the brightness of the screen Wireless LAN The transmission speed over the wireless LAN and the distance over which wireless LAN can reach may vary depending on sur...

Страница 115: ...irect current FIR fast infrared HDMI High Definition Multimedia Interface I O input output KB kilobyte LCD liquid crystal display LED light emitting diode MB megabyte MMC multi media card OCR optical character recognition reader PCI peripheral component interconnect RAM random access memory RGB red green and blue ROM read only memory RTC real time clock SD Secure Digital SDHC Secure Digital High C...

Страница 116: ...rray WAN wide area network WSXGA wide super extended graphics array WSXGA wide super extended graphics array plus WUXGA Wide Ultra Extended Graphics Array WXGA wide extended graphics array WXGA wide extended graphics array plus XGA extended graphics array ...

Страница 117: ...ts 4 7 D DC IN indicator 1 15 Display 6 2 brightness down 6 7 brightness up 6 8 hinges 1 14 opening 1 5 screen 1 14 Documentation list 1 1 Documents To Go 4 8 Dual Pointing Device Touch Pad 1 14 Touch Pad control buttons 1 14 2 1 E Email 4 9 Equipment checklist 1 1 External monitor problems 7 9 F FBReader 4 10 fring 4 10 Function keys Airplane mode 6 8 Brightness Down 6 7 Brightness Up 6 8 Display...

Страница 118: ...7 5 Bluetooth 7 9 External monitor 7 9 Hardware and system checklist 7 3 Internal display panel 7 6 Keyboard 7 6 MultiMediaCard 7 7 Overheating power down 7 4 Pointing device 7 7 Power 7 3 SD SDHC Card 7 6 Sound system 7 8 TOSHIBA support 7 10 Touch Pad 7 7 USB device 7 8 USB mouse 7 8 Wireless LAN 7 9 Processor 6 1 S SD SDHC Card formatting 6 12 note 6 11 problems 7 6 removing 6 14 Search 4 16 Se...

Отзывы: