Toshiba 24S3AS-M Скачать руководство пользователя страница 3

EN

1

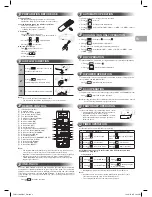
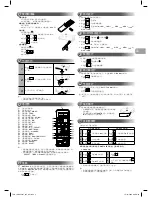
Press 

FIX

 : Move the louver in the 

desired vertical direction.

2

Press 

SWING

 : Swing the air 

automatically and press again to stop.

3

For horizontal direction, adjust manually.

Preparing Filters

1.  Open the air inlet grille and remove the air filters.
2.  Attach the filters. (see detail in the accessory sheet).

Loading Batteries (when use wireless operation.)

1.  Remove the slide cover.
2.  Insert 2 new batteries (AAA type)  

following the (+) and (–) positions.

Clock Setup

1. Push 

 by tip of the pencil.

  If timer indication is flashing, go to the next step 2.

2. Press 

 or 

 : adjust the time.

3. Press 

 : Set the time.

Remote Control Reset

Push 

 by tip of the pencil or

1.  Remove the batteries.

2. Press 

.

3.  Insert the batteries.

Note:

 •  Do not move the louver manually by others.
 •  The louver may automation positioning by some operation mode.

Note:

 •  The provided Remote Controller is a wireless type, which also can be used as 


  a wire. Please see “How to Connect The Remote Controller for Wired  
  Operation”, located in installation instruction, in case of wired control is required.

 •  In wire operation, remote controller will return to initial condition (PRESET, 


  TIMER and CLOCK will return to initial condition) when user shutdown power  
  supply of Air conditioner.

1

   Infrared signal emitter

2

   Start/Stop button

3

   Mode select button (MODE)

4

   Temperature button (TEMP)

5

   Fan speed button (FAN)

6

   Swing louver button (SWING)

7

   Set louver button (FIX)

8

   On timer button (ON)

9

   Off timer button (OFF)

!

   Setup button (SET)

"

   Clear button (CLR)

#

   Memory and Preset button (PRESET)

$

  One-Touch button (ONE-TOUCH)

%

   High power button (Hi-POWER)

&

   Economy button (ECO)

(

   Quiet button (QUIET)

)

   Comfort sleep button (COMFORT SLEEP)

~

   Filter reset button (FILTER)

+

   Set clock button (CLOCK)

,

   Check button (CHECK)

-

   Reset button (RESET)

Press the “ONE-TOUCH” button for fully automated operation that is customized 
to the typical consumer preferences in your region of the world. The customized 
settings control temperature air flow strength, air flow direction and other settings  
to provide you alternate contact with “ONE-TOUCH” of the button. If you prefer  
other settings you can select from the many other operating functions of your 
Toshiba unit.

 Press 

ONE-TOUCH

 : Start the operation.

To automatically select cooling or fan only operation
1.  Press 

MODE

 : Select A.

2.  Press 

 : Set the desired temperature.

3.     Press 

FAN

 : Select AUTO, LOW  , LOW+ 

, MED 

, MED+ 

, or 

HIGH 

.

1.   Press 

MODE

 : Select Cool   or Fan only 

.

2.   Press 

 : Set the desired temperature.

  Cooling: Min. 17°C, Fan Only: No temperature indication

3.   Press 

FAN

 : Select AUTO, LOW  , LOW+ 

, MED 

, MED+ 

or HIGH 

.

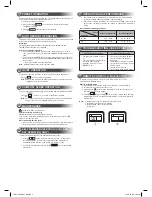
For dehumidification, a moderate cooling performance is controlled automatically.

  1. Press 

MODE

 : Select Dry  .

  2. Press 

 : Set the desired temperature.

To automatically control room temperature and airflow for faster cooling operation 
(except in DRY and FAN ONLY mode)

Press 

Hi POWER

 : Start and stop the operation.

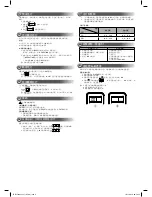
In case of the misplaced or discharged remote control

•   Pressing the RESET button, the unit can start or 

stop without using the remote control.

•    Operation mode is set on AUTOMATIC operation, 

preset temperature is 24°C and fan operation is 
automatic speed.

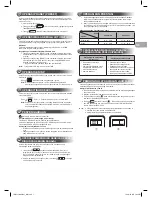
Set the timer when the air conditioner is operating.

Setting the ON Timer

Setting the OFF Timer

Press 

 : Set the desired 

ON timer.

Press 

 : Set the desired OFF 

timer.

2

Press 

 : Set the timer. 

Press 

 : Set the timer.

3

Press 

 : Cancel the timer.

Press 

 : Cancel the timer.

Daily timer allows the user to set both the ON & OFF timers and will be 

activated on a daily basis.

Setting Daily Timer

1

Press 

 : Set the ON timer. 

3

Press 

.

2

Press 

 : Set the OFF timer.

4

Press 

 : button during the  

(  or  ) mark flashing.

•   During the daily timer is activating, both arrows (

,  ) are indicated.

Note:

•   Keep the remote control in accessible transmission to the indoor unit; 

otherwise, the time lag of up to 15 minutes will occur.

•   The setting will be saved for the next same operation.

To automatically control room to save energy (except in DRY and FAN ONLY mode)


Press 

 : 

Start and stop the operation.

Note:

  Cooling operation; the set temperature will increase automatically 1 degree/    

hour for 2 hours (maximum 2 degrees increase). 

COOLING / FAN ONLY OPERATION

7

DRY OPERATION

8

Hi-POWER OPERATION

9

ECO OPERATION

10

TEMPORARY OPERATION

11

TIMER OPERATION

12

PREPARATION BEFORE USE

2

AIR FLOW DIRECTION

3

REMOTE CONTROL

4

ONE-TOUCH

5

AUTOMATIC OPERATION

6

SWING

FAN

FIX

QUIET

Hi POWER

ONE-TOUCH

COMFORT

SLEEP

4

5

!
-

"

%

(

8

1

2

$

)
,

&

#

3

+

7

6

~

9

ES

FR

IT

DE

PT

PL

CZ

RU

CR

HU

TR

NL

GR

SV

FI

NO

DK

RO

BG

EE

LV

SK

SI

TSB 1110655137_EN.indd   2

12/18/57 BE   1:42 PM

Содержание 24S3AS-M

Страница 1: ...CONDITIONER SPLIT TYPE For general public use Indoor unit RAS H13 18 24S3KS M Outdoor unit RAS H13 18 24S3AS M OWNER S MANUAL 1110655137 ENGLISH BAHASA MELAYU TSB 1110655137_cover indd 1 12 18 57 BE 1 44 PM ...

Страница 2: ... complement or replacement Otherwise abnormally high pressure may be generated in the refrigeration cycle which may result in a failure or explosion of the product or an injury to your body CAUTION Check that the circuit breaker is installed correctly If the circuit breaker is not properly installed it may cause an electric shock To check the installation method please contact the supplying retail...

Страница 3: ... Toshiba unit Press ONE TOUCH Start the operation To automatically select cooling or fan only operation 1 Press MODE Select A 2 Press Set the desired temperature 3 Press FAN Select AUTO LOW LOW MED MED or HIGH 1 Press MODE Select Cool or Fan only 2 Press Set the desired temperature Cooling Min 17 C Fan Only No temperature indication 3 Press FAN Select AUTO LOW LOW MED MED or HIGH For dehumidificat...

Страница 4: ... To prevent the unit from being activated for 3 minutes when suddenly restarted or switched to ON 2 Some minor cracking sound may occur when unit operating This is normal because the cracking sound may be caused by expansion contraction of plastic Air conditioner operating conditions To protect bad smell caused by the humidity in the indoor unit 1 If the button is pressed once during Cool or Dry m...

Страница 5: ... Kanak kanak mesti diselia untuk memastikan bahawa mereka tidak bermain dengan perkakasan Jangan gunakan apa apa bahan penyejuk selain daripada yang telah ditentukan sebagai pelengkap atau pengganti Jika tidak tekanan yang luar biasa tinggi mungkin terhasil dalam kitaran penyejukan yang boleh mengakibatkan kegagalan atau letupan produk atau kecederaan kepada badan anda AWAS Periksa sama ada pemutu...

Страница 6: ...it Toshiba anda Tekan ONE TOUCH Memulakan operasi Untuk memilih operasi pendinginan atau kipas sahaja secara automatik 1 Tekan MODE Pilih A 2 Tekan Setkan suhu yang dikehendaki 3 Tekan FAN Pilih AUTO LOW LOW MED MED atau HIGH 1 Tekan MODE Pilih Pendinginan atau Kipas sahaja 2 Tekan Setkan suhu yang dikehendaki Pendinginan Min 17 C Kipas Sahaja Tiada penunjuk suhu 3 Tekan FAN Pilih AUTO LOW LOW MED...

Страница 7: ...nit Untuk mencegah alat ini daripada diaktifkan selama 3 minit apabila alat ini dengan tiba tiba dimulakan semula atau suisnya dihidupkan ON 2 Bunyi gemeresik yang kecil mungkin kedengaran semasa unit dikendalikan Ini adalah normal kerana bunyi gemeresik ini mungkin disebabkan oleh pengembangan pengecutan plastik Keadaan kendalian alat penyaman udara Untuk mengelakkan bau yang tidak menyenangkan d...

Страница 8: ... 偡径ㅴḋ 㒩昀ㅺ䅪䀜濇ㅺ帏ặ ẈɁ ʓ Hi POWER濃乣凖濄 ʔ FILTER濃㦽凖濄 ʕ FAN ONLY濃㦽凖濄 ʖ TIMER濃渨凖濄 ʗ OPERATION濃乣凖濄 ʘ RESET 搒 㠤㝉䒙嵓㔑嵓 㫇䟒 堩Ɂ 㜀䒙嵓㔑嵓 堩ᵱ㫇䟒濇 偡径ㅴ奊䒙Ɂ壥䟒嬈 堩㔝㰹濇孛侸䱟 堩㚐堩仒䗨晚 ỿ岋丳摤 ㅺᵷᵾ䗨ỿⷸ Ɂ 救䗨ㆣ敘 ợ䒌㚐堩仒濇ㅺᵲ Ḻ䄧䁋堩仒ᵤ峛ợ䒌㚐堩仒㕚濇䟒ὁᵱ 㚃 ㆷ 䧻 弿垰彾栲Ɂ彾栲ᵱ崗 偡径ㅴ 亞㮋佰䧶 Ɂ 忣 敌䧻ㆷ 䪭㷣 樼䗨䌓 濃樼ᷲ 80 濄 擣㕚敘ợ䒌㚐堩仒Ɂ 堩仒ᵮ 偡㙭 丷濇䂚 㮘㹘 偡Ṿ厡 ᵮɁ 擣㕚敘ᵱợ䒌㚐堩仒㕚濇孛 救 ㅺ䒙嵓㔑嵓 Ɂ 嬒 擣㕚敘ợ䒌㚐堩仒 濇䒕ᵷ 弿垰ὁ Ɂ 㬳ⷘ兗 㠤㝉ᵤ㪅 堩仒䗨 堩 㖓 Ɂ 㜀 太 䈚 濇㚐堩仒 偡 厡ㅺᾢ壪濇径ㅴ ẈɁ 堩 曆㛣 䧞㭸弫㹈 䧞㭸㹈㵩 㕚濇孛䨽 䦗 䗨㠓 ᵮɁ ⅽ 偡崰 ὶㅺ Ẉ...

Страница 9: ...栲ㆫ弴垰 1 濕彭 AɁ 2 濕嬢 ㆤ晤䗨㶍 Ɂ 3 濕彭 AUTOɀLOW ɀLOW ɀMED ɀMED ㅺ HIGH Ɂ 1 濕彭 ℛ ㅺḩ栲ㆫ Ɂ 2 濕嬢 ㆤ晤䗨㶍 Ɂ ℛ濕㙤Ẳ 17 C濇ḩ栲ㆫ濕㕄㶍 䢞 3 濕彭 AUTOɀLOW ɀLOW ɀMED ɀMED ㅺ HIGH Ɂ ᶞᷪ旈㷣濇Ṿ兎 彦 䗨 ℛ 偡Ɂ 1 濕彭 旈㷣 Ɂ 2 濕嬢 ㆤ晤䗨㶍 Ɂ 兎 㶍 㭸㲥ṉ ℛ弴垰濃ᵱ DRY FAN ONLY 㦅 濄 濕 㫆弴垰Ɂ ᵱ 忉 ㅺ忉 㰅䒙䗨〩ℙᵯ RESET 搒濇㕄晤ợ䒌忉 ṉ ㅺ 㫆㚐堩仒Ɂ 弴垰㦅 嬢 ᶞ AUTOMATIC 弴垰濇柨嬢㶍 ᶞ 24 C ᵸ栲ㆫ弴垰ᶞ兎 廐徃Ɂ 䧞孧弴垰㕚濇嬢 㕚 Ɂ 嬢 ON 㕚 嬢 OFF 㕚 1 濕 嬢 ㆤ晤䗨 ON 㕚 Ɂ 濕 嬢 ㆤ晤䗨 OFF 㕚 Ɂ 2 濕嬢 㕚 Ɂ 濕嬢 㕚 Ɂ 3 濕 㳬 㕚 Ɂ 濕 㳬 㕚 Ɂ 㬳...

Страница 10: ...弴垰 㶍 㶍 ℛ 21 C 43 C 21 C 32 C 旈㷣 19 C 43 C 17 C 32 C 㜀㙭 2 ᶎ䧞孧 堩 䙜曄張䗨ằ仒濇ⅽ 䉐ợ䒌 ᶎ 堩仒䗨忉 Ɂ 忉 B 嬢仒Ɂ 1 堩仒ᵮ䗨 RESET 搒濇ㆷ 䧞孧Ɂ 2 忉 堩仒Ɂ 3 䒌搩䩸 柚ẳ忉 ᵮ䗨 搒Ɂ㖢䢞 ᵮ 䌔ĥ00ĦɁ 4 䗨 㕚 ɁĥBĦ 䌔 㖢䢞 ᵮ濇ĥ00Ħ 㳬 濇佰 䧞孧 救Ɂ嬔 忉 BɁ 㱌濕1 愱 ᵮ彔㫉樈 忉 愱仒ᶞ AɁ 2 忉 A 㰅㙭ĥAĦ㖢䢞Ɂ 3 忉 䗨 渼嬈嬢仒㖓 AɁ 㚐堩仒ᵱⵉỀɁ ℛ ẲɁ 䒙㷴 救Ɂ 䒙嵓㔑嵓 堏㼤㲟濇Ⅻ㔑ᷪ䒙㷴Ɂ 䒙㲥㔑嵓Ɂ 嬢 ᷪ ON 㕚 Ɂ 弫㹈 堏㿔 Ɂ 㶍 嬢 ᵱ㫇 Ɂ 敌䧻ㆷ Ɂ 堩仒䗨弿栲 ㅺ 栲 堏斟 Ɂ 栲ㆫ廐徃 ẲɁ 弴垰㦅 ᶞ FAN ㅺ DRYɁ 弴垰 偡 19 㒩昀 旈濃㠤㝉䀝濄 20 忉 A B 彭 21 柨嬢弴垰 13 兎 愱 弴垰...

Страница 11: ...TSB 1110655137_EN indd 4 12 18 57 BE 1 42 PM ...

Страница 12: ...1110655137 TSB 1110655137_cover indd 2 12 18 57 BE 1 44 PM ...

Отзывы: