•
•
•
•
•
Before you head away on your camping adventure we advise that you run
through the full set up process to make sure you have all the components,
and that everything is in working condition.
•
Select a dry, level site and clear the ground of any sharp objects. Remove
the tent from its carry bag, untie fabric ties and unroll the tent.
NOTE: Save the fabric ties to make packing the tent away easier.
•
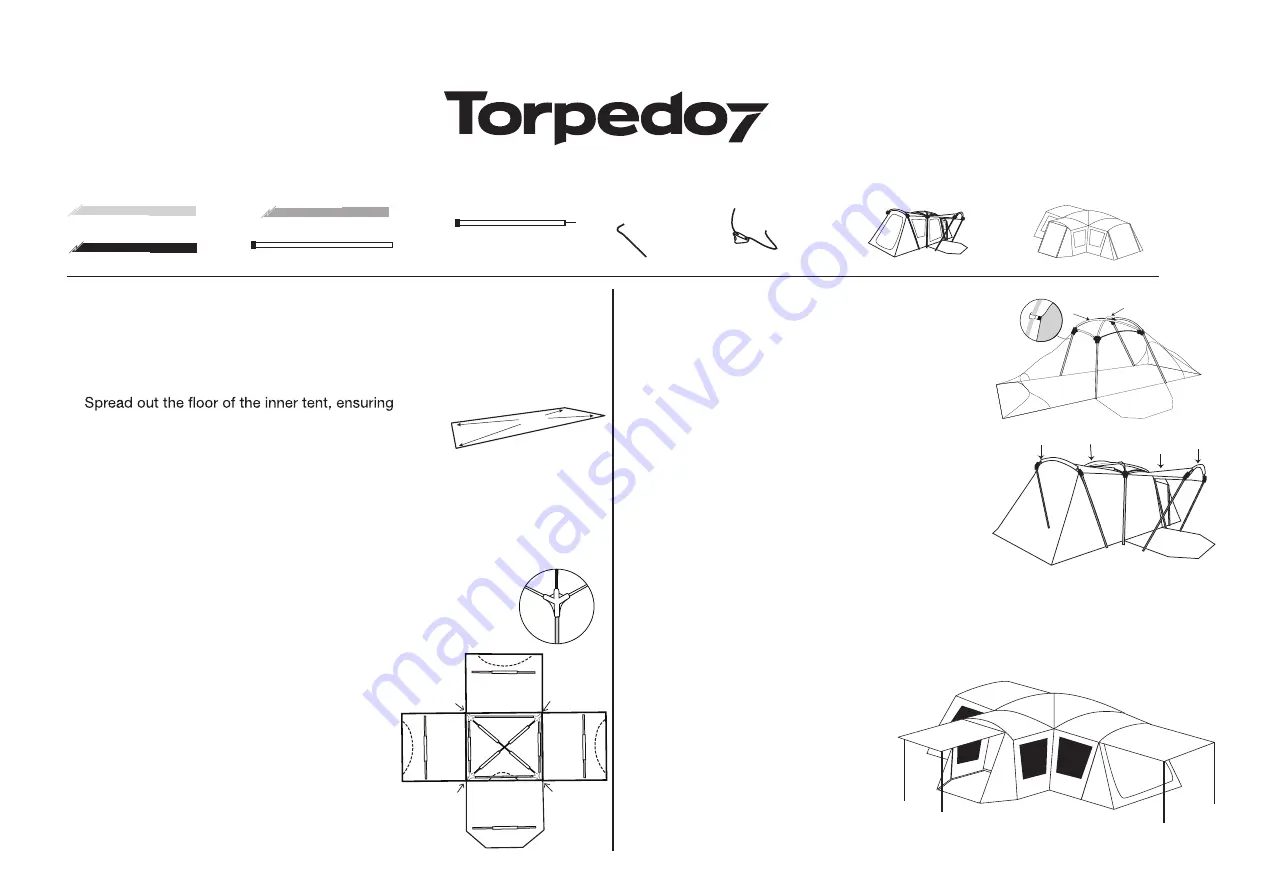
that the tent is pulled taut and square. Back/front
orientation doesn
’
t matter as the tent is symmetrical.
NOTE: To make sure the tent stays in place insert
the pegs into the ground at a 45
°
angle, not straight down. Unzip and
open the doors to make erecting the tent easier.
•
•
•
Discovery 12 Tent Instructions
Grey Fibreglass Pole
Red Fibreglass Pole
Black Fibreglass Pole
Steel pegs
Guy ropes
Inner tent
Flysheet
A
B
A
B
X10
A
A
B
SET UP INSTRUCTION FOR BEACH SHE
LTER LARGE
A
x4
x2
x28
x1
x1
x80
x4
C
B
Grey Legs pole
x12
Grey Porch pole
x4
Lay out the frame grouping all the poles by colour. Take the two longest
BLACK poles (Label C) and one at a time, feed them through the pole sleeves
with black trim to create an
‘X’
over the main room and fit the ends into the
centre opening of the star shaped knuckles.
GL
GL
GL
GL
GL
GL
GL
GL
GL
G
G
GL
BL
Take the two GREY poles(Label A), one at a time, slide the poles
through the pole sleeves, with GREY trim, that run across the
side of the roof. Attach them to the outside openings of the star
shaped corner knuckles. Repeat this with another two
Grey poles, which run along the front of the roof.
Take the four Grey Legs and insert
them into the remaining openings of the star
shaped knuckles at the top of the inner. Fit the
bottom of each pole on to the corresponding
pin at the base of the inner so that the middle
room now stands. This will take 2 people to assemble.
Attach the speed-clips onto the corresponding poles.
Take the four RED poles (Label B) and slide them through
the RED marked sleeves at each end of the tent
and front canopy, then insert them into the knuckles.
Fit the remaining 8 Grey Legs into the knuckles, pins
and rings. Attach the speed-clips onto Grey legs.
Go to the front of the tent and peg out the front
corners keeping the floor square.
G
R
R
R
R
G
G
G
B
B
Peg out the 4 corners of the tent and then peg
out the remaining peg points. Ensure that the peg at
the base of each pole is through the pegging loop and
not the ring.
Attach the speed hook to the steel poles.
Peg out the remaining pegging points ensuring the
tent is square. The inner tent is now pitched.
Carefully pull the fly up over the inner tent. Attach the
Velcro tabs inside the fly around the corresponding poles.
Attach the elastic loops at the base of the fly to the existing pegs.
Where no pegs are present, peg the fly directly into the ground, ensuring there is
adequate space between the inner and the fly.
Finally peg out the guy ropes and fine tune the fly so it remains taut and positioned
correctly over the tent. The ideal angle for guy ropes is 45
°
When pegging out the GREY Porch poles,
make sure the ropes are at a 45
°
angle to
pull the flap evenly.
GL
GL
GL
GL
G
G
G
G
B
B
R
R
R
R


