
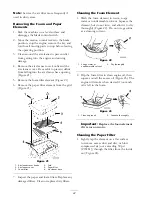


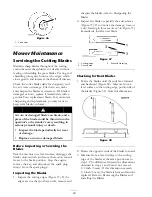

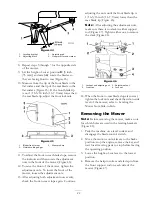


Figure 47
1. Hairpin cotter and clevis
pin
2. Support rod
5. Remove the hairpin cotter and washer from
the adjusting rod (Figure 48) on each side of
the mower.
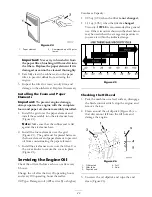
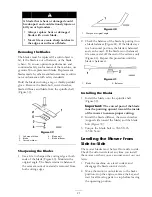
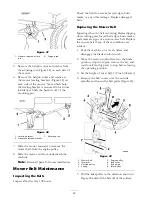
6. Remove the hairpin cotter and washer at
the mower leveling brackets (Figure 48) on
each side of the mower. Note which hole
the leveling bracket is mounted in for future
installation. Slide the brackets off of the
mounting pin.
Figure 48
1. Leveling bracket
3. Adjusting rod
2. Hairpin cotter and washer
7. Slide the mower rearward to remove the
mower belt from the engine pulley.
8. Slide the mower out from underneath the
machine.
Note:
Retain all parts for future installation.
Mower Belt Maintenance
Inspecting the Belts
Inspect all belts every 100 hours.
Check the belts for cracks, frayed edges, burn
marks, or any other damage. Replace damaged
belts.
Replacing the Mower Belt
Squealing when the belt is rotating, blades slipping
when cutting grass, frayed belt edges, burn marks,
and cracks are signs of a worn mower belt. Replace
the mower belt if any of these conditions are
evident.
1. Park the machine on a level surface and
disengage the blade control switch.
2. Move the motion control levers to the brake
position, stop the engine, remove the key, and
wait for all moving parts to stop before leaving
the operating position.
3. Set the height-of-cut at
A
[1-1/2 inch (38 mm)].
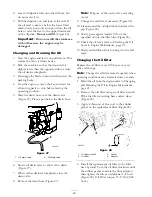
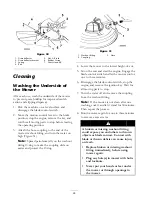
4. Remove the belt covers over the outside
spindles and loosen the belt guide (Figure 49).
Figure 49
1. Mower belt
5. Engine pulley
2. Idler arm
6. Belt cover
3. Outside pulley
7. Belt guide
4. Spring
8. Idler pulley
5. Pull the idler pulley in the direction shown in
Figure 49 and roll the belt off of the pulleys.
34
Содержание TimeCutter Z530
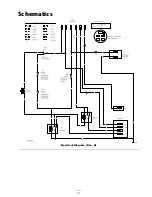
Страница 41: ...Schematics Electrical Diagram Rev B 41 ...
Страница 42: ......
Страница 43: ......
Страница 44: ......


