Toro Powerlite 38273 Скачать руководство пользователя страница 1

Form No. 3373-671 Rev B

Powerlite

®

Snowthrower

Model No. 38273—Serial No. 313000001 and Up

Model No. 38283—Serial No. 313000001 and Up

Operator's Manual

Introduction

This machine is intended to be used by residential
homeowners or professional, hired operators. It is
designed primarily for removing snow from paved
surfaces, such as driveways and sidewalks, and other
surfaces for traffic on residential or commercial
properties. It is not designed for removing materials
other than snow, nor is it designed for clearing off gravel
surfaces.

Read this information carefully to learn how to operate and
maintain your machine properly and to avoid injury and
machine damage. You are responsible for operating the
machine properly and safely.

You may contact Toro directly at www.Toro.com for machine
and accessory information, help finding a dealer, or to register
your machine.

Whenever you need service, genuine Toro parts, or additional
information, contact an Authorized Service Dealer or Toro
Customer Service and have the model and serial numbers of
your machine ready. Figure 1 identifies the location of the
model and serial numbers on the machine. Write the numbers
in the space provided.

Figure 1

1.

Model and serial number location

Model No.

Serial No.

This manual identifies potential hazards and has safety
messages identified by the safety alert symbol (Figure 2),

which signals a hazard that may cause serious injury or death
if you do not follow the recommended precautions.

Figure 2

1.

Safety alert symbol

This manual uses 2 words to highlight information.

Important

calls attention to special mechanical information

and

Note

emphasizes general information worthy of special

attention.

Contents

Introduction .................................................................. 1

Training ................................................................. 2
Preparation............................................................. 2
Operation............................................................... 2
Clearing a Clogged Discharge Chute .......................... 3
Maintenance and Storage.......................................... 3
Toro Snowthrower Safety ......................................... 3
Sound Pressure ....................................................... 3
Sound Power .......................................................... 3
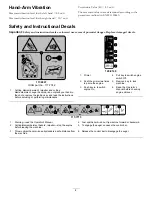
Hand-Arm Vibration ............................................... 4
Safety and Instructional Decals ................................. 4

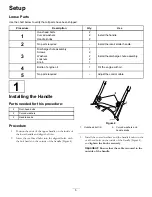
Setup ............................................................................ 5

1 Installing the Handle ............................................. 5
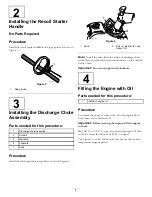
2 Installing the Recoil Starter Handle .......................... 5
3 Installing the Discharge Chute Assembly .................. 6
4 Filling the Engine with Oil...................................... 6
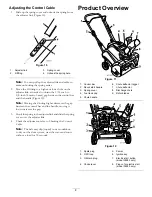
5 Adjusting the Control Cable ................................... 7

Product Overview .......................................................... 8
Operation ..................................................................... 9

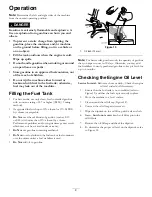
Filling the Fuel Tank ................................................ 9
Checking the Engine Oil Level .................................. 9
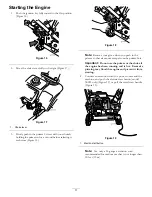
Starting the Engine .................................................11
Engaging the Rotor Blades.......................................12
Disengaging the Rotor Blades ..................................12
Stopping the Engine ...............................................12
Adjusting the Discharge Chute and Chute

Deflector ...........................................................13

Clearing a Clogged Discharge Chute .........................13
Self-propelling the Machine .....................................13
Preventing Freeze-up after Use.................................13

© 2012—The Toro® Company
8111 Lyndale Avenue South
Bloomington, MN 55420

Register at www.Toro.com.

Original Instructions (EN)

Printed in the USA

All Rights Reserved

*3373-671* B

Содержание Powerlite 38273

Страница 1: ...mber location Model No Serial No This manual identifies potential hazards and has safety messages identified by the safety alert symbol Figure 2 which signals a hazard that may cause serious injury or...

Страница 2: ...it on the ground If this is not possible then refuel such machinery on a trailer with a portable container rather than from a gasoline dispenser nozzle Keep the nozzle in contact with the rim of the f...

Страница 3: ...products or other safety information that you must know Rotating rotor blades can injure fingers or hands Stay behind the handles and away from the discharge opening while operating the machine Keep...

Страница 4: ...ur hand in the chute remove the ignition key and read the instructions before servicing or performing maintenance 120 0149 1 Primer 4 Pull key to switch engine switch Off 2 Push the primer two times t...

Страница 5: ...the control cable 1 Installing the Handle Parts needed for this procedure 2 Oval head bolts 2 Curved washers 2 Handle knobs Procedure 1 Position the ends of the upper handle on the inside of the lowe...

Страница 6: ...Note Install the bolts from the inside of discharge chute assembly so that the washers and locknuts are on the outside of the chute Important Do not overtighten the locknuts 4 Filling the Engine with...

Страница 7: ...a little to make adding oil easier Remember to return the machine to the operating position before checking the oil level Important Do not tip the machine all the way forward onto its nose or fuel ma...

Страница 8: ...he control bar and the handle moving it lower increases the gap 3 Hook the spring to the adjuster link and slide the spring cover over the adjuster link 4 Check the adjustment refer to Checking the Co...

Страница 9: ...E15 or E85 with more than 10 ethanol by volume Performance problems and or engine damage may result which may not be covered under warranty Do Not use gasoline containing methanol Do Not store fuel ei...

Страница 10: ...machine to the operating position before checking the oil level Important Do not tip the machine all the way forward onto its nose or fuel may leak out of the machine Max fill 12 oz 0 35 l type automo...

Страница 11: ...you push in the primer so that air cannot escape from the primer hole Important Do not use the primer or the choke if the engine has been running and is hot Excessive priming may flood the engine and...

Страница 12: ...ervice Dealer for service model 38283 only Note If the recoil starter does not operate properly it may be frozen Thaw out the starter before attempting to start the machine 5 While the engine is runni...

Страница 13: ...re just off the ground and the scraper and rotor blades touch the ground The machine will propel forward Figure 26 Figure 26 1 Wheels off the ground 2 Scraper and rotor blades in contract with the gro...

Страница 14: ...ine and let it run for a few minutes Operating Tips WARNING The rotor blades can throw stones toys and other foreign objects and cause serious personal injury to the operator or to bystanders Keep the...

Страница 15: ...n down to the wear indicator hole have an Authorized Service Dealer replace the rotor blades and the scraper Figure 27 Figure 27 1 The wear indicator hole is intact you do not need to replace the roto...

Страница 16: ...overfill the engine with oil remove the excess oil from the drain plug into an oil drain pan 9 Screw the oil fill cap into the oil fill hole and hand tighten it securely 10 Wipe up any spilled oil 11...

Страница 17: ...e 31 until the fuel begins to drain from the carburetor Drain the fuel into an approved fuel container Important Do not remove the carburetor bowl bolt on the bottom of the carburetor Figure 31 1 Carb...

Страница 18: ...Notes 18...

Страница 19: ...mation Toro Collects Toro Warranty Company Toro respects your privacy In order to process your warranty claim and contact you in the event of a product recall we ask you to share certain personal info...

Страница 20: ...urer 5Whichever occurs first 6Lifetime Frame Warranty If the main frame consisting of the parts welded together to form the tractor structure that other components such as the engine are secured to cr...

Отзывы: