Torbal DRX 5 Series Скачать руководство пользователя страница 35

Instruction Manual - TORBAL DRX 5 Series

11.1.3.Clearing a Tare

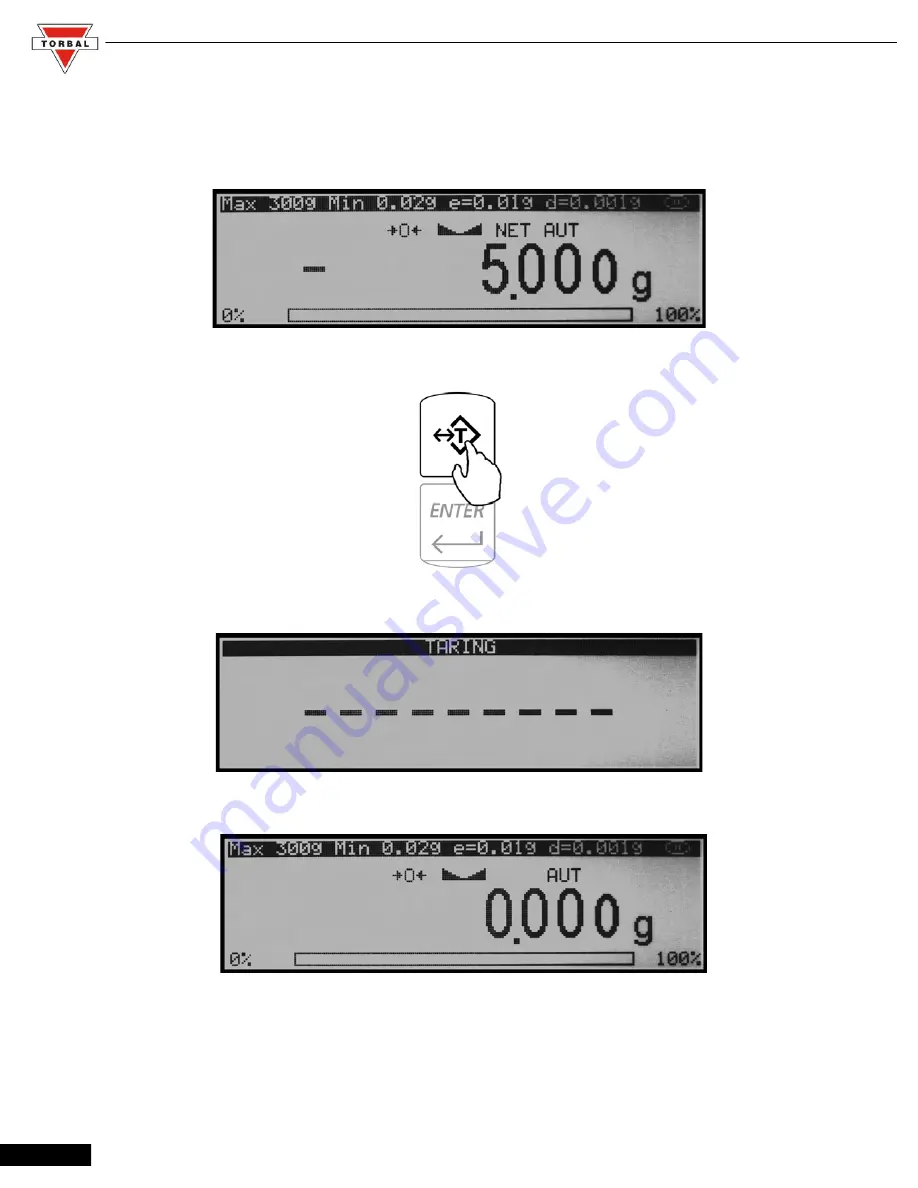
1.To clear the tare, remove the tared object along with the NET weight from the pan. The scale will then display a 

negative NET tare result. 

2.To clear the tare, press the T button.

3.The display will show dashed lines, indicating the tare is clearing. 

4.When finished clearing the tare, the scale will return to Weighing Mode.

35

Содержание DRX 5 Series

Страница 1: ...1 2 Taring 33 11 1 3 Clearing a Tare 35 Chapter 12 Pill Counting F2 Counting Prescription Drugs for the First Time 36 Chapter 13 Pill Counting F2 Counting Prescription Drugs Which have been previousl...

Страница 2: ...ered under the scale s warranty Never drop or throw any articles onto the scale s pan or onto any other parts of the unit DO NOT let the scale fall or drop from its tabletop surface When moving the sc...

Страница 3: ...than those mentioned in this manual o Set the scale on a firm stable horizontal surface o Never stand on or lean on this product Equipment may fall or collapse causing breakage and possible injury o B...

Страница 4: ...x 273mm x 91mm Operating Temperature 18 C to 33 C RS232 Port Bidirectional Standard RJ45 Network Port Optional PS2 Keyboard Port Standard Power Supply Input 120VAC 60Hz 15W Output 12VDC 500mA Display...

Страница 5: ...er 1 key F2 Pill Counting Number 2 key F3 NDC Verification independent of pill counting Number 3 key F4 Compounding Number 4 key F5 N A Number 5 key Display Indicator Description Explanation OFF Power...

Страница 6: ...ION 6 Front View Rear View Scanner Stand Scanner Pan Base Pan RJ Connector Plugs into the scanner RS232 Connector Plugs into the scale Scanner Cable AC Adaptor AC Adaptor Switch PS2 Keyboard Port RJ45...

Страница 7: ...he pan base and the pan from their packaging carefully install the pan base onto the scale by placing it on the pan support located in the middle of the scale Once the pan base has been installed gent...

Страница 8: ...urned on The scale will also calibrate whenever the temperature changes by 1 degree Celsius and at two hour intervals Calibration will initialize only if the scale has been stable and idle for 60 seco...

Страница 9: ...6 EXTERNAL KEYBOARD CONNECTION OPTIONAL Any PC external keyboard can be connected to the scale via the PS2 An external keyboard allows you to input data quickly and easily To connect a PC keyboard to...

Страница 10: ...tch the setting to Enabled 8 Exit the main menu 9 Reboot the scale by turning it off and on Note Some keyboard keys remain disabled and do not work with the scale i e function keys Shift Control etc D...

Страница 11: ...tures 1 To enter the Main Menu function setup press the Menu key 2 The scale will display a list of functions that can be configured 3 Use the arrow navigation keys to navigate up and down the menu 4...

Страница 12: ...Menu with the MENU key and use the up and down arrow keys to select the function to be configured 2 Once a desired function is highlighted press Enter 3 The scale will highlight the currently selecte...

Страница 13: ...ug weights improves counting accuracy and contributes to proper database maintenance Factory Default setting Disabled 4 Data Entry Reminder This feature ensures that the database is always updated wit...

Страница 14: ...weight and the average piece weight of the drug which is counted The feature signals if a deviation greater than 2 is found Factory Default setting Disabled 10 Onscreen Instructions This feature disp...

Страница 15: ...7 2 1 Compounding Function Description 1 Ingredient Labeling This feature allows you to assign unique names or labels to individual ingredients within the compound The name of the ingredient and its w...

Страница 16: ...ons This feature displays instructions that lead you step by step through the pill counting function The instructions appear at the bottom of the LCD display Factory Default setting Enabled 6 Default...

Страница 17: ...ng command Delete All Records which have not been updated or are older then X Month s Proceeding with this selection will erase all entries of NDC Codes which have not been updated or have been entere...

Страница 18: ...lection has been made press the ENTER key to continue 10 The scale will now display a warning indicating that all unused entries will be deleted confirm the deletion once again by selecting YES To abo...

Страница 19: ...labeled Maintaining the Drug Database 3 Once Maintaining the Drug Database is highlighted press the ENTER key 4 Using the navigation keys select Delete One and press ENTER 5 Command SCAN will be displ...

Страница 20: ...using the navigation keys select YES and press ENTER to proceed 7 The scale will display a warning indicating that NDC XXXXXXXXX will be permanently deleted To proceed with erasure of this NDC number...

Страница 21: ...e 3 Once Maintaining the Drug Database is highlighted press the ENTER key 4 Using the navigation keys select Delete All and press ENTER 5 The scale will display a warning indicating that all data will...

Страница 22: ...the navigation key select NO to proceed select YES and press ENTER WARNING Proceeding will result in formatting and erasing the entire memory bank All data will be permanently lost 7 After proceeding...

Страница 23: ...scale s LCD Contrast RS232 Communication Port Time and Date and Performance configuration 9 1 Power Save and LCD Contrast 1 Enter the main menu by pressing the MENU key 2 Use the navigation keys to se...

Страница 24: ...rast and press the ENTER key 5 Using the left and right arrow navigation keys to adjust the contrast of your display 6 Once the contrast is at a desired level press the ENTER key to save the setting 7...

Страница 25: ...OFF Once the back light is turned off press the ENTER key to save the setting 9 2 RS232 Communication Port Adjustment 1 Enter the main menu by pressing the MENU key 2 Use the navigation keys to selec...

Страница 26: ...save the setting To connect the DRX Scale to a TORBAL RXP 4 printer use the following settings Baud Rate 9600 Bits 8 Bit Parity None Protocol Long Sending Mode Button stab 9 3 Time and Date Adjustment...

Страница 27: ...nfiguration menu select Time and Date and press ENTER 4 To adjust the time using the navigation keys select Time and press ENTER 5 Using the yellow keys begin to enter the current time The time is ent...

Страница 28: ...7 To change the date select Date with the navigation keys and press ENTER 8 Using the yellow number keys begin to enter the current date The date is entered in segments day month and year 00 00 0000...

Страница 29: ...ER 3 From the configuration menu select Reset and press ENTER 4 Command Restore Default Settings NO YES will be displayed 5 To restore default configuration settings use the arrow keys to select YES a...

Страница 30: ...rature stabilizes temperature calibration will be performed less frequently To maintain the internal calibration of the scale leave the unit plugged into the wall outlet and turn the scale OFF by usin...

Страница 31: ...rt can be printed The calibration report includes data of the current internal calibration weight To print the calibration report follow these steps 1 Press the MENU key to enter the main menu 2 Use t...

Страница 32: ...tomatically enter Weighing Mode The scale is ready to begin weighing as soon as the stabilization and center of zero indicators appear on the display i e If the scale initialized in a different mode u...

Страница 33: ...the zeroing key 4 The display will show a dotted line which indicates that the scale has begun the re zeroing process i e 5 When finished re zeroing the scale will return to Weighing Mode and the dis...

Страница 34: ...container is ready to be tared To tare the container press the T button 4 The display will show a dotted line which indicates the scale has begun the taring process 5 When finished taring the balance...

Страница 35: ...tared object along with the NET weight from the pan The scale will then display a negative NET tare result 2 To clear the tare press the T button 3 The display will show dashed lines indicating the t...

Страница 36: ...first time a particular drug is counted and it has not been stored in the scale s database follow the steps below If the drug has previously been counted please turn to Chapter 13 of this manual 1 To...

Страница 37: ...y indicating that the scale is ready to scan the NDC code associated with the drug 5 Note If NDC verification has been enabled two NDC codes must be scanned to allow the scale to check for a match bet...

Страница 38: ...e production LOT number located on the drug s supply bottle The LOT number can be 10 characters long alphanumeric 9 After scanning the NDC code and entering optional drug information the scale will as...

Страница 39: ...piece weight allowed is 30mg 3e With a sample size of 10 pieces the sample weight must be equal to or greater than 300mg 30e Attempting to set a sample size of 10 pieces with a total sample weight wh...

Страница 40: ...for approximately five seconds At any time during the Fill command add the remaining pieces 15 Note If filling does not begin while the Fill command is displayed after approximately five seconds the...

Страница 41: ...OUNT FINISHED To begin a new count press the Clear key CLR Important If too many pieces have been placed into the container use tweezers a pharmacy spoon or a similar instrument to remove the excess w...

Страница 42: ...cular drug has been previously counted in the scale and it has not been stored in the scale s database follow the steps below If the drug has not been previously counted please turn to Chapter 12 of t...

Страница 43: ...splay indicating that it is ready to scan the NDC code associated with the drug 6 Note If NDC verification has been enabled two NDC codes must be scanned to allow the scale to check for a match betwee...

Страница 44: ...ard key in the number of pills to be counted and press Enter 9 The display will then indicate to begin filling The word FILL will flash on the display for approximately 5 seconds At any time during th...

Страница 45: ...nts may be removed from the scale After removal of the container with the counted pieces the scale will indicate the count is finished by displaying COUNT FINISHED To begin a new count press the Clear...

Страница 46: ...nected to the scale To print a counting receipt follow the steps below 1 Once the desired count is displayed and the stability indicator appears press Print A print icon will be displayed indicating t...

Страница 47: ...he transaction Tx or the prescription number Rx Once NDC Verification has been enabled in the pill counting setup menu anytime you are performing the counting operation two NDC codes must be scanned t...

Страница 48: ...he match is wrong the word FAILED will appear on the display The second NDC code will be highlighted on the display and the procedure must start over To start over press Enter 5 If verification is suc...

Страница 49: ...SCAN 1 will appear on the display indicating that you should scan the first NDC code associated with the drug usually the supply bottle 2 Scan the NDC code by placing it slowly under the scanner ligh...

Страница 50: ...he code will appear on the display in a field labeled Rx NDC _ _ _ _ If the match is wrong the word FAILED will appear on the display The second NDC code will be highlighted on the display and the pro...

Страница 51: ...maintaining the correct stored piece weight This is especially critical when a medicine has been reformulated or comes from different lots Manufacturers do not supply piece weight information for pill...

Страница 52: ...mation on NDC verification please turn to Chapter 15 of this manual 7 Scan the NDC code by slowly placing it under the scanner light 8 If the Remaining to Fill feature has been enabled the scale will...

Страница 53: ...apter 24 or an external keyboard Chapter 6 The name can be 10 characters long alphanumeric 11 If production LOT entry has been enabled key in the production LOT number located on the drug s supply bot...

Страница 54: ...ced on the pan 15 Once the weight of the sample stabilizes and the stability indicator appears on the display press the T key to confirm and accept the sample weight 16 The scale will now store new dr...

Страница 55: ...ad been last entered or modified in the database If the length of time is longer than what has been pre programmed in the data entry reminder feature default 30 days the scale will display a reminder...

Страница 56: ...f the sample will be displayed as it is placed on the pan 5 Once the weight of the sample stabilizes and the stability indicator appears on the display press the T key to confirm and accept the sample...

Страница 57: ...ter selecting NO the scale will allow you to postpone the reminder for an additional period of time or to turn it off 2 To postpone the reminder use the navigation keys to select a new number of days...

Страница 58: ...5 pieces Note When stopping outside of the 10 to 15 range the feature will not work 2 When you reach a count of 10 to 15 pieces stop and wait for the scale to stabilize 3 Once the scale is stable it w...

Страница 59: ...d modifying the average piece weight turn to chapter 16 of this instruction manual CHAPTER 20 ADVANCED PILL COUNTING ACCURACY APA When enabled APA can adjust average piece weight variations that may e...

Страница 60: ...gain when stopping the count between 20 and 30 pieces Activating APA in this range can be particularly useful when counting large quantities Note If APA was not performed or activated at the 10 to 15...

Страница 61: ...E will appear on the scale s display indicating that it is ready to tare a counting container 3 Place a container on the pan and tare it by pressing the T key 4 The scale is now ready for the first in...

Страница 62: ...gredient Add the ingredient until the desired weight is displayed and the stability indicator appears on the display 8 Once a desired weight is displayed press Enter to store the ingredient in the sca...

Страница 63: ...t and save recipes press the Sigma key before taring and entering an ingredient Once the sigma key has been pressed the scale will display the current recipe The recipe can be saved in the scales perm...

Страница 64: ...d the scale will display slots in which a recipe can be saved By using the navigation keys select the slot into which you wish to save the recipe and press Enter The scale will allow you to assign a n...

Страница 65: ...t that had been programmed as the remaining to fill weight 2 When an ingredient is added the filling meter begins to move towards the arrow The meter reaches the arrow when the desired weight has been...

Страница 66: ...ch number key has an assigned set of characters and letters Press they key until the desired letter or a character is displayed Once selected the scale will move to the next character automatically Fo...

Страница 67: ...h paper or with wire To seal the scale follow the instructions below 25 1 Paper Seal 1 To seal the scale with a paper seal or a sticker gently use a flathead screwdriver to remove the calibration wire...

Страница 68: ...er the opening as shown in the picture below WARNING Do not attempt to screw the flush sealing screw all the way in Stop when the screw is flush with the casing of the scale 25 2 Wire Seal 1 To seal t...

Страница 69: ...Instruction Manual TORBAL DRX 5 Series 2 The seal may then be placed over the wire Do not attempt to remove the calibration screw as it will rip the wire and break the seal 69...

Страница 70: ...Instruction Manual TORBAL DRX 5 Series CHAPTER 26 TECHNICAL INFORMATION 70...

Страница 71: ...or C03 Load error while calibrating The internal calibration mass is below 10 of the original stored mass Do not touch or move the scale while calibration is in progress The pan MUST be empty and prop...

Страница 72: ...ge exceeded A D converter read error No response from A D converter Temperature sensor error No response from the temperature sensor Service switch ON Attempt to access the Service Mode without a serv...

Страница 73: ...ESSORIES Description Part No Draft Shield Cover DRX9120 RXP 4 Thermal Printer DRX9130 RS232 PC Cable DRX9140 CHAPTER 30 REPLACEMENT PARTS Description Part No A C Adaptor DRX9150 Pan Assembly DRX9160 R...

Страница 74: ...will not apply if upon inspection it is found that the product was tampered with misused overloaded or abused mishandled placed in an improper environment improperly installed or adjusted used for a p...

Отзывы: