background image

105

33. SPECIFICATIONS

Power Source

Supplied from an external 24 V DC/400 mA power supply, Removable 

terminal block (2 pins) or from an optional AD-246 AC adapter

Power Consumption

10 W

Wave Format

44.1 kHz/32 kHz sampling rate, 16 bit PCM method, WAV file (monaural)

Sound Source Rewriting Method

LAN data transfer/Analog recording/

Direct write to memory card using the EV-700 setting software

Audio Input

MIC: 

  −55  dB*

1

 (microphone input volume control in maximum 

position), 600 Ω, unbalanced, φ6.3 phone jack (2P)

LINE (rear):   −20 dB*

(line input volume control in maximum position), 

10 kΩ, unbalanced, Removable terminal block (12 pins)

LINE (front):   −29 dB*

(line input volume control in maximum position), 

10 kΩ, unbalanced, RCA pin jack

Audio Output

LINE  1,  2: 

  0  dB*

1

, 600 Ω, unbalanced, Removable terminal block 

(12 pins)

Headphones:  0 dB*

1

, 100 Ω, monaural, φ3.5 mini jack (3P)

Frequency Response

20 Hz − 20 kHz ±3 dB (1 kHz)

50 Hz − 14 kHz ±3 dB (IT-450 mounted, 1 kHz)

Distortion

0.3 % or less (1 kHz, rated output)

Storage Media

Compatible with CompactFlash

TM

 specification Memory card  

Number of Mountable Memory cards 2 (1 Memory card containing preset sound sources is supplied.)

Backup operation available when 2 cards are mounted.

Number of Recordable Phrases

32768

Maximum Recording Time

About 3 hours (at 44.1 kHz sampling rate) or 

about 4 hours (at 32 kHz sampling rate)

Audio Output Method

Single channel monaural

Number of Playback Program

Direct mode:  16 programs

Binary mode: 256 programs

1 emergency message takes precedence over the above programs and

is played back.

R.E.M. (Recording Endless Message) playback*

2

 can be performed.

Control Input

Activations 1 − 16, playback, stop, recording, delete/clear,

emergency playback, emergency recording, emergency stop

No-voltage make contact input, pulse make length: 50 ms or more,

open voltage: 30 V DC, short-circuit current: 10 mA,

Removable terminal block (16 pins)

Control Output

Shorting outputs 1 − 8 (busy), Error: contact capacity: 30 V DC, 0.5 A,

Removable terminal block (8 pins)

Network

Network I/F

100BASE-TX

Network protocol

TCP/IP, UDP, HTTP, FTP

Connector

RJ45 connector

Operating Display

7-segment LED, 5 digits

Operating Temperature

0 to 40 ºC (32 to 122 ºF)

Operating Humidity

90 %RH or less (no condensation)

Finish

Panel: Aluminum, black, 30 % gloss, paint

Case: Pre-coated steel plate, black, 30 % gloss

Dimensions

420 (w) x 44 (h) x 222 (d) mm (16.54" x 1.73" x 8.74")

Weight

2.4 kg (5.29 lb)

*

1

 0 dB = 1 V

*

2

   An emergency broadcast function that repeatedly plays the sound source recorded on the spot with the 

highest priority in case of an emergency situation.

Notes

•  Line output can be converted to balanced type using an optical IT-450 transformer. For the converting method, 

consult your nearest TOA dealer.

•  The design and specifications are subject to change without notice for improvement. 

•  CompactFlash is a trademark of SanDisk Corporation. 

Содержание EV-700

Страница 1: ...INSTRUCTION MANUAL DIGITAL ANNOUNCER EV 700 Thank you for purchasing TOA s Digital Announcer Please carefully follow the instructions in this manual to ensure long trouble free use of your equipment ...

Страница 2: ...AM 16 10 1 What is phrase 16 10 2 What is Program 16 10 3 Playing a Program 17 10 4 Factory Preset Program 18 11 OPERATION 19 11 1 Playing a Program 19 11 2 Stopping Program Playback 21 11 3 Recording to Phrase 22 11 4 Deleting Phrase 25 11 5 Confirming the Recorded Contents on Memory Card 27 11 6 Disabling Each Key Operation on the Front Panel Lock Mode 27 12 ACTIVATING OPERATION BY WAY OF EXTERN...

Страница 3: ...y Playback Audio Source Use Switch 2 73 18 4 Uploading Downloading Unit Setting File Use Switch 3 74 18 5 Returning the Network Setting to the Default Value Temporarily Use Switch 3 75 18 6 Copying the Memory Card Use Switch 4 75 18 7 Updating the Firmware Use Switches 5 and 8 76 18 8 Initializing the Unit Settings Use Switches 6 and 8 77 18 9 Self Check Use Switches 7 and 8 78 19 CONFIRMING THE F...

Страница 4: ...ON 92 28 1 Mounting the Unit in an Equipment Rack 92 28 2 Installing the Unit on the Desk 92 29 CONNECTIONS 93 29 1 Front Panel Connections 93 29 2 Rear Panel Connections 94 29 3 Removable Terminal Plug Connection 96 30 IF YOU HAVE ANY PROBLEMS 97 30 1 Troubleshooting 97 30 2 Error List 100 31 ABOUT THE EV 700 S STATE AND INPUT OUTPUT 103 32 PRERECORDED AUDIO FILE LIST 104 33 SPECIFICATIONS 105 Ac...

Страница 5: ...ement of the obsolete outlet Protect the power cord from being walked on or pinched particularly at plugs convenience receptacles and the point where they exit from the apparatus Only use attachments accessories specified by the manufacturer Use only with the cart stand tripod bracket or table specified by the manufacturer or sold with the apparatus When a cart is used use caution when moving the ...

Страница 6: ... locations such as on a rickety table or a slanted surface Doing so may result in the unit falling down and causing personal injury and or property damage Since the unit is designed for indoor use do not install it outdoors If used outdoors there is a danger of electric shock when it gets wet with rain Use the specified rack mounting bracket in combination Doing otherwise may cause the unit to fal...

Страница 7: ... anchor bolts or take other arrangements to prevent it from falling down When connecting the unit s power cord to an AC outlet use the AC outlet with current capacity allowable to the unit The supplied rack mounting screws can be used for the TOA equipment rack only Do not use them for other racks When the Unit is in Use Make sure that the volume control is set to minimum position before power is ...

Страница 8: ...This is a class A product In a domestic environment this product may cause radio interference in which case the user may be required to take adequate measures Make a backup copy of the prerecorded audio files before using them To make a copy use the unit s copy function See p 75 or a PC Prerecorded audio files cannot be restored once deleted Redistribution is fee based Before using the EV 700 unit...

Страница 9: ... FAT16 6 2 Memory Card Handling Precautions Do not use the supplied memory card for equipment other than the EV 700 as this could lead to data damage or less Never touch the terminal pins on the memory card as this could lead to data damage or less from static electricity Ensure no foreign objects such as dust or dirt get into the connector section to prevent poor contact Do not store the unit in ...

Страница 10: ... Signals entered to this terminal and those entered to the rear mounted Line input terminals 40 are internally mixed 6 Line input volume control Adjusts the sound volume of both the Line input jack 5 and the Line input terminals of the rear mounted Input Output terminals 40 7 Microphone input jack 55 dB 2 600 Ω unbalanced 6 3 mm phone jack 2P Connect a microphone for recording or announcement use ...

Страница 11: ...ator Not used 21 LINK ACT indicator Green Lights when the unit is connected to a network and flashes during data transmission or reception Tip Lights or flashes synchronously with the LINK ACT indicator of the rear mounted LAN terminal 33 22 Level meter Indicates the audio output level during broadcast or the audio input level during recording 23 Menu key Selects mode 24 Mode indicator Indicates t...

Страница 12: ...minal Be sure to ground this terminal LINK ACT indicator 100BASE TX indicator 40 Input Output terminals No Name Function 1 Recording control input terminals Close these terminals when recording phrases 2 Delete Clear control input terminals Close these terminals when deleting the recorded phrase Closing these terminals during playback clears the stored playback order See p 36 Sequential storage pl...

Страница 13: ...e to play the programs using the EV 700 Setting software See the separate EV 700 Setting software instruction manual Prepare Audio sources Create programs Play Tip To create a program the EV 700 Setting software is required The latest versions of the EV 700 Setting software and EV 700 Setting software instruction manual are made available on the TOA product data download site http www toa products...

Страница 14: ...rocedure to play 2 tone chime of the prerecorded audio files through the front key operation Note To play other prerecorded audio files than the 8 files listed above programs need be created on the EV 700 Setting software See the separate EV 700 Setting software instruction manual Tip Phrases 00009 through 00016 are assigned to Program Nos P009 through P016 respectively by default When you record ...

Страница 15: ...seconds on the Status display followed by the program number indication Tip Program number is displayed as P P 001 which means Program No P001 by the factory default If the P P 001 indication does not appear press the Up or Down key to display P P 001 Step 2 Press the Start Stop key Playback starts Tip As the delay time is factory preset to 2 seconds playback starts 2 seconds after the Start Stop ...

Страница 16: ...hrase audio data for music and sentences can be recorded as phrases 10 2 What is Program Program consists of the audio data for broadcast created by combining phrases and the program control data such as program sound volume and playback system Up to 256 programs can be registered Silence Audio date Program list No Name P001 P002 P256 Program 1 Program 2 Program 256 Step1 Step2 Step3 Step4 Step128...

Страница 17: ...uring interval p 69 Refers to pause between phrases which can be adjusted in seconds It can be created using the EV 700 Setting software 10 3 Playing a Program Playback is executed for each program Your desired program can be selected and played through the front key operation or using the EV 700 Setting software In the case of operation by way of Control contact your desired program can be played...

Страница 18: ...ed when P009 is played Playback system is set to Program playback except P008 Ascending 4 note tone which is set to Chime playback See p 66 PLAYBACK SYSTEMS When the prerecorded audio files registered to the Phrase Nos 00001 through 00008 have been deleted through the front key operation you can record other audio files to those phrase numbers In this case they can be played without the need to cr...

Страница 19: ...PLAYBACK SYSTEMS Code Playback system P Program playback S Step playback A All phrases playback C Chime playback 11 1 Playing a Program To play a program designate the program number P P 001 Program No Playback system Example Displayed for 3 seconds PLAY Program number display 2 1 4 3 5 ON 11 OPERATION Using the front panel mounted keys play recording and deletion can be made The same operation ca...

Страница 20: ...e level meter To disable each key operation Press the Menu key to select Lock mode The Lock mode indicator lights Key operation except the Menu key is disabled preventing accidental wrong operation To cancel Lock mode press the Menu key again Note that when the Quick stop function is set to Enabled Stop operation by the Start Stop key during playback is enabled See p 88 QUICK STOP FUNCTION Tip The...

Страница 21: ...operation Tip When the Quick stop function is set to Enabled you can stop playback by simply pressing the Start Stop key even while in Lock mode Seep 88 QUICK STOP FUNCTION Step 1 Press the Menu key to select the play mode Press the Menu key some times until the Play mode indicator lights Step 2 Press the Start Stop key Playback stops and the Play indicator goes off Tip After you finish all necess...

Страница 22: ...Phrase number to be recorded A recordable phrase number will flash Note If a phrase number does not flash this indicates that this phrase number has already been registered In this case pressing the Start Stop key in the next Step 4 causes the indication below to appear for about 3 seconds then the display returns to the original phrase number indication Tips Phrase Nos 00009 through 00016 are ass...

Страница 23: ...e unit will be placed in Recording standby mode The Recording indicator and the dot at the lower right corner of the Status display flash during Recording standby Tip If you do not make any front panel operation for 5 minutes the display s status will return to the one in Step 3 Step 6 Press the Start Stop key again Recording will start after 3 seconds Remaining seconds appear from 3 to 1 on count...

Страница 24: ...he input having higher broadcast priority is recorded Even if the input signal is lost during recording recording is not switched to the input having lower priority broadcast Step 8 To stop recording press the Start Stop key The Recording indicator goes off Tip After you finish all necessary operations it is recommended that you place the unit in Lock mode to prevent accidental operation See p 27 ...

Страница 25: ...u key some times until the Delete mode indicator lights The dEL DEL indication appears for about 3 seconds on the Status display then followed by the Phrase number indication like 00001 Step 2 Press either the Up or Down key to select the phrase number to be deleted Tip You can monitor the selected phrase contents using headphones before deleting See p 27 Confirming the Recorded Contents on Memory...

Страница 26: ...tion for 5 minutes display s status will return to the one in Step 2 Step 4 Press the Start Stop key again The phrase will be deleted The dEL DEL indication appears on the Status display followed by the flashing indication of the phrase number during deletion Hyphens appear when the deletion is complete then the display s indication changes to other phrase number indication Tip After you finish al...

Страница 27: ...nals 1 and 2 Step 3 To stop monitoring partway through the playback press the Monitor key again The Monitor indicator goes off and monitor playback is terminated Tip After playback of the selected audio source is complete the Monitor indicator goes off automatically and monitor playback will be terminated 11 6 Disabling Each Key Operation on the Front Panel Lock Mode After you finish all necessary...

Страница 28: ...0 Setting software to perform settings related to external activation such as a control method and control signal type Setting example default setting See the EV 700 Setting software instruction manual for details Outline of Setting and operation First set the control function to either Direct or Binary The set control function applies to playback start recording start delete clear start and stop ...

Страница 29: ... than 50 ms When 2 or more make signals need be input in sequence allow at least 50 ms interval between first signal input and second signal input If this interval is shorter than 50 ms operation may not be performed in correct order Note that the time interval of 30 ms to 50 ms is omitted in the diagrams in this manual 12 2 Inputting Control Signals 12 2 1 Input terminals used for external activa...

Страница 30: ...irect control function For playback start each of the Contact activated input terminals 1 through 16 corresponds to the program number For recording start or deletion start each of the Contact activated input terminals 1 through 16 corresponds to the phrase number See the table below Contact activated input terminal No Playback start Program No 1 P001 2 P002 3 P003 4 P004 5 P005 6 P006 7 P007 8 P0...

Страница 31: ...age shows that a set of the terminal states is designating P006 P006 will be played if the Playback control input terminal is closed under these states For the details of activation by the Binary control function see p 45 Note Numbers designated by the unit s Binary control function differ from those expressed in binary notation For example P001 is designated when the terminal state is placed in 0...

Страница 32: ...066 0 1 0 0 0 0 1 0 P067 00067 1 1 0 0 0 0 1 0 P068 00068 0 0 1 0 0 0 1 0 P069 00069 1 0 1 0 0 0 1 0 P070 00070 0 1 1 0 0 0 1 0 P071 00071 1 1 1 0 0 0 1 0 P072 00072 0 0 0 1 0 0 1 0 P073 00073 1 0 0 1 0 0 1 0 P074 00074 0 1 0 1 0 0 1 0 P075 00075 1 1 0 1 0 0 1 0 P076 00076 0 0 1 1 0 0 1 0 P077 00077 1 0 1 1 0 0 1 0 P078 00078 0 1 1 1 0 0 1 0 P079 00079 1 1 1 1 0 0 1 0 P080 00080 0 0 0 0 1 0 1 0 P0...

Страница 33: ... activation Activates operation when a make signal is applied to the terminals and continues the operation while the terminals are being closed Playback is repeated when a closed state is maintained even if playback is finished Operation by Pulse signal input activation When Direct control function is selected Operation of playback start by Pulse signal input activation Operations of playback star...

Страница 34: ... activation and the closed state is kept even after program completion Unit s playback operation Contact activated input OFF ON Program Program Unit s playback operation Contact activated input OFF ON Program Unit s playback operation Contact activated input OFF ON Program Note When set to Level signal input activation playback continues only during the interval if terminals are closed for a short...

Страница 35: ...he last in program LIFO Plays the last in program When playbacks of 2 programs with the same priority level are simultaneously started FIFO Plays the lower numbered program LIFO Plays the higher numbered program As for the program priority levels see p 81 The figure below shows operations of the FIFO and LIFO playbacks When playback of Program P002 with the same priority is started during Program ...

Страница 36: ...ed stop Stops the program currently being played when the Stop control input terminal is closed Spontaneous stop of phrase playback Stops the program after the phrase in it currently being played has ended when the Stop control input terminal is closed Operations of the Forced stop and the Spontaneous stop of phrase playback Phrase 00002 Phrase 00001 Program playback Program playback in progress s...

Страница 37: ... input Stop activation Level signal input activation Spontaneous stop of phrase playback Contact activated input P001 Playback from the beginning P001 P001 playback stops once after the phrase playback in progress has ended but restarts immediately as the contact activated input is kept applied Operation of the Forced stop and Spontaneous stop of phrase playback during Level signal input activatio...

Страница 38: ...stop of phrase playback p 44 10 Binary control Playback Pulse FIFO priority setting p 45 11 LIFO priority setting p 46 12 Sequential storage p 47 13 Level p 48 14 Recording Pulse p 48 15 Level p 49 16 Delete Clear Pulse p 49 17 Stop Pulse Forced stop p 50 18 Spontaneous stop of phrase playback p 50 19 Common to Direct and Binary controls 2 Emergency Playback Pulse p 61 Level p 62 R E M Playback Le...

Страница 39: ...be played Operation description When P001 playback is activated during Program P002 playback P001 is played preferentially Priority setting When P001 is lower than or equal to P002 Activation method Close the Contact activated input terminal corresponding to the program number to be played Operation description Even if P001 playback is activated during Program P002 playback the last in P001 start ...

Страница 40: ...entially close the Contact activated input terminal corresponding to the program number to be played Operation description Up to 16 contact activated inputs can be stored The program corresponding to each input is played in the order of entry In the example above P001 playback and P002 playback start in order If the Contact activated input terminal corresponding to the same program is closed multi...

Страница 41: ...002 playback is complete and no subsequent programs are played 4 Operation of FIFO playback priority setting by a Level signal input activation Priority setting When P001 is higher than P002 Activation method Close the Contact activated input terminal corresponding to the program number to be played Operation description When P001 playback is activated during Program P002 playback P001 is played p...

Страница 42: ...back is activated during Program P002 playback P001 is played preferentially Priority setting When P001 is lower than P002 Activation method Close the Contact activated input terminal corresponding to the program number to be played Operation description P002 playback continues even if P001 playback is activated during Program P002 playback 6 Recording operation by a Pulse signal input activation ...

Страница 43: ...ding stops when the remaining recordable time reaches 0 Note You cannot perform any other operation until recording stops once started 8 Operation of delete clear by a Pulse signal input activation Activation method Close the Contact activated input terminal corresponding to the phrase number to be deleted while the Deletion control input terminal is being closed Operation description Starting the...

Страница 44: ...e Stop control input terminal is closed program playback will stop after the phrase playback in the program currently being played reaches its end Operation description P001 playback starts by the contact activated input signal When the Stop control input terminal is closed during Phrase 00002 playback program playback will stop after the phrase playback reaches its end Note Program playback canno...

Страница 45: ...g When P002 is higher than P003 Activation method Close the Playback control input terminal while the Contact activated input terminal corresponding to the program number to be played is being closed Operation description When P002 playback is activated during Program P003 playback P002 is played preferentially Priority setting When P002 is lower than or equal to P003 Activation method Close the P...

Страница 46: ...iority setting When P002 is higher than or equal to P003 Activation method Close the Playback control input terminal while the Contact activated input terminal corresponding to the program number to be played is being closed Operation description When P002 playback is activated during Program P003 playback P002 is played preferentially Priority setting When P002 is lower than P003 Activation metho...

Страница 47: ...Up to 16 activation inputs can be stored The program corresponding to each input is played in the order of entry In the example above P002 playback and P003 playback start in order If the Contact activated input terminal corresponding to the same program is closed multiple times these activation inputs are stored by the same number of closures In this operation of Sequential storage playback seque...

Страница 48: ...P003 is selected by the Contact activated input terminal during P002 program playback P003 will not be played regardless of the priority level thereby keeping P002 playback as there is no Playback control input signal for staring P003 playback 15 Recording operation by a Pulse signal input activation Activation method Close the Recording control input terminal while the Contact activated input ter...

Страница 49: ...osed Recording stops when the Recording control input terminal is opened Also recording stops when the remaining recordable time reaches 0 Note You cannot perform any other operation until the Recording control input terminal is opened once recording has started 17 Operation of delete clear by a Pulse signal input activation Activation method Close the Deletion control input terminal while the Con...

Страница 50: ...t terminal is being closed Program playback stops instantly when the Stop control input terminal is closed during playback Note Program playback cannot be started while the Stop control input terminal is being closed 19 Spontaneous stop operation of phrase playback by a Pulse signal input activation Activation method When the Stop control input terminal is closed program playback will stop after t...

Страница 51: ...ou to make a recording through one touch operation in the event of an emergency and repeatedly broadcast the recorded contents immediately after recording Recording starts instantly by closing the rear mounted Emergency recording control input terminals and the recorded contents are played repeatedly when the terminals are opened Priority is given to the R E M playback broadcast even during progra...

Страница 52: ...witch 2 of the DIP switch on the front panel to the ON position In this event the EMEr EMER indication appears on the Status display See the figure below This switch setting will place the unit in Maintenance mode 1 2 3 4 5 6 7 8 Set Switch 2 to the ON position EMER 14 1 Recording Audio Sources Step 1 Connect a microphone or audio source equipment such as a player to the EV 700 Step 2 Set only Swi...

Страница 53: ...s the display s status will return to the one in Step 3 You can monitor the recorded contents only with headphones See p 58 Confirming Audio Source Contents Step 5 Adjust the sound volume of the sound source to record Adjust the sound volume of the sound source with the Microphone input volume control or Line input volume control while watching the level meter Take care so that 3 LED of the level ...

Страница 54: ...t 3 seconds on the Status display followed by the EMEr EMER indication Step 7 Speak into the microphone or play the sound source by a player Step 8 Press the Start Stop key to stop recording The Recording indicator goes off Step 9 When recording of audio source is complete return Switch 2 to the OFF position Tip When you finish all operations it is recommended that you place the unit in Lock mode ...

Страница 55: ...l the Play mode indicator lights The PLAY indication appears for about 3 seconds on the Status display followed by the EMEr indication Tip You can monitor the registered recorded contents only with headphones prior to playback See p 58 Confirming Audio Source Contents Step 3 Press the Start Stop key Emergency playback starts The Play indicator lights during playback and the signal level is display...

Страница 56: ...e To cancel Lock mode press the Menu key Step 4 When Emergency playback is complete return Switch 2 to the OFF position Tip When you finish all operations it is recommended that you place the unit in Lock mode to prevent accidental operation See p 27 Disabling Each Key Operation on the Front Panel Lock Mode ...

Страница 57: ...yback stops by opening the Emergency playback control input terminals when Level signal input activation is set for Emergency playback See p 62 When the Quick stop function is set to Enabled you can stop playback by simply pressing the Start Stop key even while in Lock mode See p 88 QUICK STOP FUNCTION Step 1 Press the Menu key to select Play mode Press the Menu key several times until the Play mo...

Страница 58: ...ency playback is being selected The Monitor indicator lights and monitor playback of Emergency playback will start and the playback is output only to the headphones Tip Monitor sound is not output from the Line output terminals 1 and 2 Step 2 To finish monitoring partway press the Monitor key again The monitor indicator goes off and monitor playback is terminated Tip When the audio source for Emer...

Страница 59: ... the Delete mode indicator lights The dEL DEL indication appears for about 3 seconds on the Status display followed by the EMEr indication Tip You can monitor the recorded contents to be deleted only with headphones before you delete them See p 58 Confirming Audio Source Contents Step 3 Press the Start Stop key The rEAdy READY indication appears on the Status display then the unit will be placed i...

Страница 60: ...wed by the flashing EMEr indication during deletion Hyphens appear when the deletion is complete then the display s indication changes to EMEr Step 5 When you finish checking audio source contents return Switch 2 to the OFF position Tip When you finish all operations it is recommended that you place the unit in Lock mode to prevent accidental operation See p 27 Disabling Each Key Operation on the ...

Страница 61: ... Emergency playback will start Emergency playback will stop automatically after it is repeated by the number of times or for the period of time both preset using the EV 700 Setting software Tips Emergency playback will automatically stop after it is repeated by the set number of times even if you continue to close the Emergency playback control input terminals after Emergency playback has started ...

Страница 62: ...yback start setting Step Close the Emergency stop control input terminals Terminal No 5 Emergency playback will stop Tip Playback can be stopped by the following 2 ways depending on the Emergency stop activation setting When set to the Forced stop Emergency playback instantly stops When set to the Spontaneous stop of phrase playback Emergency playback stops after the audio source of Emergency play...

Страница 63: ...l input Recording Playback Playback Emergency stop control input Example When set to the Forced stop Playback When set to the Spontaneous stop of phrase playback Emergency playback stops after the audio source of R E M playback in progress is played to the end Closed Closed R E M playback operation Emergency recording control input Recording Playback Playback Closed R E M playback operation Emerge...

Страница 64: ...the preset number of times You can also make a setting so that playback is repeated until it is stopped manually or by Emergency stop control input See the separate EV 700 Setting software instruction manual Tips Operation from recording to playback can be resumed if the recording switch is pressed once again while R E M playback is being broadcast or after it is stopped In this case the previousl...

Страница 65: ...infinite Infinite Repeat time 5 to 120 minutes in 5 minute units infinite Infinite 5 to 120 minutes in 5 minute units infinite Infinite Repeat interval 0 to 50 seconds in 10 second units 1 to 99 minutes in 1 minute units 0 second 0 to 50 seconds in 10 second units 1 to 99 minutes in 1 minute units 0 second Busy output during interval ON OFF ON ON OFF ON Priority level 1 1 1 1 Emergency playback bu...

Страница 66: ... seconds Start Phrase 00003 Phrase 32768 Phrase 00002 Phrase 00001 Phrase 00002 Phrase 00003 Phrase 32768 Phrase 00001 It can also repeat playbacks by setting the items shown below Setting item Setting content Repeat count 1 0 2 to 127 times Repeat interval 3 0 to 99 minutes 4 1 Playback stops after it is repeated by the set number of times 2 When repeat count is set to 0 playback is made only onc...

Страница 67: ... 5 Step 4 Step 3 Phrase 00003 Phrase 32768 Phrase 00002 Phrase 00001 Silence 15 seconds Tips Prerecorded audio files are factory preset as follows Repeat count is 0 No repeat and repeat interval 0 To stop playback partway perform any of the following operations Pressing the Start Stop key See p 21 Closing the Stop control input terminals See p 33 and Using the EV 700 Setting software See the EV 70...

Страница 68: ...minals See p 33 and Using the EV 700 Setting software See the EV 700 Setting software instruction manual Playback will start from the first step in the following cases even if it is played partway through a program When the first program is activated again while the second program activated during first program playback is being played When the original program is activated again after power has b...

Страница 69: ...FF Busy output ON OFF during interval can be set using the EV 700 Setting software Monitor playback of all Steps will start when the Monitor key is pressed Memory card Automatically plays at regular time intervals in the order of Steps after activation See below for details Stop Interval Interval Interval Program Step 1 Step 2 Step 4 Step 3 Start Step 1 Playback operation Start Manually Stop Autom...

Страница 70: ...tware instruction manual The first phrase to be played can be designated When a program is activated the first phrase designated phrase is played Memory card Playback To Phrase 00001 Start Interval between Phrases is settable When Phrase 00003 is designated as the first phrase to be played Start Phrase 00001 Phrase 00003 Phrase 32768 Phrase 00002 Phrase 00001 Phrase 00003 Phrase 32768 Phrase 00002...

Страница 71: ...sition If any one of the switches is set to the ON position broadcast by way of contact control or using the EV 700 Setting software cannot be made 1 2 3 4 5 6 7 8 Switch Function Indication on the Status display Ref page 1 Used to play all programs and also adjust whole sound volume PG VoL p 72 2 Used to play record or delete Emergency playback audio source EMEr p 52 3 Used to upload or download ...

Страница 72: ...2 Press the Start Stop key All program playback starts When playback of all programs has finished all program playback is repeatedly played from the initial program Step 3 To stop playback press the Start Stop key Playback stops Step 4 After All program playback stops return Switch 1 to the OFF position Tips Interval and busy work according to the programmed settings during All program playback Wh...

Страница 73: ...is pressed It decreases by 1 dB each time the Down key is pressed Tip Pressing and holding the Up or Down key allows you to quickly select the whole sound volume Step 3 When you finish work return Switch 1 to the OFF position Tip The whole sound volume set through this work does not affect the microphone input volume and the line input volume 18 3 Playing Recording or Deleting Emergency Playback A...

Страница 74: ...3 to the ON position Step 2 Press either the Up or Down key to select the SEtdL indication on the Status display Step 3 Press the Start Stop key Unit setting file is downloaded to the Memory card A The Memory card slot A access indicator flashes during download Step 4 When the Memory card slot A access indicator stops flashing return Switch 3 to the OFF position Uploading the unit setting file fro...

Страница 75: ...t the same location with the same file name on both the Cards A and B the files on the Card A are overwritten to those on the Card B Step 1 Insert a memory card for backup into the Memory card slot B Step 2 Set Switch 4 to the ON position The CFCPy indication appears on the Status display Step 3 Press the Start Stop key The files in the Memory card A are copied to the Memory card B Copy progress i...

Страница 76: ...ppears on the Status display Step 3 Press the Start Stop key The rEAdy indication appears on the Status display Step 4 Press the Start Stop key Firmware update begins Copy progress is shown in percentage on the Status display during updating PCt The uP End appears on the Status display when firmware update is complete Step 5 Return Switches 5 and 8 to the OFF position Step 6 Hold down the Reset sw...

Страница 77: ...t Only network setting ALL All settings recorded in the unit including the network setting Step 2 Press either the Up or Down key to select the target to initialize Step 3 Press the Start Stop key The rEAdy indication appears on the Status display Step 4 Press the Start Stop key Initialization begins When initialization is complete the done indication appears for about 3 seconds on the Status disp...

Страница 78: ... the Status display and start the self check The tEST indication disappears when self check is completed Tip The Err51 indication appears on the Status display when an error is detected in the history storage memory Step 3 Set Switches 7 and 8 to the OFF position Tip Self check can be executed through the front key operation during standby in Lock mode Self check will stop when playing recording o...

Страница 79: ... and Down keys simultaneously Firmware version appears on the Status display as long as the keys are held down Step 3 Release the keys Indication disappears Tip Even during operation of the unit the firmware version can be checked when the Lock mode indicator is lighting Status display Lock mode indicator 1 2 3 ...

Страница 80: ...EV 700 Setting software Tip Operation history is downloaded in 2 formats having the same data xml and csv The history file contents in either format can be confirmed using the EV 700 Setting software As for the csv format file its contents can be confirmed without using the EV 700 Setting software How to see history file in csv format Status display Lock mode indicator 3 1 2 4 1 2 3 4 5 No Item De...

Страница 81: ... takes precedence over Program priority level Emergency playback and R E M playback both having Priority level 1 are played with the highest priority When the priority levels are set as in the table below broadcasts operate as shown in the chart below Setting example Broadcast priority level Program priority level Microphone announcement Broadcast priority level 1 Normal broadcast Broadcast priori...

Страница 82: ...gn the same priority level The table below shows the factory default settings Type of broadcast Broadcast priority level Microphone broadcast 1 Normal broadcast 2 Line input broadcast 3 Operation by the factory default setting When there is a microphone input during normal broadcast Normal broadcast is interrupted and the microphone broadcast takes precedence The memory card audio sources continue...

Страница 83: ...ecifications Microphone input specifications 55 dB 0 dB 1 V 600 Ω unbalanced phone jack 1 Step 1 Connect a microphone to the front mounted microphone input jack Before connecting a microphone set the microphone switch to OFF and rotate the microphone input volume control fully counterclockwise For the method to make the microphone ON OFF setting read the instruction manual attached to the micropho...

Страница 84: ...ne input volume with the Line input volume control while watching the level meter Take care so that 3 LED of the level meter is not constantly lighting Step 3 Stop the external audio player Preparation for the Line input broadcast has been completed Step 4 Play the audio sources using the external audio player when needed Note Depending on the priority level setting the line input broadcast may be...

Страница 85: ...le sound volume have been set the total sound volume is determined in the range of 60 to 0 dB based on them and broadcast is made with this total sound volume If the sum of the program sound volume and the whole sound volume is between 60 and 0 dB such value is the total sound volume If the sum of the program sound volume and the whole sound volume is less than 60 dB 60 dB is the total sound volum...

Страница 86: ... 99 seconds in 1 second units For the setting procedures read the EV 700 Setting software instruction manual Tips The program playback busy signal is output even during delay time Delay time setting applies to all programs including the emergency playback and the R E M playback except the case that the playback system is set for Chime playback Delay time is factory preset to 2 seconds 25 CONTROL O...

Страница 87: ...gency audio source deletion 1 8 OFF Emergency playback busy The busy signal is output during emergency playback or during R E M playback broadcast 1 2 ON 3 8 OFF R E M busy The busy signal is output during R E M playback recording 1 8 OFF Maintenance busy The busy signal is output while the unit is in Maintenance mode 1 8 OFF See the EV 700 Setting software instruction manual for details 25 2 2 Op...

Страница 88: ...ode Use the EV 700 Setting software to perform the Quick stop function setting If you wish to stop playback instantly using the Start Stop key enable the Quick stop function For the setting procedures see the EV 700 Setting software instruction manual Tips This function is disabled by default When the Quick stop function is enabled you can stop playback by pressing the Start Stop key during emerge...

Страница 89: ...etting software instruction manual for details Note Even if an error occurs on the Memory card B during operation using the Memory card B the unit s operation will not automatically switch back to the operation using Memory card A After removing the cause of the error on the Memory card A be sure to switch to the operation by hand 28 1 Enabling the Backup function Step 1 Insert the memory card acc...

Страница 90: ...using the Memory card B Restart the unit When the backup function is activated if an error has occurred on the Memory card A If data reading on the Memory card A fails when playback start is triggered data is read immediately from the Memory card B allowing the playback to start Operation is maintained thereafter using the Memory card B If data reading on the Memory card A fails during playback da...

Страница 91: ...the rear panel then connect it again Tip Operation can also be switched to that handled by the Memory card A using the EV 700 Setting software See the EV 700 Setting software instruction manual Step 3 Confirm that the Memory card B in use indicator is unlit and the Backup indicator is lit 28 3 Returning the Operation Using the Memory card B to That Using the Memory card A ...

Страница 92: ...screws used for fixing the unit s case and use them to fix the MB 15B to the unit Attach over a dimple Rubber foot accessory EV 700 28 INSTALLATION 28 1 Mounting the Unit in an Equipment Rack When mounting the unit in an equipment rack use the optional MB 15B Rack mounting bracket 28 2 Installing the Unit on the Desk When installing the unit on the desk attach the supplied rubber feet to the unit ...

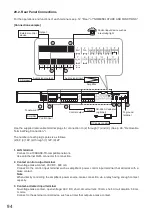
Страница 93: ...terminals the sound volume of the audio source of the Line input becomes larger compared to when the audio source is connected to the rear mounted Line input terminals only Stereo input signals if entered are converted into monaural signals after the left and right channel signals are internally mixed During recording microphone input signals and line input signals are not output from the Line out...

Страница 94: ...onnection The number of each plug s poles is as follows 2 8P 3 16P 4 through 7 12P 9 2P 1 LAN terminal Connect to a 100BASE TX compatible network Use an Ethernet RJ45 connector for connection 2 Contact control output terminal No voltage make contact 30 V DC 500 mA Connect to the control input terminal such as amplifier s power control input terminal that will work with a make contact Note When dir...

Страница 95: ...nnect to the amplifier s audio input terminal Figure below shows the connections 8 AC adapter input terminal Connect an optional AD 246 AC adapter to this terminal When connected secure the cable through the cable clamp as shown at right to prevent the AC adapter s plug from accidentally coming off from the input terminal Tip When applying power to this terminal and the DC power input terminal 9 s...

Страница 96: ...g tool CRIMPFOX 10S made by Phoenix Contact Insulation sleeve Contact section Insulation sleeve Contact section a l2 a 1 a2 l1 l2 l1 b b Cable sheath to trim Solid cable and stranded cable Shielded cable 7 mm 7 mm 20 mm 0 28 0 28 0 79 Expose 8 mm 0 31 or more when using the above ferrule terminal and cut off an extra conductor protruding from the sleeve Wiring procedures Step 1 Wiring the supplied...

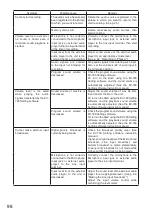
Страница 97: ...n when playback is started Line output terminals are not correctly connected Connect the line output terminals correctly Whole sound volume or program sound volume is set too low Adjust the whole volume or program sound volume for an appropriate volume level Output destinations are not correctly set Check the Program setting s output destinations See the EV 700 Setting software instruction manual ...

Страница 98: ...uction manual Volume level is too small when playing the audio signals transferred by the EV 700 Setting software Sound volume of wav file is decreased Adjust the sound volume of wav file first then transfer the file to the unit Or turn on the AGC using the EV 700 Setting software and the playback sound volume is automatically adjusted See the EV 700 Setting software instruction manual Program sou...

Страница 99: ...rrectly connected The LINK ACT indicator lights or flashes when the cable is correctly connected In the case of communication via the network check if cables connected to the switching hub are appropriate ones and they are connected to the correct port See p 94 FTP communication is interrupted Check firewall setting To connect the EV 700 online FTP communication must be executed Consult your netwo...

Страница 100: ...card B is not inserted Insert a memory card into the slot B Err12 Insufficient free space on the memory card Check the memory card then erase the unnecessary files Err13 Memory card is not formatted initialized with FAT16 Reformat the memory card The memory card format is FAT16 Err14 Device setting file does not exist on the Memory card A or failed to open the device setting file Check if the devi...

Страница 101: ...he memory card error with the PC If the error still remains it may be eliminated by reformatting the memory card But note that all saved data is erased once the card is reformatted Err28 Error occurred in deletion process Memory card error may occur Check the memory card error with the PC If the error still remains it may be eliminated by reformatting the memory card But note that all saved data i...

Страница 102: ...nding to the received command Other command except the Command control start command and the Command control end command is received before receiving the Command control start command Err51 History storage memory error is detected The unit s failure may occur Consult the TOA dealer where the unit was purchased Err53 RTC is reset The unit s clock is reset Reset the clock with the EV 700 Setting sof...

Страница 103: ...cording check Count down During recording 5 5 Input level of the Microphone input or Line input Monitor playback Output level of memory card audio sources Deletion Standby No indication Deletion check During deletion No indication Monitor playback Output level of memory card audio sources Emergency Emergency playback Output level of memory card audio sources R E M playback during recording 5 5 Inp...

Страница 104: ...mal 35 C02_westminster_fast wav Westminster chime fast 27 C03_westminster_slow wav Westminster chime slow 43 C04_4note_up wav Ascending 4 tone chime 5 P008 C05_4note_down wav Descending 4 tone chime 5 P002 C06_first_bell wav First bell 15 C07_2note wav 2 tone chime 4 P001 C08_gong wav Gong 4 P003 C09_4note_up_nx wav Ascending 4 tone chime normal 4 C10_4note_up_slow_nx wav Ascending 4 tone chime sl...

Страница 105: ...t 32 kHz sampling rate Audio Output Method Single channel monaural Number of Playback Program Direct mode 16 programs Binary mode 256 programs 1 emergency message takes precedence over the above programs and is played back R E M Recording Endless Message playback 2 can be performed Control Input Activations 1 16 playback stop recording delete clear emergency playback emergency recording emergency ...

Страница 106: ... 20537 Hamburg Germany URL https www toa jp 133 02 00223 03 Accessories Memory card 1 GB Containing prerecorded audio files 1 Removable terminal plug 2 pins 1 Removable terminal plug 8 pins 2 Removable terminal plug 16 pins 2 Removable terminal plug 12 pins 2 Rubber foot 4 Machine screw M3 x 12 for fixing the front cover 2 Optional products AC adapter AD 246 Rack mounting bracket MB 15B ...

Отзывы: