4
Connecting your Router
Connecting to the Internet
2)
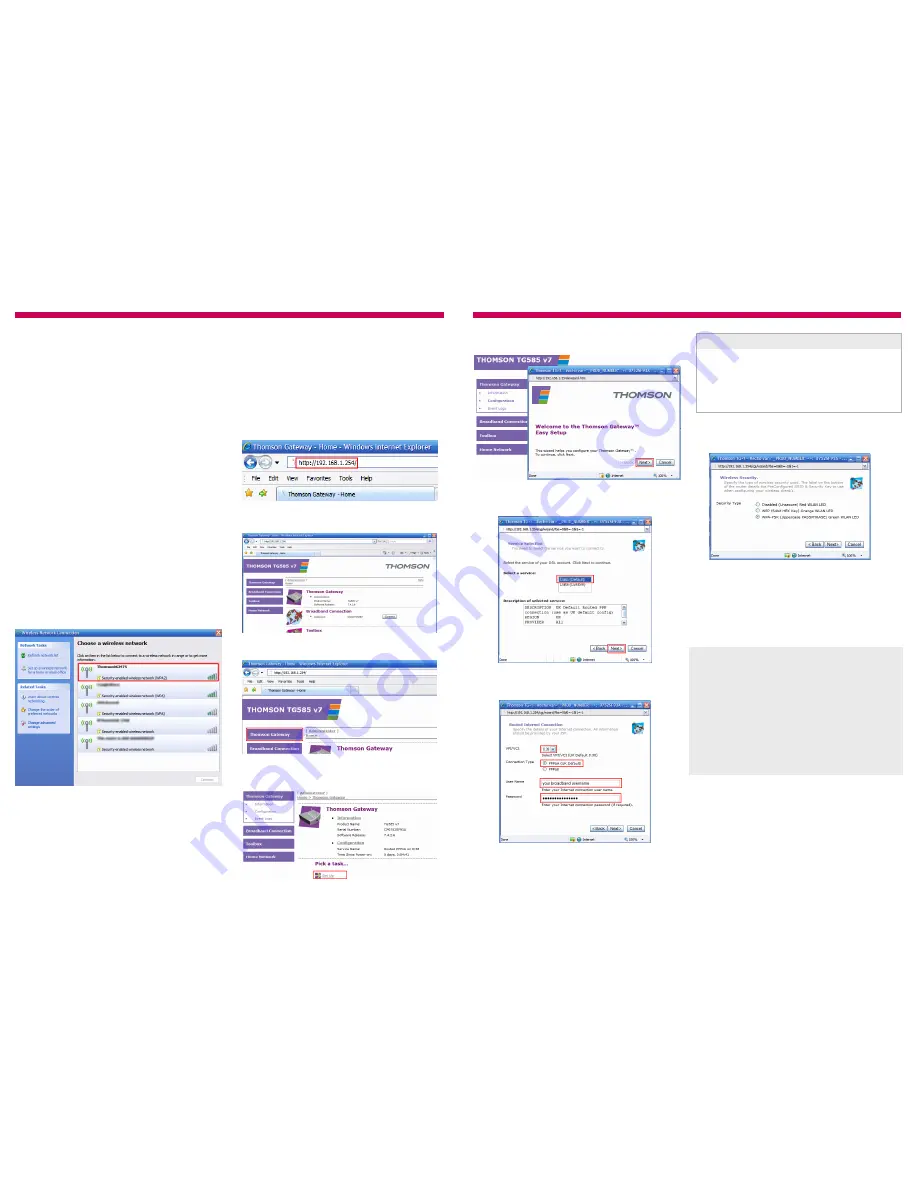
The router setup screen will appear.
3)
Click
Thomson Gateway
on the menu.
4)
Next, Click
Set Up
from the ‘Pick a task…’ list.
4)
A window will open, asking you to type in the
network security key or pass phrase.
Enter the
WPA-PSK key
shown on the bottom of
the router and click
Connect
.
Click Connect and move onto the next section.
With Wireless networking
Follow these steps to connect using wireless. Your
computer will need to be equipped with a wireless
adapter.
1)
Make sure your computer’s wireless adapter
card is installed and working OK.
2)
Use your wireless adapter’s connection utility,
or, if you are using Windows, click the Start Button,
go to
My Network Places,
and click
Connect to a
network
.
3)
Your network will show up as the
SSID
listed on
the bottom of the router. Click on your network so
it’s highlighted and click
Connect
.
With an Ethernet cable
Follow these steps to use the network cable to
connect the router to your computer. Go to the
next part entitled
‘With Wireless’
If you want to
use your computers wireless features instead.
1)
Plug the Ethernet cable into any of the 4
available Ethernet ports on the router.
2)
Plug the other end of the Ethernet cable into
your computer’s Ethernet port.
An Ethernet status light on the front of the router
will now light up.
3)
Jump to the section called
Connecting to the
Internet
.
Item code: 046918
1)
Open up a web browser and you’ll see the router
welcome page. Click on
Set up my Thomson
Gateway
and move to
step 5
(see top of page 3)
of this setup guide.
If you are not redirected or you see a page cannot
be displayed error type
http://192.168.1.254
into
your browser’s address line and click return.
5
Enter your
Broadband Username
and
Password
in the final two boxes and click
Next
. Your user-
name will look like this:
(see the box at the top of
the next column)
8)
Now choose the level of wireless security you
wish to use. Leave this as
WPA-PSK
, as it’s the
most secure method. Click
Next
.
Item code: 046918
5)
The
Easy Setup
wizard will open in a new
browser window. Click on
Next
.
6)
Make sure that
Data (Default)
is selected in
the top box, then click
Next
.
7)
On the Router Internet Connection screen,
make sure that VPI/VCI is set to
0.38
and that
Connection Type is set to
PPPoA (UK Default).
Service
Broadband username format
Plusnet
Madasafish
Force9
Free-Online
9)
Next choose a username and password, this is to
stop unauthorised access to your router settings.
You should change these to something that’s easy to
remember as you’ll need to enter them every time
you want to check or change your router settings.
When you’ve made your choice click
Next
.
10)
Finally you’ll see a summary page, make sure
everything is correct and press
Start
. The router will
restart, and ask you for login details.
These are the details you chose in step 9.
Enter these and press
OK
. When the wizard finishes
you’ll see a confirmation screen, click
Finish
.
That’s it! You’re now connected to broadband—happy
surfing!
If you don’t change the username in step 9, it’ll be
set to:
Administrator (
note the uppercase A
)
.
The password will be the
serial number of your
router.
You’ll find the serial number on the bottom
of the router, it looks like this:
CP123456789 (12)
Ignore the part in brackets, the part you need is:
CP123456789 -
note the uppercase CP
.
Содержание TG585 V7
Страница 2: ......


