background image

Chapter 8

Support

E-DOC-CTC-20041126-0014 v3.0

99

8.2 UPnP™ on Windows XP Systems

Adding UPnP™

If you are running Microsoft Windows XP, it is recommended to add the UPnP™ 
component to your system.

Proceed as follows:

1

On the 

Start

 menu, click 

Control Panel

.

2

The 

Control Panel

 window appears. Click 

Add or Remove Programs

.

3

The 

Add or Remove Programs

 window appears. Click 

Add/Remove Windows 

Components

.

4

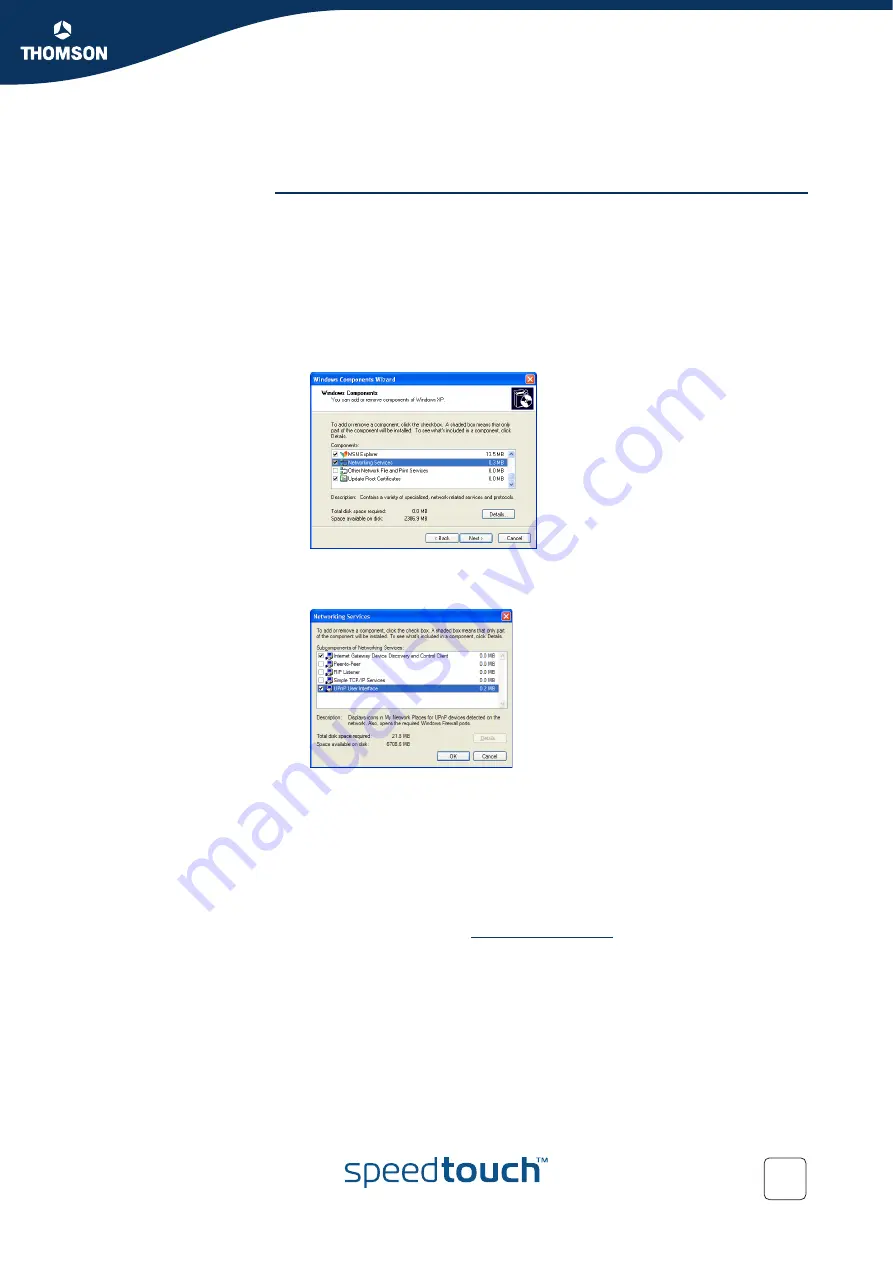
The 

Windows Components Wizard

 appears:

Select 

Networking Services in the Components

 list and click 

Details

.

5

The 

Networking Services

 window appears: 

Select 

Universal Plug and Play

 and click 

OK

.

6

Click 

Next

 to start the installation and follow the instructions in the 

Windows 

Components Wizard

.

7

At the end of the procedure, the wizard prompts you that the installation was 
successful. Click 

Finish

 to quit.

For more information on UPnP™ and SpeedTouch™ UPnP™ features browse the 
UPnP™ pages at the SpeedTouch™ web site:

www.speedtouch.com

Содержание SpeedTouch 716

Страница 1: ...SpeedTouch 716g only SpeedTouch 716 716g Broadband Voice IAD User s Guide Release R1 0 ...

Страница 2: ......

Страница 3: ...SpeedTouch 716 716g User s Guide R1 0 ...

Страница 4: ...ountries UNIX is a registered trademark of UNIX System Laboratories Incorporated Apple and Mac OS are registered trademarks of Apple Computer Incorporated registered in the United States and other countries Adobe the Adobe logo Acrobat and Acrobat Reader are trademarks or registered trademarks of Adobe Systems Incorpo rated registered in the United States and or other countries Netscape and Netsca...

Страница 5: ...p 16 2 2 USB Connection Setup 17 2 3 Wireless Connection Setup 19 2 3 1 First time Wireless Client Association 21 2 3 2 Connecting Additional Wireless Clients 23 2 4 Securing your Wireless Network 24 2 4 1 Encryption 25 2 4 2 WEP 26 2 4 3 WPA 27 2 4 4 WPA PSK 29 2 4 5 802 1x 31 2 4 6 Restricting Wireless Access 33 2 4 7 Hiding your Wireless Network 34 2 5 Extending the Range of your Wireless Netwo...

Страница 6: ...the SpeedTouch Web Pages 44 5 2 Navigating the SpeedTouch Web Pages 46 5 3 Quick Start 47 5 4 Status 52 5 5 Advanced 55 5 5 1 Local Network 56 5 5 2 Internet 58 5 5 3 IP Routing 59 5 5 4 DNS Server 60 5 5 5 Virtual Server 61 5 5 6 Firewall 63 5 5 7 Quality of Service 64 5 5 8 IGMP Proxy 65 5 6 Wireless 66 5 6 1 Basic 67 5 6 2 Security 68 5 6 3 Access Control 69 5 6 4 Repeater 70 5 7 Voice 71 5 8 D...

Страница 7: ...CP Web Pages 86 6 3 VoIP Call Features 87 6 3 1 Call Transferring 88 6 3 2 Call Waiting 89 6 3 3 3 ways Conference Calls 90 7 Advanced Configuration 91 7 1 Setting up a Virtual Server 92 7 2 SNMP 94 8 Support 97 8 1 Updating your Firmware 98 8 2 UPnP on Windows XP Systems 99 8 3 Reset to Defaults 102 8 4 Troubleshooting 103 8 4 1 Diagnostics Tests 104 8 4 2 Problems with LAN 105 8 4 3 Upgrading Pr...

Страница 8: ...Contents E DOC CTC 20041126 0014 v3 0 6 ...

Страница 9: ... THOMSON continuously develops new solutions but is also committed to improve its existing products For more information on THOMSON s latest technological innovations documents and software releases visit us at www speedtouch com A note provides additional information about a topic A tip provides an alternative method or shortcut to perform an action A caution warns you about potential problems or...

Страница 10: ...About this User s Guide E DOC CTC 20041126 0014 v3 0 8 ...

Страница 11: ...16g support ADSL2 RE ADSL ADSL2 and are backward compatible with ADSL Wireless functionality If you purchased a SpeedTouch 716g the SpeedTouch also includes a 54 Megabits per second Mbps wireless 802 11g interface to offer seamless connection of wired and wireless worlds from anywhere in the home VoIP functionality The SpeedTouch is equipped with two Voice over IP VoIP ports allowing high quality ...

Страница 12: ...ld contain SpeedTouch 716 716g Colour coded cables Yellow Ethernet cable RJ 45 Blue USB cable Grey DSL cable RJ 11 Power adapter 18V AC SpeedTouch Setup CD Safety Instructions Regulatory Information booklet Quick Installation Guide DSL filter s optional SpeedTouch wireless networking product s optional In case items are missing or damaged please contact your local distributor Front panel layout Th...

Страница 13: ...Power off or DSL line synchronising PPP Green On At least one PPPoA or PPPoE connection is up Users can access the Internet now Off No PPPoA or PPPoE connection Ethernet 1 4 Green Flashing Ethernet activity On Ethernet connection no activity Off No Ethernet connection USB Green Flashing USB activity On USB connection no activity Off Power off or wait for USB connection going up Phone 1 2 Green On ...

Страница 14: ...nks in the horizontal plane are favoured Please note that the antenna characteristics are influenced by the environment for example by reflections of the radio signal against walls or ceilings It is advised to use the received signal strength as indicated by the wireless client manager to optimise the antenna position for the link to a given client A Antenna SpeedTouch 716g only F USB port marked ...

Страница 15: ...agnostics Stand by mode RE ADSL Reach Extended ADSL RE ADSL ITU G 992 L is an extension to ADSL2 that allows to significantly extend the reach of throughput capabilities ADSL2 ADSL2 ITU G 992 5 is an extension to the ADSL2 standard that goes even further in offering optimal broadbanding it nearly doubles the maximum ADSL downstream data rates to up to 24 Mbps Connect the DSL line The grey DSL port...

Страница 16: ...utton on the back panel to switch on the SpeedTouch The SpeedTouch is ready for service as soon as the Power LED on the front panel is solid green If this LED does not light up see 8 4 Troubleshooting on page 103 Connect your computer s To connect your computer s with the SpeedTouch proceed with 2 SpeedTouch Local Networking Setup on page 15 ...

Страница 17: ...mation The SpeedTouch local network By introducing the SpeedTouch into your local network local hosts using one of the solutions above are able to share a local network that is One computer over USB Multiple computers over wired Ethernet In case you purchased a SpeedTouch 716g multiple wireless clients over wireless networking You must install the USB drivers if you want to connect your computer t...

Страница 18: ...ing procedure Use the yellow cable to connect the SpeedTouch to your computer or hub in case you want to extend your network Verifying Ethernet connectivity If the Ethernet LED of the corresponding port is solid green or flashing you are successfully connected to the SpeedTouch Ethernet network Internet connection setup To prepare the SpeedTouch for accessing the internet continue with 3 Configura...

Страница 19: ...g systems Microsoft Windows XP Microsoft Windows 2000 Microsoft Windows Milennium Procedure Proceed as follows 1 Connect the SpeedTouch to your computer using the blue USB cable provided 2 Connect the other end of the USB cable to one of the USB port s on your computer 3 Windows detects the presence of the new Thomson USB Remote NDIS device 4 If the Found New Hardware Wizard asks your authorisatio...

Страница 20: ...New Hardware Wizard installs the necessary divers on your computer 7 Click Finish to conclude the installation Verifying USB connectivity If the USB LED is solid green or flashing you are successfully connected to the SpeedTouch USB interface Internet connection setup To prepare the SpeedTouch for accessing the internet continue with 3 Configuration on page 37 ...

Страница 21: ...o located The SpeedTouch 716g supports multiple radio channels and is able to select the best radio channel at each start up The SpeedTouch 716g supports all channels allowed for wireless networking according to your region s regulations However depending on local regulations the number of channels actually allowed to be used may be additionally restricted As shown in table below Be aware that onl...

Страница 22: ...ge 37 for more information 3 Secure your wireless network See 2 4 Securing your Wireless Network on page 24 4 Associate the additional wireless clients in your network See 2 3 2 Connecting Additional Wireless Clients on page 23 Extending your wireless network The SpeedTouch 716g features Wireless Distribution System WDS functionality This feature allows you to extend the range of your wireless net...

Страница 23: ...16g wireless access point See below First time wireless client configuration To be able to connect to the SpeedTouch wireless network your wireless client must be correctly configured for the default network name As the SpeedTouch 716g broadcasts its network name to the wireless clients you can select the SpeedTouch 716g wireless network for example SpeedTouch012345 from a list of available networ...

Страница 24: ...tification area 2 The Wireless Network Connection window appears In the Choose a wireless network list select the SpeedTouch 716g wireless network and click Connect 3 Following window appears Click Connect Anyway 4 Your computer is now connected to the SpeedTouch 716g wireless network Other Operating Systems usually use a dedicated client manager to configure you wireless settings For more informa...

Страница 25: ...e SpeedTouch 716g SpeedTouch 716g configuration If the SpeedTouch Access Control List ACL is On in Deny mode some additional configuration is needed 1 Open the SpeedTouch web pages on a computer that is listed in the ACL or that is connected using wired Ethernet USB 2 Browse to Wireless Access Control 3 The Access Control page appears Click View Access Control List 4 The Wireless Action Control Li...

Страница 26: ...you to Encrypt the data sent over your wireless network See 2 4 1 Encryption for more information Restrict the access to the SpeedTouch 716g wireless network See 2 4 6 Restricting Wireless Access for more information Hide your Network Name SSID from other users See 2 4 7 Hiding your Wireless Network for more information If you choose not to secure your wireless network be aware that all clients wi...

Страница 27: ...041126 0014 v3 0 25 2 4 1 Encryption Methods The SpeedTouch offers you following encryption methods Disabled WEP WPA WPA PSK 802 1x Before configuring the SpeedTouch encryption make sure you know which encryption methods are supported by your wireless client ...

Страница 28: ...lds appear Authentication Type The SpeedTouch 716g supports two authentication types Open System All wireless clients are able to authenticate The WEP key is only used to encrypt decrypt data Shared Key Only wireless clients using a correct SSID and WEP key are able to authenticate The WEP key is used to authenticate and to encrypt decrypt data Format This section allows you to choose between Hexa...

Страница 29: ...rt described in RFC2138 Earlier RADIUS clients use port 1945 RADIUS Shared Secret A share secret is like a password which is used between Internet Authentication Service IAS and the specific RADIUS client to verify identity Both IAS and the RADIUS client must be use the same shared secret for successful communication to occur Enter the words for the share secret Data Encryption WPA Select the data...

Страница 30: ...edTouch Local Networking Setup E DOC CTC 20041126 0014 v3 0 28 Wireless client configuration Configure your wireless clients with the same settings For more information see your wireless client s user documentation ...

Страница 31: ...ecurity 3 In the Wi Fi Protected Access list click WPA PSK 4 Following fields appear Format Choose the typing method of encryption key You have to click either Hexadecimal digits or ASCII characters and type the keys on the field of Pre Share Key Pre Share Key Please type the key to be between 8 and 63 characters or 64 hexadecimal digits Only the devices with a matching key that you set here can j...

Страница 32: ...dTouch Local Networking Setup E DOC CTC 20041126 0014 v3 0 30 Wireless client s configuration Configure your wireless client s with the same settings For more information see your wireless client s user documentation ...

Страница 33: ...DHCP server for the router is used and 802 1x must be enabled 802 1x client A WLAN card supporting WEP Configuring 802 1x on the SpeedTouch Proceed as follows 1 Open the SpeedTouch web pages 2 Browse to Wireless Security 3 In the Wi Fi Protected Access list click 802 1x 4 Following fields appear RADIUS Server IP Address The IP Address of the RADIUS Server RADIUS UDP Port Except for the IP address ...

Страница 34: ...tworking Setup E DOC CTC 20041126 0014 v3 0 32 Wireless client s configuration Configure your wireless client s with the new authentication and encryption settings For more information see your wireless client s user documentation ...

Страница 35: ...eedTouch 716g WLAN Adding a new ACL entry To add a new MAC address to your wireless MAC address filters 1 Open the SpeedTouch web pages 2 Browse to Wireless Access Control 3 Click View Access Control List 4 The Wireless Access Control List page appears Click Add 5 Enter the MAC Address of the wireless device you want to allow in the MAC address of wireless adaptor field Click Apply 6 The SpeedTouc...

Страница 36: ...eedTouch 716g SSID broadcast By default the SpeedTouch 716g broadcasts it s SSID allowing you to easily recognise your wireless network in the list of available wireless networks Once you have configured your wireless clients it is recommended to disable this feature Disabling SSID broadcast Proceed as follows 1 Open the SpeedTouch web pages and browse to Wireless Basic Settings 2 Select Hide Wire...

Страница 37: ...he same WEP key if WEP is enabled The same fixed channel The SpeedTouch 716g allows you to configure up to four WDS links Repeaters extend the coverage area of your wireless LAN however bear in mind that throughput is reduced for wireless clients that are connected through the repeater SpeedTouch 180 SpeedTouch 716 WDS Link DSL PPP WLAN Ethernet VoIPReady Phone USB PWR 1 4 3 2 Internet WPA encrypt...

Страница 38: ... wireless networks 5 The SpeedTouch 716g lists the available networks in following table 6 Select your wireless repeater from the list and click Apply Wireless repeater configuration Configure the WDS link with the SpeedTouch on your wireless repeater As an example the picture below shows the repeater settings of a SpeedTouch 180 For more information see 5 1 Accessing the SpeedTouch Web Pages on p...

Страница 39: ... capable and allows to run Javascripts Configuration procedure Proceed as follows 1 Start the web browser on your computer 2 Browse to the SpeedTouch web pages at http 192 168 1 254 3 The SpeedTouch prompts you to enter user name and password Type admin in both fields and click OK 4 Your browser connects to the SpeedTouch web pages 5 On the top menu click Quick Start 6 On the left menu click Quick...

Страница 40: ...Chapter 3 Configuration E DOC CTC 20041126 0014 v3 0 38 ...

Страница 41: ... access is provided Dial in access The SpeedTouch supports both most popular connection methods PPP over ATM PPPoA and PPP over Ethernet PPPoE The connection method depends on the service profile you selected to configure the SpeedTouch and should correspond with the service Provider s requirements Routed PPPoA the SpeedTouch needs to be configured for the Routed PPPoA Service Routed PPPoE the Spe...

Страница 42: ...ndows XP Systems on page 99 If your computer runs Windows XP Service Pack 2 SP2 and you are using the Windows Firewall make sure the Windows Firewall allows incoming network connections for the UPnP service see Windows firewall configuration on page 100 Make sure UPnP is enabled on the SpeedTouch see The UPnP page on page 57 Starting an Internet session Proceed as follows 1 Click Settings Control ...

Страница 43: ...an Internet session Proceed as follows 1 Click Settings Control Panel on the Start menu 2 The Control Panel window appears Go to Network and Internet Connections Network Connections 3 The Network Connections window appears 4 Right click the Internet Connection icon and select Disconnect to close the session As a result SpeedTouch s embedded PPP dial in client will close the Internet connection The...

Страница 44: ...SpeedTouch s embedded PPP dial in client establishes the Internet connection You can open another web browser or continue with this one and surf the Internet During the Internet session You are able to overview and monitor your Internet connectivity as long as the session is running via the SpeedTouch Status pages See 5 4 Status on page 52 Terminating an Internet session To close an active Routed ...

Страница 45: ...oduction The SpeedTouch comes with integrated configuration web pages It allows you to configure your SpeedTouch simply by using a web browser from any local computer connected to the SpeedTouch This chapter aims to give a brief overview of the SpeedTouch web pages and their respective functionality ...

Страница 46: ... default http 192 168 1 254 3 Type your SpeedTouch s User name default admin and Password default admin and click OK to access the SpeedTouch web pages Using UPnP If your computer is UPnP enabled you can access the SpeedTouch web pages as follows 1 Click Settings Control Panel on the Start menu to open the Control Panel 2 Go to Network and Internet Connections My Network Places 3 The following win...

Страница 47: ...b Interface E DOC CTC 20041126 0014 v3 0 45 4 Type User name default admin and password default admin and click OK to access the SpeedTouch web pages The SpeedTouch start page As a result the Connect to Internet page appears ...

Страница 48: ...rable aspects of the SpeedTouch The SpeedTouch web pages are grouped into following categories Quick Start Status Advanced Wireless Voice Diagnostics Management Applying new settings In some cases it is required to reboot your SpeedTouch to apply your changes If this is the case a message will be shown in the bottom left corner This link is only available if you purchased a SpeedTouch 716g ...

Страница 49: ...ou to establish dial in connections if applicable For more information see 4 2 Using the SpeedTouch Web Pages on page 42 The Quick Setup page The Quick Setup wizard guides you through the configuration of your Internet connection During the configuration procedure following windows will appear ATM PVC Connection type WAN IP settings PPP user name and password Configure LAN side settings Summary Th...

Страница 50: ...in an ATM network The valid range is from 32 to 65535 Enter the values provided by your ISP and click Next Connection type The Connection Type page allows you to select your connection type To configure your connection type 1 In the Protocol dialog box select the protocol provided by your ISP for example PPPoE 2 In the Encapsulation list click the Encapsulation type provided by your ISP for exampl...

Страница 51: ... QoS The MTU box allows you to change the Maximum Transmission Unit MTU PPP user name and password If you are configuring a PPPoE or PPPoA connection following window will appear Following fields are available PPP User Name Type the user name provided by your ISP PPP Password Type the password provided by your ISP Always On Click this option to make sure the connection is always active Dial on Dem...

Страница 52: ...llowing fields are available Primary IP Address Enter the first IP address for your LAN connection Subnet Mask Enter the subnet mask for your LAN connection Configure the secondary IP Address and Subnet Mask Select this check box to make another set of IP Address and Subnet Mask to connect to your router if they are not included in the range that DHCP server accepts Secondary IP Address Enter the ...

Страница 53: ...es used by your DHCP server Leased Time default 1 day Enter the time for which you want to assign the IP address DHCP Server Off Click this option if DHCP service is not needed on the LAN Enter all the necessary settings and click Next for next page Summary At the end of the configuration procedure the Quick Setup wizard summarizes your settings If you want to Make changes to the listed configurat...

Страница 54: ...e Internet Connection page The Traffic Statistics page The DHCP Table page The Wireless Clients page The Routing Table page The ARP Table page The Overview page The Overview page allows you to view the current status of the DSL connection The ADSL Line Status page The ADSL Line Status page allows you to View all information on ADSL Click More Information to view more detailed statistics ...

Страница 55: ...me in seconds in the Tested Time list 2 Click Start 3 The SpeedTouch runs the ADSL BER test 4 At the end of the test the results are listed in following window 5 Click Close to close this window The Internet Connection page This page allows you to view the connection information of your SpeedTouch The Traffic Statistics page This page allows you to view the records of data going through the LAN an...

Страница 56: ...s Clients page This page lists the wireless clients currently associated to the SpeedTouch Access Point The Routing Table page This page shows the static routes used by the SpeedTouch IP router The ARP Table page This page shows the Address Resolution Protocol ARP table used by the SpeedTouch to translate the IP address of a host connected to the SpeedTouch into a physical addresses ...

Страница 57: ... Interface E DOC CTC 20041126 0014 v3 0 55 5 5 Advanced The Advanced menu The Advanced menu consists of the following submenus Local Network Internet IP Routing DNS Server Virtual Server Firewall Quality of Service IGMP Proxy ...

Страница 58: ...This page allows you to configure The LAN IP address of the SpeedTouch Change the Maximum Transmission Unit MTU A static DNS hostname for the SpeedTouch Providing a static DNS hostname for the SpeedTouch allows you to address the SpeedTouch not only by IP address but also by name for example ST716 lan You can assign a second IP address to the SpeedTouch by selecting the Configure secondary IP addr...

Страница 59: ...ilable on another network Server and Relay Off to disable the SpeedTouch DHCP server The UPnP page The UPnP page allows you to enable disable UPnP If you select the Enable UPnP check box all local hosts will be able to detect the SpeedTouch Any local host will be able to create port mappings for any local device Click Reserved IP Address List to assign a static IP address to a computer on your LAN...

Страница 60: ...ttings page The Connection page The Internet Connection Configuration page allows you to view change the WAN settings for each service If you click the Connect link of the connection the SpeedTouch will connect to the WAN automatically To reconfigure a connection click The ADSL Settings page This page allows you to view change the ADSL settings This feature is for advanced users only ...

Страница 61: ...rmation Protocol RIP is used to exchange routing information between routers This helps the routers to determine optimal routes The Dynamic Routing page allows you to enable disable RIP on the SpeedTouch interfaces Following fields are available Version It incorporates the RIP information when receiving and broadcasting the RIP packets Operation Active to transmit and receive routing information f...

Страница 62: ...lows you to configure your DNS settings If Enable Automatic Assigned DNS check box is Selected The SpeedTouch will accept the first received DNS assignment from one of the PPPoA PPPoE or MER DHCP enabled PVC s when establishing the connection Cleared You must provide A Primary DNS Server IP address A Secondary DNS server IP address optional ...

Страница 63: ...hen the SpeedTouch detects outbound traffic on a port listed in the Port Triggering table a trigger port it automatically creates the necessary port forwarding rules to allow inbound traffic for this connection The Port Triggering page The Port Triggering page allows you to add delete port triggering rules For more information on port forwarding and virtual servers see 7 1 Setting up a Virtual Ser...

Страница 64: ...Zone DMZ host All incoming connections that do not match any static or dynamic port forwarding rule will be forwarded to this DMZ Host Dynamic DNS This page allows Internet users to access your virtual servers using a domain name instead of an IP address If you specify a DMZ host make sure that this host is using a static IP address ...

Страница 65: ...fic to travel into and out of an organization s network Most often firewalls are placed at the network boundary to protect an organization from malicious users on the Internet Firewall rules The SpeedTouch firewall can Deny or permit any packet from passing through explicitly Distinguish between various interfaces and match on the following fields Source and destination IP address Port The IP Filt...

Страница 66: ...e section consists of following pages The Bridge QoS page The IP QoS page The Bridge QoS page The Bridge QoS page allows you to classify the upstream traffic to the Internet by assigning the transmission priority for various user data The Bridge QoS function prioritizes the data transmission based on layer 2 bridge packets The IP QoS page The IP QoS page allows you to classify the upstream traffic...

Страница 67: ...he host portion of the IGMP task as follows When it is queried the system will send group membership reports to the group When one of the hosts joins a multicast address group to which none of the other hosts belong the system will send unsolicited group membership reports to that group When the last hosts in a particular multicast group leaves the group the system will send a leave group membersh...

Страница 68: ...lity Wireless basics For more information on wireless networking basics see 2 3 Wireless Connection Setup on page 19 Navigation Following menu items are available on the Wireless menu Basic Security Access Control Repeater This menu item is only available if you purchased a SpeedTouch 716g ...

Страница 69: ...ansmission Mode Following modes are available 802 11b only 802 11g only Mixed Mode Click this mode to allow both IEEE802 11b and IEEE802 11g clients Transmission Rate This list allows you to configure the transmission rate of your wireless connection Turbo Mode Check Enabled to invoke this function for speeding up the transmission or check Disabled to close this function For more information see 2...

Страница 70: ...ace E DOC CTC 20041126 0014 v3 0 68 5 6 2 Security The Security page The security page allows you to choose an encryption method for data sent over the SpeedTouch wireless network For more information see 2 4 1 Encryption on page 25 ...

Страница 71: ...OC CTC 20041126 0014 v3 0 69 5 6 3 Access Control The Access Control page The Wireless MAC Access Control page allows you to enable the wireless MAC control configuration For more information see 2 4 6 Restricting Wireless Access on page 33 ...

Страница 72: ...eless Distribution System WDS allows you to extend the range of your SpeedTouch 716g by means of one or more wireless repeaters The Repeater page The Repeater page allows you to configure a WDS link with other Access Points For more information see 2 5 Extending the Range of your Wireless Network on page 35 ...

Страница 73: ...uch variant you purchased one of the following protocols are used for Voice over IP VoIP Session Initiation Protocol SIP For more information on the SIP web pages see 6 1 2 SIP Web Pages on page 81 Media Gateway Control Protocol MGCP For more information on the MGCP web pages see 6 2 2 MGCP Web Pages on page 86 ...

Страница 74: ...Touch Web Interface E DOC CTC 20041126 0014 v3 0 72 5 8 Diagnostics The Diagnostics page The Diagnostics page allows you to check the SpeedTouch connections For more information see 8 4 1 Diagnostics Tests on page 104 ...

Страница 75: ... to Configure Remote Access methods Following access methods are supported Web Browser Telnet SNMP Secure Shell SSH FTP TFTP Ping It is highly recommended to configure a system password to protect the SpeedTouch Make sure however not to use an obvious password such as your name date of birth and so on The default value for the User name and password is admin If you choose this selection all Intern...

Страница 76: ... Click Authorized Host IP Address List to configure which users are allowed to use remote access the SpeedTouch Internet Time This page allows you to adjust the time used in the syslog and call log pages You are able to set the time Manually By means of a time server ...

Страница 77: ...will be logged All the items above the selected item will be logged Display Level Allows you to specify which logs will be shown if you click View System Log All the items above the selected item will be displayed in the list Mode Allows you to send the log files to a dedicated server SNMP Setting This page allows you to configure the SNMP settings If your SpeedTouch is in its default configuratio...

Страница 78: ...figuration Upload and apply a SpeedTouch backup configuration file Update Firmware The Update Firmware page allows you to update your firmware Reset Router The Reset Router page allows you to reboot reset your SpeedTouch For more information see 8 1 Updating your Firmware on page 98 For more information see 8 3 Reset to Defaults on page 102 ...

Страница 79: ...over the Internet can be used to send packets between two or more parties without reserving the connection Furthermore based on a powerful signalling protocol such as SIP protocol Voice over IP VoIP communications allow other Internet applications as Web e mail chat presence and instant messaging to be blended with voice to provide entirely new classes of services and features not available with c...

Страница 80: ...ng Call Hold Call Transfer for IP telephony SIP proxy server The SIP network servers are network devices that handle the signalling associated with multiple sessions In a proxy model a SIP proxy server forwards signalling messages between the called and calling parties it is the only point of contact that the clients have for signalling messages After the session has been established the RTP audio...

Страница 81: ...ed On your local network click Primary LAN On the WAN click the interface name of your WAN connection 5 Under SIP Registrar Address enter the IP address or domain name of your SIP registrar server 6 Under SIP Outbound Proxy enter the IP address or domain name of your SIP proxy server 7 Under Registration Information enter the registration information provided by your SIP registrar 8 Click Apply 9 ...

Страница 82: ...onfiguration Proceed as follows 1 On the left menu click PSTN Control 2 In the Select Tone Ring Signals for list click your region 3 In the Prefix digits to dial PSTN phone call box type the prefix you want to dial to make phone calls using the PSTN 4 Click Apply ...

Страница 83: ...u SIP Basic SIP Extension Audio Codec PSTN Control Call Log SIP Basic The SIP Basic Settings page allows you to configure your connection to the SIP servers SIP Extension The SIP Extension page allows you to configure advanced SIP settings Audio Codec The Audio Codec Configuration page allows you to select the audio codec of your choice ...

Страница 84: ...age allows you to configure The tone ring signals specific to your country The prefix digits for PSTN calls If you dial this prefix default the SpeedTouch will use the PSTN network to call the number following the prefix Call Log The SpeedTouch logs all VoIP activity on the Call Log page ...

Страница 85: ...for handling the signalling and session management needed during a multimedia conference MGCP can be used to Set up Maintain Terminate calls between multiple endpoints Components The Media Gateway Control Protocol MGCP is an IETF defined protocol for controlling Media Gateways MGs from external call elements called Media Gateway Controllers MGCs or Call Agents ...

Страница 86: ...figuration Proceed as follows 1 Open the SpeedTouch web pages 2 Browse to Voice MGCP 3 The MGCP configuration page appears 4 If the Call Agent is located On your local network click LAN On the WAN click the interface name of your WAN connection 5 Enter the Device Name and Call Agent IP Address 6 Click Apply 7 If you are Not using the PSTN port no additional configuration is needed Using the PSTN p...

Страница 87: ...onfiguration Proceed as follows 1 On the left menu click PSTN Control 2 In the Select Tone Ring Signals for list click your region 3 In the Prefix digits to dial PSTN phone call box type the prefix you want to dial to make phone calls using the PSTN 4 Click Apply ...

Страница 88: ...vice is ready Call agent is down You cannot make VOIP phone calls Internet connection is not available You cannot make VOIP phone calls Interface The interface you want to use to connect to your call agent Device Name The device name you registered at the ISP for your router Call Agent IP Address The IP address of your call agent Audio Codec The Audio Codec Configuration page allows you to select ...

Страница 89: ...Chapter 6 Voice over IP E DOC CTC 20041126 0014 v3 0 87 6 3 VoIP Call Features Introduction The SpeedTouch offers you following VoIP call features Call Transferring Call Waiting 3 ways Conference Calls ...

Страница 90: ...m to person B Procedure Proceed as follows 1 If your phone has A hook flash button press it No hook flash button put down the hook for 1 2 second to put person A on hold 2 Wait for the dial tone 3 Dial the number of person B 4 Person B picks up the phone 5 Hang up the phone to transfer the call For more information consult your phone s user documentation ...

Страница 91: ... displays the name or number of person B on the display Switching to the new caller Proceed as follows 1 If your phone has A hook flash button press it No hook flash button put down the hook for 1 2 second 2 Person A is put on hold while you talk to person B 3 At the end of the conversation with person B you are redirected to person A For more information consult your phone s user documentation ...

Страница 92: ...dure Proceed as follows 1 Call person A 2 If your phone has A hook flash button press it No hook flash button put down the hook for 1 2 second 3 Person A is put on hold 4 Wait for the dial tone 5 Dial the number of person B 6 Person B picks up the phone 7 Dial hook flash to start the 3 way conference For more information consult your phone s user documentation ...

Страница 93: ...uration E DOC CTC 20041126 0014 v3 0 91 7 Advanced Configuration Introduction This chapter will guide you through some advanced features of the SpeedTouch Contents Following topics are described Setting up a Virtual Server SNMP ...

Страница 94: ...P Example configuration In the example below both Internet users are connecting to the same IP address but using different protocols To access The virtual web server they have to enter http 203 70 212 52 The virtual FTP server they have to enter ftp 203 70 212 52 WAN IP address To Internet users all your virtual servers have the same IP Address This IP Address is allocated by your ISP This address...

Страница 95: ...te a port forwarding entry for a specific application 1 Select an application in the Pre defined list 2 Type the IP address of the local host that will be used to provide this service in the Forwarded to field 3 Click Apply Manually create a port forwarding entry 1 Enter a name for the application 2 Type the IP address of the local host that will be used to provide this service in the Forwarded to...

Страница 96: ...ation a manager process controls access to a central MIB at the management station and provides an interface to the network manager The manager process achieves network management by using SNMP which will be implemented on top of the UDP IP and the relevant network dependent protocols for example Ethernet For an agent device that supports other applications such as FTP both TCP and UDP are require...

Страница 97: ...95 Configuring SNMP on the SpeedTouch Proceed as follows 1 Open the SpeedTouch web pages 2 Browse to Management SNMP 3 The SNMP Configuration page appears Enter your settings 4 Click Apply For more information see 5 1 Accessing the SpeedTouch Web Pages on page 44 ...

Страница 98: ...Chapter 7 Advanced Configuration E DOC CTC 20041126 0014 v3 0 96 ...

Страница 99: ...Chapter 8 Support E DOC CTC 20041126 0014 v3 0 97 8 Support In this chapter This chapter contains following topics Updating your Firmware UPnP on Windows XP Systems Reset to Defaults Troubleshooting ...

Страница 100: ...r storage device Procedure Proceed as follows 1 Open the SpeedTouch web pages 2 Browse to Management Update Firmware 3 The Update Firmware page appears Click Browse 4 Locate the firmware upgrade file on your computer and click Open 5 Click Update Firmware 6 The SpeedTouch uploads the new firmware 7 The SpeedTouch saves the new firmware and restarts For more information see 5 1 Accessing the SpeedT...

Страница 101: ...ick Add Remove Windows Components 4 The Windows Components Wizard appears Select Networking Services in the Components list and click Details 5 The Networking Services window appears Select Universal Plug and Play and click OK 6 Click Next to start the installation and follow the instructions in the Windows Components Wizard 7 At the end of the procedure the wizard prompts you that the installatio...

Страница 102: ... Windows Firewall make sure the Windows Firewall allows incoming network connections for the UPnP service 1 On the Start menu point to Connect To and then click Show all connections 2 Under Network Tasks click Change Windows Firewall settings 3 The Windows Firewall window appears 4 Click the Exceptions tab 5 Select the UPnP Framework check box 6 Click OK ...

Страница 103: ...l 2 The Control Panel window appears Click Add or Remove Programs 3 The Add or Remove Programs window appears Click Add Remove Windows Components 4 The Windows Components Wizard appears Select Networking Services in the Components list and click Details 5 The Networking Services window appears Select Internet Gateway Device Discovery and Control Client and click OK 6 Click Next to start the instal...

Страница 104: ... Using the reset button Proceed as follows 1 Make sure the SpeedTouch is powered on 2 Use a pencil to press the reset button for 7 seconds 3 Release the reset button 4 The SpeedTouch restarts WLAN clients You will need to re associate your WLAN clients using the factory defaults WLAN settings For more information see 2 3 1 First time Wireless Client Association on page 21 For more information see ...

Страница 105: ... page allows you to troubleshoot your SpeedTouch connections in a swift and easy way For more information see 8 4 1 Diagnostics Tests on page 104 Common problems If you are having problems with LAN connectivity go to 8 4 2 Problems with LAN on page 105 Firmware upgrade go to 8 4 3 Upgrading Problems on page 106 ...

Страница 106: ...Diagnostics 3 Select the interface you want to troubleshoot in the Select the Internet Connection list 4 Click Run Diagnostics Tests Results Depending on the result of the test following message will be shown PASS If SpeedTouch detects a signal from the service provider Fail If SpeedTouch does not detect a signal from the service provider N A If this test was not needed Troubleshooting Click the H...

Страница 107: ...t get an IP address Make sure the DHCP server is enabled on the SpeedTouch Cannot access the SpeedTouch Web pages Make sure that your computer and the SpeedTouch are using the same subnet Cannot access the virtual server Make sure that your firewall allows to run the service on the server Make sure that server has a static IP address ...

Страница 108: ...mage upgrade Error Message Image uploading failed The selected file contains an illegal image Possible cause The firmware file format is invalid Action Check the file format is correct otherwise download a firmware file with correct format Error Message Image uploading failed The system is out of memory Possible cause It may be caused by the lack of memory Action Reboot your SpeedTouch and perform...

Страница 109: ......

Страница 110: ...Need more help Additional help is available online at www speedtouch com THOMSON 2004 All rights reserved E DOC CTC 20041126 0014 v3 0 ...

Отзывы: