background image

4   Support

E-DOC-CTC-20031204-0011 v2.0

46

3

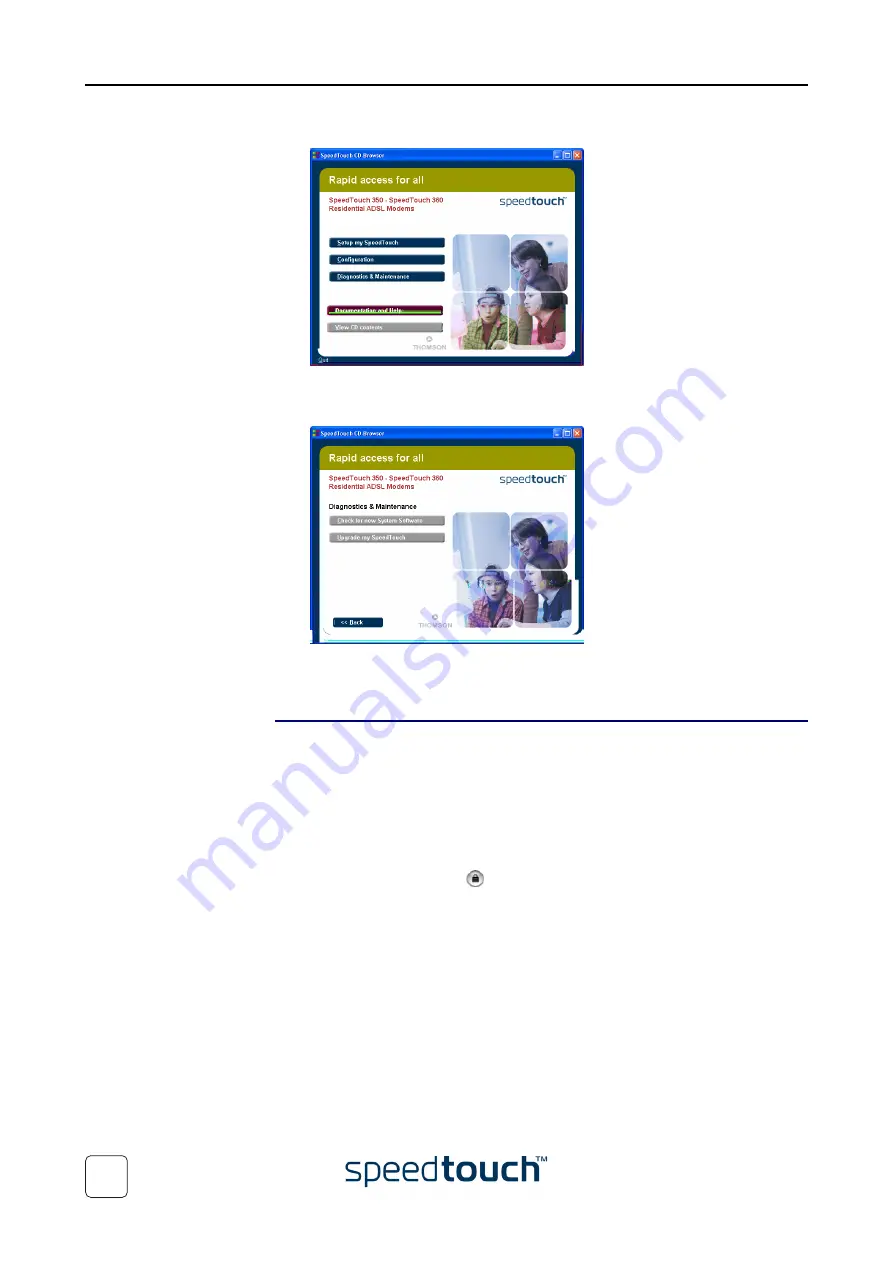
The SpeedTouch™ CD Browser menu appears:


Click 

Diagnostics & Maintenance

.

4

The following window appears:


Click 

Upgrade My SpeedTouch™

 to start the SpeedTouch™ Upgrade wizard.

See 

“ Upgrade procedure” on page 47

 to continue.

On Mac OS X

Proceed as follows:

1

Insert the SpeedTouch™ Setup CD-ROM in your PC's CD-ROM drive. 

2

Open the CD-ROM and browse to the 

osx

 folder.

3

In the 

osx

 folder double-click 

upgradeST.pkg

 to install the SpeedTouch™ Upgrade 

application.

Note

The installation wizard may prompt you for authentification. If this is 
the case, click   to enter your credentials.

Note

If your computer runs Mac OS X v10.3, your computer may prompt 
you to run a program to determine if the installer package can be 
installed. If this the case, click 

Continue

.

4

After installation go to the 

Applications > Speedtouch

 folder on the system startup 

disk (usually the location where you installed the SpeedTouch™ Upgrade applica-
tion) and double-click 

SetupST

. to start the SpeedTouch™ Upgrade wizard.

5

The Choose Language window prompts you to select a language.


Select the language of your choice and click 

OK

.

Note

The selected language will also be used as default language in the 
SpeedTouch™ web pages. See 

“ Language” on page 31

 for more infor-

mation on how to change the web page language.

See 

“ Upgrade procedure” on page 47

 to continue.

Содержание SpeedTouch 350

Страница 1: ...SpeedTouch 350 360 ADSL Modems Setup and User s Guide R4 2 7 300 SERIES ...

Страница 2: ......

Страница 3: ...SpeedTouch 350 360 R4 2 7 ...

Страница 4: ......

Страница 5: ... 1 3 1 Ethernet Connection Setup 11 1 3 2 USB Connection Setup for Microsoft Windows 12 2 SpeedTouch Internet Connectivity 15 2 1 Connect to the Internet via a Host PPPoE Dial in Client 16 2 1 1 Using an MS Windows XP BroadBand Connection 17 2 1 2 Using the Mac OS X PPPoE Dial in Client 21 3 SpeedTouch Web Interface 23 3 1 Basic Topics Menu Links 25 3 2 Advanced Topics Menu Links 27 ...

Страница 6: ...peedTouch Configuration Setup 36 4 1 2 Operating System Independent SpeedTouch Configuration Setup 41 4 2 SpeedTouch System Software Upgrade 44 4 2 1 Upgrade via the SpeedTouch Upgrade Wizard 45 4 2 2 Manual System Software Management via BOOTP Server 50 4 3 Resetting the SpeedTouch 52 4 4 Troubleshooting 53 ...

Страница 7: ...eedTouch 350i ADSL ISDN modem the SpeedTouch 360 ADSL POTS modem the SpeedTouch 360i ADSL ISDN modem Note You can easily identify your product by checking the identification label located on the bottom of your SpeedTouch Terminology Generally the SpeedTouch 350 i and SpeedTouch 360 i will be referred to as SpeedTouch in this Setup and User s Guide unless specifically indicated Safety instructions ...

Страница 8: ...In the event of damaged or missing items please contact your local product dealer for further information Front panel layout Your SpeedTouch is presented in a desktop housing box Front panel LEDs A set of LEDs is provided to overview the SpeedTouch status Note The USB LED is available on the SpeedTouch 360 i product only LED indicator LED logo Description Power Power System status LED Ethernet LAN...

Страница 9: ... LAN activity Flashing Ethernet link LAN activity USB if present Off No USB link Green Solid USB link no activity Flashing USB link activity DSL Off No DSL line Green Flashing Pending DSL line synchronization Solid DSL line synchronized Internet Off No WAN connection due to either no DSL line synchronization no Bridged Ethernet interface Green Solid WAN Internet IP connected no activity upstream n...

Страница 10: ...n integrity activity Depending on the SpeedTouch product you are using a second LED may be provided to indicate the 10 100Base T selection A DSL line port marked grey D Recessed Reset button B 10 100Base T Ethernet port marked yellow E Power button C USB port marked blue F Power inlet B A D E F B A D E F C Indicator Description Name LED Status A Optional 10 100Base T Off 10Base T Ethernet connecti...

Страница 11: ...tters filters Public telephone lines carry voltages that can cause electric shock Only install splitter filters yourself if these are qualified for that purpose Other splitter filters may only be installed by quali fied service personnel Connect the DSL line The grey DSL port on the SpeedTouch is marked Use the grey DSL cable provided to wire the SpeedTouch DSL port to your tele phone wall outlet ...

Страница 12: ... neously connecting multiple computers running various Operating Systems See 1 3 1 Ethernet Connection Setup on page 11 for more information USB connectivity The SpeedTouch 360 i USB port allows you to connect one computer to the Speed Touch via its USB port This scenario may be useful in case your computer is not equipped with an Ethernet port USB connectivity is supported for following Operating...

Страница 13: ...omputer to your Speed Touch You will need an external Ethernet hub or switch and the appropriate Ethernet cables to connect multiple computers Standard wiring procedure Use the Ethernet cable provided to wire your computer s Ethernet port to the Speed Touch s Ethernet port If needed you can use the yellow Ethernet cable included to wire any Ethernet port of the Ethernet hub or switch to the SpeedT...

Страница 14: ... processor 166 MHz or compatible 32 megabytes MB of memory For Windows 2000 XP Pentium II processor or compatible 64 MB of memory 30 MB of free disk space Prerequisites Make sure to remove any SpeedTouch USB driver installation that may reside on your PC before you install the USB drivers from the SpeedTouch Setup CD ROM deliv ered with your SpeedTouch 360 i product Make sure both your PC and Spee...

Страница 15: ... SpeedTouch Setup CD ROM make sure that the wizard looks for the drivers on the CD ROM drive and click Next to continue 6 The wizard will notify that it found drivers for the THOMSON USB Remote NDIS device on the CD ROM Click Next to continue 7 The installation procedure continues with the installation of the USB Remote NDIS drivers 8 In the following windows you can follow the installation proced...

Страница 16: ...rface by opening the Network Connections window from Windows s Control Panel Connecting another computer Optionally you can connect another computer using the SpeedTouch 360 Ethernet port Connecting to the Internet In most cases no additional configuration of your SpeedTouch is required You can immediately connect your computer to the Internet see 2 SpeedTouch Internet Connectivity on page 15 ...

Страница 17: ...ng that in the very most cases no specific configuration of the device needs to be done By default following Internet services are readily available Virtual Channel VC VPI VCI 0 35 ETHoA LLC snap Bridged Ethernet Virtual Channel VC VPI VCI 8 35 ETHoA LLC snap Bridged Ethernet Virtual Channel VC VPI VCI 1 101 ETHoA LLC snap Bridged Ethernet Virtual Channel VC VPI VCI 1 32 ETHoA LLC snap Bridged Eth...

Страница 18: ...roadBand dial in clients To connect to the Internet you can use An MS Windows XP broadband dial in client See 2 1 1 Using an MS Windows XP BroadBand Connection on page 17 for more information A Mac OS X broadband dial in client Ethernet connectivity only See 2 1 2 Using the Mac OS X PPPoE Dial in Client on page 21 for more infor mation or A broadband PPPoE dial in client provided by your Service P...

Страница 19: ...click Settings Control Panel 2 The Control Panel window appears Go to Network and Internet Connections Network Connections 3 In the Network Tasks menu click Create a new connection The New Connection Wizard appears Click Next to continue 4 In the next window select Connect to the Internet Click Next to continue 5 In the next window select Set up my connection manually Click Next to continue ...

Страница 20: ...tinue 7 In the next window give a name to the connection you are creating e g MyISP 8 In the next window select whether the connection is available to any user or only to yourself Note If you want to share this connection with other users you must select Anyone s use 9 In the next window fill in the Internet account information This information should be provided by your service provider ...

Страница 21: ...ect To and click the name of the connection you ve created e g MyISP Note If you are using the classic Start menu click Start Settings Network and Dial up connections MyISP 2 The Connect MyISP window appears 3 If needed enter user name and password for your user account at the Service Provider 4 Click Connect 5 As soon as the connection is established the connection message box and dial up window ...

Страница 22: ...n the Start menu point Connect To and click the name of the connection you ve created e g MyISP Note If you are using the classic Start menu go to Start Settings Network and Dial up connections MyISP 2 The MyISP Status window appears 3 Click Disconnect The connection is released As a result no Internet connectivity exists anymore ...

Страница 23: ...ppears Click the Network icon 3 The Network window appears Make sure Built in Ethernet is selected in the Show list and click the PPPoE tab 4 Enter the Account Name and Password provided by your Service Provider Note Select Save password in case you want the computer to remember the password for this account name Optionally you can enter a name for this connection in the Service Provider field All...

Страница 24: ...ter user name and password for your user account at the Service Provider 4 Click Connect As soon as the connection is established you can open your web browser and surf the Internet Terminating a broadband Internet session Proceed as follows 1 Click the Internet Connect dockling Note If the Internet Connect dockling is not available go to the Applications folder on the system startup disk and doub...

Страница 25: ...s not using a proxy server and the SpeedTouch IP address is not submitted to a proxy server To configure your computer with an IP address please consult the Operating System s Help For more information on how to disable your web browser s proxying please consult the web browser s Help Browsing to the SpeedTouch web pages To access the SpeedTouch web pages 1 Start the web browser on your computer 2...

Страница 26: ...ows you to save the SpeedTouch settings You should use this link whenever you have made definitive changes to the SpeedTouch configu ration Help The Help link in the topics menu header allows you to browse the SpeedTouch online Help For more information on a specific topic you can click the context related Help links located at the Topic s web pages BASIC topic menu Click To System Information The...

Страница 27: ...ine The DSL Statistics allow you to view Line Status this shows whether the DSL link is synchronized Enabled or not Initializing Bandwidth Up Down the maximum available bandwidth of the DSL link in both up and downstream direction Uptime The duration of the current Enabled Line Status Click the Configuration tab to view the service configuration currently active on the SpeedTouch In most cases thi...

Страница 28: ...a system password to restrict access to the Speed Touch It is highly recommended to configure a system password to protect the Speed Touch Make sure however not to use an obvious password such as your name date of birth etc Enter User id and Password maximum 16 characters of your choice and re enter your password in the appropriate field Click Apply to apply the System password and Save all to sav...

Страница 29: ...his link to display the Diagnostics page This page consists of three expandable sections Expand the System section to view some important system information Expand the Lan section to view the LAN configuration Expand subsequently the Wan and DSL sections to view the current DSL state and connection information ...

Страница 30: ... one or more additional IP addresses to the Speed Touch Ethernet interface identified as eth0 e g for purposes of multi homing You can also delete superfluous IP addresses However be aware that you cannot delete the SpeedTouch IP address which you are currently using DHCP Click this link to display the Dynamic Host Configuration Protocol DHCP page Click the DHCP Server tab to access the DHCP serve...

Страница 31: ...uch DHCP configuration If the SpeedTouch DHCP server was running it will be stopped immediately Existing SpeedTouch DHCP client entries are deleted Note Always click Apply after changing the DHCP server configuration In case the SpeedTouch DHCP server is running the Server Leases tab allows you to view the currently provided leases If needed you can also manually add static DHCP leases for specifi...

Страница 32: ... you will be able to contact this printer by name rather than by IP address View and or supply the SpeedTouch DNS domain name and to enable disable the SpeedTouch DNS server Note The use of DNS subdomains is supported e g dsl office lan System Click this link to display the Configuration page Back up the current SpeedTouch configuration restore the SpeedTouch default configuration or upload a back...

Страница 33: ... the current system software version identification and the SpeedTouch board type Check for the latest SpeedTouch software upgrades Note See 4 2 SpeedTouch System Software Upgrade on page 44 for upgrade instructions Language Click this link to view the Language page This page allows you to select the SpeedTouch web page language By default the only available language is English Another language ca...

Страница 34: ...3 SpeedTouch Web Interface E DOC CTC 20031204 0011 v2 0 32 ...

Страница 35: ... 20031204 0011 v2 0 33 4 Support In this chapter This chapter contains the following topics Topic Page SpeedTouch Configuration Setup 34 SpeedTouch System Software Upgrade 44 Resetting the SpeedTouch 52 Troubleshooting 53 ...

Страница 36: ...al Channel VC VPI VCI 8 48 ETHoA LLC snap Bridged Ethernet Automatic Permanent Virtual Channel PVC configuration if supported by the Telephone Operator Service Provider Note Bridged Ethernet is also referred to as IEEE802 1b Transparent Bridging However in case your Service Provider instructs you to use an Internet service other than the ones listed above i e another Virtual Channel needs to be ap...

Страница 37: ...h Setup CD ROM will automatically guide you through the configuration of both the SpeedTouch and your PC for setting up the appropriate configuration Proceed with 4 1 1 Microsoft Windows SpeedTouch Configuration Setup on page 36 Another OS e g Mac OS Unix Linux The SpeedTouch Embedded Easy Setup wizard accessible from the Speed Touch web pages will automatically guide you through the configuration...

Страница 38: ...Configuration Setup Microsoft Windows One of the following Windows operating systems must already be installed on your PC s Windows 98 Windows 98SE Windows ME Windows NT4 0 SP6 Ethernet only Windows 2000 Windows XP You may need the Windows installation CD ROM during installation ...

Страница 39: ...SpeedTouch Setup wizard 4 The Welcome to the SpeedTouch Setup Wizard window appears Click Next 5 The Software License Agreement window appears You must accept before continuing Click Yes to accept Note If you have accepted this License Agreement in a previous configura tion setup this window will not be shown anymore ...

Страница 40: ...h 360 and click Next Note If the wizard does not find any SpeedTouch on the network an error window appears In this case check that The SpeedTouch is turned on and fully initialized Your PC is correctly connected to the SpeedTouch Your PC has a valid IP address i e any IP address but 0 0 0 0 No dedicated firewall device or router is placed between your PC and the SpeedTouch No personal firewall so...

Страница 41: ...the appropriate service for your Inter net connectivity Select region Provider and Service as specified by your Service Provider and click Next to continue Note If the Service Provider has included a separate disk with a dedicated service profile click Have Disk to navigate to the location of the appro priate Service template file 3 Subsequent screens will guide you through the configuration setup...

Страница 42: ...figuration Some additional configuration may be needed MS Windows IP configuration Most Service profiles will configure the PC s Ethernet interface to comply with the service s requirements To make sure that all PCs are configured as expected e g DHCP or fixed IP addresses 1 Re run the SpeedTouch Setup wizard on every PC 2 Select Change the LAN configuration 3 Follow the instructions Note For fixe...

Страница 43: ... 9 The SpeedTouch device is in its default configuration state See 4 3 Resetting the SpeedTouch on page 52 for resetting your device The SpeedTouch and your computer share the same IP subnet 10 0 0 0 24 By default the SpeedTouch has a local IP address 10 0 0 138 To be able to access the web pages your computer needs to be configured for an IP address in the same subnet e g 10 0 0 1 Your web browse...

Страница 44: ... device 2 The embedded Easy Setup wizard will appear automatically Click Next Note If Easy Setup doesn t start automatically go to Basic Easy Setup 3 The following window invites you to select the appropriate Virtual Channel for the Bridged Ethernet Service 4 Subsequent screens will guide you through the configuration setup of the Speed Touch Follow the instructions and enter the required informat...

Страница 45: ...ation the SpeedTouch s IP configuration may have been changed If this is the case the last window will not be shown If so refer to the Service Provider s instructions for more infor mation on the new IP configuration of the SpeedTouch Additional configuration Some additional configuration may be needed Computer IP configuration The Service profile will configure the PC s Ethernet interface to comp...

Страница 46: ...ered in any way will not be accepted by the SpeedTouch This way the SpeedTouch or its service can never be corrupted or lost System software upgrades Depending on the operating system your computer is running you can upgrade your SpeedTouch via The SpeedTouch Upgrade Wizard Microsoft Windows or Mac OS X See 4 2 1 Upgrade via the SpeedTouch Upgrade Wizard on page 45 for more information The SpeedTo...

Страница 47: ...izard Depending on your Operating System you must start the SpeedTouch Upgrade wizard as follows On MS Windows Operating Systems Proceed as follows 1 Insert the SpeedTouch Setup CD ROM in your PC s CD ROM drive The SpeedTouch CD Browser will start automatically Note If the SpeedTouch CD Browser window does not appear automati cally open a Run window via Start Run from the Start menu and enter foll...

Страница 48: ...ase click to enter your credentials Note If your computer runs Mac OS X v10 3 your computer may prompt you to run a program to determine if the installer package can be installed If this the case click Continue 4 After installation go to the Applications Speedtouch folder on the system startup disk usually the location where you installed the SpeedTouch Upgrade applica tion and double click SetupS...

Страница 49: ...t 2 The SpeedTouch Software License Agreement window appears You must accept before continuing Click Yes to accept Note If you have accepted this License Agreement in a previous configura tion setup this window will not be shown anymore 3 The Setup wizard will search for the SpeedTouch on the network The following window shows the detection progress ...

Страница 50: ...No dedicated firewall device or router is placed between your PC and the SpeedTouch No personal firewall software is running on your PC TCP IP is correctly installed on your PC 5 To repeat the search for your SpeedTouch click Back and proceed with step 3 of this procedure 6 Click Next 7 The following window shows the system software version currently active on the SpeedTouch as well as one or more...

Страница 51: ...uch Upgrade wizard will upgrade your SpeedTouch with the selected system software You can follow the upgrade progress in following win dow You can follow the upgrade progress in following window 10 As soon as the SpeedTouch Upgrade wizard completed the upgrade of the SpeedTouch following window will appear Click Finish to close the wizard ...

Страница 52: ...d below will reset the Speed Touch to its factory default settings Therefore prior to performing an upgrade of the system software it is recommended to back up the SpeedTouch configuration Before you start You need a third party BOOTP server installed on the computer from which you want to perform the SpeedTouch system software upgrade Make sure that the SpeedTouch is connected to your computer vi...

Страница 53: ... press and hold the recessed reset button D on the Speed Touch rear panel 5 While holding the reset button D push in the power button E to switch on the SpeedTouch You will notice that the power LED is solid red 6 Keep holding the reset button for at least six seconds until the power LED turns solid green 7 Release the reset button as soon as the power LED turned solid green This indi cates that t...

Страница 54: ...the SpeedTouch rear panel for at least six seconds until all the LEDs on the front panel turn off 3 As soon as all the LEDs on the front panel go off release the reset button This indicates that the SpeedTouch is restarting in its default configuration Note Make sure to release the reset button as soon as all the LEDs have gone off to prevent that the SpeedTouch enters BootP mode The SpeedTouch wi...

Страница 55: ...pushed in LAN LED does not light up Link integrity Activity LED of Ethernet port does not light up Make sure that the Ethernet cable is securely connected to the 10 100Base T port Make sure that you are using the correct cable type for your Ethernet equipment No Line synchronization achieved DSL LED off or flashing Check whether the central splitter or dedi cated filters are installed correctly an...

Страница 56: ...4 Support E DOC CTC 20031204 0011 v2 0 54 ...

Страница 57: ......

Страница 58: ... 2004 THOMSON All rights reserved E DOC CTC 20031204 0011 v2 0 300 SERIES www speedtouch com Built for excellence ...

Отзывы: