background image

23 February 2004

PVS3000 & PVS 3500 Installation Guide

33

Start NetCentral Lite
monitoring software

NetCentral  Lite monitoring software is installed and preconfigured to run on your 
Profile XP Media Platform to monitor system status. Using NetCentral  Lite, you can 
check status information for all major subsystems in the Profile XP Media Platform 
and receive alert messages when a subsystem is operating at reduced capacity or is no 
longer functioning.

Since the Profile XP network and SNMP settings are preconfigured at the factory, you 
can start NetCentral now to begin monitoring your Profile XP’s subsystems. 

NOTE: If you are connecting your Profile XP system to a network, and need to 
reconfigure network settings, you must refer to the NetCentral Lite setup 
instructions in the Profile XP Service Manual to reconfigure SNMP settings.

Starting NetCentral Lite on the Profile XP system

Use the following steps to start NetCentral Lite and begin monitoring the Profile XP 
Media Platform.

To start NetCentral Lite:

1. Click 

Start | Programs | NetCentral | NetCentral Lite

. After NetCentral Lite starts, the 

NetCentral icon 

is displayed in the system tray of your Windows task bar. The 

moving block in the icon provides visual confirmation that the system is operational, 
using these colors to indicate device status level: 

Green = Normal; Red = Warning; Red = Alarm/Dead or Off-line

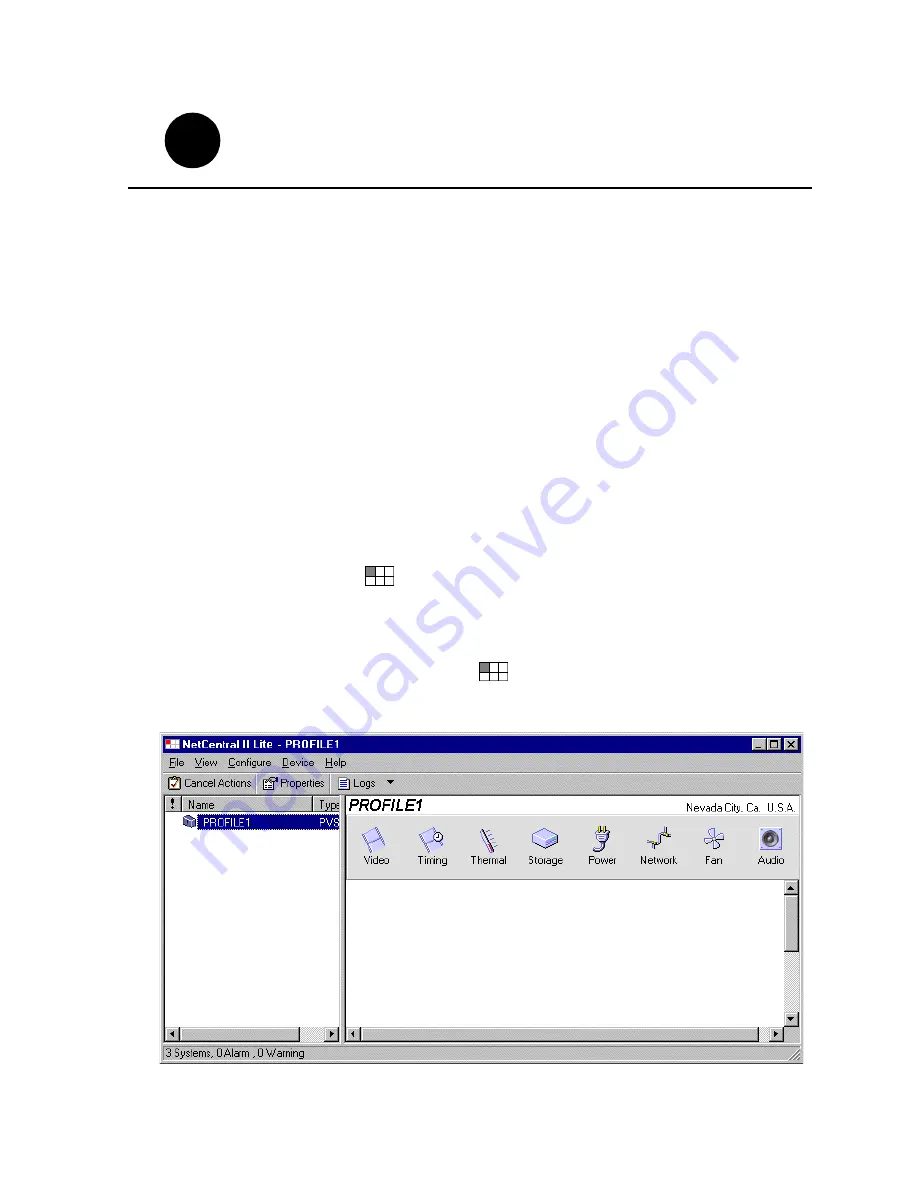
2. Double click the NetCentral icon 

in the system tray to display the NetCentral 

window. Refer to the Profile XP Service Manual for information on using NetCentral 
Lite monitoring software.

1

5

1

8

Содержание GRASS VALLEY Profile XP PVS3000

Страница 1: ...Profile XP PVS3000 PVS3500 MEDIA PLATFORMS FOR STANDARD HIGH DEFINITION Installation Guide SOFTWARE VERSION 5 4 071 8255 00 FEBRUARY 2004 the most watched worldwide...

Страница 2: ...t and Media Solutions Inc trademarks and other proprietary rights may be found at www thomsongrassvalley com Disclaimer Product options and specifications subject to change without notice The informat...

Страница 3: ...m is shipped with default Recorder and Player channels These default channels are named Vtr1 Vtr2 Vtr3 and so on The following table describes the video and audio connections you ll make for the two c...

Страница 4: ...l F a m il y o f X P S e r ie s G r a s s V a l l e y G r o u p Release Notes Path for the Installer Path for the Operator System Guide User Manuals Other Manuals Contains the latest information abou...

Страница 5: ...play clips in any combination of these formats on any SD channel using an SDI output HD channels let you record and play high definition clips with your HD SDI inputs and outputs PVS3500 The PVS3500 i...

Страница 6: ...ion chassis prior to or at the same time as the RAID Controller chassis 3 Wait for RAID storage initialization as follows PFR700 RAID Storage systems Wait until all disk access LEDs are steady approxi...

Страница 7: ...lay HD SDI PVS 3024 Channel names Video Connections Vtr1 Vtr2 Vtr3 Vtr4 Vtr5 Vtr6 NTSC PAL SD SDI Monitor Record Play HD SDI SDI 2In 2Out A B A B Record Play PVS 3534 Channel names Video Connections V...

Страница 8: ...Vtr2 Vtr3 Vtr4 NTSC PAL SD SDI Monitor Record Play HD SDI SDI 2In 2Out A B A B Record Play PVS 3514 Channel names Video Connections Video Connections with Embedded Audio Vtr1 Vtr2 Vtr3 Vtr4 Vtr5 NTSC...

Страница 9: ...2 13 16 Vtr1 Vtr2 Vtr3 Vtr4 Vtr5 Vtr6 Vtr7 Vtr8 OR OR AES EBU Breakout Panels Profile Audio Chassis PAC Digital 9 16 Digital 1 8 BNC216 1 2 1 2 3 4 3 4 5 6 5 6 7 8 7 8 9 10 9 10 11 12 11 12 13 14 13 1...

Страница 10: ...ch always set to 0 Set Fibre Channel Loop Address ID settings Refer to the table Maximum of 5 PFC 500 Chassis 0626 13 Media Platform Port A Port B 0 1 2 3 4 5 6 7 8 9 0 2 4 1 3 5 6 8 10 7 9 11 System...

Страница 11: ...alled 9 8 7 6 5 4 3 2 1 0 Order of daisy chain A B Loosen retaining screws Remove both Loop Bypass Board modules to access the chassis address switch on the midplane board Set the switch to the approp...

Страница 12: ...Chassis PFR500E Expansion Chassis PFR500E Expansion Chassis Caution See serial cabling detail below Media Platform After RAID Controller A is configured the standard serial cable will be moved to this...

Страница 13: ...ed 4 3 2 1 0 Order of daisy chain A B Loosen retaining screws Remove both Loop Bypass Board modules to access the chassis address switch on the midplane board Set the switch to the appropriate address...

Страница 14: ...sis Caution See serial cabling detail below Media Platform After RAID Controller A is configured the standard serial cable will be moved to this connector to configure RAID Controller B if installed M...

Страница 15: ...ables Diagnostic cables Power Cords 115V 230V 5 Power up Verification Ready LEDs on RAID controllers are steady ON Front panel Power LED is ON Service LED is OFF after approximately 3 minutes Refer to...

Страница 16: ...16 Set up the RAID Storage PFR700 E Local storage only 23 February 2004...

Страница 17: ...steps on pages 10 15 3 Turn on the Profile XP Media Platform using the front panel standby switch and wait for Windows NT to initialize and perform auto logon The Windows NT desktop will appear after...

Страница 18: ...Start your system 18 PVS3000 PVS3500 Installation Guide 23 February 2004...

Страница 19: ...g the Disk Utility NOTE If you want to configure some drives as hot spare drives do not perform this procedure Instead perform the procedures found in Chapter 3 of the Profile XP System Guide in the s...

Страница 20: ...ntroller chassis has finished initializing restart the Windows NT operating system on the Profile XP Platform f Start Configuration Manager using the desktop shortcut or by selecting Start Programs Pr...

Страница 21: ...rollers take less than a minute to bind a LUN but can bind only one LUN at a time You must wait until binding is completed before binding the next LUN PFC500 and PFR700 controllers take several hours...

Страница 22: ...February 2004 7 Enter a volume name or accept the default name then click Next 8 Select Yes create a file system using all RAID3 LUNs then click Finish 9 Click OK in the warning message box The Progre...

Страница 23: ...S3500 Installation Guide 23 10 Upon 100 completion click Close in Progress Report window 11 When the reboot message appears click OK then restart the Windows NT operating system on the Profile XP Plat...

Страница 24: ...Create a video file system 24 PVS3000 PVS3500 Installation Guide 23 February 2004...

Страница 25: ...em Both RAID controllers must be configured if the optional RAID Controller B is installed Refer to the Profile XP Service Manual for information on using NetCentral Lite Modifying network and SNMP se...

Страница 26: ...cling the power on the RAID Controller chassis You can leave the Expansion chassis on The boot screen should appear Rebooting now this will kill this shell Ciprico Web Manager Copyright Ciprico Inc 20...

Страница 27: ...ce 1 or 2 2 Type 1 then press Enter NOTE The default value may appear different than shown here Mail and SNMP notification level 1 most verbose through 5 off 2 Press Enter Modify User Password N Type...

Страница 28: ...Ciprico Network Server Mail and SNMP notification will occur for Hardware changes Warnings and Critical events SNMP TRAP CONFIGURATION TRAP COMMUNITY NAME public TRAP MANAGER 1 IP Address 192 168 0 10...

Страница 29: ...will use a baud rate of 9600 HARDWARE PARAMETERS This board s MAC Address is 0 20 46 11 15 81 APPLICATION PARAMETERS Boot Ciprico Network Server Mail and SNMP notification will occur for Warnings and...

Страница 30: ...Set up PFR500 or PFR600 network settings 30 PVS3000 PVS3500 Installation Guide 23 February 2004...

Страница 31: ...ervice Manual for information on using NetCentral Lite Configuring PFR700 network and SNMP settings Network and SNMP settings are set and stored on the LAN card Therefore the PFR700 RAID chassis inclu...

Страница 32: ...onitoring the PFR700 E with your NetCentral Lite on your Profile XP Media Platform enter its IP address If you are monitoring the PFR700 E with NetCentral enter the IP address of the NetCentral server...

Страница 33: ...need to reconfigure network settings you must refer to the NetCentral Lite setup instructions in the Profile XP Service Manual to reconfigure SNMP settings Starting NetCentral Lite on the Profile XP s...

Страница 34: ...click File Add Device 2 In the Add Device dialog box enter the IP address or host name for RAID Controller A then click OK You can use the following default address if you have not modified network s...

Страница 35: ...AES EBU embedded audio and analog audio formats An interface chassis is required for analog audio and AES EBU digital audio If you are using only embedded audio no interface chassis is required Selec...

Страница 36: ...wn list arrow in the Embedded column for the channel pair you want to configure and select a video input as shown NOTE With one audio board only the first 4 video inputs are selectable b Click the rig...

Страница 37: ...se audio formats are selected automatically when the system sees the audio interface is attached 3 Select embedded audio output using the following steps a For embedded audio select the Embedded check...

Страница 38: ...two audio groups 8 audio channels can be embedded on a single video output Embedded audio can only be allocated by groups of 4 channels In some cases with two audio boards installed you may have to s...

Страница 39: ...1 Start VdrPanel using the desktop shortcut or by selecting Start Programs Profile Applications VdrPanel The VdrPanel window appears NOTE The first time VdrPanel runs a panel opens for each default re...

Страница 40: ...oad Clip to open the Load Clip dialog box c Select clip 1 in the clip list then click OK to load the clip d Click Play and verify that video audio are present at the channel outputs If you have a prob...

Страница 41: ...l load a clip and verify the output timing for each play channel To adjust video output timing 1 In VdrPanel load and playback a clip as follows a Click anywhere in the panel for the first Play Channe...

Страница 42: ...lick Next to navigate to page 2 of 3 4 Select the video output from the list then adjust the video output timing with the timing controls NOTE Use the Select All button to enter the same offset for al...

Страница 43: ...for remote control 1 If VdrPanel is not already running start it using the desktop shortcut or by selecting Start Programs Profile Applications VdrPanel The VdrPanel window appears 2 In VdrPanel click...

Страница 44: ...0 rear panel P1 through P8 are RS 422 ports on the I O Panel Figure 1 dialog box 5 Click OK in the Channel Configuration dialog box 6 Repeat step 2 through step 5 for the remaining panels 7 Test the s...

Страница 45: ...or by selecting Start Programs Profile Applications Prolink 3 Select an RS 422 serial port then click Select The Prolink window appears 4 Test the PVS3000 system using your controller 5 Repeat steps 2...

Страница 46: ...Select an RS 422 control protocol 46 PVS3000 PVS3500 Installation Guide 23 February 2004...

Страница 47: ...entative may be available in your country To locate the support representative for your country visit the product support Web page on the Grass Valley Web site Profile Users Group You can connect with...

Страница 48: ...48 PVS3000 PVS3500 Installation Guide 23 February 2004...

Отзывы: