THERMOROSSI URBAN Скачать руководство пользователя страница 18


Page 

17


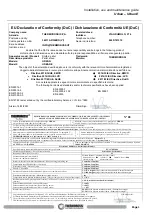
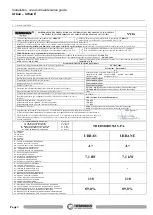
Installation, use and maintenance guide 


Urban 

– Urban E 


6 – USE OF THE APPLIANCE 


6.1 DESCRIPTION OF THE OPERATING STAGES 

START: 

has a duration of approx. 20 minutes, during this phase the appliance is programmed to light the flame. The appliance will 

not accept power variations in the firebox. If the appliance does not start up correctly it could be due to one of the following factors: 
cleanliness of the generator, smoke exhaust particularly cold, sudden surges and drops in the electric power supply, fuel is too moist 
or does not comply with the specifications. 

WORK:

 the appliance works according to the combustion and ventilation power set by the user. The spark plug is dead.  

OFF: 

has a duration of approx. 25 minutes. In this phase the appliance is switched off until a new "on" phase is initiated. The aim is 

to make the pellet embers in the brazier die out and cool the appliance. The room fan and the smoke suction unit continue to operate 
as required. In any case after approx. 25 minutes the appliance goes into stand-by mode.


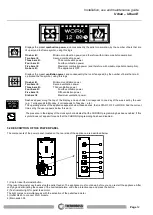
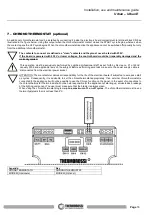
6.2 SWITCHING ON THE STOVE 

Before using the appliance check that all the movable parts are correctly fitted. Also remove any labels and stickers from 
the glass to avoid that permanent traces remain on the surfaces. Verify that the electric connections have been made 

perfectly. Check also that the firebox door is firmly closed. 

Before starting up the product check that the brazier is present 

and correctly positioned.


Then carry out the following operations:


1) 

Power up the appliance and turn the I/0 switch to position “I”. 

2)  Ensure  that  the  appliance  is  connected  to  the  smoke  exhaust:  we  recommend  against  using  aluminium  tubes  and  we 

recommend always using sealing gaskets. Further information is given in paragraph dedicated to the smoke discharge of 
this use and maintenance booklet. 

3)  Load the pellets into the hopper. 
4)  Press the 

Flame Button 

to begin the start up phase and the word 

START 

will appear on the display. 

Press the 

Flame Button


repeatedly to set the desired combustion power which will only activate at the end of the START cycle which 

takes roughly 20 minutes. 
In this stage any level of combustion power set by the user is ignored to meet the correct power values set by the manufacturer. 
Press the 

Ventilation button

 repeatedly to set the six fan speeds; the fan will only activate once the smoke has reached the preset 

temperature. 
The electrical heater will start to overheat and only after a few minutes the first lot of pellets will start dropping into the brazier. This 
occurs because the screw feeder has to fill up because it is completely empty. At the first start up the appliance may require the 
starting sequence to be performed twice for the reason explained above: before starting up the second time empty and vacuum out 
the brazier. 
 

ATTENTION: During the START sequence the appliance ignores all the commands that are transmitted or set. Once this 
phase has ended the word WORK appears on the display. 
When the machine is in the running phase the combustion can be changed manually. 
 
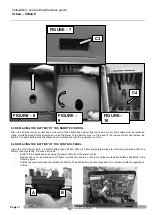
ATTENTION: If the appliance does not start up correctly check that the brazier and electric heater are clean. It is very 
important  to  ensure  that  the  tube  lodging  of  the  electric  heater  is  clean;  there  must  be  no  deposits  or  dust.  It  is 
recommended to use an efficient ash vacuum cleaner but only when the appliance has cooled down. 


6.3 COMBUSTION AND VENTILATION ADJUSTMENTS 

Set  the  combustion  power  of  the  stove  by  acting  on  the 

Flame

button

or  on  the  supplied  infrared  remote  control.  The  combustion 

power regulates the pellet drop. The selected combustion power level will appear on the display. 
 
Set the ventilation speed of the stove by acting on the 

Ventilation Button


or using the supplied infrared remote control. The ventilation 

speed regulates the number of fan revolutions. A slight vibration of the stove is quite normal when it is running. The selected ventilation 
power level will appear on the display. 

6.4 INFRARED REMOTE CONTROL 

A practical infrared remote control is supplied with the appliance: act on the blue button to regulate the ventilation power, act on the 
grey button to start up, adjust the combustion power and shut off the appliance. 

6.5 SWITCHING OFF THE APPLIANCE 

To switch off the appliance press the 

Flame


Button 

until the power bars on the display disappear and the text OFF appears. 

DO NOT disconnect the generator from the electric power socket to switch it off. This operation generates smoke that 
could not be evacuated because of the construction characteristics of the flue outlet. 
The OFF procedure lasts for approx. 25 minutes. 


Содержание URBAN

Страница 1: ...Installation use and maintenance guide Models URBAN URBAN E ...

Страница 2: ...Page 1 Installation use and maintenance guide Urban Urban E ...

Страница 3: ...SETTING THE DATE AND TIME 13 5 4 CHRONO ON OFF PROGRAMMING 13 5 5 LEVEL OPERATING LEVEL SETTING 15 5 6 ROOM CONTROL CONNECTION WITH THE ROOM CONTROL DEVICE OPTIONAL 16 6 USE OF THE APPLIANCE 17 6 1 DESCRIPTION OF THE OPERATING STAGES 17 6 2 SWITCHING ON THE STOVE 17 6 3 COMBUSTION AND VENTILATION ADJUSTMENTS 17 6 4 INFRARED REMOTE CONTROL 17 6 5 SWITCHING OFF THE APPLIANCE 17 7 CHRONOTHERMOSTAT op...

Страница 4: ... and maintenance guide Urban Urban E 11 ELECTRONIC BOARD 27 12 INFORMATION FOR THE SKILLED TECHNICIAN 28 12 1 MAIN COMPONENTS AND THEIR POSITION 28 12 2 PRESCRIPTIONS FOR CORRECT USE 28 12 3 TROUBLESHOOTING CAUSE SOLUTION 29 ...

Страница 5: ... A Via Grumolo n 4 36011 Arsiero VI 5 Nome e indirizzo del mandatario ai sensi dell articolo 12 paragrafo 2 Name and address of the agent as required pursuant Article 12 2 6 Sistema di valutazione e verifica della costanza della prestazione del prodotto da costruzione di cui all allegato V Sistema 3 e 4 System of assessment and verification of constancy of performance of the construction product a...

Страница 6: ...la potenza termica nominale Nominal heat output CO 300 0 mg m3 alla potenza termica ridotta Reduced heat output Pressione massima di esercizio Maximum operating pressure bar Temperatura fumi a potenza termica nominale Flue gas temperature at nominal heat output T 178 C Resistenza meccanica per sopportare il camino Mechanical resistance to carry a chimney NPD Nessuna Prestazione Determinata Potenza...

Страница 7: ...d the manufacturer s responsibility pursuant to Italian Decree no 224 of the President of the Republic of 24 05 1988 art 6 b It is recommended to keep this manual in a safe place that is easily accessible to all users if the manual is lost or deteriorated contact the manufacturer for a replacement copy If the appliance is sold or transferred to another user ensure that the manual is handed over wi...

Страница 8: ...eat resistant or inflammable or combustible objects in the vicinity of the appliance keep them at a suitable distance Do not place wet clothing to dry on the appliance When using a clothes horse keep at a suitable distance It is strictly prohibited to disconnect the appliance from the electrical power mains while it is in operation Warning do not wet the appliance and do not touch the electrical p...

Страница 9: ...power Min Max kW 3 70 7 10 Consumption Min Max Kg h 0 82 1 66 Ø smoke exhaust pipe mm 80 Min draught at rated power Pa 12 Min draught at reduced power Pa 12 Tank capacity Kg 17 Average smoke temperature at rated power C 178 Average smoke temperature at reduced power C 111 Smoke flow at rated power g s 4 7 Smoke flow at reduced power g s 2 6 Efficiency at rated power 89 00 Efficiency at reduced pow...

Страница 10: ...ON it is normal to find some pellets remaining in the tank even if the stove shuts off because the pellets have run out To access the feedbox firstly lift the tank cover as illustrated in the figure on the side Attention when filling up the tank take care not to drop any pellets into the internal parts of the appliance as in extreme cases this could generate live flames The manufacturer recommends...

Страница 11: ... other combustible material it is mandatory to install a fireproof floor protector plate between the appliance and the floor Failure to observe this instruction will immediately invalidate the appliance warranty The installer must issue a certificate of conformity for the installation which includes the design plans and the following documents a Report containing the type of materials utilised b P...

Страница 12: ... using a clothes horse keep at a suitable distance It is strictly prohibited to disconnect the appliance from the electrical power mains during normal operation 5 1 DESCRIPTION OF THE CONTROL PANEL The control panel is managed by a microprocessor The control buttons and the various displays are described below The control buttons are Clock button Press this button to activate deactivate the progra...

Страница 13: ...r Dashes appear along the top of the display and each dash corresponds to one day of the week set by the user e g 1 corresponds to Monday 2 corresponds to Tuesday etc The operating status of the appliance appears below these dashes that is START OFF or WORK And the current time set by the user appears below this word The presence in the display of the clock symbol indicates that the CHRONO program...

Страница 14: ...en will appear and repeat the procedure described above 5 4 CHRONO ON OFF PROGRAMMING The appliance must be energised and the I 0 switch in position I The CHRONO function allows you to set the weekly program by setting up to 3 on off cycles at different times for every day from Monday through to Sunday To set a program follow the procedure described below 1 Press the Menu Button twice quickly to v...

Страница 15: ... been set The following screen will appear At this point if no further programming is required for that day go to point 6 A If on the other hand you wish to program a third ON OFF cycle for that day go to point 6 B 6 A Press the Menu Button to exit the screen in order to enable you to program the times for the ON OFF cycles for the other days of the week In this case repeat the instructions from p...

Страница 16: ...l screen for approx five seconds The words CLEAR TIMERS will appear momentarily on the screen Do not release the button until the text CLEARED appears on the screen Only the appearance of the words CLEARED signal that the previously entered programmed cycles have been deleted When the programmed cycles are active the operating level at start up that is the combustion power will be the same level s...

Страница 17: ...vel simply press the Menu Button several times until the initial screen will appear on the display The level selection can be made with the appliance OFF or ON If the change is made while the appliance is running the difference in the flame will be apparent It is mandatory to pay particular care when selecting the most appropriate operating cycle for your installation After the selection of the op...

Страница 18: ... power values set by the manufacturer Press the Ventilation button repeatedly to set the six fan speeds the fan will only activate once the smoke has reached the preset temperature The electrical heater will start to overheat and only after a few minutes the first lot of pellets will start dropping into the brazier This occurs because the screw feeder has to fill up because it is completely empty ...

Страница 19: ...onal staff as set forth by Decree no 37 of 22nd January 2008 and applicable laws on the subject Before performing said task make sure the power supply cable is disconnected from the electrical power socket ATTENTION The manufacturer denies all responsibility for the life of the electrical heater if subjected to excessive start up cycles Consequently it is advisable to set the chronothermostat appr...

Страница 20: ...around the spark plug Figure 2 This is to ensure that the appliance operates correctly and to avoid start up failures Remove if present all silica agglomerates they indicate poor quality fuel EVERY 2 DAYS Empty the ash pan of all residues Figure 3 EVERY WEEK Remove the brazier and vacuum the residual ash from the compartment Figure 4 Vacuum the ash from the compartment C3 Figure 5 6 and 7 Remove t...

Страница 21: ...s inactive and or unused for more than one month it is necessary to clean the entire appliance thoroughly as well as the smoke discharge tube and the flue outlet to remove any obstructions e g birds nests in the chimney cap before restarting FIGURE 1 FIGURE 3 FIGURE 4 FIGURE 5 FIGURE 6 FIGURE 2 ...

Страница 22: ...e regulations in force 8 4 REPLACING THE BATTERY OF THE CONTROL PANEL Inside the control panel there is a buffer battery type CR1632 When the time and programming are not being memorised then the battery needs replacing Proceed as follows Switch off the appliance and unplug the power cable from the power source Remove the cover by pressing your fingers towards the centre in order to press the two ...

Страница 23: ...Page 22 Installation use and maintenance guide Urban Urban E ...

Страница 24: ...penings in the walls must comply with the following conditions have an unobstructed section of at least 6 cm for each Kw of installed thermal power with a minimum limit of 100 cm be made in such a way that the vent openings both on the inside and outside of the wall cannot be obstructed be protected with grills or similar systems that do not reduce the opening section indicated above be situated a...

Страница 25: ... the smoke tube is installed in a fixed position it is advisable to provide inspection openings for clean out purposes especially in the horizontal sections These openings are essential to allow for the removal of ash and unburned products which tend to accumulate along the discharge path The appliance functions with the combustion chamber in a vacuum while the discharge of smoke to the flue outle...

Страница 26: ... to the appliance If the generator is connected to a non compliant flue system the appliance could rapidly deteriorate due to an abnormal continuous overheating in this case the damaged parts will not be covered by warranty IF THE CHIMNEY CATCHES FIRE DO NOT HESITATE TO CALL THE FIRE BRIGADE IMMEDIATELY ISPEZIONE COMIGNOLO E CANNA FUMARIA SECONDO NORMA UNI 10683 INTERNO ESTERNO Tutte le tubazioni ...

Страница 27: ... from the brazier must not be fed into the tank This occurs when the smoke outlet is partially blocked To reset the alarm the power to the appliance must be switched off then on by turning the switch 0 1 located on the power panel Before restarting the appliance check for any irregularities such as blocked flue outlet open firebox door very dirty appliance Do not start up the appliance until the p...

Страница 28: ...TCH ASPIRATORE FUMI SMOKE SUCTION UNIT VENTILATORE AMBIENTE ROOM FAN MOTORE COCLEA SCREW FEEDER MOTOR RESISTENZA ACCENSIONE LIGHTING HEATER TERMOSTATO 95 THERMOSTAT 95 C TERMOCOPPIA FUMI SMOKE THERMOCOUPLE FRONTALINO COMANDI CONTROL FRONT PANEL CRONOTERMOSTATO MODEM Optional MODEM CHRONOTHERMOSTAT Optional ENCODER ESTRATTORE FUMI SMOKE EXTRACTOR ENCODER ...

Страница 29: ...e reactivate the appliance by unscrewing the plastic cover of the thermostat located on the power control panel and pressing the button the temperature of the appliance must have dropped considerably 12 2 PRESCRIPTIONS FOR CORRECT USE Read this instruction booklet The appliance must always be switched off from the control panel It is forbidden to switch off the appliance by means of the main switc...

Страница 30: ... FOUND A SOLUTION FOR THE OVERTEMPERATURE PROBLEM WAIT UNTIL THE APPLIANCE COOLS DOWN AND RESET THE THERMOSTAT APPLIANCE DOOR OPEN THE SMOKE NO OUT CHECK OUTLET ALARM IS SHOWN ON THE DISPLAY CLOSE THE DOOR THE APPLIANCE ACCUMULATES PELLETS IN THE BRAZIER WHILE OPERATING SMOKE EXHAUST NOT FREE OR WITH TERMINAL THAT OBSTRUCTS THE PASSAGE OF SMOKE CLEAN THE BRAZIER AS IN DICATED IN THIS USE AND MAINT...

Страница 31: ...OPERATING PROGRAM LEVEL 2 AS INSTRUCTED IN THIS USE AND MAINTENANCE GUIDE IF THIS DOES NOT SUFFICE CHANGE TO A BETTER QUALITY OF PELLETS THE TEMPERATURE OF THE APPLIANCE DOES NOT RISE ROOM TEMPERATURE THERMOSTAT SET TOO LOW APPLIANCE OPERATES INTERMITTENTLY THE APPLIANCE NEEDS TO RUN FOR MORE HOURS AT A HIGHER POWER SET A HIGHER ROOM TEMPERATURE THE ROOM IS TOO LARGE THE WALLS ARE COLD THE APPLIAN...

Страница 32: ...Page 31 Installation use and maintenance guide Urban Urban E Via Grumolo 4 Z I 36011 Arsiero VI ITALY Fax 0445 741657 www thermorossi com info thermorossi it F ireL o v e rs Code 70030675 05 2020 ...

Отзывы: