background image

Installation Guide

Expansion module 1

C

OK

Содержание Expansion module 1

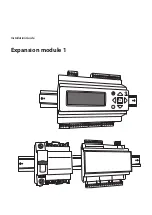
Страница 1: ...Installation Guide Expansion module 1 C OK ...

Страница 2: ...ranty if these instructions are not adhered to during installation or service The English language is used for the original instructions Other languages are a translation of the original instructions Directive 2006 42 EC Copyright Thermia Värmepumpar ...

Страница 3: ...ting to accessory bus 7 2 4 Hardware specifications 8 3 System solutions 9 3 1 Connections 9 3 2 Distribution circuit 2 5 10 3 3 TWC WCS 13 3 4 Cooling Cooling2 14 3 5 Pool 15 3 6 Legacy 17 4 Configuring the module 20 4 1 Language selection 20 4 2 Software selection Set unit ID 21 5 Manual test 22 5 1 Manual test set up 22 5 2 Table of functions 23 Installation Guide Expansion module 1 Thermia Vär...

Страница 4: ...dult supervision Warning Risk of personal injury Children are not permitted to play with the product 1 2 Electrical connection Danger Hazardous electrical voltage The terminal blocks are live and cause death through electric shock All power supplies must be isolated be fore electrical installation is started Warning Electrical installation may only be carried out by an authorized electri cian and ...

Страница 5: ... 53 B 60 A 61 N 62 E 63 Dl1 71 Dl2 72 Dl3 73 Dl4 74 Dl5 75 Dl6 76 Dl7 77 Dl8 78 Agnd 90 AO1 91 AO2 92 AO3 93 AO4 94 AO5 95 1 G 3 2 G0 4 C 10 GDO 11 DO1 12 DO2 13 DO3 14 DO4 15 DO5 16 DO6 17 DO7 31 Al1 30 Agnd 32 Al2 34 Al3 35 Al4 33 Agnd 41 Ul1 40 Agnd 42 Ul2 44 Ul3 45 Ul4 43 Agnd C OK Ext Disp 15 NO 16 NC 17 DO1 18 NO 19 NC 20 DO2 21 NO 22 NC 23 DO3 24 NO 25 NC 26 DO4 27 NO 28 NC 29 DO5 30 NO 31 ...

Страница 6: ... Ul1 40 Agnd 42 Ul2 44 Ul3 45 Ul4 43 Agnd C OK Ext Disp 15 NO 16 NC 17 DO1 18 NO 19 NC 20 DO2 21 NO 22 NC 23 DO3 24 NO 25 NC 26 DO4 27 NO 28 NC 29 DO5 30 NO 31 NC 32 DO6 DO1 C1 2 DO2 DO3 C3 4 DO4 DO5 C5 6 DO6 12 24V 13 24V 14 1 2 3 4 5 6 7 8 9 10 11 0V 1 2 3 4 24V 0V 10 12 230V IP20 24V 1 67A 24V G 0V G0 230V 6A 0V L1 N C28 RM6 1 Heat pump 2 Genesis EM1 DUC C28 3 Automatic fuse C6A 4 Transformer 2...

Страница 7: ...3 9 3 O A A A 4 9 4 O 4 9 4 O 4 9 4 O A A A 5 9 5 O 5 9 5 O 5 9 5 O A A A G 1 G 1 G 1 3 3 3 C 4 C 4 C 4 0 G 2 0 G 2 0 G 2 O D G 0 1 O D G 0 1 O D G 0 1 1 O D 1 1 1 O D 1 1 1 O D 1 1 2 O D 2 1 2 O D 2 1 2 O D 2 1 3 O D 3 1 3 O D 3 1 3 O D 3 1 4 O D 4 1 4 O D 4 1 4 O D 4 1 5 O D 5 1 5 O D 5 1 5 O D 5 1 6 O D 6 1 6 O D 6 1 6 O D 6 1 7 O D 7 1 7 O D 7 1 7 O D 7 1 1 l A 1 3 1 l A 1 3 1 l A 1 3 2 l A 2 ...

Страница 8: ...t LCD 4 rows with 20 alphanumeric Power consumption 4VA Digital inputs DI Potenial free contact 24V DC C Analogue inputs AI UI 0 10V DC PT1000 Selected by software 24 V DC supply C 0 15A short circuit protected DI Analogue outputs AO 0 10V DC 5 mA 12 bit D A short circuit protected Digital output DO Potential free contact via RELAY module RM6 230V 10A 1 Dimensions mm 335x455x15 Weight kg 5 1 Elect...

Страница 9: ...V G0 G 91 90 Y GND G0 G AO1 Agnd 24V 0V G0 G Distribution circuit 3 Distribution circuit 5 3 wired connection 4 wired connection 92 90 Y G0 G AO2 Agnd G0 G 24V 0V 92 90 Y GND G0 G AO2 Agnd G0 G 24V 0V WCS 3 wired connection 4 wired connection 93 90 Y G0 G G0 G 24V 0V AO3 Agnd 93 90 Y GND G0 G G0 G 24V 0V AO3 Agnd Installation Guide Expansion module 1 Thermia Värmepumpar VQILV502 9 ...

Страница 10: ... UI3 43 44 C28 UI4 43 45 C28 AI3 33 34 RM6 DO2 18 20 C28 AI4 33 35 C28 AO2 90 92 Distribution circuit 4 Distribution circuit 5 EM 1 C28 UI1 40 41 C28 UI2 40 42 C28 AI1 30 31 RM6 DO1 15 17 C28 AI2 30 32 C28 AO1 90 91 EM 1 C28 UI3 43 44 C28 UI4 43 45 C28 AI3 33 34 RM6 DO2 18 20 C28 AI4 33 35 C28 AO2 90 92 Installation Guide Expansion module 1 VQILV502 Thermia Värmepumpar 10 ...

Страница 11: ... DO2 13 DO3 14 DO4 15 DO5 16 DO6 17 DO7 31 Al1 30 Agnd 32 Al2 34 Al3 35 Al4 33 Agnd 41 Ul1 40 Agnd 42 Ul2 44 Ul3 45 Ul4 43 Agnd C OK Ext Disp 15 NO 16 NC 17 DO1 18 NO 19 NC 20 DO2 21 NO 22 NC 23 DO3 24 NO 25 NC 26 DO4 27 NO 28 NC 29 DO5 30 NO 31 NC 32 DO6 DO1 C1 2 DO2 DO3 C3 4 DO4 DO5 C5 6 DO6 12 24V 13 24V 14 1 2 3 4 5 6 7 8 9 10 11 C28 RM6 15 NO 16 NC 17 DO1 1a 1b 1a Potential free output for ci...

Страница 12: ...perature On page 2 you can adjust the heat curve for Distribution circuit 2 Notice that depending on if the distribution circuit is set as a radiator or floor heating system the Factory reset button will set different values After all the adjustments are made go back to page 1 and press the switch at the top of the page to activate the func tion and also make it visible and accessible in the menu ...

Страница 13: ...WC RM6 D04 24 26 C28 AI3 33 34 C28 AI1 30 31 C28 AI2 30 32 C28 AO1 90 Y91 C28 AI1 33 35 RM6 D03 21 23 WCS C28 UI2 C28 AO3 40 42 RM6 DO5 27 29 90 Y 93 EM 1 Installation Guide Expansion module 1 Thermia Värmepumpar VQILV502 13 ...

Страница 14: ...C28 AI2 30 32 C28 AI1 30 31 RM6 DO1 15 17 C28 AO1 90 Y 91 C28 AI3 33 34 C28 AI4 33 35 RM6 DO2 18 20 RM6 DO3 21 23 EM 1 C28 AO2 90 Y 92 RM6 DO5 27 29 C28 UI2 40 42 C28 UI1 40 41 RM6 DO4 24 26 Installation Guide Expansion module 1 VQILV502 Thermia Värmepumpar 14 ...

Страница 15: ...28 AI1 30 31 C28 AI2 30 32 RM6 DO3 21 23 EM1 Alt 2 RM6 DO3 21 23 C28 AI1 30 31 EM1 C28 AI2 30 32 Alt 3 C28 AO1 90 Y 91 RM6 DO1 15 17 C28 AI1 30 31 C28 AI2 30 32 RM6 DO3 21 23 EM1 Installation Guide Expansion module 1 Thermia Värmepumpar VQILV502 15 ...

Страница 16: ...ibution circuits this example shows Distribution circuit 2 and 3 EM1 C28 C28 AI1 30 31 AI2 30 32 RM6 DO1 15 17 C28 AO1 90 91 C28 AI3 33 34 RM6 DO2 18 20 C28 AI4 33 35 C28 AO2 90 92 Installation Guide Expansion module 1 VQILV502 Thermia Värmepumpar 16 ...

Страница 17: ...4 1 2 3 4 1 2 1 1 Start signal RM6 DO1 15 17 2 Signal compressor in operation C28 DI1 71 4 C 3 Alarm C28 DI2 72 4 C 4 Operating pressure switch C28 DI5 75 4 C 2 1 Start signal RM6 DO2 18 20 2 Signal compressor in operation C28 DI3 73 4 C 3 Alarm C28 DI4 74 4 C 4 Operating pressure switch C28 DI7 77 4 C Installation Guide Expansion module 1 Thermia Värmepumpar VQILV502 17 ...

Страница 18: ...nd Modbus 109 for Legacy 3 and 4 etc 4 Choose whether the Legacy heat pump should be active for heat or hot water or both 5 Internal ID for EM1 connection The number indicates which internal ID the legacy heat pump will have when it communicates with EM1 The numbers have to be either 1 OR 2 within the same Modbus address 6 Confirmation is needed when changes have been made and will also need a res...

Страница 19: ... that you re logged in N There might be several changes that will need a restart to function The pop up information can appear in more than one occasion during a configuration so when the final configuration is done only one re start is necessary Installation Guide Expansion module 1 Thermia Värmepumpar VQILV502 19 ...

Страница 20: ...the installation menu Manual test Installation OK OK OK c Press OK and change language setting with up down arrows confirm with OK exit by pressing repeatedly on the left arrow until you reach the start menu Installation Language English OK OK OK c Installation Guide Expansion module 1 VQILV502 Thermia Värmepumpar 20 ...

Страница 21: ...run the selected application Title EM_TWC_WCS Activate No OK c Installation Change Unit ID OK then up down then OK Installation Unit ID 0 OK OK OK c TWC WCS must be stated as ID 1 Shunt 2 3 must be stated as ID 2 Shunt 4 5 must be stated as ID 3 Cooling Cooling2 must be stated as ID 4 Pool must be stated as ID 5 Legacy control must be stated as ID 8 15 Set as ID 0 if it is not to be connected with...

Страница 22: ...to 5 Here you can set the output in for Auto and Manual mode The Out parameter determines which parame ter of Auto and Manual that is currently active in Manual test Manual test AO1 Auto 65 0 Manual 0 Out Auto 1 5 OK OK OK c In manual test for Digital out the following menu shows an ex ample of page 1 of 7 Here you can set the parameters for Auto and Out The Out parameter determines which setting ...

Страница 23: ... X Fan control Cooling module X Circulation pump Cooling module X X Reversing valve active cooling Cooling module X Reversing valve cooling tank Cooling module X Reversing valve heat dump Cooling module X Mix valve Pool module X Circulation pump Pool module X Reversing valve Pool module X Reversing valve hot water Legacy pump 1 X Reversing valve hot water Legacy pump 2 X Start signal Legacy pump 1...

Страница 24: ...Installation Guide Expansion module 1 VQILV502 Thermia Värmepumpar 24 ...

Страница 25: ...Installation Guide Expansion module 1 Thermia Värmepumpar VQILV502 25 ...

Страница 26: ...Installation Guide Expansion module 1 VQILV502 Thermia Värmepumpar 26 ...

Страница 27: ...Installation Guide Expansion module 1 Thermia Värmepumpar VQILV502 27 ...

Страница 28: ... Danfoss reserves the right to alter its products without notice This also applies to products already on order provided that such alterations can be made without subsequential changes being necessary in specifications already agreed All trademarks in this material are property of the respective companies Thermia Värmepumpar and the Thermia Värmepumpar logotype are trademarks of Danfoss A S All ri...

Отзывы: