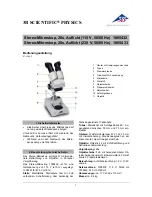
1
Base
2
Arm
3
Focus adjustment knob
4
Switch for the illumination
0 = Off
I = Bottom light (transmitted light)
II = Top light (incident light)
5
Stage
6
Stage clips
7
Revolving nosepiece with three objective
lenses (4×, 10×, and 40x magnification)
8
Tube
9
Ocular lens (10x magnification)
10
Bottom lamp (for transmitted light)
11
Top lamp (for incident light)
12
Aperture wheel
Microscopes are delicate and sensitive optical instruments. Avoid shaking your mi-
croscope and use all of the moving parts with care. Carry the microscope with the
base resting in the palm of one hand and the other hand holding the arm handle.
Never carry it by the tube, stage, or nosepiece. Any time you are not working with
it, you should place it back in its packaging in order to protect it from dust. You
can also put the enclosed dust cover over it for this purpose. You will be rewarded
for this kind of protective handling with awesome and, above all, clear images.
You will find the battery compartment on the underside of the stand base. Before
you can get started using the microscope, you will need to insert three AA batter-
ies (1.5 volt, LR 6 type).
Caution!
Before you turn the microscope upside-down, you need to pull the
ocular lens out of the tube and lay it to the side. Otherwise, it could fall out and
break when you turn the microscope over.
The First Steps
Now it’s time to take your first look through the microscope. Your microscope
works as both a high-power magnifying glass and a microscope. You may be
asking yourself, “microscope, magnifying glass... what’s the difference, really?”
This will become clear as you read the following two sections. Let’s start with the
simpler of the two types of viewing modes: the magnifying glass.
The Microscope as a Magnifying Glass
When observing an object under a magnifying glass, we use the light that falls
onto the object from above, such as from the sun or a lamp. This is called incident
light. When using an actual microscope, the object is illuminated from below, so
when you look through the ocular lens of the microscope, you are seeing the por-
tion of the light that has made its way through the object. This is called transmit-
ted light. Can you think of the problem that this poses? To be observed through a
microscope, objects have to be very thin. Very few things are naturally so thin that
you can place them directly onto the microscope stage (you will get to know some
later in these instructions). Most of the time, they have to be cut in order to look
at them at all. This sounds complicated — but you will learn to do it with a little
practice. You will find tips on cutting methods in several places in this manual.
If using the microscope with transmitted light is so complicated, why not just use it
in the magnifying glass mode? The microscope mode makes it possible to examine
How to Use the Microscope
Your New Microscope
2
3
2
1
4
5
10
11
12
6
7
8
9
Regardless of whether you are sitting
in front of a microscope for the first
time or have already used another
microscope before and know how it
works, use the following sections to
get to know your new microscope and
to find out what is in it.
7
Содержание TK2 Scope
Страница 1: ...Experiment Manual ...
Страница 52: ......


