I
QBOX-2061 User’s Manual
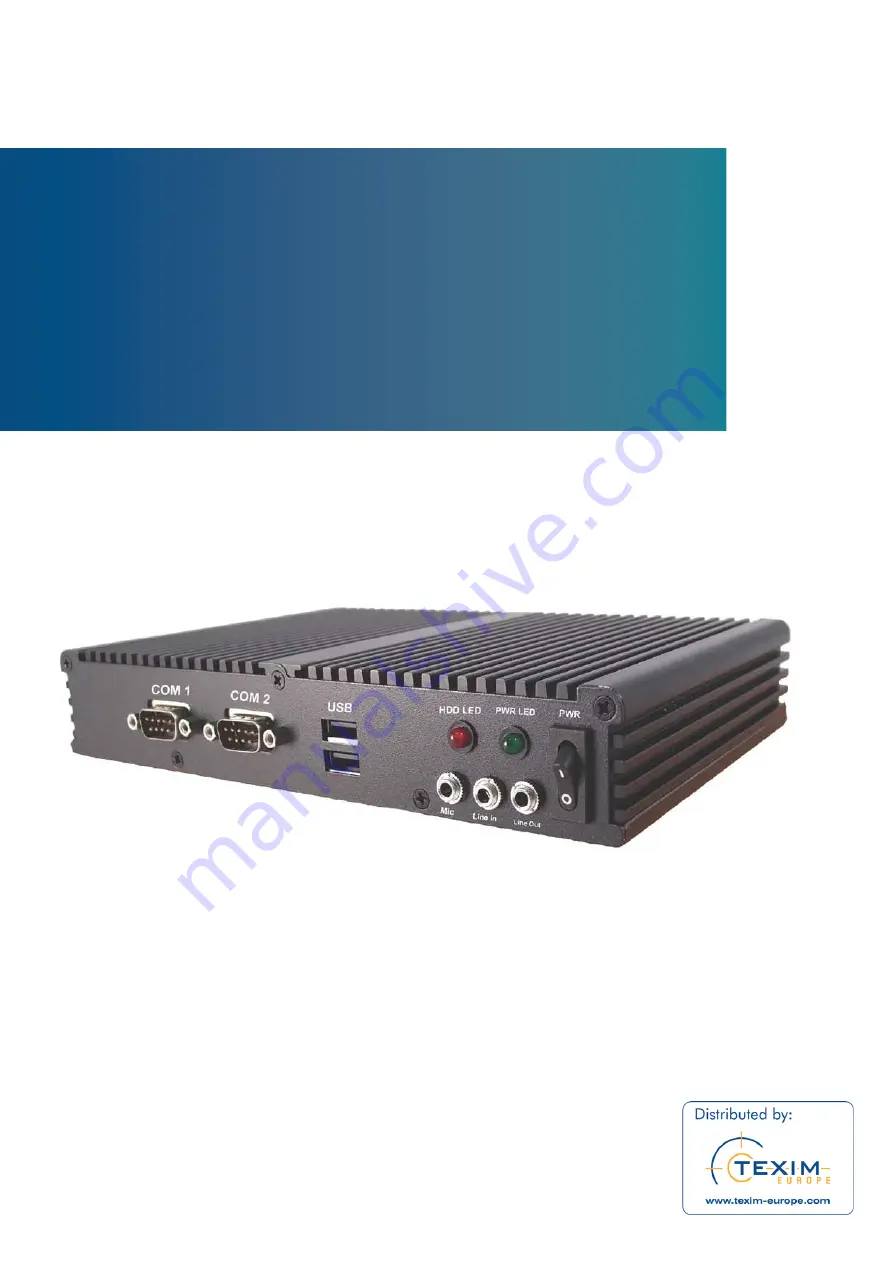
QBOX-2061
Fanless BOX PC with Dual Core Intel
®
Atom™
Processor D2550
User’s Guide
Страница 1: ...I QBOX 2061 User s Manual QBOX 2061 Fanless BOX PC with Dual Core Intel Atom Processor D2550 User s Guide...
Страница 2: ...of others Quanmax is a registered trademark of Quanmax All trademarks registered trademarks and trade names used in this user s guide are the property of their respective owners All rights reserved T...
Страница 3: ...How to Use This Guide 10 Unpacking 10 Regulatory Compliance Statements 10 Warranty Policy 11 Maintaining Your Computer 12 Chapter 1 Introduction 15 Overview 15 Product Specifications 16 System Tour 17...
Страница 4: ...gure 1 Front Panel 17 Figure 2 Rear Panel 18 Figure 3 Mechanical Dimensions 19 Figure 4 DVI I HDMI 20 Figure 5 Connect USB mouse keyboard 21 Figure 6 RJ45 connector 21 Figure 7 Com ports 22 Figure 8 D...
Страница 5: ...Configuration 30 Table 7 Advanced Menu SATA Configuration 31 Table 8 Advanced Menu USB Configuration 31 Table 9 Advanced Menu DIO Configuration 32 Table 10 Advanced Menu Super IO Configuration 33 Tab...
Страница 6: ...ions in this user s guide for precautions and procedures If you have any questions please contact Quanmax Post Sales Technical Support Access can only be gained by service persons or by users who have...
Страница 7: ...help avoid possible damage to system boards wait five seconds after turning off the computer before removing a component removing a system board or disconnecting a peripheral device from the computer...
Страница 8: ...component s antistatic packing material until you are ready to install the component in a computer Just before unwrapping the antistatic packaging be sure you are at an ESD workstation or grounded Th...
Страница 9: ...placed with incorrect type Only replace with the same or equivalent type recommended by the manufacturer Do not dispose of lithium batteries in domestic waste Dispose of the battery according to the l...
Страница 10: ...e If there is damage notify Quanmax customer service immediately Refer to Warranty Policy for the return procedure Regulatory Compliance Statements This section provides the FCC compliance statement f...
Страница 11: ...e harmful interference or to be noncompliant with the appropriate standards for its intended use Warranty Policy Limited Warranty Quanmax Inc s detailed Limited Warranty policy can be found under Supp...
Страница 12: ...rts made by various manufacturers in performing warranty repairs and building replacement products If Quanmax repairs or replaces a product its warranty term is not extended Shipments not in complianc...
Страница 13: ...section of this user s guide for the operating and storage humidity specifications Power Protection The greatest threats to a system s supply of power are power loss power spikes and power surges caus...
Страница 14: ...ower to the system for a limited amount of time depending on the UPS system UPS systems range in price from a few hundred dollars to several thousand dollars with the more expensive unit s allowing yo...
Страница 15: ...2x COMs 1x mSATA slot 1x DIO The QBOX 2061 provides high reliability rugged case not only for great protection from EMI cold and heat but also integrated with passive cooling design for quiet fan less...
Страница 16: ...Audio Amplifier Mic In Line In Line Out Supported Storage 1x 2 5 SATA HDD or SSD 1x mSATA USB 6x USB 2 0 COM 2x COM RS 232 ports with power selection 1x COM port with RS 232 422 485 selection on COM1...
Страница 17: ...is power on HDD LED Red The hard disk LED blinks when data is being written into or read from the HDD Line Out The stereo headphone jack is used to connect the system s audio out signal to amplified s...
Страница 18: ...on between the computer and its display device Ethernet The eight pin RJ 45 LAN port supports a standard Ethernet cable for connection to a local network USB The USB Universal Serial Bus port is compa...
Страница 19: ...Chapter 1 19 QBOX 2061 User s Manual Mechanical Dimensions 210 x 35 x135 mm W x H x D Figure 3 Mechanical Dimensions...
Страница 20: ...onnect the DVI I HDMI cable from your display to the DVI I HDMI port Figure 4 DVI I HDMI NOTE When the system reboots without connecting the DVI I HDMI there might be no image on screen when you inser...
Страница 21: ...to connect with your computer Figure 5 Connect USB mouse keyboard NOTE Using a third party USB mouse or keyboard may require software drivers Check the manufacturer s website for the latest software d...
Страница 22: ...UB 9P Pin RS 232 RS 422 Half Duplex RS 485 Full Duplex RS 485 1 DCD TX DATA TX 2 RXD RX N A RX 3 TXD TX DATA TX 4 DTR RX N A RX 5 GND GND GND GND 6 DSR N A N A N A 7 RTS N A N A N A 8 CTS N A N A N A...
Страница 23: ...BOX 2061 User s Manual DIO Digital Input Output DIO port with the pin definition Digital Input Output D SUB 9P Pin Signal Name 1 5V 2 DIO_0 3 DIO_1 4 DIO_2 5 DIO_3 6 DIO_4 7 DIO_5 8 DIO_6 9 DIO_7 Figu...
Страница 24: ...he system 1 Connect the power adapter cable to the DC Jack DC IN of the QBOX 2061 2 Connect the power cable to the power adapter 3 Connect the power cable to a power outlet 4 Press the power switch on...
Страница 25: ...ase contact Quanmax AMI s ROM BIOS provides a built in Setup program which allows the user to modify the basic system configuration and hardware parameters The modified data will be stored in a batter...
Страница 26: ...ate between menu screens Table 2 BIOS Main Menu BIOS SETUP UTILITY M a i n A d v a n c e d B o o t S e c u r i t y S a v e E x i t Product Information Select Screen Select Item Enter Select Change Opt...
Страница 27: ...t Disabled Onboard LAN2 Controller Enabled Onboard LAN2 Boot Disabled Audio Controller Enabled Display Configuration Power Management Configuration CPU Advanced Configuration SATA Configuration USB Co...
Страница 28: ...x i t Display Configuration Select Screen Select Item Enter Select Change Opt F1 General Help F2 Previous Values F3 Optimized Defaults F4 Save Exit ESC Exit Fixed Graphics Memory Size 128 MB IGFX Boo...
Страница 29: ...S3 By PS 2 Keyboard Disabled Resume from S3 By PS 2 Mouse Disabled Resume By PCIE Device Disabled Resume By RTC Alarm Disabled Watchdog Timer Configuration Version 2 14 1219 Copyright C 2011 American...
Страница 30: ...tem Enter Select Change Opt F1 General Help F2 Previous Values F3 Optimized Defaults F4 Save Exit ESC Exit Hyper Treading Enabled Execute Disable Bit Enabled Limit CPUID Maximum Disabled EIST Enabled...
Страница 31: ...nfigure SATA as Options IDE AHCI Table 8 Advanced Menu USB Configuration BIOS SETUP UTILITY M a i n A d v a n c e d B o o t S e c u r i t y S a v e E x i t USB Configuration Select Screen Select Item...
Страница 32: ...4 Output Low DIO 5 Output Low DIO 6 Output Low DIO 7 Output Low DIO 0 Value 0 DIO 1 Value 0 DIO 2 Value 0 DIO 3 Value 0 DIO 4 Value 0 DIO 5 Value 0 DIO 6 Value 0 DIO 7 Value 0 Version 2 14 1219 Copyri...
Страница 33: ...l Port 1 Configuration BIOS SETUP UTILITY M a i n Ad v a n c e d B o o t C h i p s e t P o w e r S e c u r i t y E x i t Serial Port 1 Configuration Serial Port Enabled Device Settings IO 3F8h IRQ 4 C...
Страница 34: ...Device Settings IO 2F8h IRQ 3 Change Settings Auto Select Screen Select Item Enter Select Change Opt F1 General Help F2 Previous Values F3 Optimized Defaults F4 Save Exit ESC Exit Version 2 14 1219 Co...
Страница 35: ...Enter Select Change Opt F1 General Help F2 Previous Values F3 Optimized Defaults F4 Save Exit ESC Exit CPU Warning Temperature Enabled CPU Temperature 50 C SYS Temperature 42 C VCORE 0 832 V VGFX 1 0...
Страница 36: ...Exit Full Screen LOGO Display Disabled Setup Prompt Timeout 1 Bootup NumLock State On Boot Option Priorities Boot Option 1 UEFI SanDisk Boot Option 2 SATA PM TOSHIBA Hard Drive BBS Priorities Version...
Страница 37: ...e following range Minimum Length 3 Maximum length 20 Administrator Password User Password Select Screen Select Item Enter Select Change Opt F1 General Help F2 Previous Values F3 Optimized Defaults F4...
Страница 38: ...OS asks for a confirmation before exiting Discard Changes Discards changes done so far to any of the setup values This option allows you to discard the selections you made and restore the previously s...
Страница 39: ...m and the necessary drivers to operate it After you have finished assembling your system and connected the appropriate power source power it up using the power supply and install the desired operating...