

INSTALLATION INSTRUCTIONS
Introduction
The
Speech Module
provides four recordable 12 second audio messages, each message is
assigned to an alarm channel, which in turn can be triggered from one of the many output
functions of the control panel. The
Speech Module
is supported by the following Texecom control
panels:
•
Premier 816Plus
(Must be fitted with software version 9.3 or higher)
•
Premier 832
(Must be fitted with software version 2.3 or higher)
Channels 3 & 4 only operate on V14.03 and later
PCB Layout and Connections
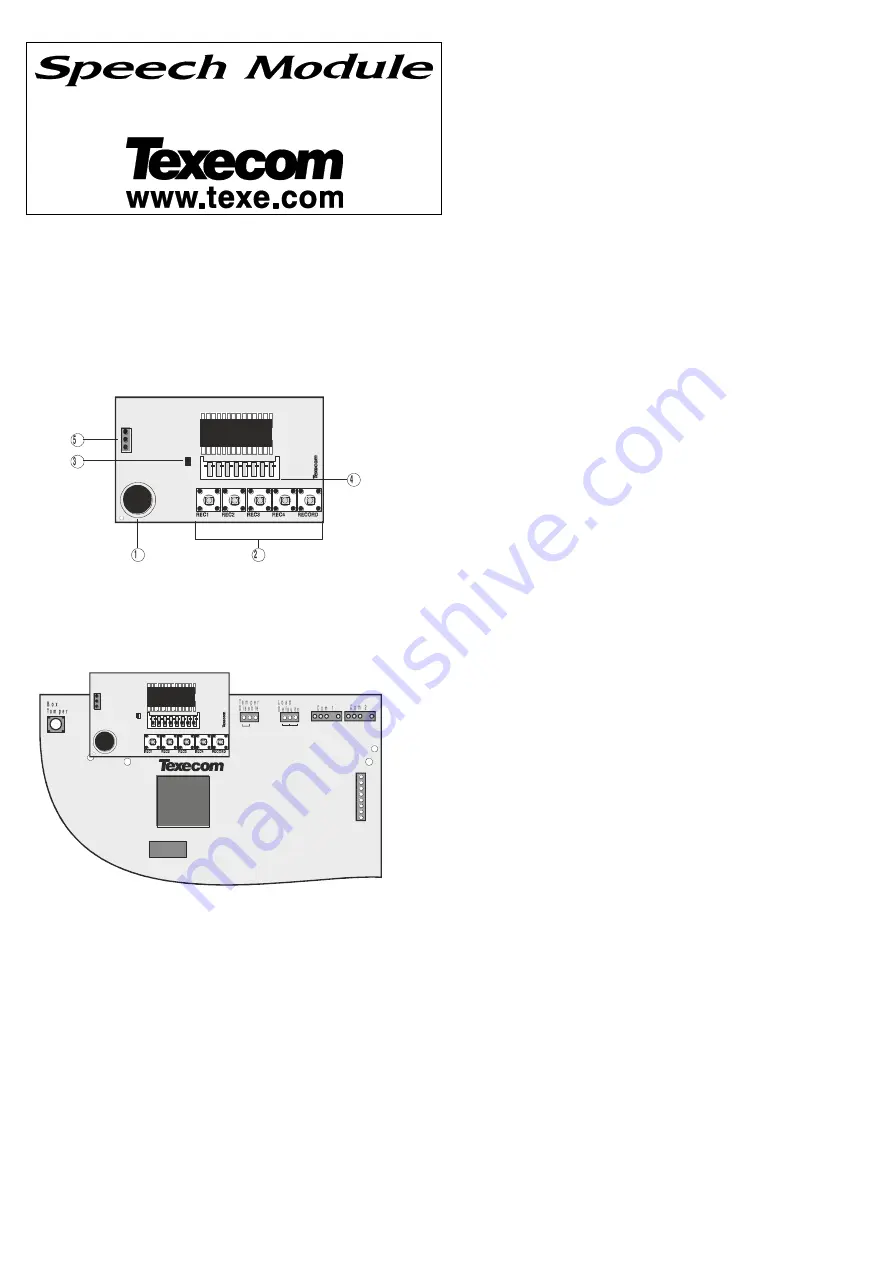
The figure below shows the PCB layout of the
Speech Module
:
Figure 1.
Speech Module
PCB Layout
Microphone
Record buttons
Record/Play Indicator
Control panel connector
Connection for output 3 & 4
Figure 2. Speech Module Installed on Control Panel PCB
Speech Module Installation
To install the
Speech Module
proceed as follows:
1)
Ensure that all power is removed from the control panel before connecting the
Speech
Module
.
2)
Plug the
Speech Module
(see Figure 2) onto the 8 way plug (SK1) of the control panel.
3)
Connect the supplied lead to panel outputs 3&4 for messages 3&4.
4)
Re-apply power to the system and proceed to the next section.
Recording Messages
The
Speech Module
can store four 12 second audio messages. Message 1 is allocated to channel
1 and message 2 is allocated to channel 2 etc. To record a message proceed as follows:
5)
Press and hold the [RECORD] button, then press and hold either [REC1] for message 1 or
[REC2] for message 2 [REC3] for message 3 or [REC4] for message 4
6)
Speak clearly into the microphone to record your message. During the recording process
the record indicator will illuminate.
7)
To stop the recording process, release the record buttons. The recording process will
automatically end after 12 seconds and the record indicator will go out.
8)
Repeat steps 1 to 3 for other messages, if required.
Programming the Control Panel
The control panel will then need to be programmed correctly in order for the
Speech Module
to
function as expected:
9)
Select the “Engineer’s programming” menu.
10)
Enter
to select the “ARC No 1 Menu”. Within this menu program the following
options:
a)
Enter
to select the “Primary Telephone” number and then enter the first contact
telephone number of the person who is going to receive the message(s) followed by
/
.
*
b)
Enter
then
to select the “Secondary Telephone” number and then enter
the second contact telephone number of the person who is going to receive the
message(s) followed by
/
.
*
c)
Enter
to select the “Protocol Type” and then enter
to select “Fast
Format/Speech Module”.
d)
Enter
to select the “Dial Attempts” and then enter the required number of dial
attempts (1-9).
e)
Enter
to select the “Fast Format Reporting Channels” and then use keys
,
,
,
to select/deselect channels 1, 2, 3 & 4. Channels 1,2,3&4
correspond to messages 1,2,3&4. i.e., when channel 1 is triggered the panel will
report message 1 to the contact(s) telephone number. Channels 5 to 8 should be
deselected. Press
/
to accept the channel selection.
f)
Enter
to select the “Protocol Options” and then use keys
to
to
select/deselect options 1 to 8. Ensure that option 1 (Enable Speech Module) is
selected and options 2-8 are deselected. Press
/
to accept the selection.
g)
Press
to exit the “ARC No 1 Menu”.
*
If both the primary and secondary numbers are programmed you can force the
control panel to dial the next number, even if the first attempt is acknowledged. In
order to do this you must program a + as the last digit of the telephone number. The
+ character is entered by pressing
then
.
11)
Enter
to select the “Fast Format Restore Channels” option and then use keys
to
to select/deselect channels 1 to 8. If channels 1,2,3&4 are selected, the Speech
message will be reported both when the channel is activated and restored. For most
applications all channels will be deselected. Press
/
to accept the selection.
12)
Enter
to select the “Fast Format Open/Close Channels” option and then use keys
to
to select/deselect channels 1 to 8. Channels 1-8 should be deselected. Press
/
to accept the selection.
Programming Channels 1 & 2
1)
Enter
to select the “Fast Format/Speech Channels” type, then program the
following channels:
a)
Enter
to select channel 1. Enter output group, type and attributes (refer to
control panel installation manual). For example, to program channel 1 as
“Partition 1234 Fire Alarm”, enter 210 then press
/
to accept.
b)
Enter
to select channel 2. Enter output group, type and attributes (refer to
control panel installation manual). For example, to program channel 2 as
“Partition 1234 Burglar Alarm”, enter 202 then press
/
to accept.
c)
Press
to exit this menu.
2)
Enter
to select the “Communicator Options”, then use keys
to
to
select/deselect option 1 to 8. Ensure that option 1 (Enable Communicator) is selected. Press
/
to accept the selection.
Programming Channels 3 & 4
Enter
to select the “Panel Outputs” type, then program the following channels:
d)
Enter
to select channel 3. Enter output group, type, partitions and
attributes (refer to control panel installation manual). For example, to program
channel 3 as “Partition 1 Fire Alarm”, enter 210 then press
/
to
accept.
e)
Enter
to select channel 4. Enter output group, type, partitions and
attributes (refer to control panel installation manual). For example, to program
channel 4 as “Partition 1 Burglar Alarm”, enter 202 then press
/
to
accept.
Press
to exit this menu.
Once these steps have been completed you can test the operation of the
Speech Module
.
Channels 3 & 4 are not to be used on a UL or CUL installation.
Testing the Speech Module
The procedure below shows how to perform a simple operational test for the
Speech Module
.
1)
Select the “Engineer’s programming” menu.
2)
Enter
to select the “Send Test Call” option.
3)
Press
/
to initiate a test call.
4)
If you have a telephone on the same line as the control panel you can pick it up and listen
to the message.
5)
During the test call you may press
,
,
or
to switch between playing
messages 1 2 3 & 4.
6)
The person listening to the message on their telephone can acknowledge the call by
pressing the
[#]
key. This will cause the panel to hang-up the call. If the call is
acknowledged using the
[*]
key the panel is put in remote control mode whereby it can be
controlled using a touch-tone telephone (see below).
7)
Once the messages have been tested using menu 92, it is advisable to test the channels
respond correctly. For example, if you have programmed the function of channel 2 as
Burglar Alarm, then you should arm the system and activate an alarm zone, then verify that
the message is reported as expected.
Remote Control Commands
The figure below shows a quick guide to the remote control commands, for full details; refer to the
Touch-Tone Remote Control User Guide:
IN
S
29
7-
4


