background image

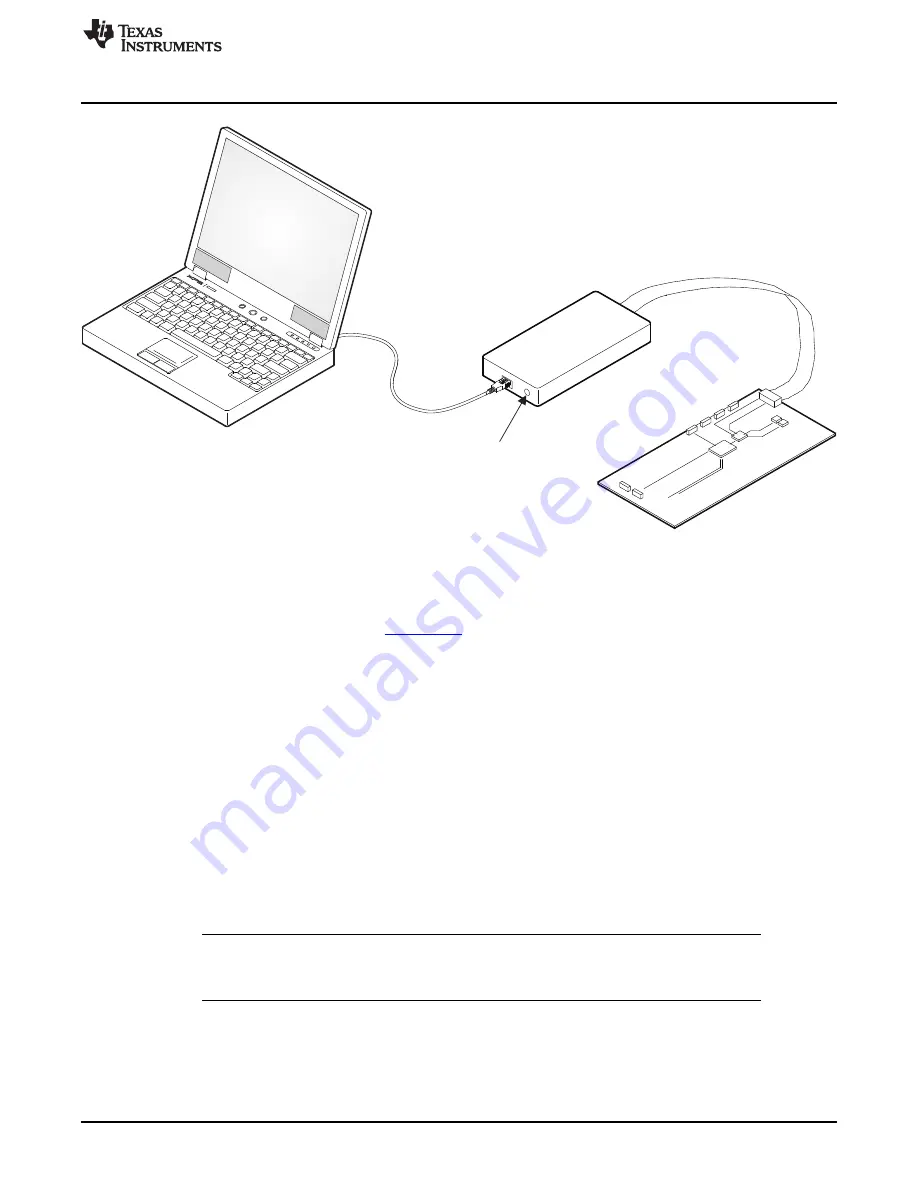
Host

Computer

USB Cable

USB

Interface

Adapter

Green LED

Indicates

Power

10-Pin

Ribbon

Cable

EVM Board

www.ti.com

Bench Test Setup Conditions

Figure 8. USB Interface Adapter Quick Connection Diagram

5.4

Installing Software

If installing from the TI Web site, go to

www.ti.com

.

Note: This installation page is best viewed with the Microsoft

®

Internet Explorer

®

browser (It may not

work correctly with other browsers)

Click on the install button; your PC should give you a security warning and ask if you want to install this
application. Select Install to proceed. If a pre-release or Beta version is currently installed on your PC, you
must uninstall this version of the software before installing the final version.

To run the software after installation, go to Start

All programs

Texas Instruments

TPS65276V

EVM Software.

At start-up, the software first checks the firmware version of the USB-TO-GPIO adapter box. If an incorrect
firmware version is installed, the software automatically searches on the internet (if connected) for
updates. If a new update is available, the software gives notification of the update, and downloads and
installs the software. Note that after the firmware is updated the USB cable between the adapter and PC
must be disconnected and then reconnected, as instructed during the install process. The host PC
software also automatically searches on the internet (if connected) for updates. If a new update is
available, the software gives notification of the update and downloads and installs it. During future use of
the software, a prompt may be given to install a new version, if one becomes available.

NOTE:

VeriSign™ Code Signing is used to prevent any malicious code from changing this

application. If at any time in the future the binaries are modified, the code will no longer
attempt to run.

9

SLVU878 – February 2013

4.5-V to 18-V Input, Dual (6.5-A and 3.5-A) Synchronous Step-Down

Converter With I

2

C Controlled VID and Current Sharing Evaluation Module

Submit Documentation Feedback

Copyright © 2013, Texas Instruments Incorporated

Содержание TPS65276V PMIC

Страница 1: ...7 TPS65276V EVM Bill of Materials 12 List of Figures 1 TPS65276V Schematic 3 2 Component Placement Top Layer 4 3 Board Layout Top Layer 5 4 Board Layout Second Layer 5 5 Board Layout Third Layer 6 6...

Страница 2: ...z to 1 6 MHz external compensation soft start and enable As there are many possible options to set the converters Table 1 presents the performance specification summary for the EVM Table 1 Summary of...

Страница 3: ...MIC EVM schematic Figure 1 TPS65276V Schematic 3 SLVU878 February 2013 4 5 V to 18 V Input Dual 6 5 A and 3 5 A Synchronous Step Down Converter With I2 C Controlled VID and Current Sharing Evaluation...

Страница 4: ...boards for this EVM Figure 2 Component Placement Top Layer 4 4 5 V to 18 V Input Dual 6 5 A and 3 5 A Synchronous Step Down SLVU878 February 2013 Converter With I2 C Controlled VID and Current Sharin...

Страница 5: ...4 Board Layout Second Layer 5 SLVU878 February 2013 4 5 V to 18 V Input Dual 6 5 A and 3 5 A Synchronous Step Down Converter With I2 C Controlled VID and Current Sharing Evaluation Module Submit Docum...

Страница 6: ...6 Board Layout Bottom Layer 6 4 5 V to 18 V Input Dual 6 5 A and 3 5 A Synchronous Step Down SLVU878 February 2013 Converter With I2 C Controlled VID and Current Sharing Evaluation Module Submit Docu...

Страница 7: ...ut1 Vout2 Figure 7 Header Description and Jumper Placement Table 2 shows the I O connections for the EVM Table 2 Input Output Connection Jumper Number Function Description J1 Vin Connector Apply power...

Страница 8: ...required for synchronization The EVM kit includes a USB TO GPIO interface box which when installed on a PC and connected to the EVM allows communication with the EVM via a GUI interface The minimum P...

Страница 9: ...firmware version is installed the software automatically searches on the internet if connected for updates If a new update is available the software gives notification of the update and downloads and...

Страница 10: ...to select the output voltage two to configure the buck converter s operation and one for status feedback Changes are made by selecting and checking the components in the GUI on the left hand side and...

Страница 11: ...to J1 3 Toggle JP1 or JP2 to enable Vout1 and Vout2 respectively 4 Apply loads to the output connectors 11 SLVU878 February 2013 4 5 V to 18 V Input Dual 6 5 A and 3 5 A Synchronous Step Down Converte...

Страница 12: ...Two Pin Header 14 HEADER 10 PIN 3 1 JP15 HEADER10 3M N2510 6002 RB Ten Pin Header 15 3 3uH 2 L1 L2 IND3 Coilcraft MSS1048 332NLB SMT power inductor 16 100K 2 R1 R2 0603 Generic RES 100k OHM 1 10W 1 0...

Страница 13: ...ncy energy and has not been tested for compliance with the limits of computing devices pursuant to part 15 of FCC or ICES 003 rules which are designed to provide reasonable protection against radio fr...

Страница 14: ...na type and its gain should be so chosen that the equivalent isotropically radiated power e i r p is not more than that necessary for successful communication This radio transmitter has been approved...

Страница 15: ...roduct only after you obtained the license of Test Radio Station as provided in Radio Law of Japan with respect to this product or 3 Use of this product only after you obtained the Technical Regulatio...

Страница 16: ...property damage personal injury or death If there are questions concerning these ratings please contact a TI field representative prior to connecting interface electronics including input power and in...

Страница 17: ...sponsible for compliance with all legal regulatory and safety related requirements concerning its products and any use of TI components in its applications notwithstanding any applications related inf...

Отзывы: