background image

www.ti.com

DRV10987 GUI

9

SLOU476 – August 2017

Submit Documentation Feedback

Copyright © 2017, Texas Instruments Incorporated

DRV10987 Evaluation Module User's Guide

4.2.4.2

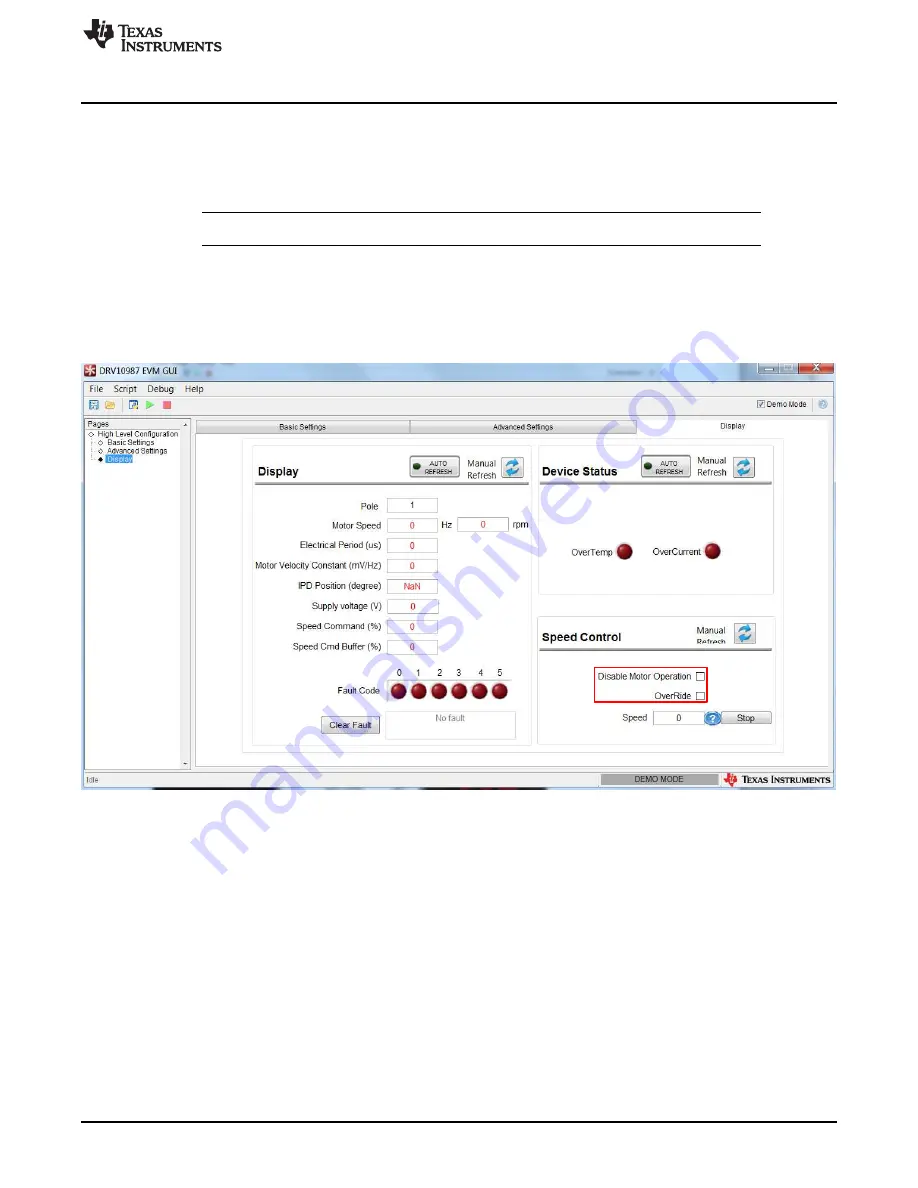
Display

The

Display

tab monitors the device status and motor parameters.

The left section of the

Display

tab (also called

Display

) shows all motor parameters. The parameters can

be refreshed manually, or automatically every second.

NOTE:

Auto refresh may slow communication with the device.

The right section of the

Display

tab shows the device status. An active fault condition lights the red

indication.

Control the motor speed from the GUI with the speed control options in the bottom section of the

Display

tab. To control the motor speed using the GUI, check the OverRide bit and set the motor speed from 0 to
511 decimal. To disable Motor Operation, check the Disable Motor Operation bit.

Figure 7. DRV10987 GUI Display Settings

Содержание DRV10987 EVM

Страница 1: ...3 4 Jumper J1 Direction 5 3 5 Jumper J2 Speed Input 5 3 6 FG Test Pin 5 4 DRV10987 GUI 6 4 1 Overview 6 4 2 Basic Settings 6 5 Out of the Box Quick Start Guide 10 6 Power On Sequence and Connection With User Specific Motor 15 7 Schematic and Bill of Materials 15 7 1 Schematic 15 7 2 Bill of Materials BOM 17 Appendix A GUI Installation and Overview 18 Appendix B GUI to DRV10987 Register Cross Refer...

Страница 2: ... USB2ANY Start Installation 23 27 USB2ANY Installation Complete 24 28 Basic Settings Page 25 29 Confirmation on Voltage Level 26 30 Help Icon 27 31 Advanced Settings 27 32 Display 28 33 About Page 29 34 File Menu 30 35 Script Menu 31 36 Launch Macro 31 37 Start Recording 32 38 Stop Recording 33 39 Run Macro 34 40 Debug Menu 35 List of Tables 1 P1 Terminal Assignments 4 2 P2 Terminal Assignments 4 ...

Страница 3: ...luate the device features 2 Introduction The DRV10987 EVM is a complete solution for evaluating the DRV10987 12 V or 24 V three phase sensorless BLDC motor drivers Device evaluation and configuration for specific applications is possible with the provided DRV10987 EVM GUI This document describes the kit details and explains the functions and locations of test points jumpers and connectors present ...

Страница 4: ...escription 1 VCC 2 W 3 V 4 U 5 GND 3 2 Test Point Connector P2 The P2 connector can be used to measure signals from the DRV10987 device P2 is not populated Table 2 lists the pin assignment of terminal P2 Table 2 P2 Terminal Assignments Pin Description 1 GND 2 VREG 3 V1P8 4 V3P3 5 SC from J3 connects to SCL of device 6 SD from J3 connects to SDA of device 7 SPEED input from PWMIN or ANALOG R2 3 3 C...

Страница 5: ...nnected DIR is set to GND shown 3 5 Jumper J2 Speed Input The motor speed input source is configured with J2 If J2 pins 2 3 is populated supply a PWM to the PWMIN test pin to control the motor speed If J2 pins 1 2 is populated the motor speed is controlled with the analog potentiometer R2 equipped on the EVM Table 5 SPEED Pin Setting J2 Connection Description 1 2 Analog Pot R2 shown 2 3 PWMIN digi...

Страница 6: ...tab is the landing screen after launching the GUI on the computer The tab sets the motor parameters startup parameters initial speed detection prior to startup and current limits This tab can also load and save motor parameters and program the EEPROM with optimized settings Figure 2 DRV10987 GUI Basic Settings 4 2 1 Communication The GUI is designed to work with and without the hardware connected ...

Страница 7: ...ues Figure 4 shows the checkbox enabled Figure 4 Example Checkbox Text box The text box allows users to input data that might be changed by the device because of the data type conversations In Figure 5 a value of 1 5 was entered and the nearest value 1 552 was selected Figure 5 Example Text Box 4 2 4 Work With EEPROM The settings are saved and loaded using the Save and Load buttons on the Basic Se...

Страница 8: ...10987 Evaluation Module User s Guide 4 2 4 1 Advanced Settings The Advance Settings tab controls functions such as lock detection anti voltage surge AVS dead time PWM frequency Current Limit for Lock Detection slew rate Duty Cycle Limit spread spectrum modulation and Temp Warning Action Figure 6 DRV10987 GUI Advanced Settings ...

Страница 9: ... be refreshed manually or automatically every second NOTE Auto refresh may slow communication with the device The right section of the Display tab shows the device status An active fault condition lights the red indication Control the motor speed from the GUI with the speed control options in the bottom section of the Display tab To control the motor speed using the GUI check the OverRide bit and ...

Страница 10: ...1 Phase sequence is not important as it only determines the direction of rotation Step 4 Connect the USB2ANY board to the computer using the supplied USB cable Step 5 Connect the 10 pin ribbon cable header to J4 on the USB2ANY board and J3 on the DRV10987 EVMs Step 6 Connect a power supply to VCC pin1 and GND pin 5 of connector P1 WARNING Caution Hot surface Contact may cause burns Do not touch St...

Страница 11: ...nitial GUI Screen If the Demo Mode button was clicked the GUI displays the Basic Settings as shown in Figure 10 Click the Demo Mode checkbox to deselect the demo mode communication and proceed to step 11 If the Retry button was selected the GUI displays the screen as shown in Figure 11 directly after step 10 Figure 10 GUI in Demo Mode Step 11 The status bar displays HARDWARE CONNECTED and the bar ...

Страница 12: ...Copyright 2017 Texas Instruments Incorporated DRV10987 Evaluation Module User s Guide Figure 11 Enable Configure Step 12 The Display tab provides fault code information CAUTION Do not short motor phases to VCC at connector P1 specifically P1 2 Wphase to P1 1 VCC because EVM is in power on condition ...

Страница 13: ... increase as increasing PWM duty cycle and the motor speed decrease as decreasing PWM duty cycle In analog input mode the motor speed increases as the pot R2 is turned clockwise and decreases as the pot R2 is turned counter clockwise For DRV10987 Sleep mode device check the Disable Motor Operation bit connect the motor phases of the user motor to connector P1 load or change desired parameter infor...

Страница 14: ...opyright 2017 Texas Instruments Incorporated DRV10987 Evaluation Module User s Guide Figure 13 Disabled Motor Operation Selected Step 13 Change the motor direction by connecting or removing jumper J1 Step 14 Switch to the Display tab and select the OverRide checkbox to override the PWM speed control ...

Страница 15: ...OverRide checkbox 6 Power On Sequence and Connection With User Specific Motor When the supplied motor is evaluated a user motor can be evaluated The DRV10987 EVMs are shipped with default EEPROM settings for all registers which may or may not be suitable to operate the target motor To connect the user motor to the EVM follow the steps listed in Section 5 to avoid any damage to the EVM To successfu...

Страница 16: ...3 J2 PWMIN V3P3 TP4 25k ohm R2 0 1µF C7 GND GND GND J6 U V W SPEED VCP CPP SW VREG V3P3 V1P8 DIR SDA SCL GND FG Optional Diode DNP GND VCC 0 1µF C4 4 7µF C6 DNP 0 01µF C5 1µF C3 1µF C2 GND GND 78 7 R7 DNP 78 7 R6 DNP 47uH L1 10µF C1 GND D1 DNP GND CPP 2 CPN 3 SW 4 SWGND 5 VREG 6 V1P8 7 GND 8 V3P3 9 SCL 10 SDA 11 FG 12 SPEED 13 DIR 14 PGND 15 PGND 16 U 17 U 18 V 19 V 20 VCP 1 W 21 W 22 VCC 23 VCC 2...

Страница 17: ...Hemisphere 0 44 X 0 20 Clear 3M SJ 5303 CLEAR 4 J1 Header 100mil 2x1 Tin plated TH Molex 90120 0122 1 J2 J4 Header 100mil 3x1 Tin plated TH Sullins Connector Solutions PEC03SAAN 2 J3 Header shrouded 100mil 5x2 Gold TH TE Connectivity 5103308 1 1 J5 J6 1mm Uninsulated Shorting Plug 10 16mm spacing TH Harwin D3082 05 1 L1 Inductor Shielded Drum Core Ferrite 47uH 1 15A 0 216 ohm SMD Coiltronics DR74 ...

Страница 18: ...lation is completed A 1 System Requirements The system requirements are as follows Supported OS Microsoft Windows XP Windows 7 32 bit 64 bit Recommended RAM memory 4GB or higher Recommended CPU operating speed 3 3 GHz or higher A 2 Installation Procedure The following procedure describes how to install the DRV109xxEVM GUI The installer also installs Python 2 7 USB2ANY SDK along with the GUI instal...

Страница 19: ...up window is displayed as shown in Figure 17 Click the Next button to begin the setup wizard Figure 17 GUI Installation Initialization 3 The license agreement is displayed next as shown in Figure 18 Read through the agreement carefully and select the I accept the agreement radio button and then click the Next button to proceed to the next step Figure 18 License Agreement ...

Страница 20: ...nd Overview 4 Set the destination directories for the GUI installation and click the Next as shown in Figure 19 TI recommends to keep the default values as provided in the installer Figure 19 GUI Destination Directory 5 The Ready to Install window appears next as shown in Figure 20 Click the Next to begin installation Figure 20 GUI Start Installation ...

Страница 21: ...nstaller begins self extraction and proceeds with the installation as shown in Figure 21 Figure 21 GUI Installation in Progress 7 After the installation of the GUI the Python installation initiates When Python is installed a the window shown in Figure 22 is displayed Click the Finish button to proceed with the USB2ANY installation Figure 22 Python Installation Complete ...

Страница 22: ...e USB2ANY installation is displayed as shown in Figure 23 Click the Next button to proceed with the initialization Figure 23 USB2ANY Installation Initialization 9 The license agreement is displayed next as shown in Figure 24 Read through the agreement carefully and select the I accept the agreement radio button and then click the Next button to proceed Figure 24 USB2ANY License Agreement ...

Страница 23: ... Installation and Overview 10 Set the destination directories for the USB2ANY installation and click the Next as shown in Figure 25 Figure 25 USB2ANY Destination Directory 11 The Ready to Install window is displayed next as shown in Figure 26 Click the Install button to begin the USB2ANY installation Figure 26 USB2ANY Start Installation ...

Страница 24: ...t include the LabVIEW Run Time Engine Go to http www ni com download labview run time engine 2014 4887 en to download the National Instruments LabVIEW Run Time Engine A 3 GUI Overview The DRV10987 GUI was developed to communicate with the device to configure different registers within the device and to understand the response based on the configurations The following sections describe some of the ...

Страница 25: ...ta use If the Enable Configure button is enabled the control turns green in color the register data is used or else the control turns red the EEPROM data is used A 3 1 1 2 Enable IPD Clicking the Enable IPD checkbox enables and disables the controls related to IPD settings If this control is disabled a value 0 is written to the IPD current threshold If the control is enabled a value 1 is written t...

Страница 26: ...lue of the corresponding fields from the registers and updates the controls The function of this button is same in every section A 3 1 1 6 Save Motor Configuration The Save Motor Configuration button saves the current motor configuration to a file that is later loaded into the GUI using the Load button The button saves the last read values of the registers Perform a manual refresh operation before...

Страница 27: ... Texas Instruments Incorporated GUI Installation and Overview Figure 30 Help Icon A 3 1 2 Advanced Settings The Advanced Settings tab contains controls to handle the frequency overflow Current Limit for Lock Detection FG motor pole option and so forth see Figure 31 Figure 31 Advanced Settings ...

Страница 28: ...ntrols of the motor parameters which read the latest value of the corresponding fields from the registers and update the controls The rate of auto refresh is specified in the configuration file found parallel to the application The function of this button is same in every section A 3 1 3 2 Pole The number entered into the Pole text field is used to calculate the RPM in the Display section given by...

Страница 29: ...mit Documentation Feedback Copyright 2017 Texas Instruments Incorporated GUI Installation and Overview A 3 1 3 4 About The About window provides the details like the GUI version supported OS and the firmware version of the USB2ANY Figure 33 About Page ...

Страница 30: ... the time consumption in repeating similar operations Scripting is helpful in situations where performing a particular device function requires setting 10 to 15 registers on the device to a particular value In these circumstances scripts can be recorded and run whenever needed In DRV10987 EVM GUI the scripting occurs using Python A 3 2 2 1 Recording and Running Scripts Use the following steps to r...

Страница 31: ...porated GUI Installation and Overview Figure 35 Script Menu An untitled empty Python window opens in the Idle IDE see Figure 36 Figure 36 Launch Macro When the Idle IDE Python window appears the Start Recording option is enabled under the Script menu The Start Recording button is also available as shown in Figure 37 ...

Страница 32: ...ns performed on the GUI are recorded in the Idle IDE Python window The recording function is indicated in the untitled Idle IDE Python window when the window flashes green while the window is recording as shown in Figure 37 Figure 37 Start Recording The Idle IDE Python window captures predefined actions only While recording no action such as moving the cursor or entering data has to be performed i...

Страница 33: ...op Recording The Launch Script Window remains open after the recording has been stopped as shown in Figure 38 This window can be closed with or without saving To save the script it must be saved with extension py under the script folder To run the script go to the Run menu and select the Run Modeul option in the untitled Idle IDE Python window as shown in Figure 39 ...

Страница 34: ...o the File menu and select the Open option in the Idle IDE Python window Select the file from the Scripts folder A 3 2 2 2 Debug The debug option is used for the following operations Simulation Selecting the Demo menu option runs the GUI in demo mode Unselecting Demo mode runes the GUI in connected mode Debugging The Debug Log menu option logs all user activities If not selected only the high leve...

Страница 35: ...www ti com GUI Overview 35 SLOU476 August 2017 Submit Documentation Feedback Copyright 2017 Texas Instruments Incorporated GUI Installation and Overview Figure 40 Debug Menu ...

Страница 36: ...rol Advanced s CONFIG3 0x92 ISDThr 1 0 Basic Before Startup Initial Speed Detect Threshold ISDEn Basic Before Startup Enable Initial Speed Detect RvsDrEn Basic Before Startup Enable Reserve Drive RvsDrThr 1 0 Basic Before Startup Reserve Drive Brake Threshold OpenLCurr 1 0 Basic Startup Setting Open Loop Align Current OpLCurrRt 2 0 Basic Startup Setting Open Loop Current rate BrkDoneThr 2 0 Basic ...

Страница 37: ...anical AVS Mode IPDRIsMd Basic IPD Setting IPD Release Mode CLoopDis Basic Startup Setting CLoopDis ClsLpAccel 2 0 Basic Closedloop Setting Closed loop Accelerate DutyCycleLimit 1 0 Advanced Device Options Duty Cycle Limit SlewRate 1 0 Advanced Device Options Slew Rate CONFIG7 0x96 IPDAdvcAg 1 0 Basic IPD Setting IPD Advanced Angle IPDCurrThr 3 0 Basic IPD Setting IPD Current Threshold A IPDClk 1 ...

Страница 38: ...y set forth above or credit User s account for such EVM TI s liability under this warranty shall be limited to EVMs that are returned during the warranty period to the address designated by TI and that are determined by TI not to conform to such warranty If TI elects to repair or replace such EVM TI shall have a reasonable time to repair such EVM or provide replacements Repaired EVMs shall be warr...

Страница 39: ...the user guide with the maximum permissible gain and required antenna impedance for each antenna type indicated Antenna types not included in this list having a gain greater than the maximum gain indicated for that type are strictly prohibited for use with this device Concernant les EVMs avec antennes détachables Conformément à la réglementation d Industrie Canada le présent émetteur radio peut fo...

Страница 40: ...ed loads Any loads applied outside of the specified output range may also result in unintended and or inaccurate operation and or possible permanent damage to the EVM and or interface electronics Please consult the EVM user guide prior to connecting any load to the EVM output If there is uncertainty as to the load specification please contact a TI field representative During normal operation even ...

Страница 41: ...COST OF REMOVAL OR REINSTALLATION ANCILLARY COSTS TO THE PROCUREMENT OF SUBSTITUTE GOODS OR SERVICES RETESTING OUTSIDE COMPUTER TIME LABOR COSTS LOSS OF GOODWILL LOSS OF PROFITS LOSS OF SAVINGS LOSS OF USE LOSS OF DATA OR BUSINESS INTERRUPTION NO CLAIM SUIT OR ACTION SHALL BE BROUGHT AGAINST TI MORE THAN TWELVE 12 MONTHS AFTER THE EVENT THAT GAVE RISE TO THE CAUSE OF ACTION HAS OCCURRED 8 2 Specif...

Страница 42: ... TI Resource NO OTHER LICENSE EXPRESS OR IMPLIED BY ESTOPPEL OR OTHERWISE TO ANY OTHER TI INTELLECTUAL PROPERTY RIGHT AND NO LICENSE TO ANY TECHNOLOGY OR INTELLECTUAL PROPERTY RIGHT OF TI OR ANY THIRD PARTY IS GRANTED HEREIN including but not limited to any patent right copyright mask work right or other intellectual property right relating to any combination machine or process in which TI product...

Страница 43: ...Mouser Electronics Authorized Distributor Click to View Pricing Inventory Delivery Lifecycle Information Texas Instruments DRV10987EVM ...

Отзывы: