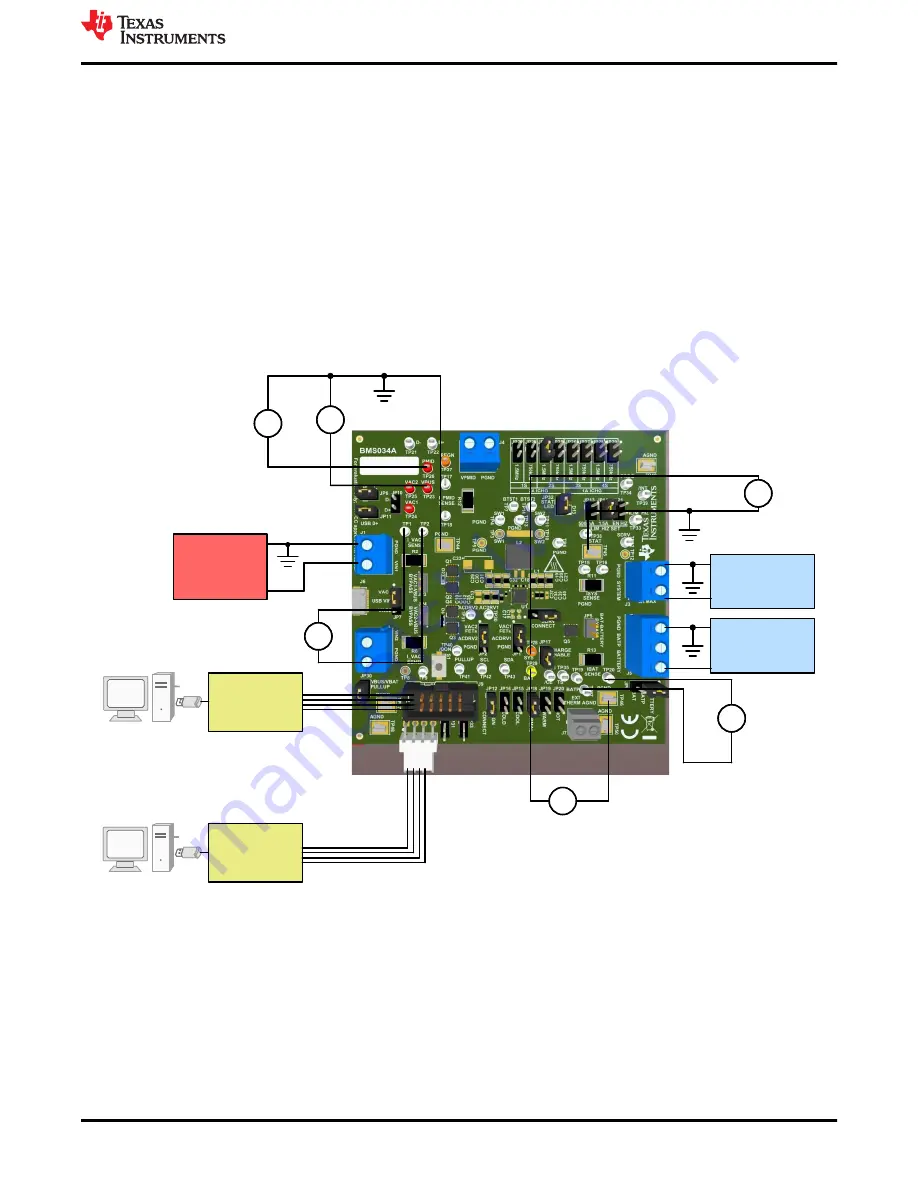
1. Review the EVM connections in
.
2. Set PS#1 for 5.0-V, 3-A current limit and then turn off the supply. Connect PS#1 to J1 (VIN1 and PGND).
3. Connect a voltage meter across TP23 (VBUS) and TP44 (PGND) to measure the input voltage as seen from
the VBUS pins of the charger.
4. Connect a voltage meter across TP1 and TP2 (I_VAC1_SENSE) to measure the input current into the VBUS
pins through the VIN1 path. Alternatively, you may connect a current meter between PS1 and J1.
5. Set Load #1 to constant voltage mode, capable of sinking (for example, compliance) at least 3 A, and output
to 5.0 V, and then disable load. Connect Load #1 to J5 (BATTERY and PGND).
6. Connect a voltage meter across TP29 (BAT) and TP46 (PGND) to measure the battery voltage as seen from
the BAT pins of the charger.
7. Connect a voltage meter across TP19 and TP20 (I_BAT_SENSE) to measure the battery charge current out
of and discharge current into BAT pins. Alternatively, you may connect a current meter between Load #1 and
J5.
8. Connect a voltage meter across TP28 (SYS) and TP45 (PGND) to measure the system voltage as seen
from the SYS pins of the charger.
9. Install shunts as shown in
.
Power Supply #1
Load #1:
Battery
Simulator
V
V
V
+
V
V
V
EV2300/2400
USB
V
V
V
+
V
V
4-pin Connector
V
PMID
V
VBUS
V
SYS
V
BAT
V
V
V
I
VAC1
±
+
±
±
+
±
V
V
V
Optional Load #2:
eLoad or
resistor
USB2ANY
USB
OR
10-pin
Connector
I
BAT
Figure 2-1. Equipment Test Setup for Testing Battery Charging
2.3 Software Setup
The charger is controlled by a state machine that uses I
2
C registers and the state machine makes decisions
based off of the I
2
C registers. Software only helps with reading and writing to those registers.
2.3.1 BQSTUDIO using EV2400
Download the latest version of
Battery Management Studio
installation file
and follow the installation steps. The software supports Microsoft
®
Windows
®
XP, 7, and 10 operating systems.
Launch BQSTUDIO and select
Charger
. If the EVM configuration file for BQSTUDIO does not appear in the
Charger, close BQSTUDIO and either download the .BQZ file from the EVM product folder at
Test Setup and Results
SLUUCB5E – JUNE 2020 – REVISED JULY 2022
BQ25792EVM, BQ25798EVM and BQ25798BKUPEVM (BMS034) Evaluation
Module
7
Copyright © 2022 Texas Instruments Incorporated


