background image

1

-

10

Avigo User’s Guide

To set the Decimal Separator format:

Tap one of the options below 

Decimal Separator

:

¦ 

Period

1,234.56

¦ 

Comma

1.234,56

To set the Start of Week format:

Tap one of the options below 

Start of Week

:

¦ 

Sunday

¦ 

Monday

To display the next screen, tap 

Ö

; to display the previous screen, tap 

×

.

If you choose 

Ö

, the 

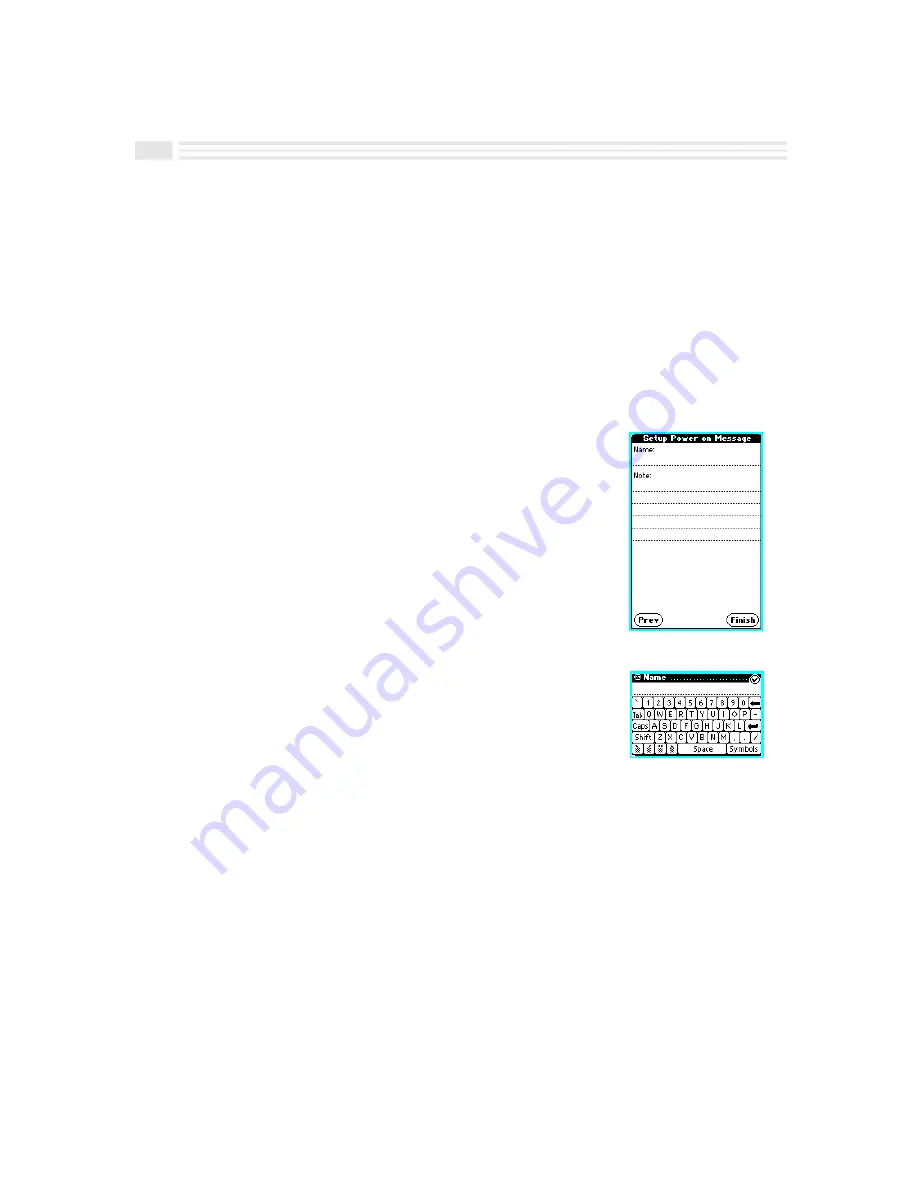
Setup Power on Message

 screen

is displayed.

Setting the Power on Message

The owner’s information can be displayed as part of the
power on graphic. The Power on Message makes it easy
for you and others to identify your own Avigo. If you
were to lose your Avigo, this information increases the
chances of it being returned to you.

To set the Power on Message:

1.

Tap on the line below 

Name

. A keyboard appears.

2.

To create the information for the

 Name 

field, use the

displayed keyboard.

3.

To save your changes and place the text, tap 

(

.

4.

Repeat the above steps for the 

Note 

field as desired.

5.

To complete the initial Setting Preferences process,
tap 



; to display the previous screen, tap 

×

.

Содержание Avigo

Страница 1: ...Avigo Quick Start Guide Avigo Financial Calculator User s Guide Avigo User s Guide...

Страница 2: ...ilson Doyle Evans Mike Tiffin Mark Hogland Jim Merchant Charles Schwope Toi Beveridge David Taylor Randy Hebert Alton Ryan Gopher Chen Andrew Chen Michael Chen Steve Ruzic Tham Nguyen Bob Vestal Other...

Страница 3: ...and 5MB for Adobe Acrobat 8MB RAM 486 or higher processor CD ROM drive floppy disk available for shipping charge Windows 95 or Windows NT Serial or Infrared port Optional spreadsheet program such as M...

Страница 4: ...area The Avigo displays the Time screen Tap on to select the current hour Tap on the minute box then tap on to select the current minute Tap on the am pm box and then tap on to select am or pm Tap on...

Страница 5: ...nt to make changes to any of these settings at a later date you can 1 Tap the apps icon to display the Applications screen Then tap the Setup icon 2 Tap on an item to change its settings Install Your...

Страница 6: ...he Avigo dock station on a flat surface near your PC Figure 1 Connect the cable connector to the PC serial port you will use If necessary use a 9 pin to 25 pin adapter Make sure that all the connector...

Страница 7: ...e Help Follow the instructions for connecting Avigo to your PC in this Quick Start Guide In Avigo Manager open the Language menu and choose Avigo The Avigo Language dialog box opens From the language...

Страница 8: ...s Mike Wilson Doyle Evans Mike Tiffin Mark Hogland Jim Merchant Charles Schwope Toi Beveridge David Taylor Randy Hebert Alton Ryan Gopher Chen Andrew Chen Michael Chen Steve Ruzic Tham Nguyen Bob Vest...

Страница 9: ...adio frequency energy and if not installed and used in accordance with the instructions may cause harmful interference with radio communications However there is no guarantee that interference will no...

Страница 10: ...y Amortization Application 3 Financial TVM Components 3 Time Lines 5 Applications 5 Using the Financial TVM Application 6 Computing an Amortization Schedule 6 Example Part 1 7 Example Part 2 8 Example...

Страница 11: ...ylus Open the Primary list box and choose Financial TVM Financial Calculator View The Financial TVM application is useful in a wide range of cash flow applications in which the cash flows are equal ev...

Страница 12: ...Setting Setting Entered Entered Setting Setting Setting Financial TVM Components On the first screen you must enter at least three variables to solve for the other unknowns Use the first screen to det...

Страница 13: ...it is assumed that the number of compounding periods per year is equal to the number of payments per year However when you select you can tap on the Compounds year input field and set the number of c...

Страница 14: ...ive numbers and outflows as negative The following time line illustrates this convention Applications You can use the TVM application for many annuities cash flow problems in which the cash flows are...

Страница 15: ...een depend on the values entered on the first screen If you want amortization data for a range of payments 1 Move to the second screen 2 Specify the range of payments by entering values for Starting p...

Страница 16: ...ication Tap the Primary list box then select Financial TVM Screen one of the Financial TVM Clear the input fields C All zeros Display the input calculator to enter the loan amount Tap the input box St...

Страница 17: ...yment 9 Compute the first year amortization data Tap on or or 119 407 46 592 54 8 194 70 Change the payment range to 10 through 21 Tap on the Starting payment input box 10 Ending payment input box 21...

Страница 18: ...oundings per year Tap on 12 or accept the default of 12 Compounds year 12 Select payments to be made at the End Tap on or accept the default Payments made at End Select two decimal places Tap on 2 or...

Страница 19: ...t the default of 12 Compounds year 12 Select payments to be made at the End Tap on or accept the default Payments made at End Select two decimal places Tap on 2 or accept the default of 2 Decimal plac...

Страница 20: ...year input box and tap on 12 or accept the default of 12 Compounds year 12 Select payments to be made at the End Tap on or accept the default Payments made at End Select two decimal places Tap on 2 o...

Страница 21: ...ie Huffman Robin Hunt Smith Win Jackson Lisa Kanarek Brent Kinard Nelah McComsey Jim Merchant Tham Nguyen Bob Pospick Steve Ruzic Alton Ryan Charles Schwope David Taylor Mike Tiffin Bob Vestal and Mik...

Страница 22: ...ction against harmful interference in a residential installation This equipment generates uses and can radiate radio frequency energy and if not installed and used in accordance with the instructions...

Страница 23: ...ad 1 6 Setting the Local City Date and Time 1 7 To set the Local City 1 7 To set the Date 1 7 To set the Time 1 7 Setting System Preferences 1 8 To set auto Power down options 1 8 To turn Alarm sound...

Страница 24: ...Start Short Cuts Introduction 2 3 Calendar Views 2 3 DayScan View 2 4 Schedule View 2 4 Daily Timeline 2 5 Week 2 5 To Do View 2 6 Address View 2 6 Memo View 2 7 Data View 2 7 Expense View 2 8 Calcul...

Страница 25: ...5 3 Setting To Do Preferences 5 4 Entering Tasks 5 4 Viewing Tasks 5 5 Editing and Deleting Tasks 5 6 To edit a Task 5 6 To delete a Task 5 6 Chapter 6 Keeping In Contact Introduction 6 3 Setting Add...

Страница 26: ...pense Summaries 9 5 Chapter 10 Making Your Sketches Paint a Thousand Words Introduction 10 3 Creating Sketches 10 3 Editing and Deleting Sketches 10 5 To edit a Sketch 10 5 To delete a Sketch 10 5 Cha...

Страница 27: ...To lock Avigo 12 6 To unlock Avigo 12 6 Managing Avigo Memory 12 6 To view memory status 12 7 To delete unwanted applications 12 7 To optimize memory 12 7 Synchronizing with Your PC 12 8 To use Wired...

Страница 28: ...Introducing Avigo 1...

Страница 29: ...ur fingertips and when new information comes along you can enter it on Avigo immediately Then you can take it back to your home or office when it s convenient and synchronize with your PC With Avigo y...

Страница 30: ...plus instructions for adding and editing entries categories and custom fields Chapters 3 through 12 cover Avigo features in greater detail Appendices provide you with Avigo character set troubleshooti...

Страница 31: ...Setting Up Your Avigo 1...

Страница 32: ...on graphic 1 9 Setting Date Time and Decimal Separator 1 9 To set the Date display format 1 9 To set the Time display format 1 9 To set the Decimal Separator format 1 10 To set the Start of Week form...

Страница 33: ...e through applications infrared ir port Establish wireless communiction contrast control Adjust brightness of the display display View applications and data application icons Access Calendar other app...

Страница 34: ...ction Select to search for data Battery Information Avigo uses two types of batteries two AAA alkaline batteries and a CR2025 lithium battery which serves as a backup for retaining information such as...

Страница 35: ...on Do not incinerate old batteries or leave them within the reach of small children or pets Opening the Cover and Turning Avigo On To open the display cover slide the open power key upward To power up...

Страница 36: ...r one item tap to go to the next preferences screen or tap to go back to the previous screen Calibrating Touch Pad Calibrating Touch Pad ensures that your Avigo performs exactly as you expect when you...

Страница 37: ...s to the right or left of the year to set the current year Use the arrows to the right or left of the month to set the current month Tap on today s date in the displayed calendar to set the current da...

Страница 38: ...oards buttons fields etc Power on graphic is a bitmap image that you choose to briefly display every time you power up Avigo To set auto Power down options 1 Open the list box to the right of Power do...

Страница 39: ...refer to the Avigo Manager online help 2 To display the next screen tap to display the previous screen tap Did you know that you can use a picture of your family or your company logo as the Power on...

Страница 40: ...ner s information can be displayed as part of the power on graphic The Power on Message makes it easy for you and others to identify your own Avigo If you were to lose your Avigo this information incr...

Страница 41: ...d Paste List boxes contain options such as entry Categories and display options such as All Active Completed etc When a menu is available for your use it is indicated by a control located on the title...

Страница 42: ...rd menu and tapping Standard T9 keyboard system The T9 keyboard system enables you to type at high speeds on the pocket sized Avigo screen By reducing the number of keys you need to press and by using...

Страница 43: ...bols such as and lets you enter foreign characters such as and The punctuation key in the top left of the keyboard makes it easy to enter a period It can also be used to enter hyphenated words such as...

Страница 44: ...the displayed keyboard Use the Shift or Caps key to access characters such as as well as upper case letters Tap on Symbols to access special characters 4 To close the keyboard and place the text in t...

Страница 45: ...0 Tap on the field you want to paste the text in 11 Open the keyboard menu and tap Paste 12 To save your changes tap Turning On the Backlight To illuminate the display in low light conditions press th...

Страница 46: ...Quick Start Short Cuts 2...

Страница 47: ...Data View 2 7 Expense View 2 8 Calculator Views 2 8 Sketch View 2 9 Adding Editing and Deleting Entries 2 10 To add an Event 2 10 To edit an Event 2 11 To delete an Event 2 11 Adding and Editing Categ...

Страница 48: ...yScan Schedule or To Do view for the selected or highlighted date One Month Six Months Year N use the 7 8 arrows to change N return to today s date Month tap on a month to select and display it Day N...

Страница 49: ...selected day Schedule View Schedule view displays scheduled Events for the currently selected day To access Schedule view select in Calendar view or press the schedule key While in Schedule view you c...

Страница 50: ...se to view previous next time blocks for the currently selected day Events details N use to view previous next event details for a selected schedule Week The Week view displays a week s scheduled Even...

Страница 51: ...rioritized A priority of 1 2 3 or No Priority may be associated with Tasks By tapping on a Task entry you can display a detail view of the Task Address View Address view displays entries of a selected...

Страница 52: ...add a new Memo N use to view previous next screens if displayed By tapping on a Memo entry you can display a detail view of the Memo In Memo detail view you can change the orientation of the Memo from...

Страница 53: ...tion N use to generate Expense summaries N use to view previous next screens Calculator Views Calculator view displays three different calculators N Standard Cost Sell Margin and Date To access Calcul...

Страница 54: ...culator Primary list box N use to switch between Standard Cost Sell Margin and Date calculators N use to solve for Start Date other two values known N use to solve for number of days other two values...

Страница 55: ...default schedule category called unfiled will be displayed A total of eight schedule categories may reside on Avigo To add or change the names of categories see Adding and Editing Categories in this c...

Страница 56: ...it You can also create a new Event by displaying an existing Event opening the Detail menu and selecting Duplicate entry then changing the newly created duplicate entry as desired To edit an Event 1 I...

Страница 57: ...ed unfiled will be displayed 3 Tap Edit Categories to add or edit a category 4 Tap a blank line in the category list to add a new category name or tap on an existing category to edit it 5 Use the disp...

Страница 58: ...contain up to sixteen items For more information see To create and edit a List in Setup in this chapter What follows are the steps for adding and editing Schedule custom fields To add and edit a Sched...

Страница 59: ...lists Method and Type which are normally used with expense information Method is used to describe how an expense will be paid Type describes the reason for the expense Select the list you want to asso...

Страница 60: ...and Type but you cannot change the names of the lists 8 Edit list names or items as desired by tapping on them and using on screen keyboards to edit them 9 To delete existing names or items Tap on th...

Страница 61: ...Planning Your Day 3...

Страница 62: ...3 2 Avigo User s Guide Contents Introduction 3 3 Using the Calendar 3 3 Six Months View 3 4 DayScan View 3 4 1...

Страница 63: ...nd the current day highlighted A dot below and to the left of a date on the Calendar indicates there is a scheduled Event in the morning of that day A dot below and to the right indicates a scheduled...

Страница 64: ...ey 3 To return to One Month view tap DayScan View DayScan view will display Events and Tasks for the currently selected day To access DayScan view 1 In One Month view tap on the desired date 2 Tap A t...

Страница 65: ...Events To Remember 4...

Страница 66: ...ing Schedule Preferences 4 3 To set Schedule preferences 4 3 Scheduling Events 4 4 To schedule an Event 4 4 Viewing Events 4 6 To view a timeline of a day 4 6 To view a week 4 7 To view Event details...

Страница 67: ...med events for a selected day Within Schedule view you can add edit or delete events view events in detail view graphical displays of the day s and week s events or go to another date Explanation of s...

Страница 68: ...1 a category is selected or created 2 dates and times are selected 3 various fields are filled out and 4 boxes are checked Custom fields may need to be created as well What follows are the steps for...

Страница 69: ...onthly or Yearly Make adjustments to frequency of occurrance starting and ending dates etc as appropriate Tap to confirm your choices or tap to close the Repeat screen without changes taking effect If...

Страница 70: ...can choose to view daily timelines of all schedule categories for a selected day or a display of a week s scheduled events To view a timeline of schedules for a selected day select To view a week s ev...

Страница 71: ...Tap to return to Schedule view Use notes to store more details about an event For example the note attached to Flight to Chicago might include the flight confirmation number seat number and even renta...

Страница 72: ...to delete to display detail view If the Event is a private one open the menu in Schedule view and select Show private Enter a password when prompted to do so 2 In the Detail screen open the menu and s...

Страница 73: ...Taming Your To Do List 5...

Страница 74: ...2 Avigo User s Guide Contents Introduction 5 3 To Do View 5 3 Setting To Do Preferences 5 4 Entering Tasks 5 4 Viewing Tasks 5 5 Editing and Deleting Tasks 5 6 To edit a Task 5 6 To delete a Task 5 6...

Страница 75: ...the Calendar screen or press the to do key the To Do View is displayed Previously created Tasks and their associated statuses and priorities will be displayed Explanation of Task status N Pending Tas...

Страница 76: ...ted at the right time be sure to prioritize all of your Tasks and scan them on a daily basis 1 Tap at the bottom of Calendar or press the to do key 2 If necessary tap to select a date for the Task Not...

Страница 77: ...selecting Show private It is a good idea to review your To Do lists daily checking off a Task when completed and monitoring pending or overdue Tasks In To Do view you can press the pgup pgdn key to g...

Страница 78: ...the current date as a default completion date You can change the completion date as desired by choosing the Due on box and selecting a date with the Date picker 4 Add change or delete information as...

Страница 79: ...Keeping In Contact 6...

Страница 80: ...tting Address Preferences 6 3 Adding Address Entries 6 4 Viewing Address Entries 6 5 To view different contact numbers 6 5 To view Address entries 6 6 Editing and Deleting Address Entries 6 6 To edit...

Страница 81: ...splayed in Schedule and DayScan views whenever the birthday is the current date Use an existing Address entry to serve as a pattern for a new one Just display an existing Address entry open the menu i...

Страница 82: ...Categories in Chapter 2 Quick Start Short Cuts 3 Tap 4 to display the New Address screen 4 Tap 2 at the bottom of the screen to display the Options screen In this screen you determine how your entrie...

Страница 83: ...newly created duplicate entry as desired Viewing Address Entries Accessing and displaying address entries is easily done To view Address entries marked Private select the Show private command and ent...

Страница 84: ...meeting Just search on the name of the company XYZ Corporation for example Then view the names of all of your contacts at that company so you ll have them fresh in your mind before the meeting Editin...

Страница 85: ...nt to delete If the entry is a private one open the menu and select Show private Enter a password when prompted to do so 2 Tap on the Address entry title to display detail view 3 Open the Detail view...

Страница 86: ...Organizing Your Data 7...

Страница 87: ...2 Avigo User s Guide Contents Introduction 7 3 Creating a New Data Table 7 4 Adding Data Table Entries 7 5 Viewing Data Table Entries 7 5 To change the display orientation 7 6 Editing Data Tables 7 6...

Страница 88: ...a tables on Avigo Transfer data from Avigo data tables into a spreadsheet on your PC Hide and lock table entries with a password to protect sensitive data Use a Search function to locate table entries...

Страница 89: ...ng data type selections will be displayed 6 Select a data type for each of the new field names from the pop up list below Data Type Choices are as follows Select When your data is Text letters numbers...

Страница 90: ...enter a password after opening the menu and selecting Show private 1 Tap on the data icon to display the data application screen 2 Select a table from the list of existing table names A list of table...

Страница 91: ...entries will be displayed Use the arrows to view entries in previous or following screens 3 To add or change table field names open the menu and choose Edit table The Edit Table screen will appear 4 A...

Страница 92: ...Turning Your Memos Into Action 8...

Страница 93: ...s Guide Contents Introduction 8 3 Adding Memos 8 4 Viewing Memos 8 5 To change the display orientation 8 5 To change the display font size 8 5 Editing and Deleting Memos 8 6 To edit a Memo 8 6 To dele...

Страница 94: ...w memos in portrait or landscape orientation View memos in normal or large fonts Use an existing memo as a pattern for a new one Just display the existing memo open the menu in the Detail screen and c...

Страница 95: ...ting Categories in Chapter 2 Quick Start Short Cuts 3 Tap 4 to add a new Memo 4 Enter a Memo title in the line to the right of Title 5 If desired password protect and hide the new Memo 6 Enter the tex...

Страница 96: ...and select Show Private Enter a password when prompted to do so 2 To display the detail view of the Memo tap on the Memo title To change the display orientation Tap at the bottom of the display scree...

Страница 97: ...the bottom of the display to edit the Memo 4 Add change or delete information as desired 5 Tap to save your changes or tap to return to the previous screen without saving your changes Collect quotes j...

Страница 98: ...Facts Figures and Finances Tracking Your Expenses 9...

Страница 99: ...ide Contents Introduction 9 3 Adding Expense Entries 9 3 Viewing Expense Entries 9 4 Editing and Deleting Expense Entries 9 5 To edit an Expense entry 9 5 To delete an Expense entry 9 5 Creating Expen...

Страница 100: ...te an Expense category for the new Expense entry Note The first time you view the category list a default category called unfiled will be displayed If you want to change the name of this category or c...

Страница 101: ...hout saving your changes You may also create a new Expense entry by displaying an existing Expense entry opening the Detail menu and selecting Duplicate entry and then changing the newly created dupli...

Страница 102: ...ou want to delete If the Expense entry is a private one open the menu and select Show private Enter a password when prompted to do so 2 Open the Detail menu and select Delete entry to delete the Expen...

Страница 103: ...B Note If desired you can open the menu and tap Copy to copy the summary total This value may be pasted in any text field by Tapping on the field where you want to paste it Opening the menu in the dis...

Страница 104: ...Making Your Sketches Paint A Thousand Words 10...

Страница 105: ...10 2 Avigo User s Guide Contents Introduction 10 3 Creating Sketches 10 3 Editing and Deleting Sketches 10 5 To edit a Sketch 10 5 To delete a Sketch 10 5 1...

Страница 106: ...h pad When you re finished with it delete it quickly and easily Creating Sketches Creating a sketch is easily done by using one or more of the drawing tools provided with Sketch You may also add prede...

Страница 107: ...on frame Drag the pasted section to the desired position on the screen Tap on the screen outside of the selection frame to confirm your choice and remove the selection frame To change the thickness of...

Страница 108: ...a Sketch by using the Toolbar You can also edit a Sketch by copying information from one Sketch and pasting it into another Deleting Sketches is easily done by displaying the Sketch opening the menu a...

Страница 109: ...Making Everything Add Up 11...

Страница 110: ...ay 11 3 To clear 11 3 To perform standard calculations 11 4 Performing Cost Sell Margin Calculations 11 6 To access the Cost Sell Margin Calculator 11 6 To perform Cost Sell Margin calculations 11 6 T...

Страница 111: ...ulator 1 Tap on the Primary list box in the Calculator screen 2 Select Standard The Standard Calculator screen will be displayed The Standard Calculator display Entries and results are displayed with...

Страница 112: ...6 18 33 N12 3 7 9 1 6 12 3 W U 7 9 U 1 6 N2 8 Multiplication and Division 12 Q 13 P 6 12 X 13 Y 6 26 28 P 0 5 Q 76 28 Y 5 X 76 4 256 Constant Calculations 2 3 2 U 3 5 4 3 4 7 8 N 6 8 V 6 2 3 N 6 3 N3...

Страница 113: ...ay Percentage Calculations 5 of 250 250 X 5 12 5 250 5 250 U 5 262 5 250 N 5 250 V 5 237 5 Memory Operations Clear Memory R R 4 Q 11 99 4 X 11 99 T M 47 96 12 Q 0 98 12 X 98 T M 11 76 R M 59 72 Clear...

Страница 114: ...greater than zero Cost values must be greater than or equal to zero Margin values must be less than or equal to one hundred Cost values can be equal to zero if and only if the Margin value is equal t...

Страница 115: ...he total number of Days is 27 find the End Date 1 Tap on the box to the right of A Date Picker will be displayed 2 If necessary use the to the left and right of the year to access the appropriate year...

Страница 116: ...Additional Features 12...

Страница 117: ...a forgotten Password 12 5 Resetting Avigo 12 5 To lock Avigo 12 6 To unlock Avigo 12 6 Managing Avigo Memory 12 6 To view memory status 12 7 To delete unwanted applications 12 7 To optimize memory 12...

Страница 118: ...for data matching the characters keyword you are interested in locating To search for data 1 Tap on the find icon to display the Find screen 2 Enter the keyword to search for by Drag selecting copying...

Страница 119: ...To designate an entry as being private check the private box when adding or editing the entry To make hidden entries visible open the menu on the Title bar and tap Show private To hide private entries...

Страница 120: ...hen set a new one However resetting a password will cause all private entries to be deleted 1 Tap on the apps icon to display the Applications screen 2 Tap on the Security icon 3 Tap A message will be...

Страница 121: ...organizer is locked Enter your password to unlock the organizer 4 Enter the current password in the Password line 5 Tap to confirm your action or tap to return to the previous screen without making a...

Страница 122: ...te Application screen A list of applications which have been copied from your PC will be displayed 2 Tap on the application you wish to delete and then tap The memory status bar will be updated automa...

Страница 123: ...ntation To use Wired Serial Port Synchronizing 1 Set up the Avigo dock station on a flat surface near your PC Figure 1 Figure 1 Figure 2 2 Connect the cable to the PC serial port you will use If neces...

Страница 124: ...the following 1 Make sure that the appropriate synchronization software is running on the PC 2 Tap on the apps icon to display the Applications screen 3 Tap on the Sync icon 4 Under Connection type se...

Страница 125: ...t has already been calculated by Avigo Whenever Daylight Savings Time occurs Avigo will automatically update your World Time settings 1 Choose the apps icon to display the Applications screen 2 Tap on...

Страница 126: ...e sure that the batteries are installed properly and that they are fresh Avigo appears to be locked up and will not respond to keyboard input Press the recessed Reset button on the back of the organiz...

Страница 127: ...Appendix B Avigo Character Set Below is the character set that may be displayed by your Avigo organizer This character set is available in both normal and bold styles 1...

Страница 128: ...4 30 p m CST on Friday For more information about TI products and services contact TI by e mail or visit the TI calculator home page on the World Wide Web ti cares ti com http www ti com organizers On...

Страница 129: ...ove limitations or exclusions may not apply to you Legal Remedies This warranty gives you specific legal rights and you may also have other rights that vary from state to state Warranty Performance Du...

Страница 130: ...igo language 1 11 Contact numbers 6 5 Conventions 0 3 Copying applications 12 9 Cost sell margin calculations 11 7 Cost sell margin calculator 2 9 Creating a new data table 7 4 Creating expense summar...

Страница 131: ...short cuts 2 1 R Repeating events 4 5 Resetting Avigo 12 5 S Schedule preference settings 4 3 view 2 4 view screen 4 3 Scheduling events 4 4 Service and warranty C 1 Setting date time and decimal sep...

Страница 132: ...h pad 1 6 Turning Avigo on 1 5 U Unlocking Avigo 12 6 Untimed events 4 5 Using the stylus 1 5 V Viewing a week 4 7 address entries 6 5 data table entries 7 5 event details 4 7 events 4 6 expense entri...

Отзывы: