background image

www.ti.com

Testing the EVM in CW Mode

17

SLOU430A – December 2015 – Revised February 2016

Submit Documentation Feedback

Copyright © 2015–2016, Texas Instruments Incorporated

AFE5818 16-Channel Analog Front End Evaluation Module (EVM Rev. C)

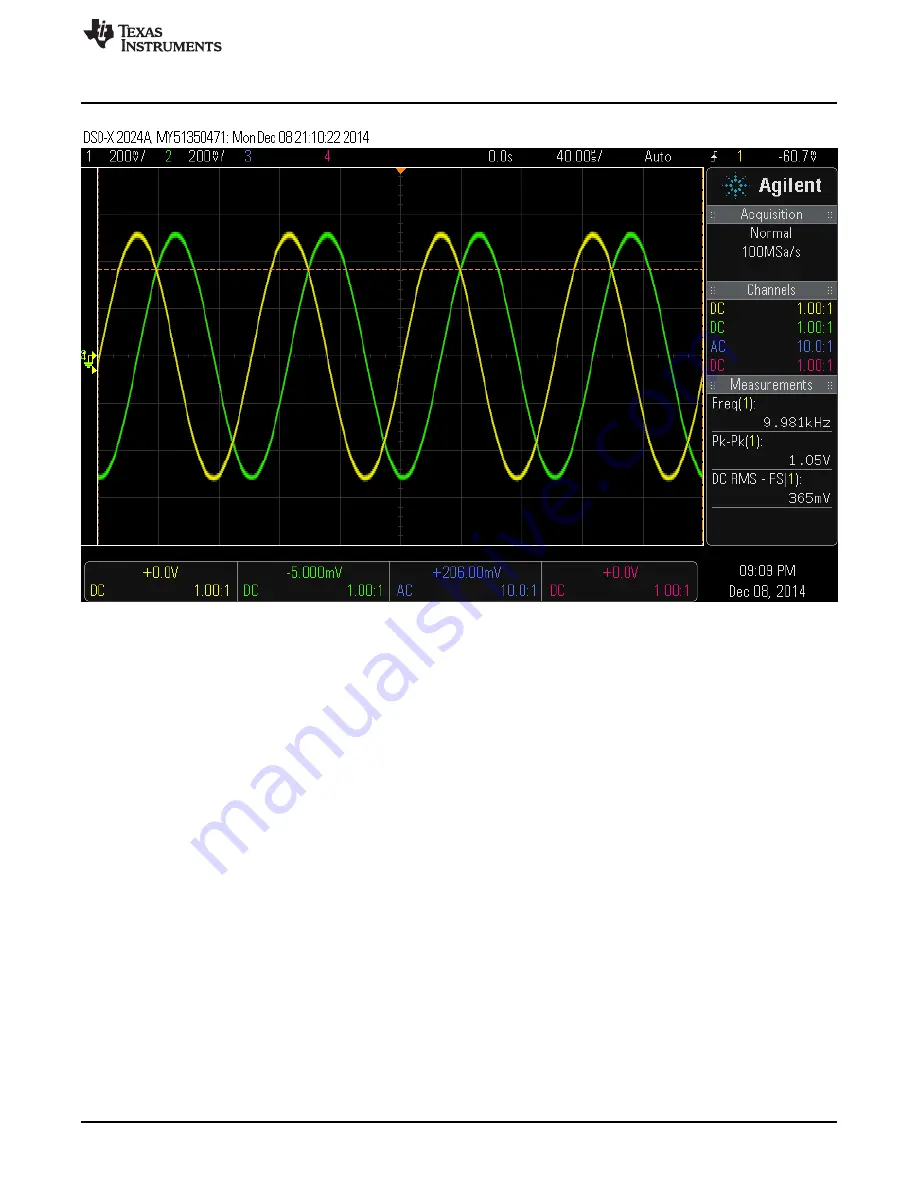
Figure 24. CW Output

Содержание AFE5818

Страница 1: ...to function For any further questions regarding the EVM GUI or device please contact AFE5818 support list ti com Contents 1 EVM Hardware Overview 4 2 GUI Software Installation 5 3 Quick Views of Evaluation Setups for LVDS Interface 6 3 1 Equipment Setup Overview 6 4 Testing the EVM Data Capture With LVDS 8 4 1 EVM Hardware Setup 8 4 2 Capturing an Analog Input Signal With the LVDS Interface 9 5 Te...

Страница 2: ...ation Ready 25 39 HMC DAQ GUI Install Installation Progress 25 40 HMC DAQ GUI Install LabView Run time Engine Installation 26 41 HMC DAQ GUI Install LabView Run time Engine Installation 26 42 HMC DAQ GUI Install LabView Run time Engine Installation 27 43 HMC DAQ GUI Install LabView Run time Engine Installation 27 44 HMC DAQ GUI Install LabView Run time Engine Installation 28 45 HMC DAQ GUI Install...

Страница 3: ... Analog Front End Evaluation Module EVM Rev C 65 AFE5818 Rev C EVM Schematic 9 of 11 48 66 AFE5818 Rev C EVM Schematic 10 of 11 49 67 AFE5818 Rev C EVM Schematic 11 of 11 50 68 Enable NET Framework 57 69 Read DDR Error for No Capture 58 List of Tables 1 Default Header Configuration Table Rev C 32 2 EVM Rev C Testpoints 32 3 AFE5818 EVM Bill of Materials 51 ...

Страница 4: ...on Feedback Copyright 2015 2016 Texas Instruments Incorporated AFE5818 16 Channel Analog Front End Evaluation Module EVM Rev C 1 EVM Hardware Overview Figure 1 AFE5818 EVM Hardware Overview The EVM received should resemble Figure 1 For more hardware details and the default jumper map see Appendix B ...

Страница 5: ...or J1 Connector 2 GUI Software Installation The AFE5818 EVM and the TSW capture card EVM have individual software and both require software installations Ensure that no USB connections are made to the EVMs until after the installations are complete This user s guide refers to software HMC DAQ GUI v 2 8 or higher and HSDCPro Software v 4 1 or higher See the HSDCPro Installation section for informat...

Страница 6: ... analysis using the graphical user interface GUI called High Speed Data Converter Pro HSDCPro For more information on the TSW1400EVM see TSW1400EVM Power Supply A barrel connector power cable is provided with the EVM and is connected at J1 but does not support the 5 V needed for the CW mode or Vcntl circuit This requires an additional cable not provided This 5 V power supply must be able to source...

Страница 7: ...e input signal 0 01 MHz to 40 MHz for optimal performance An on board crystal oscillator option is provided so that an external clock source is not needed for basic capture Additionally for best performance a band pass filter BPF is recommended on the analog input signal to attenuate the harmonics and noise from the signal For coherent sampling or custom sample rate an external clock is provided t...

Страница 8: ...N of the TSW1400 EVM See the TSW manual for more information if needed Next connect a 5 V 2 A power supply using the provided power cable to J1 of the AFE5818 EVM Connect the white striped side of this cable to the 5 V power supply Optionally connect a 5 V 1 A supply at J3 or TP3 if using the CW or Vcntl circuit No cable is provided for this Turn on the TSW1400 at the SW7 switch 3 USB After instal...

Страница 9: ...he hardware is connected correctly as in Section 4 1 follow these steps to acquire data HSDCPro Actions 1 Connect both EVMs to the PC using two USB cables as instructed in Section 4 1 2 Open HSDCPro GUI using Run as Administrator Do not open the HMC DAQ GUI before this step because it opens automatically If it is already open close it 3 If the TSW Hardware is already connected to the USB then a po...

Страница 10: ...log Front End Evaluation Module EVM Rev C Figure 7 Choose Firmware AFE5818 Shown 6 When prompted to update firmware click the Yes button Figure 8 Update Firmware 7 The firmware begins downloading to the FGPA on the TSW EVM Figure 9 Firmware Download Progress Bar 8 When the firmware has finished downloading several Green LEDs are lit on the TSW EVM For the TSW1400 D5 USER_LED3 may be on and D6 is o...

Страница 11: ...015 2016 Texas Instruments Incorporated AFE5818 16 Channel Analog Front End Evaluation Module EVM Rev C Figure 10 TSW LEDs Turn On After FW Download 9 The AFE5818 EVM GUI HMC DAQ opens automatically at this time Wait until this is finished to continue If any errors arise at this time consult a TI engineer Figure 11 Launching Device GUI EXE ...

Страница 12: ...ev C Figure 12 HMC DAQ GUI Launches 10 In HSDCPro change the Test Selection to Single Tone 11 In HSDCPro change the window type to Blackman HMC DAQ GUI Actions 1 Verify the clock configuration by matching J36 J34 J31 and J37 to Figure 13 Figure 13 Clock Configuration on AFE EVM for LVDS 2 Press the AFE_RST button on the AFE EVM located above the AFE device SW1 Hold for 1 second Alternatively press...

Страница 13: ...e Initialize Device button on the HMC DAQ GUI The progress bar indicates the device is configured over SPI Figure 16 Initialize Device 4 Choose the desired serialized data format in the Output Format control 5 The default ADC Format is Analog Input This requires no action Figure 17 GUI Quick Start Setup Output Data Configuration 6 At this point D5 on the TSW1400 EVM should turn on For the TSW14J56...

Страница 14: ...eady 1 Choose VCA GAIN as Mid Gain Figure 19 Choose VCA Gain 2 Return to HSDCPro and press the Capture button A capture similar to that shown in Figure 21 appears The quality of the output spectrum depends heavily on the coherency and the purity of the input signal and clock Since it is not possible to sync the input signal with the on board clock TI recommends using a window in HSDCPro found at t...

Страница 15: ...ure With LVDS 15 SLOU430A December 2015 Revised February 2016 Submit Documentation Feedback Copyright 2015 2016 Texas Instruments Incorporated AFE5818 16 Channel Analog Front End Evaluation Module EVM Rev C Figure 21 Analog Input Capture ...

Страница 16: ...Choose CW 16x 1 953 MHz Figure 23 CW Mode Preset 3 Connect a sine wave generator to SMA J6 INP1 or any other channel Set the frequency to 1 963125 MHz and the amplitude to 20 dBm 4 Connect two cables to an oscilloscope with timebase 40 µs and 500 mV div Input resistance should be 50 Ω on each scope channel 5 Connect those two cables to SMAs J53 and J57 6 The oscilloscope displays the frequency I a...

Страница 17: ...VM in CW Mode 17 SLOU430A December 2015 Revised February 2016 Submit Documentation Feedback Copyright 2015 2016 Texas Instruments Incorporated AFE5818 16 Channel Analog Front End Evaluation Module EVM Rev C Figure 24 CW Output ...

Страница 18: ...g the TSW1400 Section A 2 provides details for installing Healthtech Multi Channel Data Acquisition HMC DAQ the software GUI which controls a suite of AFE and ADC solutions including the AFE5818 A 1 High Speed Data Converter Pro HSDCPro GUI Installation Go to the HSDCPro website Under Technical Documents find the Software section and download and save the High Speed Data Converter Pro GUI Installe...

Страница 19: ...d Software Installation 3 Read the License Agreement from Texas Instruments and select I accept the License Agreement then press the Next button as shown in Figure 26 Figure 26 HSDCPro Install TI License Agreement 4 Read the License Agreement from Texas Instruments and select I accept the agreement then press the Next button as shown in Figure 27 Figure 27 HSDCPro Install TI License Agreement ...

Страница 20: ...ntation Feedback Copyright 2015 2016 Texas Instruments Incorporated Software Installation 5 Allow the installation to be placed in the default directory by clicking Next as in Figure 28 Figure 28 HSDCPro Install Install Directory 6 Click Next to begin the installation as in Figure 29 Figure 29 HSDCPro Install Installation Ready ...

Страница 21: ...mentation Feedback Copyright 2015 2016 Texas Instruments Incorporated Software Installation 7 The Cypress Driver begins installing as shown in Figure 30 Figure 30 HSDCPro Install Cypress Driver Install 8 Click Finish to continue installation as shown in Figure 31 Figure 31 HSDCPro Install Continue Cypress Driver Installation ...

Страница 22: ...n Feedback Copyright 2015 2016 Texas Instruments Incorporated Software Installation 9 Continue Driver Installation as in Figure 32 Figure 32 HSDCPro Install Continue Driver Installation 10 Finish HSDCPro installation by choosing the installation options and pressing Finish as in Figure 33 Figure 33 HSDCPro Install Finish Installation ...

Страница 23: ...FE5818EVM Scroll down the page to the Software section for the software GUI link 1 Unzip the saved file and run the installer executable as administrator by right clicking on the file and selecting Run as Administrator Press the Next button once the graphic in Figure 34 appears Figure 34 HMC DAQ GUI Install Begin Installation 2 Read the Texas Instruments License Agreement and select I accept the a...

Страница 24: ...orated Software Installation 3 Read the National Instruments License Agreement and select I accept the agreement followed by the Next button as in Figure 36 Figure 36 HMC DAQ GUI Install NI License Agreement 4 Allow the software to be installed in the default location by pressing the Next button as in Figure 37 Figure 37 HMC DAQ GUI Install Install Directory ...

Страница 25: ...ght 2015 2016 Texas Instruments Incorporated Software Installation 5 Pressing the Next button begins installation as shown in Figure 38 Figure 38 HMC DAQ GUI Install Installation Ready 6 The window shown in Figure 39 appears showing that the installation is in progress Figure 39 HMC DAQ GUI Install Installation Progress ...

Страница 26: ... 2015 2016 Texas Instruments Incorporated Software Installation 7 Press the Next button to install the required Labview Run Time Engine as in Figure 40 Figure 40 HMC DAQ GUI Install LabView Run time Engine Installation 8 Press the Next button as in Figure 41 Figure 41 HMC DAQ GUI Install LabView Run time Engine Installation ...

Страница 27: ...tion Feedback Copyright 2015 2016 Texas Instruments Incorporated Software Installation 9 Press the Next button as in Figure 42 Figure 42 HMC DAQ GUI Install LabView Run time Engine Installation 10 Press the Next button as in Figure 43 Figure 43 HMC DAQ GUI Install LabView Run time Engine Installation ...

Страница 28: ...ncorporated Software Installation 11 Press the Next button as in Figure 44 Figure 44 HMC DAQ GUI Install LabView Run time Engine Installation 12 The run time engine installs unless it has already been detected as should be the case if the HSDCPro GUI was already installed In this case the following message appears Press the Cancel button as in Figure 45 ...

Страница 29: ...dback Copyright 2015 2016 Texas Instruments Incorporated Software Installation Figure 45 HMC DAQ GUI Install LabView Run time Engine Installation 13 Press the Yes button to confirm as in Figure 46 Figure 46 HMC DAQ GUI Install LabView RTE Cancel if Installed Already 14 Press the Finish button as in Figure 47 ...

Страница 30: ...tion Feedback Copyright 2015 2016 Texas Instruments Incorporated Software Installation Figure 47 HMC DAQ GUI Install Finished HMC DAQ is launched automatically from HSDCPro once a device has been selected Therefore there is no need to launch HMC DAQ manually and there is no need for a desktop shortcut ...

Страница 31: ...his section describes the functions of the headers on the EVM It also provides a list of test points on the EVM that are useful for debug and general use purposes B 1 1 EVM Header Configuration The AFE5818 EVM is flexible in its configurability through the use of 2 and 3 pin headers The default configuration of the EVM is set to facilitate initial testing requiring minimal bench equipment Figure 4...

Страница 32: ...nt Vcntl Amp voltage source pot or SMA 2 3 Pot J47 Vcnt SE to Diff Amp Bypass 1 2 Bypassed J49 Vcnt Vcntl Amp CM voltage to GND J26 LNA TR Enable TR_EN 1 4 J52 54 CW Output CW In phase Output M P J56 58 CW Output CW Quadrature phase Output M P B 1 2 EVM Testpoints Table 2 lists all test points on the AFE5818 EVM and their purposes Table 2 EVM Rev C Testpoints Testpoint Circuit Label Testpoint Desc...

Страница 33: ...P44 46 LMK Clock Circuit None LMK ADC Clock to Dut P N TP45 47 LMK Clock Circuit None LMK SYSREF Clock to Dut P N TP48 LMK Clock Circuit FPGA_CLK_OUT _P LMK ADC CLK to FPGA P TP49 LMK Clock Circuit None LMK VCXO output B 1 3 ADC Clock Source Configuration The AFE clock input can be driven differentially sine wave LVPECL or LVDS or single ended LVCMOS The clock input of the device has an internal b...

Страница 34: ...e the differential direct external clock as the clock source for the AFE connect shunt jumpers for configuration 2 Use this configuration for LVDS Data output only not JESD204B Also connect a single ended external clock generator to SMA J35 Set the clock source to an appropriate frequency such as 10 MHz to 80 MHz and 15 dBm amplitude Configuration 3 Default This mode uses an on board crystal to st...

Страница 35: ...ench equipment such as function generators is to generate the trigger from the TSW EVM itself This requires a feedback loop from the TSW trigger output to the TSW trigger input using a short SMA cable Secondly a second trigger output from the TSW board can be routed to the AFE EVM if needed or to external bench equipment such as a function generator See the TSW or HSDCPro manual for more informati...

Страница 36: ...quipment such as function generators is to generate the trigger from a bench trigger source such as the function generator This requires feeding the trigger source to the TSW trigger input using an SMA cable Secondly a second trigger output from the trigger source can be routed to the AFE EVM if needed See the TSW or HSDCPro manual for more information Figure 53 HSDCPro Trigger Configuration for H...

Страница 37: ...dth below 200 kHz the default assembly of the EVM results in attenuation in this range and the EVM requires hardware modification Simply change all INP and INM capacitors on the LNA inputs to 1 µF 0402 Also set the internal HPF in the AFE to the lowest setting This should support a bandwidth as low 50 kHz or lower External SPI Programming The AFE EVM allows for external access to the SPI bus for t...

Страница 38: ...pyright 2015 2016 Texas Instruments Incorporated Hardware Reference Appendix E SLOU430A December 2015 Revised February 2016 Hardware Reference E 1 AFE5818 EVM Hardware Overview The following images give an overview illustration of the EVM hardware Figure 55 AFE5818 EVM Circuits Map ...

Страница 39: ...AFE5818 EVM Hardware Overview 39 SLOU430A December 2015 Revised February 2016 Submit Documentation Feedback Copyright 2015 2016 Texas Instruments Incorporated Hardware Reference Figure 56 AFE5818 EVM Block Diagram ...

Страница 40: ...16 1 9V 1 66k 3 01k 280pF AFE58xx18 3 3V 5 1k 3 01k 158pF 3 01k R14 5 1k R13 5VA 5VA 160pF C25 1 2 3 J2 Orange D1 Red D3 TP2 IN 2 EN 1 OUT 4 NR FB 5 GND 6 GND 3 U5 TPS79601DCQR IN 2 EN 1 OUT 4 NR FB 5 GND 6 GND 3 U3 TPS79601DCQR GND GND EN 1 IN 2 OUT 4 NR 5 3 GND 6 U2 TPS79633DCQR 1 3 2 J1 1 2 3 J3 IN 2 EN 1 OUT 4 NR FB 5 GND 6 GND 3 U10 TPS79618DCQR AVDD_M AVDD_H DVDD_1 2 DVDD_1 8 AVDD_1 8 120 oh...

Страница 41: ...0 D0 1 D4 2 D2 3 VCCIO 4 D1 5 D7 6 GND 7 NC 8 D5 9 D6 10 D3 11 PWREN 12 RD 13 WR 14 USBDP 15 USBDM 16 3V3OUT 17 GND 18 RESET 19 VCC 20 GND 21 TXE 22 RXF 23 NC 24 AGND 25 TEST 26 OSCI 27 OSCO 28 U7 FT245RL 3 3V_USB_RX 5V_USB USB_D USB_D 47pF C30 47pF C32 120 ohm FB17 USB_GND USB_GND USB_GND USB_GND USB_GND 0 R22 8 9 VBUS 1 GND 5 6 7 D 2 D 3 ID 4 J5 USB_GND RESET_3 3 5 4 1 2 3 J4 0 R19 100 R23 3 3VD...

Страница 42: ...8 40 A1 A1 A2 A2 A3 A3 A4 A4 41 43 45 47 49 51 53 55 57 59 42 44 46 48 50 52 54 56 58 60 J22A 61 62 63 64 65 66 67 68 69 70 71 72 73 74 75 76 77 78 79 80 81 82 83 84 85 86 87 88 89 90 91 92 93 94 95 96 97 98 99 100 101 102 103 104 105 106 107 108 109 110 111 112 113 114 115 116 117 118 119 120 A5 A5 A6 A6 A7 A7 A8 A8 J22B SMA_INP1 SMA_INP2 SMA_INP3 SMA_INP4 SMA_INP5 SMA_INP6 SMA_INP7 SMA_INP8 SMA_...

Страница 43: ...5 J41 1 2 3 4 5 J35 3 2 1 4 5 6 PRI SEC 3 2 1 6 5 4 T4 ADT4 1WT 3 2 1 4 5 6 PRI SEC 3 2 1 6 5 4 T5 3 2 1 4 5 6 PRI SEC 3 2 1 6 5 4 T3 ADT4 1WT IN 2 S1 15 IN 3 VBB 4 EN 16 Y1 7 Y0 10 Y0 11 S0 13 VDDPECL 1 VDD1 8 VDD0 9 VDD0 12 EP 17 VSS 5 VSS 6 VSS 14 U12 CDCM1802RGTR LMK_ADC_CLKP LMK_ADC_CLKN 0 R97 0 R98 GND LMK_ADC_CLK_DIV_N GND 60 4k R94 LMK_ADC_CLK_DIV_CMOS LMKBUF_VCC GND 49 9 R92 49 9 R93 49 9...

Страница 44: ...lock Sources RESET GPO LMK RESET LMK_DATA_OUT CLKsrc_SE_2 LMK RESET 100pF C141 C144 100pF C165 C159 10pF C163 LMK_CLKIN2_P LMK_CLKIN2_N DNP DNP DNP DNP DCLKOUT0 1 DCLKOUT0 2 SDCLKOUT1 4 SDCLKOUT1 3 RESET 5 SYNC 6 NC 7 NC 8 NC 9 VCC1_VCO 10 LDOBYP1 11 LDOBYP2 12 SCK 19 SDIO 20 SDCLKOUT5 22 VCC3_SYSREF 21 SDCLKOUT5 23 DCLKOUT4 24 DCLKOUT4 25 VCC4_CG2 26 DCLKOUT6 27 DCLKOUT6 28 SDCLKOUT7 29 SDCLKOUT7...

Страница 45: ...D6 AVDD_3P3 E14 AVDD_3P3 E13 AVDD_3P3 E12 AVDD_3P3 E11 AVDD_3P3 E7 AVDD_3P3 E6 AVDD_3P3 F14 AVDD_3P3 F13 AVDD_3P3 F12 AVDD_3P3 F11 AVDD_3P3 F7 AVDD_3P3 F6 AVDD_3P3 G12 AVDD_3P3 G11 AVDD_3P3 G7 AVDD_3P3 G6 AVDD_3P3 H12 AVDD_3P3 H11 AVDD_3P3 H7 AVDD_3P3 H6 AVDD_3P3 J12 AVDD_3P3 J11 AVDD_3P3 J7 AVDD_3P3 J6 AVDD_3P3 K12 AVDD_3P3 K11 AVDD_3P3 K7 AVDD_3P3 K6 AVDD_1P8 L13 AVDD_1P8 L12 AVDD_1P8 L11 AVDD_1...

Страница 46: ...7 39 2 4 6 8 10 12 14 16 18 20 22 24 26 28 30 32 34 36 38 40 A1 A1 A2 A2 A3 A3 A4 A4 41 43 45 47 49 51 53 55 57 59 42 44 46 48 50 52 54 56 58 60 J59A 61 62 63 64 65 66 67 68 69 70 71 72 73 74 75 76 77 78 79 80 81 82 83 84 85 86 87 88 89 90 91 92 93 94 95 96 97 98 99 100 101 102 103 104 105 106 107 108 109 110 111 112 113 114 115 116 117 118 119 120 A5 A5 A6 A6 A7 A7 A8 A8 J59B DOUTM1 DOUTP1 AFE581...

Страница 47: ...9 DNP 0 R170 DNP 0 R151 DNP 0 R161 DNP 0 R153 0 R162 0 R169 0 R178 CW_Q_OUTP_INT CW_I_OUTP_INT CW_I_OUTM_INT TP36 DNP TP37 DNP 1uF C229 DC_OUTM_QP DC_INP_QP 1uF C239 DC_OUTP_QP DC_INM_QP 1uF C218 DC_OUTM_IP DC_INP_IP 1uF C228 DC_OUTP_IP DC_INM_IP 0 R165 DNP 0 R182 DNP 0 R147 DNP 0 R163 DNP 499 R152 499 R160 499 R171 499 R180 3 2 1 J55 STX 3000 1 2 3 4 5 J53 1 2 3 4 5 J57 1 2 3 J52 DNP 1 2 3 J54 DN...

Страница 48: ... R141 DNP 0 R142 DNP CPLD_UD CPLD_SL VCntl AFE58xx18 Only DTGC AFE58xx16 Only 0 R130 DNP 0 R132 TGC_UP_DOWN_EXT TGC_UP_DOWN_EXT TGC_SLOPE_EXT TGC_SLOPE_EXT TGC_SLOPE_EXT TGC_UP_DOWN_EXT ATGC DTGC VCNTLP OPAMP OPAMP OPAMP OPAMP OPAMP OPAMP 200 R128 200 R131 0 1uF C201 0 1uF C202 CM_VCON_OPAMP 0 R123 49 9 R120 390 R114 390 R113 390 R119 390 R118 100 R135 100 R133 100 R136 100 R134 0 R127 DNP 0 R129 ...

Страница 49: ... BYP_D14 1uF C99 DNP BYP_G13 AVDD_M AVDD_H GND 0 R51 0 R49 DNP DVDD_1 2 DVDD_1 8 GND GND AVDD_1 8 AGND AGND AGND 0 1uF C112 AGND AVDD_M 10µF C100 AGND AGND S1 TX_Trig 0 1uF C113 0 1uF C104 0 1uF C105 0 1uF C106 0 1uF C107 0 1uF C108 0 1uF C116 0 1uF C117 0 1uF C118 0 1uF C98 0 1uF C95 0 1uF C96 0 1uF C97 0 1uF C109 0 1uF C110 0 1uF C111 0 1uF C119 0 1uF C122 0 1uF C123 0 1uF C124 0 1uF C125 0 1uF ...

Страница 50: ...t be clean and free from flux a nd all contaminants Use of no clean flux is not ac ceptable Assembly Note ZZ4 These assemblies must comply with workmanship stand ards IPC A 610 Class 2 unless otherwise specified Label Table Variant Label Text 001 AFE58JD18EVM 002 AFE58JD16EVM Label Assembly Note ZZ1 This Assembly Note is for PCB labels only Assembly Note ZZ5 Indication for all LEDs has been marked...

Страница 51: ...8 C29 C31 C33 C34 C35 C36 C85 C86 C89 C90 C91 C92 C93 C94 C95 C96 C97 C98 C104 C105 C106 C107 C108 C109 C110 C111 C112 C113 C116 C117 C118 C119 C120 C121 C122 C123 C124 C125 C126 C127 C128 C129 C130 C137 C140 C143 C147 C148 C149 C150 C151 C152 C153 C154 C155 C156 C157 C160 C162 C166 C168 C169 C170 C171 C172 C175 C176 C177 C178 C179 C180 C181 C182 C185 C187 C188 C189 C191 C192 C193 C194 C196 C197 C...

Страница 52: ...10 X7R 0402 0402 GRM155R71H222KA01D Murata C174 1 1000pF CAP CERM 1000 pF 25 V 5 C0G NP0 0402 0402 C1005C0G1E102J TDK C186 C190 C195 C198 C207 C212 C215 C217 8 1 µF CAP CERM 1 µF 16 V 10 X5R 0603 0603 C0603C105K4PACTU Kemet C219 C227 C230 C238 4 1200pF CAP CERM 1200 pF 50 V 10 X7R 0603 0603 GRM188R71H122KA01D Murata C220 C221 C225 C226 C231 C232 C236 C237 8 3300pF CAP CERM 3300 pF 50 V 10 X7R 0402...

Страница 53: ...eo R A TH Connector 3 Leads 3 5mm Stereo Jack R A TH STX 3000 Kycon Inc LBL1 1 Thermal Transfer Printable Labels 0 650 W x 0 200 H 10 000 per roll PCB Label 0 650 H x 0 200 W THT 14 423 10 Brady R1 R7 R8 R9 R19 5 0 RES 0 5 0 1 W 0603 0603 RC0603JR 070RL Yageo America R2 1 30k RES 30k ohm 5 0 125W 0805 0805 CRCW080530K0JNEA Vishay Dale R3 1 604 RES 604 1 0 063 W 0402 0402 CRCW0402604RFKED Vishay Da...

Страница 54: ...d plated Black Shunt SNT 100 BK G Samtec 969102 0000 DA 3M T2 T3 T4 T5 4 RF Transformer 50 ohm 2 to 775 MHz SMT CD542 ADT4 1WT Minicircuits TP1 TP4 TP5 TP6 TP8 TP9 TP15 7 Red Test Point Miniature Red TH Red Miniature Testpoint 5000 Keystone TP2 TP11 TP12 TP13 TP14 TP16 TP17 TP18 TP38 9 Black Test Point Miniature Black TH Black Miniature Testpoint 5001 Keystone TP3 1 White Test Point Miniature Whit...

Страница 55: ...D8 Green RoHS no Sb Br D0008A OPA2614ID Texas Instruments Equivalent Texas Instruments U20 1 SINGLE BIT DUAL SUPPLY BUS TRANSCEIVER WITH CONFIGURABLE VOLTAGE TRANSLATION AND 3 STATE OUTPUTS DBV0006A DBV0006A SN74AVCH1T45DBVR Texas Instruments SN74AVCH1T45DBVT Texas Instruments Y1 1 OSC 3 3 V 125 MHz 15 pF SMD 7x5mm VCC1 B3B 125M000000 Vectron Y2 1 VCXO 100 MHz 3 3V SMD CVHD 950 4 CVHD 950 100 000 ...

Страница 56: ... RES 0 5 0 063 W 0402 0402 CRCW04020000Z0ED Vishay Dale R108 R109 R110 R111 R112 0 10 0k RES 10 0 k 1 0 1 W 0603 0603 ERJ 3EKF1002V Panasonic R150 R159 R167 R177 0 1 0k RES 1 0 k 5 0 1 W 0603 0603 CRCW06031K00JNEA Vishay Dale S3 0 Switch Tactile SPST NO 0 05A 12V SMT Switch 4 4x2x2 9 mm TL1015AF160QG E Switch S4 0 Switch SPST 4 Pos Top Actuated SMD SMD 8 Leads Pitch 1 27mm 1571983 5 TE Connectivit...

Страница 57: ... option requires an internet connection Do not select the child items Figure 68 Enable NET Framework Power supply capacity It is likely that both the AFE EVM and the TSW EVM do not have a wall power supply Instead they include the ability to connect to a bench top supply via the provided cable It is critical that each of these EVMs has access to 2 A of current capacity No Capture in HSDCPro It is ...

Страница 58: ...iginal October 2015 to A Revision Page Modified the abstract 1 Changed board image and text and renamed the EVM Hardware Overview section 4 Moved and changed text in the GUI Software Installation section 5 Moved and changed the section name of the Quick Views of Evaluation Setups for LVDS Interface section 6 Changed text in the Quick Views of Evaluation Setups for LVDS Interface section 6 Changed ...

Страница 59: ...ring the warranty period to the address designated by TI and that are determined by TI not to conform to such warranty If TI elects to repair or replace such EVM TI shall have a reasonable time to repair such EVM or provide replacements Repaired EVMs shall be warranted for the remainder of the original warranty period Replaced EVMs shall be warranted for a new full ninety 90 day warranty period 3 ...

Страница 60: ... by Industry Canada to operate with the antenna types listed in the user guide with the maximum permissible gain and required antenna impedance for each antenna type indicated Antenna types not included in this list having a gain greater than the maximum gain indicated for that type are strictly prohibited for use with this device Concernant les EVMs avec antennes détachables Conformément à la rég...

Страница 61: ... connecting any load to the EVM output If there is uncertainty as to the load specification please contact a TI field representative During normal operation even with the inputs and outputs kept within the specified allowable ranges some circuit components may have elevated case temperatures These components include but are not limited to linear regulators switching transistors pass transistors cu...

Страница 62: ...F REMOVAL OR REINSTALLATION ANCILLARY COSTS TO THE PROCUREMENT OF SUBSTITUTE GOODS OR SERVICES RETESTING OUTSIDE COMPUTER TIME LABOR COSTS LOSS OF GOODWILL LOSS OF PROFITS LOSS OF SAVINGS LOSS OF USE LOSS OF DATA OR BUSINESS INTERRUPTION NO CLAIM SUIT OR ACTION SHALL BE BROUGHT AGAINST TI MORE THAN ONE YEAR AFTER THE RELATED CAUSE OF ACTION HAS OCCURRED 8 2 Specific Limitations IN NO EVENT SHALL T...

Страница 63: ...esponsible for compliance with all legal regulatory and safety related requirements concerning its products and any use of TI components in its applications notwithstanding any applications related information or support that may be provided by TI Buyer represents and agrees that it has all the necessary expertise to create and implement safeguards which anticipate dangerous consequences of failur...

Отзывы: