background image

Assembly instructions


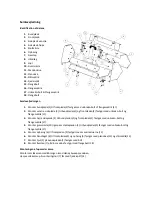
Identification of part


Bottom plate 


Front plate  


Left side plate 


Right side plate 


Dust catcher* 


Suspension 


Fixing tap  


Handle 


Wheel 


Rubber strip 


Machine screw  


Face plate  


Steel nut  


Spring cotter 


Collar bolt  


Collar nut  


Allen bolt and collar nut  


Collar bolt 

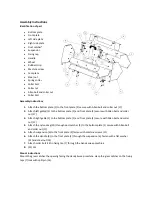
Assembly instructions


1.


Attach the bottom plate (1) to the front plate (2) secure with Allen bolt and collar nut (17) 

2.


Attach left gabled (3) to the bottom plate (1) and front plate (2) secure with Allen bolt and collar 
nut (17) 

3.


Attach right gable (3) to the bottom plate (1) and front plate (2) secure with Allen bolt and collar 
nut (17) 

4.


Attach the nylon drag (10) through dust catcher (5) to the bottom plate (1) secure with Allen bolt 
and collar nut (17) 

5.


Attach suspension (6) to the front plate (2) fasten with machine screws (11) 

6.


Attach the Handle (8) to the front plate (2) through the suspension (6) fasten with a flat washer 
(12) and steel nut (13) 

7.


Attach collar bolt (18) in fixing tap (7) through the handy sweep machine 

8.


(15/16) 

Mount instructions 


Mount the grass catcher the opening facing the Handy Sweep machine. Hasp the grass catcher on the fixing 
taps (7) lock with split pin (14). 


Содержание COLLECTOR BOX

Страница 1: ...LER KASSE COLLECTOR BOX KEHRGUT FANGKORB Texas A S Knullen 22 DK 5260 Odense S Denmark Version 12 1 Tel 45 6395 5555 www texas dk post texas dk DK Samlevejledning GB Assembly instruction DE Montageanleitung ...

Страница 2: ...tgør med unbrako bolt og flangemøtrik 17 3 Monter højre sideplade 3 til bundpladen 1 og frontpladen 2 fastgør med unbrako bolt og flangemøtrik 17 4 Monter gummiliste 10 igennem støttepladen 5 til bundpladen 1 fastgør med unbrako bolt og flangemøtrik 17 5 Monter ophæng 6 til frontpladen 2 fastgør med maskinskruerne 11 6 Monter håndtaget 8 til frontpladen 2 og ophæng 6 fastgør med planskive 12 og st...

Страница 3: ...llen bolt and collar nut 17 3 Attach right gable 3 to the bottom plate 1 and front plate 2 secure with Allen bolt and collar nut 17 4 Attach the nylon drag 10 through dust catcher 5 to the bottom plate 1 secure with Allen bolt and collar nut 17 5 Attach suspension 6 to the front plate 2 fasten with machine screws 11 6 Attach the Handle 8 to the front plate 2 through the suspension 6 fasten with a ...

Страница 4: ...und Flanschmutter 17 3 Montieren Sie die rechte Seitenplatte 3 an der Bodenplatte 1 und Frontplatte 2 Befestigen mit Inbusschraube und Flanschmutter 17 4 Montieren Sie die Kunststoff schleppe 10 und den Staubfänger 5 an die Bodenplatte 1 Befestigen mit Inbusschraube und Flanschmutter 17 5 Montieren Sie die Aufhängung 6 auf der Frontplatte 2 mit Maschinenschrauben befestigen 11 6 Befestigen Sie den...

Страница 5: ......

Страница 6: ...gkorb Tournant charrue Zbiralec box Collector Box Er fremstillet i overensstemmelse med følgende direktiver Is in compliance with the specifications of the machine directive and subsequent modifications In Form und Ausführung der Maschinen Richtlinie entspreche Correspondent aux specifications de la directive machines et aux modifications conséquentes v skladu s specifikacijami direktive o strojih...

Отзывы: