background image

User Manual for Tersus Radio RS400H3 v2.0

19

2.2 Software Configuration

The detailed steps of software configuration are as follows:
1) Hardware connection
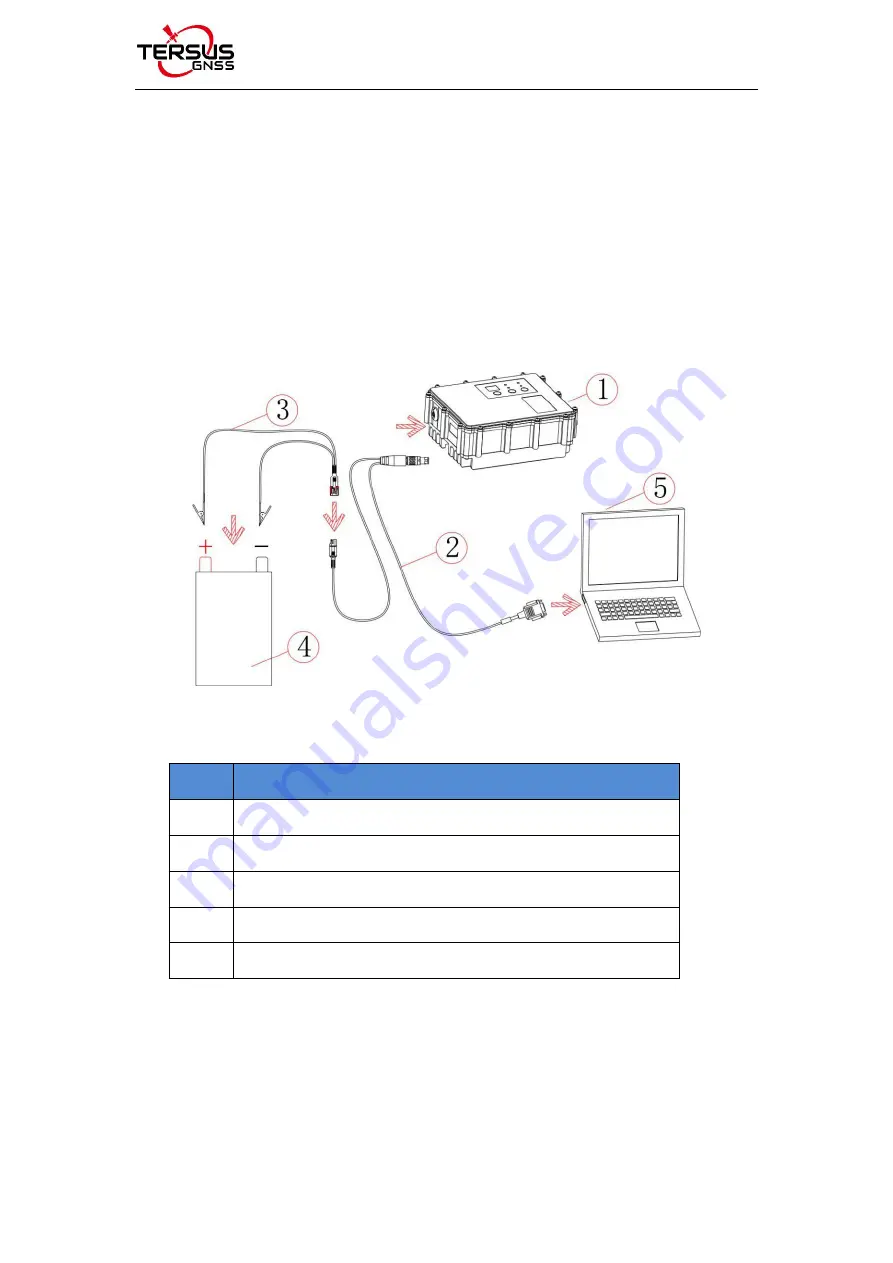
Use the accessary cables listed in section 1.3 to connect the radio to the
computer following the connection in the figure below. Power on the radio
using 12V external power supply.

Figure 2.11 Hardware connection for software configuration

Table 2.2 Devices in Figure 2.11

No.

Device Name

1

Radio RS400H3

2

Configuration cable for external radio

3

Bullet-DC to Alligator Clips

4

12V external power supply

5

Computer (Desktop/Laptop)

2) Radio Config Tool installation
Run the radio config tool installation file as administrator, and click “Next” until
installation is completed. The shortcut will appear on the desktop. Right-click

Содержание RS400H3

Страница 1: ...210728 User Manual For Tersus Radio RS400H3 Wireless Data Transceiver 2021 Tersus GNSS Inc All rights reserved Sales Technical Support sales tersus gnss com support tersus gnss com More details please...

Страница 2: ...User Manual for Tersus Radio RS400H3 v2 0 1 Revision History Version Revision Date Change summary 1 0 20200714 Initial Release 2 0 20210728 Upgrade section1 2...

Страница 3: ...tory 1 Table of Content 2 List of Figures 3 List of Tables 4 1 Introduction 5 1 1 Overview 5 1 2 Specification 6 1 3 Accessories 8 2 General Operation 12 2 1 Basic Operation 12 2 2 Software Configurat...

Страница 4: ...cable for external radio 11 Figure 2 1 Device information 14 Figure 2 2 Channel and frequency 14 Figure 2 3 Data protocol 15 Figure 2 4 Air baud rate 15 Figure 2 5 Transmit power 16 Figure 2 6 Serial...

Страница 5: ...Figure 2 19 Select firmware upgrade file 25 Figure 2 20 Start upgrade 25 Figure 2 21 Upgrade firmware successfully 26 List of Tables Table 1 1 Specifications of Radio RS400H3 6 Table 1 2 LED indicato...

Страница 6: ...mbination of stability superior performance and long range are required The RS400H3 provides high speed high power wireless data links and has been designed to survive the rigors of GNSS RTK surveying...

Страница 7: ...28W 44 5 0 5dBm DC 12V Medium level 22W 43 4 0 5dBm DC 12V Low level 5W 37 1dBm DC 12V Power stability 1dBm Adjacent channel power 50dB Distance Typical 14 16KM Antenna Antenna Impedance 50 Ohm Anten...

Страница 8: ...he definition of the LED indicators are as follows Table 1 2 LED indicators LED Description BT BT is Bluetooth green indicator light Currently RS400H3 does not support Bluetooth RX TX RX TX is data tr...

Страница 9: ...ltage 1 3 Accessories When using Radio RS400H3 to set up a base with Oscar GNSS receiver a high gain radio antenna and a telescopic pole are needed which are shown as below Figure 1 2 High Gain Radio...

Страница 10: ...al 5pin to Ext Radio DC 5pin Bullet DC Cable Figure 1 5 Bullet DC to Alligator Clips The Serial 5pin to DC JACK DB9 Male cable and the DC JACK male with two wires below are optional It is to power Osc...

Страница 11: ...C JACK DB9 Male cable Figure 1 7 DC JACK male with two wires The DB9 Female to USB Type A Male converter cable is to convert DB9 male to USB Type A male connector so that it can connect to the USB por...

Страница 12: ...r Tersus Radio RS400H3 v2 0 11 The Configuration cable for external radio below is used to configure parameters of the external radio instead of the default setting Figure 1 9 Configuration cable for...

Страница 13: ...fic functions as follows Short press the power button for about 1 second to power on the green power indicator light illuminates when successful power on under normal power supply While power on long...

Страница 14: ...han the under voltage threshold value 11 0V by default depending on the user s actual setting value the green power indicator light illuminates constantly When the voltage alarm appears if it is under...

Страница 15: ...press the power key to select this frequency as the current communication frequency the star character will appear after selection Data protocol Under this menu you can set up the current communicati...

Страница 16: ...MK3 supports 19200bps Select required air baud rate through up and down buttons and press the power button to select this air baud rate as the current communication air baud rate the star character wi...

Страница 17: ...200 38400 57600 and 115200 bps Select required serial port communication baud rate through up and down buttons and press the power button to select this serial port communication baud rate as the seri...

Страница 18: ...ps up indicating successful self adaptive matching meanwhile self adaptive triggering enabling stops automatically If the serial port baud rate is not successfully self adaptive this function is alway...

Страница 19: ...n the current channel you can modify the detection channel number manually and press the power button for detection There are three levels of detection result superior moderate poor Language Set the d...

Страница 20: ...on the radio using 12V external power supply Figure 2 11 Hardware connection for software configuration Table 2 2 Devices in Figure 2 11 No Device Name 1 Radio RS400H3 2 Configuration cable for exter...

Страница 21: ...guration tool for radio parameter configuration and query the radio is not allowed to enter the background parameter configuration mode by the buttons and OLED display 3 Radio parameter query After th...

Страница 22: ...User Manual for Tersus Radio RS400H3 v2 0 21 Figure 2 13 Select serial port and baud rate Figure 2 14 Read parameters successfully...

Страница 23: ...meter configuration In the basic information tab only radio information can be queried configurations are not supported In the channel information tab the frequency range setting is between 410 470MHz...

Страница 24: ...when setting up the low voltage alarm threshold value must be larger than wireless data transmission voltage 2 3 Firmware Upgrade When the radio runs under the normal operating mode data transmission...

Страница 25: ...re 2 17 Firmware upgrade tool 3 Select the correct serial port number and baud rate open the serial port and select internally installed radio Figure 2 18 Select serial port and baud rate 4 Click Sele...

Страница 26: ...firmware upgrade file 5 Click Start Update it will pop out a confirmation window Click OK and it will enter the upgrade status immediately Figure 2 20 Start upgrade 6 After upgrade it pops out indicat...

Страница 27: ...e radio is hooked on a tripod 1 Large amount of heat would be generated when the radio is in transmission When the radio is working please do not place the radio in poor ventilated box wrap or cover a...

Страница 28: ...this radio would result in a shortened transmission distance for the radio and it is possible to damage the radio if the mismatch is particularly serious 2 The original antenna of this radio is strict...

Страница 29: ...oint Name ASCII American Standard Code for Information Interchange BT Bluetooth DC Direct Current GNSS Global Navigation Satellite System GPS Global Positioning System IP Internet Protocol LED Light E...

Страница 30: ...t notice and does not reflect the commitment on Tersus GNSS Inc No part of this manual may be reproduced or transmitted by all means without authorization of Tersus GNSS Inc The software described in...

Отзывы: