background image

Appendix F - Acoustic Output Reporting for Track 3

Acoustic Output Tables for t3000 Transducers

Terason t3000 / Echo Ultrasound System User Guide

361

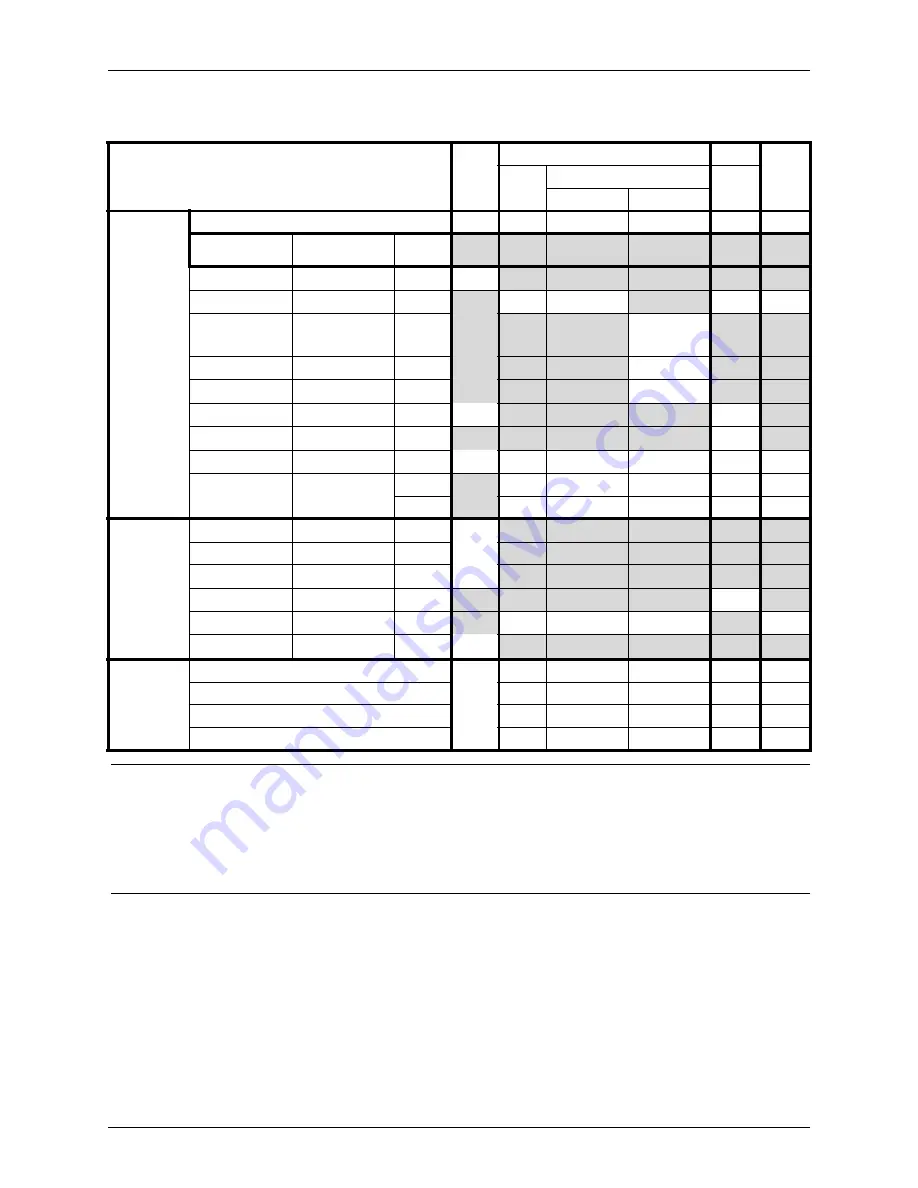
Acoustic Output Reporting Table for Track 3 for the 8EC4A Transducer

(Terason t3000 Ultrasound System in 2D Mode) 

Note: 1.

 Information need not be provided for any formulation of TIS not yielding the maximum value of 

TIS for that mode.

2. 

Information need not be provided regarding TIC for any transducer assembly not intended for 

transcranial or neonatal cephalic uses.

3.

 Information on MI and TI need not be provided if the equipment meets both exemption clauses 

given in 51.2 aa) and 51.2 dd).

MI

TIS

TIB

TIC

Index Label

Scan

Non- scan

Non-
scan

A

apr 

 1cm

2

A

aprt 

>1cm

2

Maximum Index Value

0.80

0.59

-

-

-

Note 2

USFDA Track 

3

IEC

Associated

Acoustic

Parameter

p

r.3

p

ra

(MPa)

1.78

W

o

P

(mW)

25.00

-

-

-

min of [W

.3

(z

1

), 

I

TA.3

(z

1

)]

Min of [P

(z

s

), 

I

ta, 

(z

s

)]

.525

-

z

1

z

s

(cm)

-

z

bp

z

bp

(cm)

-

z

sp

z

b

(cm)

1.40

-

d

eq

(z

sp

)

d

eq

(z

b

)

(cm)

 -

f

c

f

awf

(MHz)

4.99

4.99

-

-

-

-

Dim of A

aprt

Dim of A

aprt

X (cm)

0.78

-

-

-

-

Y (cm)

0.50

-

-

-

-

PD

t

d

(µsec)

0.58

PRF

prr

(Hz)

150

Other

pr@PIImax

p

r

 at max. I

pi

(MPa)

2.17

Information

deq@PIImax

d

eq

 at max I

pi

(cm)

-

Focal Length

FL

(cm)

2.5

-

-

-

I

PA.3

 @MI

max

I

pa,

 at max. MI (W/cm

2

) 124.03

Operating

Control

Conditions

Control 1

X

Control 2

X

Control 3

Control 4

Содержание t3000

Страница 1: ...Terason t3000 Echo Ultrasound System User Guide ...

Страница 2: ...erason Terason is a trademark Other trade names trademarks or registered trademarks are property of their respective holders FireWire is a registered trademark of Apple Computer Inc Reproduction adaptation or translation without prior written permission is prohibited except as allowed under copyright laws November 2009 Part number 16 3031 12 Terason a Division of Teratech Corporation 77 79 Terrace...

Страница 3: ...sktop Computer 20 Contacting Terason 21 Chapter 1 About the Terason Ultrasound System About Ultrasound Modes 22 2D Mode 23 M Mode Motion Mode 23 Power Doppler 24 Color Doppler 25 Directional Power Doppler 26 Pulsed Wave Doppler 27 Continuous Wave Doppler 28 Triplex 28 TeraVision 29 Support for Medical Procedures 29 Terason Transducers 30 About the Terason Main Screen 32 Terason Explorer Window 33 ...

Страница 4: ...ing and Exiting the Software 63 Connecting a Transducer 64 Switching Transducers 65 Conducting an Ultrasound Exam 65 Using the Console 65 Choosing a Scan Mode 66 Conducting a 2D M Mode or Color Doppler Exam 66 Special Controls Used With the 4V2A Transducer 68 Conducting a PWD Exam 68 Conducting a CWD Exam 68 Conducting an Exam in Triplex Mode 69 Freezing Images 70 Working with Image Loops 70 Savin...

Страница 5: ...Gate Position 114 Adjusting Spectral Gain 115 Compression 115 Adjusting Noise Rejection 116 Adjusting the Baseline 116 Adjusting the Sound Volume 116 Updating the Displays 117 Using the Console 118 Using Color and Power Doppler Image Controls 118 Adjusting the Scan Area 119 Adjusting Pulse Repetition Frequency PRF 120 Inverting the Doppler Display Color Invert 121 Adjusting the Wall Filter 122 Adj...

Страница 6: ...Percent Stenosis 157 Working with Measurements on an Obstetrical Exam 158 Making Gynecological Measurements 164 Measuring in the M Mode Window 165 Making M Mode Measurements 165 Measuring in the Spectral Doppler Modes 166 Measuring Vessel Blood Velocities 171 Calculating Arterial Ratios 172 Measuring Heart Rate and Rise Time 173 Measuring Flow Volume 174 Measuring Vascular Exams 175 Vascular Measu...

Страница 7: ... 10 Working With DICOM Using Images with a DICOM Printer or Server 227 Printing Files to a DICOM Printer 227 Sending Files to a DICOM Server 228 Using DICOM Worklist 228 Worklist Queries 229 Configuring Worklist 229 Configuring Broad Queries 230 Making a Query 232 Applying a Patient Info Set 234 Customizing the Worklist 234 DICOM Network Service 236 Chapter 11 Using System Tools Testing the Monito...

Страница 8: ...1 Area 281 Circumference 281 Volume 282 Processing Terason Transducers Between Uses 282 General Cleaning 283 Precleaners and Low Level Disinfectants 284 High Level Disinfectants 284 Compliance and Approvals 285 System Warranty 285 Recommended Maintenance 286 Equipment List 286 System Specifications 288 Optional 289 Environmental Protection 289 Product Recycling and Disposal 289 Caring for Batterie...

Страница 9: ...8 Printing Problems 318 Print Quality 318 The Print Output is Too Small 318 Display Problems 319 VCR TV Problems 319 CD Writing or Reading Problems 319 Network Problems 320 Contacting Terason Technical Support 320 Appendix D Gestational Tables 322 Appendix E Electromagnetic Compatibility Tables 329 Compatibility for All Equipment 329 Compatibility for Non Life Supporting Equipment 331 Appendix F A...

Страница 10: ...asound exam or any other medical procedures Present medical protocols for ultrasound exams or medical procedures Discuss interpretation of acquired scans You must follow the required clinical procedure for the specific exam you need to conduct The figures in this guide that show scanned images were captured using a variety of transducers Depending on the transducer you use the images on your compu...

Страница 11: ...t of topics or use the Guide s table of contents or index to locate topics For information on using Adobe Reader or Acrobat Reader select Help Reader Guide for Acrobat Reader 4 0 or Help Reader Help for Adobe Reader from the menu bar Warnings Cautions and Notes This Guide uses graphic symbols and special text to alert you to important information Links If you are viewing this User Guide online you...

Страница 12: ...Topics menu The Help window has three tabs on the left used to view information on the right Prerequisites Before you use the Terason Ultrasound System you should be trained in clinical procedures for conducting ultrasound exams This guide does not provide guidelines for the clinical aspects of performing exams or for interpreting ultrasound images You also need to know how to use the laptop or de...

Страница 13: ...n the patient Allergies Metals used in some of the decorative exterior plates may contain nickel If persons using the system are allergic to nickel avoid handling the exterior decorative metal System Covers Do not remove any system covers or cables Only qualified Terason personnel should service the Terason Ultrasound System Electrical Shock Hazard Transducer cables have strain relief at terminati...

Страница 14: ...he Terason software and restart it Surges to AC Power Mains If the system is powered from AC mains that could experience surges above 1 Kv for example from extreme lightning conditions additional surge suppression is recommended RF Interference The unit should be operated in a location that is no closer than listed in Compatibility for Non Life Supporting Equipment on page 331 to any part of RF co...

Страница 15: ...s must be interpreted by a qualified medical professional This system in no way interprets these images or provides a medical diagnosis of the patient being examined The Terason Ultrasound System has successfully completed compliance tests for IEC 60601 1 IEC 60601 1 1 2nd edition IEC 60601 1 2 and IEC 60601 2 37 medical standards for the configuration as originally installed To maintain complianc...

Страница 16: ...em and should not be used in the patient environment Electromagnetic Interference EMI Medical electrical equipment such as the Terason Ultrasound System requires special precautions regarding electromagnetic compatibility and must be installed and put into service according to the tables in Appendix E Electromagnetic Compatibility Tables Warning The user should never simultaneously make contact wi...

Страница 17: ...oints the computer program may freeze or windows may open unexpectedly In these cases the Terason software may require restarting and you may have to close extra windows In extreme cases the computer may require restarting These events are not dangerous to the patient or to the operator Liquids The Terason transducer electronics envelope and computer are not protected from spilled liquids The tran...

Страница 18: ...de for information about its labels and regulatory compliance Type BF Equipment Applied Part Terason Ultrasound System Emits Ultrasound Energy Indoor Use Only Warning Do not drop the ultrasound transducer If you accidentally drop the transducer check it carefully for damage Perform a sample scan to make sure it operates correctly If not contact Terason for service or replacement Warning The Teraso...

Страница 19: ...e This certification mark indicates that the Terason Ultrasound System has been tested to and meets the minimum requirements of widely recognized U S and Canadian product safety standards It also means that the manufacturing site has been audited and that Terason has agreed to a program of periodic factory follow up inspections to verify continued conformance This label indicates that the user sho...

Страница 20: ...he Bookmarks tab to view a list of topics or use the Guide s table of contents or index to locate topics For information on using Adobe Acrobat Reader select Help Reader Guide for Acrobat Reader 4 0 or Help Reader Help for Acrobat Reader 5 0 from the menu bar Windows Online Help For help with the Windows operating system click the Start button in the lower left of the screen and click Help The Win...

Страница 21: ...on a Division of Teratech Corporation 77 79 Terrace Hall Avenue Burlington MA 01803 U S A By Telephone Voice in the U S A 1 866 TERASON 1 866 837 2766 Ext 1048 Voice from outside the U S A 781 270 4143 Ext 1048 By FAX 1 781 270 4145 By Email techsupport terason com You can view contact information by selecting Help Technical Support On The Web For more information you can visit our web site at www...

Страница 22: ...the Terason Main Screen on page 32 The Terason Console on page 34 About Ultrasound Modes Ultrasound is primarily an operator dependent imaging technology The quality of images and the ability to make a correct diagnosis based on scans depend on precise image adjustments and adequate control settings applied during the exam The Terason software provides tools to optimize the image quality during a ...

Страница 23: ...age Display window The figure below shows a sample 2D obstetrical scan Example 2D Scan To use 2D see Acquiring Images on page 63 Using 2D and I Q Controls on page 90 Measuring in the 2D Window on page 151 M Mode Motion Mode The Terason Ultrasound System provides simultaneous 2 dimensional B Mode and M Mode imaging This combination is valuable for the efficient assessment of moving structures Use M...

Страница 24: ... colors than the carotid artery because the jugular vein contains more red blood cells at any given time than does the carotid artery All flows display in shades of the same color no directional information is provided You also can choose to apply a high frame rate or high resolution to control the quality of the scan In general Power Doppler is more sensitive than Color Doppler Amplitude estimati...

Страница 25: ...of the transmitted signal The primary characteristics of this echo signal are its frequency and its amplitude or power The frequency shift is determined by the movement of the red blood cells relative to the transducer flow towards the transducer produces a higher frequency signal than flow away from the transducer Amplitude depends on the amount of moving blood within the volume sampled by the ul...

Страница 26: ...nventional Power Doppler and of Color Doppler It provides the increased sensitivity of conventional Power Doppler plus the directional information derived from Color Doppler Directional Power Doppler does not provide an estimate of blood flow velocity The color palette is proportional to the strength of the Doppler signal This mode allows you to obtain good quality images of deep arteries and othe...

Страница 27: ...s represents Doppler frequency shift The shift in frequency between successive ultrasound pulses caused mainly by moving red blood cells can be converted into velocity and flow if an appropriate angle between the insonating beam and blood flow is known Shades of gray in the spectral display represent the strength of the signal The thickness of the spectral signal is indicative of laminar or turbul...

Страница 28: ...splay all velocities present over the entire length of the ultrasound cursor This is useful for imaging very high velocities such as those resulting from a leaking heart valve As with Pulsed Wave Doppler scans the X axis of the graph represents time and the Y axis represents Doppler frequency shift For more information on using Continuous Wave Spectral Doppler see Acquiring Images on page 63 Using...

Страница 29: ... The Terason Ultrasound System can be configured with needle guides used for tissue biopsy fluid aspriation amniocentesis and catheter placement The system can also be incorporated into cryoablation or targeted ablation and brachytherapy products from other vendors The Terason Ultrasound System scans the anatomy or vessel for size location and patency and provides guide lines between which the nee...

Страница 30: ...ers Also see System Specifications on page 288 and Indications For Use on page 254 Terason Transducer Specifications Transducer Elements Description Applications PDOF Echo only 1 Single element transducer with a maximum depth of 340 mm and a single point field of view Cardiac 4V2S t3000 only 64 Phased linear array transducer with a maximum depth of 240 mm and a user controllable field of view Adul...

Страница 31: ...128 Curved linear transducer with a maximum depth of 160 mm Fetal Pediatric Small Organ Peripheral vascular Neonatal Cephalic Adult Cephalic Cardiac 10V5S t3000 only 96 Phased array sector transducer with a maximum depth of 120 mm and a 90 field of view Vascular access 12HL7 128 Angled head linear wideband array transducer with a maximum depth of 70 mm and a user controllable field of view Intra o...

Страница 32: ...ing View on the Toolbars menu For complete descriptions of the menus and toolbars available in the Terason software see Appendix B Menu and Toolbar Reference Note The gray unavailable condition does not apply to the tabs at the bottom of the Image Control window visible tabs are always available The tabs are gray when they are not selected Thumbnail Window Patient Info Window Image Control Measure...

Страница 33: ...e Display Patient Info and Review Windows These windows use the same space on the computer screen Click a tab to open that window The tab for the Image Display window shows the name of the connected transducer 4V2 in the example You might see any Terason transducer model as the name of this tab if that transducer is connected If you have more than one transducer connected to the computer there is ...

Страница 34: ...abs are available For a loaded file in a format other than ULT this window shows an Info tab See Storing Images and Loops on page 131 for information about viewing saved files For information about how the image controls for the scan modes work see Chapter 5 Working With Scan Modes on page 89 For information about using the Measure tabs see Chapter 7 Working With Measurements The Terason Console A...

Страница 35: ...kball in the middle of the console takes the place of a computer mouse It moves the onscreen cursor or a selected feature in the same way a mouse would Left Button The button just to the left of the trackball performs the same functions as the left button on a mouse When the ultrasound cursor is selected clicking this button deselects the cursor Right Button The button just to the right of the tra...

Страница 36: ...ight of the imaging display says which gain is currently controlled by the Gain knob Example in Color mode the Gain knob normally controls color gain and the onscreen legend reads Color Gain Pushing the button down changes the control to 2D gain and the legend reads BMode Gain When you press the Gain knob down for two seconds during live imaging all settings revert to the presets When the scan is ...

Страница 37: ...n page 44 Licensing the Terason Software on page 50 For information on connecting hardware components or if you must reinstall the computer s operating system refer to the Configuration Guide that came with your system Installing Terason Software Terason Ultrasound System are shipped with all required software installed on the laptop You do not need to complete the following procedure unless you w...

Страница 38: ...wse and navigate to a different directory not recommended The wizard reminds you to unplug the Terason Transducer Reminder to Unplug the Transducer 6 Click OK The installer copies files from the CD to the computer 7 The Install shield opens again to install the Sentinel Protection Installer When the Welcome dialog box opens click Next Sentinel Installer Welcome 8 On the License dialog box read the...

Страница 39: ... Message If you see Rebooting is required you must restart your computer before you use the Terason software 11 Click Finish Upgrading Terason Software When upgrading software the Terason installer first removes the existing version and then installs the new version To upgrade to a newer version of the Terason software complete these steps 1 Exit all applications and unplug the Terason transducer ...

Страница 40: ...d wait while the computer reboots restarts After the computer finishes starting up you may have to log on before proceeding When you are logged in the Welcome dialog for the new Terason application opens 6 Click Next The License Agreement dialog appears Read the License Information carefully 7 Click Yes The Choose Destination Location dialog box opens 8 Click Next to install the application in the...

Страница 41: ...u upgrade software To permanently remove the Terason application complete these steps 1 Click Start in the Windows task bar 2 Select Settings Control Panel The Control Panel window opens 3 Double click Add Remove Programs 4 Scroll down the list of programs and click to select Terason Software Uninstalling the Terason Software When you select an application the listing expands to show the size of t...

Страница 42: ...orm this procedure Complete this procedure only if you see a Digital Signature Not Found or New Hardware Found message When the Terason transducer is connected to your PC you may have to install the device driver for the operating system to recognize the new hardware After you plug in the Terason transducer for the first time make sure your computer is turned on and wait approximately one minute U...

Страница 43: ...Next Including a Location 3 Clear the Search removable media floppy CD ROM check box 4 Select the Include this location in the search check box 5 Click Browse 6 Navigate to the Program Files folder on the C drive 7 Double click the Teratech folder then double click the Terason 3000 folder The complete path to the required folder is C Program Files Teratech Terason 3000 Drivers 8 Click the Drivers ...

Страница 44: ...the utility is configured follow the instructions in Printing Files to a DICOM Printer on page 227 or Sending Files to a DICOM Server on page 228 to use the DICOM print and export functions See Using DICOM Worklist on page 228 for instruction on using Worklist to retrieve patient information Installing the DICOM Utility To install the DICOM utility complete these steps 1 If necessary save the acti...

Страница 45: ...rogram installs the driver and displays a status message HASP Installing Message When complete the installation program displays the Finished message HASP Installation Finished Screen e Click Finish 4 Install the DICOM Utility a With the same installation disk in the CD drive change to the Install Disk folder b Double click the Setup exe file The installation program prompts you to choose where to...

Страница 46: ...g Directory for Installation c Click Next The installation program prompts you to select a program folder for using the Start button to access the application Selecting Program Folder Accessed from the Start Button d Click Next The installation program prompts you to confirm your choices Confirm Choices and Start Installation ...

Страница 47: ... Programs TerasonDICOM Terason The system opens the DICOM Configuration Window DICOM Configuration Window Local Settings Tab 2 Configure the Local Settings tab a Verify that the Local AE Title and port number are correct for your DICOM server The default values are TERASON_3000 and 104 respectively Your server or network configuration may require different values especially if your facility has mo...

Страница 48: ... different values edit the PDU size Timeout and Number of Retries boxes as necessary f Click the C Echo button to test whether or not the server is active on the network g If necessary you can change the image path where the computer temporarily stores DICOM files by clicking the button and browsing to a different location h If necessary you can change the failed path where the DICOM files are mov...

Страница 49: ...t the printer is active on the network g If necessary edit the number of copies to print default value is 1 h If necessary change the image path where the computer temporarily stores DICOM files by clicking the button and browsing to a different location i If necessary change the failed path where DICOM files are moved if they cannot be successfully sent after the number of retries by clicking the...

Страница 50: ...ntains this information about a file sent to a DICOM server or printer Date Time File name Destination Status If you see Failed images in the Status column you should use the Terason software to resend those files to the server or printer as appropriate See Sending Files to a DICOM Server on page 228 for instructions Licensing the Terason Software When installed the Terason software can be used fo...

Страница 51: ...ason The Ultrasound License dialog box opens Ultrasound License Dialog Box 2 To register by phone call Terason at 1 866 TERASON 1 866 837 2766 and give the Terason Support Representative the Serial Number shown in the dialog box 3 To register by email send an email message to techsupport Terason com and provide these details Serial number see the Terason Ultrasound License Registration dialog box ...

Страница 52: ...r Extend Evaluation 4 Read the new Serial Number to Terason Technical Support Technical Support will give you a new 10 digit unlock code 5 Type the unlock code into the text field and click Unlock The Terason software updates the status to Evaluation 6 Click Continue Ultrasound The Terason software starts up Transferring the License You can transfer the Terason software license from one computer t...

Страница 53: ...te down the Serial Number Do not close the window 4 On the first computer start the Terason software 5 Select Help License The Ultrasound License Registration window opens License Registration Window 6 Click the Transfer radio button 7 Enter the number you wrote down in step 3 in the Transfer PC Serial Number field The Transfer button remains gray until you enter the correct number of digits in th...

Страница 54: ...ialog shown here Note that the unlock code shown above will not enable the software on this computer You must contact Terason for a different unlock code 13 On the second computer enter the unlock code you wrote down in Step 11 The Unlock button remains gray until you type the correct number of characters 14 Click Unlock You can no longer use the Terason software on the first computer If you try t...

Страница 55: ...cation 2 Select Help License The software shows the license dialog box Evaluation Period Dialog Box 3 Click the Upgrade radio button 4 Contact Terason Technical Support and read the serial number to the Support Representative The Representative will give you an unlock level number and an 10 digit unlock code 5 Enter the Unlock Code 6 Click Unlock The Terason software upgrades the features of your ...

Страница 56: ...along with a patient information file If you do not enter patient details the image is stored in a folder with other images and is not associated with a specific patient To work with patient information you should understand Using the Patient Info Window see page 57 Adding a New Patient see page 57 Preparing Patient Info for an Exam see page 60 Updating Patient Information see page 61 Deleting a P...

Страница 57: ...tient If you need to start the ultrasound exam immediately the Terason software lets you skip entering patient information However if you save the image it will not be associated with this patient and no patient information will be saved with or displayed on the scan The Edit Menu Items for the Patient Info Window Menu Name What it Does Undo Undoes the most recent cut text typing or deletion Cut R...

Страница 58: ...t were saved on the indicated date Starting an exam after creating or opening a patient info file creates a new date folder and a report file The report file and any saved images are saved in the date folder The Terason software uses the Image folder to store all images that were saved without entering patient information Each folder in the Image folder contains all images that were saved without ...

Страница 59: ...ys as 2 etc b Type the day as one or two numerals c Type the year as two or four numerals 02 displays as 2002 84 displays as 1984 etc 10 Click in the check box for the patient s gender M for male or F for female 11 Enter the patient s height and weight To change the units of measurements used see Setting the Units for Patient Measurements on page 249 12 Enter any comments You can type directly in ...

Страница 60: ...ot see the patient information select View Image Display Properties Patient Information Patient Information at the Top of the Image Display Window This scan shows an empty scan in Power Doppler mode You are now ready to conduct the ultrasound exam Preparing Patient Info for an Exam Before you perform an ultrasound exam you should load the patient information and enter details about the exam To pre...

Страница 61: ... 8 Click Save You are now ready to scan the patient Updating Patient Information To update a patient s information complete these steps 1 Click in front of the patient s name in the Patient folder in the Terason Explorer window 2 Double click the Patient Info file 3 If necessary click the Patient Info tab to make it active 4 Enter the new information in the appropriate fields 5 To edit the comment...

Страница 62: ...te these steps 1 In the Terason Explorer window locate the patient s name 2 Right click the patient s folder and select Delete The Terason software prompts you to verify that you really want to delete the Patient Info file 3 Click Yes The Terason software prompts you to verify that you really want to delete the folder and all its contents 4 Click Yes ...

Страница 63: ...king With Scan Modes Powering the Laptop On and Off To power the laptop on press the power button at the top right of the keyboard This does not power up the console you must start the ultrasound software and extend the console out from the system to power on the console To power off the laptop either press the power button or select Shut Down from the Windows Start menu Using either method also s...

Страница 64: ... To connect a transducer 1 Make sure the locking lever is in the unlocked position 2 Insert the transducer connector into the port as far as it will go 3 Move the locking lever to the locked position If the Terason software is running it detects the transducer and displays its name on the imaging window If the software is started after the transducer is connected the Terason software will detect a...

Страница 65: ...general complete these steps to conduct an exam 1 Load or create patient information 2 Start live imaging 3 Select an exam type See Working With Exams on page 212 4 Select a scan mode and adjust image controls See Scan Modes Overview on page 89 5 Freeze the image 6 Add annotations or measurements See Working With Measurements on page 150 7 Save or print the image For more detailed instructions com...

Страница 66: ... for 2D M for M Mode C for Color Doppler P for Pulsed Wave Doppler W for Continuous Wave Doppler D for Directional Power Doppler R for Power Doppler Conducting a 2D M Mode or Color Doppler Exam If you are using the 4V2A transducer in 2D mode see Special Controls Used With the 4V2A Transducer To conduct an ultrasound exam in 2D Color Doppler Power Doppler Directional Power Doppler or M mode complet...

Страница 67: ...m you are conducting 5 If necessary adjust the 2D image controls See Using 2D and I Q Controls on page 90 for instructions 6 If necessary adjust the I Q image controls See Controls on the I Q Image Control Window on page 100 for instructions 7 If necessary adjust the image controls for the selected scan mode For M Mode see Using M Mode Image Controls on page 105 For Color Doppler and Power Doppler...

Страница 68: ...uct an exam in 2D mode as described in Conducting an Ultrasound Exam on page 65 do not freeze the scan 2 Position the Windows pointer in the 2D image where you want to set the range gate then double click You can also use any of these methods Click Select Modes Pulsed Wave Doppler Right click and select Set PWD Gate Type P when not in text mode Click in the range gate and move it to the proper loc...

Страница 69: ...am in Triplex Mode To conduct an exam in Triplex mode complete these steps 1 Conduct an exam in Color Doppler Directional Power Doppler or Power Doppler mode as described in Conducting an Ultrasound Exam on page 65 do not freeze the scan 2 Position the Windows pointer in the 2D image where you want to set the range gate then double click You can also use one of these methods Click Select Modes Pul...

Страница 70: ...e image display at any time If you click Live without saving the image or image loop you lose the temporarily stored frames When performing an ultrasound scan click to freeze the displayed image or select Image Freeze from the menubar You can then use the Playback toolbar or the arrow keys to move through the frames acquired during the scan see Working with Image Loops on page 70 To start a new sc...

Страница 71: ... Pause buttons You can track the frames and the number of the current frame in the progress bar next to the Next button To stop a playing loop click the Pause button You can also use the Image menu to implement the Play Pause Back and Next functions Playback Functions on the Image Menu Saving Prospective and Retrospective Loops In 2D Color and Power Doppler modes the Terason system can acquire loo...

Страница 72: ...File Type menu on the Save tab Tools Options Save to choose a different file format If ult is selected the system saves prospectively acquired loops as dcm Saving Retrospective Loops During live imaging clicking the Freeze button then the Save Loop button tells the system to acquire a loop of the frozen scan The loop displays in the Thumbnail window at the left of the Main Screen The default lengt...

Страница 73: ...ies window Terason Status Messages Image Display Window Status Description Initializing Starting up and verifying the connection to the transducer Live Imaging Actively acquiring scan data from the transducer Frozen Image Stopped acquiring data Playing Loop An acquired loop is playing Paused Loop An acquired loop was playing and is now paused Single Image File A Terason format ULT image file has b...

Страница 74: ...ain If you do not see the thumbnail or if you want to hide it select View Image Display Properties Zoom Thumbnail Clicking on this menu item toggles between showing and hiding the thumbnail The Large Thumbnail option in this menu works with the Review tab not with the zoom function Use the scroll bars if you must view obscured areas of the scan Click the Zoom button to return the image display to ...

Страница 75: ... Full Screen to revert the Image Display window to its original size Hiding Windows When you show all of the Terason windows you have access to all of the software s functions You can locate a patient s information choose an image mode save or print images and all of the other Terason functions However the windows take up room To have more room for the actual scanned image you can hide any of the ...

Страница 76: ... selected window in front of the other two windows you cannot close these windows Enhancing the Image Using TeraVision Optimization TeraVision is an optional image optimization package that sharpens images produced by the Terason ultrasound system TeraVision requires a license See the TeraVision Image Enhancement Installation Guide for instructions on installing the TeraVision software The default...

Страница 77: ...eraVision level numbers range from 0 to 6 or 8 All currently supported transducers have level numbers 0 through 6 except for the 4V2 which has 0 through 8 The 0 setting applies no image processing The larger the number the more processing is applied to the image With the 4V2 levels 7 and 8 are intended for cardiac imaging Adding Guides to the Image Display Image Display Properties on the View menu...

Страница 78: ... guides Changing the Text Size The Terason software lets you choose the font size for the text displayed in the Image Display window If you choose a large text size the text may overlap the image If you choose a small text size the text may be difficult to read To choose a text size select View Text Size and then the specific size you want to set Image Control settings for selected scan mode part ...

Страница 79: ...ppler You can use any of the following methods to enter split screen mode Click Select View Split Screen Type S when not in Text mode When you enter Split Screen mode the Terason software copies the current settings for the Image Control window to the new screen You can then apply any Image Control setting independently to either screen You can go live or freeze either screen only one screen can b...

Страница 80: ...n mode only the active window is saved If you wish to save an image with both windows visible save the image in a format other than ult See Working With Image Files on page 131 for information on saving images and loops When you exit Split Screen mode the Terason software keeps the acquired data for the active screen the one with the cyan lines at the top and bottom and discards the acquired data ...

Страница 81: ...ions You can only add text to the 2D Image Display window You cannot add text to the Time Series window To work with text annotation you should understand Adding Text to an Image on page 81 Setting the Text Home Position on page 83 Placing Arrows on the Image on page 83 Moving Text on page 84 Typing Text on an Image on page 84 Editing Text on page 85 Deleting Text from an Image on page 85 Adding T...

Страница 82: ... of text beneath the last line The Arrow button places an arrow next to the text see Placing Arrows on the Image on page 83 The Clear Text button deletes all text including manually typed text from the image You can also choose to use all caps ALL CAPS by clicking in the check box before you select the text This check box has no affect on text already added to the image Click any text to add it to...

Страница 83: ...set a text home position complete these steps 1 Select Annotation Set Text Home Position The Windows pointer changes to an arrow with the Text symbol Setting the Text Home Position 2 Click the location on the Image Display tab where you want to set the home position The Terason software uses this location when adding text from the Annotation Window and as the text cursor location when typing text ...

Страница 84: ...r if needed Add an arrow to existing text by right clicking on the text and selecting Show Arrow from the pop up menu Remove an arrow by deleting the text or right clicking on the text and selecting Show Arrow to toggle the check mark off Moving Text After placing text on an image you can easily move it to any location within the Image Display tab Just click the text move it to a new location and ...

Страница 85: ...owing the Text tab 2 Use the backspace key to delete text or the arrow keys to move the text cursor to where you want to delete or insert text 3 Right click the text and select New Text to add a new line 4 Double click any text phrases in the Text tab that you want to include on the image 5 Use the keyboard to add or delete text 6 Press the Enter key when finished Deleting Text from an Image You c...

Страница 86: ... 86 Changing the Icon in the Body Marker on page 87 Moving the Indicator on page 87 Changing the Indicator s Direction on page 87 Rotating the Indicator on page 88 Removing the Body Marker on page 88 Adding a Body Marker To add a body marker to an image complete these steps 1 Select Annotation Body Marker The Terason software opens the Annotation window Adding a Body Marker to a Scan 2 Click the v...

Страница 87: ...on window Moving the Indicator You can move the pink marker to anywhere on the icon to more precisely indicate the scanned anatomy To move the pink marker complete these steps 1 Move the Windows pointer over the rectangular end of the pink indicator When the pointer changes to a circle with four arrows click the left mouse or console button 2 Move the pointer to the desired location on the body ma...

Страница 88: ...these steps 1 Move the Windows pointer over the round end of the pink rectangle The pointer changes to a circular arrow Rotating the Body Marker 2 Click and move the pointer until the pink rectangle is in the desired orientation 3 Click to lock the rectangle in position Removing the Body Marker To remove the Body Marker from the image right click the body marker and select Remove Body Marker ...

Страница 89: ...ge Controls on page 109 Select Continuous Wave Doppler CWD mode when aliasing is a problem and when depth specific information is not important See Using Spectral Doppler Image Controls on page 109 Select Color Doppler CD when you must view the mean velocity within an assigned region of interest See Using Color and Power Doppler Image Controls on page 118 Select Power Doppler Pwr to view the densi...

Страница 90: ...he available 2D image controls You can only adjust these image controls during live scanning When you freeze a scan the Terason software replaces the 2D tab with a 2D Measure tab for making measurements on the scan image See Chapter 7 Working With Measurements You can adjust the following 2D image controls during live scanning Exam Patient size Frequency Depth Focus depth Gain Time Gain Compensati...

Страница 91: ...for that anatomy and the connected transducer To select an exam choose it from the Exam menu at the top of the 2D Image Control window You can highlight the exam type box in blue and then either press the first letter of the exam type name or use the right and left arrow keys to cycle through the exam types For example if you are using a 12L5 probe and want the Carotid exam click the exam control ...

Страница 92: ...or the size of the patient or for the structured anatomy Click the size button that matches the patient size for small medium or large or for superficial moderately deep and deep areas of interest The Size setting applies a preset 2D transmit frequency In general Choosing the small size sets the highest transmit frequency to yield the best 2D resolution while the medium size sets a mid range frequ...

Страница 93: ... available only with the 12L5 transducer The exact frequencies vary depending on the connected transducer Adjusting the Depth Depth adjusts the field of view You can increase the depth to see larger or deeper structures You can decrease the depth to enlarge the display of structures near the skin line or to not display unnecessary areas at the bottom of the window When you select an exam type the ...

Страница 94: ... focus control settings You can view a depth ruler on the image by selecting View Image Display Properties Depth Ruler The figure below shows the depth ruler along the right side of the image Example Depth Ruler The pink triangle on the depth ruler indicates the focus depth You can also use the Image menu to set the depth To do so complete these steps 1 Select Image Depth The Set Depth dialog box ...

Страница 95: ...ing the Focus Non 2D You can also use the left and right arrow buttons to increase or decrease the focus depth To set multiple focus depths in 2D complete these steps 1 From the menu select the primary focus depth You can also use the left and right arrow to increase or decrease the depth 2 From the menu select the number of focus points 3 From the focus distribution menu select a distribution met...

Страница 96: ...d pressing the left to decrease gain and right to increase gain arrow keys Or you can use the Image menu to move the gain one setting higher Image Gain Up or one setting lower Image Gain Down Changing the Gain from the Image Menu When you adjust the gain setting the Terason software automatically adjusts the Time Gain Compensation curve to support the new gain setting Adjusting Time Gain Compensat...

Страница 97: ...he TGC curve select View Image Display Properties TGC Display TGC Curve Display Options Select On to show the curve or select Off to hide the curve If you select Time Out the default setting the curve displays briefly when you start the application adjust the gain or adjust an individual TGC slider The optional console houses physical sliders that control TGC See Console Controls on page 35 Adjust...

Страница 98: ...Display Mode Defaults on page 247 for information on choosing defaults associated with sector width and image format Tissue Harmonic Imaging THI The transmitted ultrasound signal generates harmonics signals at frequencies that are multiples of the transmitted signal frequency in tissue Tissue harmonic imaging processes a returned harmonic signal to enhance the displayed image The harmonic used for...

Страница 99: ... 2D Image Control window THI Button Select THI in the Modes menu THI in Modes Menu Omni Beam Omni permits electronic steering of the ultrasound beam to acquire scans of an ROI from several directions Omni works with linear and curved linear array transducers but not with phased array and endocavity transducers It is not available in Stress Echo exams When Omni is on the word Omni shows in the scan...

Страница 100: ...dual adjustments as necessary for the current exam You can use these optimized presets or you can make individual adjustments to these image controls as necessary for the current exam Left Right and Up Down invert Color palette Image smoothing Persistence Image map Needle guide Compression Noise Rejection TeraVision The following figure shows the I Q controls I Q Controls Inverting Images The Left...

Страница 101: ... as shades of gray over a range from white to black The Terason software provides several alternate schemes To determine if another scheme improves visibility of the anatomy being scanned cycle through the available options Which scheme produces the best image depends on the anatomy that is being scanned To select a different scheme use one of the following methods Click the down arrow next to the...

Страница 102: ...s is decreased making the image appear rougher and the frame rate increases To adjust the smoothness of the image click the down arrow to the right of the Smoothing field and select a value from the menu Selecting a Smoothing Option You can also select Image Smoothing to choose a different smoothing option Selecting a Smoothing Option from the Image Menu Adjusting Persistence Persistence refers to...

Страница 103: ...ogies To change the number of gray levels click the down arrow next to the Map field You can choose any of eight maps labeled from A to H Choosing an Image Map in the I Q Window You can also select Image Map to choose a different image map setting Choosing an Image Map from the Image Menu Image Map Reference Bar The effect of your map choice is represented by a reference bar to the right of the de...

Страница 104: ...than one angle options for each supported angle are displayed Needle Guides and Target for a Biopsy On the 2D image the white dashed lines are the guide lines and the green circled is the needle guide target indicator If you do not see the needle guides in the Image Display window click or select View Needle Guide Display Guide Lines Viewing Needle Guides Adjusting Compression The Compress slider ...

Страница 105: ...h transducer is connected and on other selections Pressing the left and right arrow buttons at the left center of the console changes the controls displayed in the four boxes To change a setting use the up and down arrow buttons at the top left corner of the console Each pair of up and down arrow buttons controls the setting in one of the four boxes in the Scan Mode toolbar The position of the but...

Страница 106: ...he Slow Medium or Fast button Sweep Speed Controls You can also choose the speed by selecting Image Sweep Speed and choosing a speed or by right clicking in the M Mode window and choosing a speed The tick marks in the Time Series window are closer or farther apart depending on the speed Each large tick mark represents one second Shortcut Menu in the Time Series Window of an M Mode Scan Adjusting t...

Страница 107: ...rasound cursor is selected it turns green When it locks in position it returns to its normal color Using Anatomical M Mode Anatomical M Mode is a feature available when you select the Cardiac exam with a 4V2 transducer connected It is not available with other transducers or exams Anatomical M Mode lets you manipulate the ultrasound cursor by clicking and dragging it You can change the angle of the...

Страница 108: ...k again when the ultrasound cursor offset is correct Using the Console When the console is extended while live imaging in M mode the Scan Mode toolbar changes to display the current settings of a group of controls The specific control settings displayed vary depending on which transducer is connected and on other selections Pressing the left and right arrow buttons at the left center of the consol...

Страница 109: ...tware lets you choose the sweep speed for Spectral Doppler modes A slow speed shows more waveforms over time but less detail A medium speed is suitable for normal use Fast speed shows fewer waveforms over time but with more detail The spacing of the ticks along the top of the Time Series window indicates the sweep speed Each tick represents one second When an image is frozen you cannot change the ...

Страница 110: ...gh enough to prevent aliasing and low enough to provide adequate detection of slow blood flow It may be necessary to vary the PRF during an exam depending on the speed of the blood flow or when pathology is present Aliasing occurs when the frequency of what you are observing exceeds one half of the sample rate If the blood is moving faster than the pulse repetition rate then the waveform on the di...

Страница 111: ...used by tissue motion or by rapid movement of the transducer Increasing the wall filter setting reduces the display of low velocity tissue motion Decreasing the wall filter setting displays more information but more wall tissue motion Use a wall filter setting that is high enough to remove clutter but low enough to display information near the baseline To adjust the wall filter value click the rig...

Страница 112: ... clinical situation may require that you press down on one corner of the transducer to obtain an adequate angle to flow The steering angle does not directly affect the calibration of the velocity scale To select a different steering angle select an angle from the menu Steering Angle Menu You can only use this control when viewing a live image When an image is frozen you cannot change the setting Y...

Страница 113: ...page 116 The data above the baseline is classified as forward flow The data below the baseline is classified as reverse flow When the waveform is inverted reverse flow displays above the baseline and forward flow is below the baseline To invert the waveform click the Invert button You can only use this control when viewing a live image When an image is frozen you cannot change this setting Adjusti...

Страница 114: ... not moved for five seconds it is anchored in position You can also use the left and right arrow keys to move the ultrasound cursor and the up and down arrow keys to move the sample volume indicator You can only use this control when viewing a live image When an image is frozen you cannot adjust the sample volume Modifying the depth location of the sample volume affects the Thermal Index TI value ...

Страница 115: ...hat the spectral waveform is bright but not so high that the systolic window fills in or other artifacts are created To adjust the gain click the slider and drag it to the left to decrease the gain or drag it to the right to increase the gain Spectral Doppler Gain Control You can also adjust the gain by clicking on the slider a blue box displays around the slider and using the left and right arrow...

Страница 116: ...scale available at that particular PRF value Drag the slider to the left to move the baseline down Drag the slider to the right to move the baseline up Baseline Control You can also adjust the baseline by clicking on the slider a blue box displays around the slider and using the left and right arrow keys The figure below shows a centered baseline the default and adjusted baselines Effects of Alter...

Страница 117: ...ftware freezes the 2D data while acquiring Spectral Doppler data When Update is selected the button appears pressed in and is a lighter shade than its surroundings The default setting for this button in most exams is selected continuous scanning of the 2D and Spectral Doppler data In The Cardiac and Renal exams the default is not selected When you de select the Update button but do not freeze the ...

Страница 118: ...the Scan Mode toolbar The position of the button set corresponds to the position of the box the leftmost up and down buttons control the setting in the leftmost box and so on Special Trackball Responses to Mode When Pulse Wave Doppler mode is chosen the Terason software automatically selects the Sample Volume Gate and moving the trackball controls the SVG position A click of the Select button abov...

Страница 119: ...e The larger the scan area the slower the frame rate For cardiac or arterial applications use a small scan area to accurately visualize the flow dynamics A medium or large scan might also be used for applications where the blood flow dynamics do not change rapidly or to get a larger overall view of blood flow You can move the scan area by clicking on the region of interest border moving the ROI to...

Страница 120: ...prevent aliasing and low enough to provide adequate detection of low flow It may be necessary to vary the PRF during an exam depending on the speed of the blood flow or if pathology is present Aliasing occurs when the frequency of what you are observing exceeds one half of the sample rate If the blood is moving faster than the pulse repetition rate then the Doppler display will alias or wrap aroun...

Страница 121: ...ncy shifts flow toward the transducer and blue is assigned to negative frequency shifts flow away from the transducer However this color assignment can be reversed by clicking the Color Invert button Whether the display is inverted or not flow toward the transducer is assigned the colors of the top half of the color bar and flow away from the transducer is assigned the colors of the bottom half of...

Страница 122: ...isplayed but low enough to display slow flow If the wall filter is set too high slower flow may be not seen Set the wall filter setting higher for applications where there is significant tissue motion such as cardiac or in instances where the transducer is moved rapidly while scanning in Color Doppler mode Set the wall filter setting lower for small parts or instances where flow is slow but there ...

Страница 123: ...ft Color Priority Control You can also adjust the color priority by clicking on the slider a blue box displays around the slider and using the left and right arrow keys Adjusting the Color Persistence The color persistence setting determines the amount to be averaged between frames Increasing the persistence causes the display of flow to persist on the 2D image Decreasing the persistence allows be...

Страница 124: ...he Color Baseline In general color baseline adjustments are unnecessary The baseline refers to the zero baseline within the Color Doppler image To adjust it move the baseline down to display more positive flow forward and move the baseline up to display more negative flow reverse This adjustment can be used to prevent aliasing in either direction This image control works with Color Doppler and Dir...

Страница 125: ...D Suppress narrows the width of the displayed image to the region of interest This increases the Color Doppler frame rate To apply 2D Suppress click the 2D Suppress button on the CD Image Control window 2D Suppress Control Tissue Doppler Imaging Selecting tissue Doppler imaging TDI optimizes the image controls for imaging tissue motion The control settings vary with the selected scan mode The cont...

Страница 126: ...ler or with Directional Power Doppler scanning You can enable Triplex scanning using any of the following methods Select a Doppler mode CD PD or DPD then select Pulsed Wave Doppler or Continuous Wave Doppler mode Select a Doppler mode then right click in the scan window and select Set PWD Gate from the shortcut menu Select a Doppler mode then type P for PWD or W for CWD Position the Windows pointe...

Страница 127: ...oftware does not provide a unique Image Control tab for Triplex scanning Use the 2D scan mode controls CD DirPwr or Pwr tab and the PWD tab to set image controls for Triplex scanning Notice that the Probe Info shows two sets of PRF values The Terason software requires the same PRF value for both PWD and the 2D scan If you change the PRF value on one tab the Terason software matches the other tab t...

Страница 128: ...ot be adjusted when the 2D image is frozen in Triplex scanning Availability of Image Controls When Update Disabled Image Control Tab Available Not Available 2D Size Exam Frequency Depth Focus Gain TGC curve Sector width THI IQ Left Right invert Up Down invert Colorization Smoothing Map Compression Noise Rejection Persistence CD DirPwr Pwr Scan Area PRF Wall filter Color Invert Color Gain Color Pri...

Страница 129: ...Chapter 5 Working With Scan Modes Scanning in Triplex Mode Terason t3000 Echo Ultrasound System User Guide 129 ...

Страница 130: ...Chapter 5 Working With Scan Modes Scanning in Triplex Mode Terason t3000 Echo Ultrasound System User Guide 130 ...

Страница 131: ...ge 133 Exporting a File see page 135 By default images and loops are saved in the Terason format and have a file extension of ult You can also copy the image in the 2D Image window by selecting Edit Copy Image or pressing the F4 key and pasting the image into another application on your computer Monitoring Disk Space You should be aware of the amount of free space on your C drive the default drive...

Страница 132: ...files or include them as graphics in other applications If you save images using the JPEG format be aware of the effects of data compression By default the Terason software uses a lossy JPEG compression algorithm After compression some of the image data is gone When viewed the compressed image may show artifacts caused by the JPEG compression The artifacts may also show if you view the image on a ...

Страница 133: ...and added the text new exam the default filename would be CAR NEW EXAM ULT For Split Screen mode you can save the Split Screen image as a single frame showing both screens when you save to the DICOM TIF JPEG or BMP file formats If you save to the Terason format ULT only the active screen is saved You can save the Split Screen image as a loop file using the DICOM or AVI formats When you do the Tera...

Страница 134: ...o store all images when the patient is known patient information was loaded as part of the exam Within the Patient folder the Terason software creates a folder for each patient Each patient s folder contains their patient info file and one or more dated folders that contain saved images for the indicated date If you did not load patient information for an exam the Terason software uses the Image f...

Страница 135: ...ete these steps 1 Click if viewing a live image 2 Select File Export Save As Dialog Box 3 Choose a location from the Save in menu 4 Enter a filename in the File name field 5 Select a file format from the Save as type menu 6 To save the file as a loop file click the check box You can only select the check box if you choose Terason Image File AVI or DICOM file as the format 7 If you selected a file ...

Страница 136: ...you can use the Terason Explorer window to find it and open it Locating Saved Images and Loops To open a folder click the symbol or double click the folder name To open an image file you can either Double click the file name or Right click the file and select Open Images and loops have different icons in the Terason Explorer so you can distinguish them If you save files in formats other than the T...

Страница 137: ...w on page 139 If you have moved deleted or renamed files using Windows Explorer while the Terason software is running right click in the Terason Explorer window and select Refresh to update The Terason software loads the selected image file into a new tab in the Image Display window When finished with the image file select File Close Image and the Terason software removes the tab For ult files Ter...

Страница 138: ...ger than the Image Display window the window includes scroll bars along the right and bottom edges These bars let you see the parts of the image that do not fit within the window Click and drag in a scroll bar to see a different part of the image For non ULT files the Terason software provides a shortcut menu that lets you use the Playback functions for AVI or DICOM loops resize the image to a sel...

Страница 139: ...view the Review window click the Review tab Review Tab Large Thumbnails You can also use this window to print all of a set of ultrasound images instead of printing them one at a time see Printing Images on page 146 for instructions To open an image or loop double click the thumbnail You can view large thumbnails which makes it easier to tell what the images are or small thumbnails which makes more...

Страница 140: ...st first If you use Windows Explorer to rename or delete files you can select Refresh from the shortcut menu or View Refresh to update the thumbnails displayed in the Review window Browsing to Find Files Terason recommends that you save all patient and image files in the default folders However if you have archived images or if the images are stored elsewhere for any reason you can still use the T...

Страница 141: ...another folder or directory The method described here is only one of the many ways you can use Windows to copy files from one location to another To copy a Terason image or patient file complete these steps 1 Click the Start button at the bottom left of the screen and choose Programs Accessories Windows Explorer Windows Explorer 2 In the left pane of the window open folders by clicking them until ...

Страница 142: ...eady have these activities scheduled talk to the computer administrator at your site about setting up a schedule If your site does not support automatic backups you may have to perform the backups yourself Use the CD writer software on your computer to back up files to a CD Refer to the different CD writer software user guide or online help for instructions Follow these guidelines to choose what t...

Страница 143: ...and select Rename 3 Type the new name and press Enter The Terason software changes the name of the file Renaming Files in Windows Explorer You can rename both image and patient info files using Windows Explorer To rename files from Windows Explorer complete these steps 1 Click the Start button at the bottom left of the screen and select Programs Accessories Windows Explorer 2 Open folders by click...

Страница 144: ...is emptied Emptying the Recycle bin permanently removes all files from the system they cannot be recovered You can use Windows Explorer to delete Patient Info files To delete files from Windows Explorer complete these steps 1 Click the Start button at the bottom left of the screen and select Programs Accessories Windows Explorer 2 Open folders by clicking them until the file or folder you want to ...

Страница 145: ...g with an image or a loop The Terason software can edit only Terason Image Format files and loops ult You can use the Terason software to view images saved in other formats but not to edit them For a retrieved image you can edit any of these image controls Add or delete measurements Add or delete text Zoom in on an image if the image is re saved the new zoom setting is not saved Invert Left Right ...

Страница 146: ...screen image Select File Print DICOM Image see Printing Files to a DICOM Printer on page 227 You can also use Print Setup on the File menu to select a default printer and default print settings such as page size and orientation Printing the Displayed Image When viewing an image in the Image Display or Review windows you can click to print the image or images When you click the Print button the Ter...

Страница 147: ...needed The Images per page and Print Range options only work when printing from the Review window If you highlighted specific images in the Review window the print range is Selection To print the image to see details choose a smaller value for Images per page To print many images on a page choose a larger value 4 Click OK Printing from the Review Window To print all of the images shown in the Revi...

Страница 148: ...from the Print Preview Window Print Preview on the File menu lets you see the expected printout for the image or images in the Image Display or Review window whichever window is active When you select File Print Preview the Terason software opens the Print Preview window Print Preview Window Selected with Review Window Active Click the Print button at the top to send the job to your default printe...

Страница 149: ...ess the F11 key The Terason software enlarges the Image Display window to cover the entire screen 3 Click The Terason software prints the Image Display window including both screens Buttons on the Print Preview Window Button Result Print Prints all pages on your computer s default printer Next Page Displays the next page of images if there are at least two pages Prev Page Displays the previous pag...

Страница 150: ...easurements on scanned images you must understand Measuring in the 2D Window see page 151 Measuring in the M Mode Window see page 165 Measuring in the Spectral Doppler Modes see page 166 Measuring Vascular Exams see page 175 Measuring Cardiac Exams see page 184 Selecting Measurements see page 200 Deleting Measurements see page 201 Restoring All Measurement Groups to Defaults see page 201 Stress Ec...

Страница 151: ...ent such as FL only the button that works with that measurement is available If you select a default measurement such as Distance you can click any button to choose a different default measurement You can also make a measurement by right clicking and selecting New Measurement from the pop up menu This starts a measurement of the type currently selected in the 2D Measure tab Measuring Distances To ...

Страница 152: ...sor and click where you want to finish measuring Selecting a measurement type enables the start point target cursor If you did not select a measurement type click New to enable the target cursor The Terason software displays the results in the bottom left corner of the 2D window Distance Measurement on an Image 6 To move the start or end point of a measurement click one of the anchors calipers mov...

Страница 153: ...nd depth measurements in any order that make sense for the specific scan 1 Click The measure tabs for the selected scan mode are added to the Image Control window 2 If necessary click the 2D Measure tab or click in the 2D window 3 Select Length from the Measurement list 4 Click at the starting point of the area s length then click at the ending point of the area s length The Terason software displ...

Страница 154: ...ou measure To use the ellipse tool to measure an elliptical area complete the following steps 1 Click If playing a loop click The measure tabs for the selected scan mode are added to the Image Control window 2 If necessary click the 2D Measure tab or click in the 2D window 3 Use one of the following methods to activate the ellipse tool Click the Ellipse button Select Circumference from the Measure...

Страница 155: ...n which changes the shape of the ellipse Tracing Areas on the Image The Terason software lets you trace the contour of any shape on an image to measure the circumference and area You can also use the Ellipse tool to measure a circumference or area see Measuring Elliptical Circumference and Area on page 154 for instructions You can use the trace tool to Trace an irregular shape by sketching the out...

Страница 156: ...e mouse button and press the Backspace key to delete line segments then press the left mouse button and continue tracing 5 To draw a polygon a Click where you want to start measuring b Click the next corner of the shape The target cursor looks like while you draw the polygon Tracing a Polygon c Continue clicking on corners d To erase part of the polygon press the Backspace key to remove unwanted l...

Страница 157: ...se measurements in any order the Terason software always uses the largest measurement as the diameter or area of the vessel This procedure shows you how to measure the percentage of stenosis based on the diameter 1 Click Freeze If playing a loop click Pause The measure tabs for the selected scan mode are added to the Image Control window 2 If necessary click the 2D Measure tab or click in the 2D w...

Страница 158: ...al exam allows you to measure anatomy on up to six fetuses labelled A through F You can make any combination of measurements on any fetus during an exam When you freeze an Obstetrical exam the following operations are enabled Making Obstetrical Measurements see page 159 Calculating Estimated Fetal Weight see page 162 Calculating Gestational Sac Size and Age see page 163 Caution An additional compu...

Страница 159: ...circumference AC and head circumference HC use the Ellipse or Trace tools see Measuring Elliptical Circumference and Area on page 154 or Tracing Areas on the Image on page 155 You can make multiple measurements of one type on multiple scans to acquire all the needed measurements For example the following scan shows a femur length FL measurement FL Measurement on an Image In this example the 6 10 c...

Страница 160: ...set the trimester to 1 2 or 3 using the right and left arrows or you can click either the LMP last menstrual period or EDD estimated due date button and enter the date To choose the date click the down arrow and use the calendar tool to click the date of the LMP or EDD depending on which button is selected When you enter a date the Terason software updates the Trimester accordingly The trimester s...

Страница 161: ...ic Fluid Index Quadrant 1 AFI Q1 Crown Rump Length CRL Amniotic Fluid Index Quadrant 2 AFI Q2 Femur Length FL Amniotic Fluid Index Quadrant 3 AFI Q3 Gestational Sac Diameter Width GSDW Amniotic Fluid Index Quadrant 4 AFI Q4 Gestational Sac Diameter Height GSDH Abdominal Anterior Posterior Diameter APD Gestational Sac Diameter Length GSDL Abdominal Transverse Diameter APTD Head Circumference HC Bi ...

Страница 162: ...ou choose a different setup the selected setup may not support the EFW calculation To calculate the estimated fetal weight complete the following steps 1 Perform an obstetrical exam 2 Click 3 Select AC from the Measurement menu and use the Ellipse tool to measure the abdominal circumference 4 If necessary click Live and acquire a view for the head circumference measurement then click Freeze 5 Sele...

Страница 163: ...ults on page 250 If you choose a different setup the selected setup may not support the GSS and GA calculation To measure the mean gestational sac size complete the following steps 1 Perform an obstetrical exam 2 Click 3 Select GSDH from the Measurement menu and measure the gestational sac diameter height 4 If necessary click and acquire a view for the gestational sac diameter width measurement th...

Страница 164: ...tances on page 151 When you freeze a Gynecological exam the Terason software lets you choose any of the default 2D measurements plus the measurements in the following table To make a gynecological measurement complete the following steps 1 Perform an gynecological exam 2 Click 3 Select the needed measurement from the Measurement list The Terason software selects the Caliper tool 4 Click at the beg...

Страница 165: ...e an image to the ULT format measurements in the M Mode window are saved You can edit those measurements when you view the file To measure in the M Mode Time Series window complete the following steps 1 Click If playing a loop click The measure tabs for the selected scan mode are added to the Image Control bar 2 Select a measurement type from the drop down menu on the M Measure tab 3 Click the tar...

Страница 166: ...des When you freeze a Pulsed Wave Doppler Continuous Wave Doppler or Triplex scan the Terason software adds the 2D Measure and PWD Measure or CWD Measure tabs to the Image Control bar The controls on the CWD Measure tab are identical to those on the PWD Measure tab The graphics in this section show the PWD Measure tab and any reference to the PWD Measure tab functions also applies to the CWD Measu...

Страница 167: ...n page 112 The Vessel Info section lets you label the scanned vessel When you make a measurement you can identify what is being measured by selecting Laterality right or left Location prox mid or distal Vessel Ratio is used to indicate whether the selected vessel will be used as Artery 1 or Artery 2 in an arterial ratio calculation see Calculating Arterial Ratios on page 172 The vessel wall marker...

Страница 168: ...nal A Main Renal Artery Renal V Renal Vein SMA Superior Mesenteric Artery SMV Superior Mesenteric Vein Splenic A Splenic Artery Splenic V Splenic Vein Arterial ATA Anterior Tibial Artery Axillary A Axillary Artery Brachial A Brachial Artery CFA Common Femoral Artery CIA Common Iliac Artery DPA Dorsalis Pedis Artery Ext Iliac A External Iliac Artery Innominate A Innominate Artery Peroneal A Peronea...

Страница 169: ... Tract MV Mitral Valve PV Pulmonic Valve RVOT Right Ventricular Outflow Tract TV Tricuspid Valve Musculoskeletal Artery Artery Vein Vein Obstetrical Ext Iliac A External Iliac Artery Fetal Ao Fetal Aorta Fetal ICA Fetal ICA Fetal MCA Fetal MCA Fetal RA Fetal Renal Artery Int Iliac A Internal Iliac Artery Ovarian A Ovarian Artery Placental Placenta Radial A Radial Artery Umbilical A Umbilical Arter...

Страница 170: ...roid A Inferior Thyroid Artery Sup Thyroid A Superior Thyroid Artery Thyroidal A Thyroidal Artery Vascular Access Antecubital V Antecubital Vein Axillary A Axillary Artery Axillary V Axillary Vein Basilic V Basilic Vein Brachial A Brachial Artery Cephalic V Cephalic Vein CFA Common Femoral Artery CFV Common Femoral Vein GSV Greater Saphenous Vein LSV Lesser Saphenous Vein Med Baslic V Median Basil...

Страница 171: ...age Control bar 2 Click the Rt right or Lt left button to specify the Laterality of the scanned artery 3 Click the Prox Mid or Distal button to specify the Location of the scanned artery Venous Antecubital V Antecubital Vein ATV Anterior Tibial Vein Axillary V Axillary Vein Basilic V Basilic Vein Brachial V Brachial Vein Cephalic V Cephalic Vein CFV Common Femoral Vein Com Iliac V Common Iliac Vei...

Страница 172: ...rotid artery ICA to CCA ratios or systolic renal artery to aorta ratio Before you make a PS ED measurement select Artery 1 denominator or Artery 2 numerator from the Ratio menu This selection determines the order of calculation for the ratio For example if you scanned the ICA as Artery 2 and CCA as Artery 1 then the S and D ratios represent the ICA CCA ratios You do not need to select Artery 1 or ...

Страница 173: ...Time Complete the following steps to measure the heart rate or rise time values for an artery 1 Click If playing a loop click The 2D and PWD measure tabs are added to the Image Control bar 2 Click the Rt right or Lt left button to specify the Laterality of the scanned artery This is not required 3 Click the Prox Mid or Distal button to specify the Location of the scanned artery 4 Select the scanne...

Страница 174: ...ty centimeters second DIA diameter millimeters The formula used is FV TMV 4 DIA2 To accurately measure flow volume the range gate must be open from wall to wall within a vessel The following procedure shows you how to adjust the size of the range gate for a frozen scan To measure flow volume complete the following steps 1 Set the sample volume size SV Size and location and acquire image data 2 Cli...

Страница 175: ... move to another end diastolic location and click Measuring Vascular Exams When you make a measurement in the 2D Image Display window the measurement value displays at the bottom left of the window If you make a series of measurements that result in the Terason software calculating another value the calculated values display at the bottom left of the window The Terason software provides Vascular m...

Страница 176: ...can modify existing lists See Modifying Vascular Measurement Lists on page 176 You can create custom measurement labels called vessels See Creating Vessel Labels on page 177 You can restore the system default groups See Restoring Vascular Measurement List Defaults on page 179 Modifying Vascular Measurement Lists To add or remove measurements in a list 1 Open the Options Measurements window Tools O...

Страница 177: ...e in the list at the left then click Add 6 To remove a measurement from the group click its name in the Current Measurement list then click Remove 7 Click OK Creating Vessel Labels To create a vessel label 1 Open the Options Measurements window Tools Options Measurements 2 In the Configuration pull down menu select the exam type 3 Click Configure 4 On the Configure Vascular Measurements window cli...

Страница 178: ...ectral 6 To create a new vessel a Click Configure All Vessels The All Vessels window opens All Vessels Window b Enter the name in the New Vessel Name field Each vessel name must be unique c If the new vessel has laterality check the Has Laterality checkbox d If the new vessel has location check the Has Location checkbox e Click OK to create the new vessel f In the Configure Vascular Measurements w...

Страница 179: ...am type that you want to restore 4 Click Configure The Configure Vascular Measurements window opens 5 Use the radio buttons to select the applicable scan mode 2D M Mode or Spectral 6 Click Restore to restore the selected group to the default To restore a Current Vessel list to the default set of vessels 1 Open the Options window click Tools Options 2 Click the Measurements tab 3 In the Configurati...

Страница 180: ...nts by Window Measurement Group Measurements Tool Used Vascular Measurements in the 2D Image Display Window Stenosis Diameter Diameter Stenosis Caliper Stenosis Area Area Stenosis Trace Vascular Measurements in the M Mode Time Series Window HR HR Time Caliper Cardiac Measurements for PWD CD Time Series Window PS ED PS Velocity Point ED Velocity Point RT RT Time Caliper HR HR Time Caliper Flow Volu...

Страница 181: ...m the report the report is not editable The highest velocity of each vessel location is displayed in the report and the highest velocity of each vessel is used for ratios The only exception would be if Always use mid CCA for ICA CCA ratio is checked on the worksheet You can enter pertinent vascular history to the worksheet in the Blood pressure Indications and Comments fields The following page sh...

Страница 182: ...Chapter 7 Working With Measurements Measuring Vascular Exams Terason t3000 Echo Ultrasound System User Guide 182 Vascular Worksheet Film 0001 Date Monday November 21 2005 Hour 02 21 26 PM ...

Страница 183: ...hich measurements you wish to include on the report If there is a measurement that you do not wish to include remove the checkmark for that particular measurement When you have examined the information on the worksheet click the report button at the top of the worksheet to display the report Vascular Report Film 0001 Date Monday November 21 2005 Hour 02 59 00 PM ...

Страница 184: ...phy Measurements see page 191 There is also a sample Echocardiography Report see Working With Cardiac Reports on page 196 Cardiac Measurement Groups The Terason software includes default groups of commonly used measurements that are available in the Measurement pull down menu on the Image Control panel when an image is frozen and the measurements included in the selected group display in the field...

Страница 185: ...ements window Tools Options Measurements 2 In the Configuration pull down menu select Cardiac 3 Click Configure Options Measurements Window The Configure Cardiac Measurements window opens Configure Cardiac Measurements Window 4 Click the radio button 2D M Mode or Spectral that corresponds to the scan mode you want to modify a group for 5 To choose a group for modification select it in the Group Na...

Страница 186: ...move 8 When all the modifications are made click OK Creating and Deleting Cardiac Measurement Groups To create or delete a measurement group 1 Open the Options Measurements window Tools Options Measurements 2 In the Configuration pull down menu select Cardiac 3 Click Configure 4 On the Configure Measurements window click the Groups tab The window changes to allow creation and deletion of groups Co...

Страница 187: ...roups window click the Measurements tab f Modify the contents of the new group as described in Modifying Cardiac Measurement Groups on page 185 7 Click OK Restoring Cardiac Measurement Group Defaults You can restore a measurement group or set of measurement groups to the default group To restore a measurement group to the default set of measurements 1 Open the Options window click Tools Options 2 ...

Страница 188: ...icle Dimensions RVAWd Right ventricle anterior wall thickness in end diastole Caliper RVIDd Right ventricle internal dimension in end diastole Caliper IVSd Interventricular septal thickness in end diastole Caliper LVIDd Left ventricle internal dimension in end diastole Caliper RVAWs Right ventricle anterior wall thickness in end systolic Caliper RVIDs Right ventricle internal dimension in end syst...

Страница 189: ...entricle posterior wall thickness in end diastole Depth Caliper LVPWs Left ventricle posterior wall thickness in end systole Depth Caliper LVIDs Left ventricle internal dimension in end systole Depth Caliper LVIDd Left ventricle internal dimension in end diastole Depth Caliper IVSd Interventricular septal thickness in end diastole Depth Caliper IVSs Interventricular septal thickness in end systole...

Страница 190: ...te Heart Rate PI Peak Pulmonic insufficiency peak velocity Velocity Point TV TV Mean Tricuspid valve mean velocity Velocity Trace TV E Peak Tricuspid valve E peak velocity Velocity Point TV A Peak Tricuspid valve A peak velocity Velocity Point TV PHT Tricuspid valve pressure half time Slope Caliper TV HR Tricuspid valve heart rate Heart Rate TR Peak Tricuspid regurgitation peak velocity Velocity P...

Страница 191: ...Vs LV volume systolic ml Vd LV volume diastolic ml Stroke Volume V LV volume ml s systole d diastole ml Cardiac Output SV stroke volume ml HR heart rate bpm l min Cardiac Index CO Cardiac Output BSA body surface area m2 l min m2 LV Mass A1 SAX epicardial diastolic area cm2 A2 SAX endocardial diastolic area cm2 L apical length in diastole cm t mean myocardial thickness g cm LV Mass Index LV g BSA b...

Страница 192: ...ventricul ar Septum IVSs interventricular septum in systole IVSd interventricular septum in diastole Fractional Thickening Left Ventricular Posterior Wall LVPWs left ventricular posterior wall in systole LVPWd left ventricular posterior wall in diastole Volume Cubed LVID left ventricle inside diameter ml Volume Teichholz LVID left ventricle inside diameter ml Ejection Fraction Cubed Vs systolic vo...

Страница 193: ...in BSA body surface area m2 l min m2 Cardiac Index Teichholz CO Cardiac Output Teichholz l min BSA body surface area m2 l min m2 LV Mass IVSd interventricular septum diastole cm LVIDd left ventricle inside diameter diastole LVPWd left ventricle posterior wall diastole g LV Mass Index LV Mass g BSA body surface area g m2 Body Surface Area W weight range 0 5 160 kg H height range 150 204 cm m2 M Mod...

Страница 194: ...e points ti time between two successive velocity trace points sec mmHg Time Velocity Integral TVI area under curve cm Stroke Volume TVI time velocity integral cm Flow Area derived from the flow diameter cm2 ml Cardiac Output SV stroke volume ml HR heart rate bpm l min Cardiac Index CO Cardiac Output BSA body surface area m2 l min m2 Pressure Half Time Vmax Maximum velocity m s Deceleration Slope m...

Страница 195: ...ral Valve Area by Continuity Equation Using Aorta MVA mitral valve area cm2 CSALVOT cross section area of LVOT cm2 TVILVOT time velocity integral in LVOT m TVIMV time velocity integral of mitral valve m LVOT left ventricular outflow tract cm2 Mitral Valve Area by Continuity Equation Using Pulmonary Artery MVA mitral valve area cm2 CSAPA cross section area of pulmonary artery cm2 TVIPA time velocit...

Страница 196: ...t Ratio COQp pulmonic cardiac output l min COQs systemic cardiac output l min Shunt Difference COQp pulmonic cardiac output l min COQs systemic cardiac output l min l min Example Echocardiography Report Exam Type Report Date Patient Information Patient Patient Id Sex Height Birth Date Weight BP BSA Study Information Study Date Accession Number Referring Physician Interpreting Physician Indications...

Страница 197: ...xx cm2 x xx cm x x ml Ap2c Dias x xx cm2 x xx cm x x ml Ap2c Sys x xx cm2 x xx cm x x ml Biplane Dias x x ml Biplane Sys x x ml Ap4c FAC xx Ap2c FAC xx HR xx bpm EF xx SV x x ml CO x xx l min CI x xx l min m2 Left Ventricle Mass SAX Epi Dias x xx cm2 SAX Endo Dias x xx cm2 SAX Endo Sys x xx cm2 FAC xx Apical Length x xx cm LV Mass x x g LVMI x x g m2 Valves and Atria 2D Diameter Area LVOT x xx cm ...

Страница 198: ... x xx m s x x mmHg AI Peak x xx m s x x mmHg PHT xxx ms LVOT Diameter x xx cm LVOT CSA x xx cm2 Mitral SV x x ml Stroke Volume x x ml Regurg Fraction xx HR xx bpm Cardiac Output x xx l min Cardiac Index x xx l min m2 Velocity Gradient TVI Time LVOT Mean x xx m s x x mmHg x xx m xxx ms LVOT Peak x xx m s x x mmHg AV Area TVI x xx cm2 AV Area Peak x xx cm2 Mitral Valve Velocity Gradient TVI Time MV ...

Страница 199: ...x m xxx ms PV Peak x xx m s x x mmHg PI Peak x xx m s x x mmHg PV Diameter x xx cm PV CSA x xx cm2 Stroke Volume x x ml HR xx bpm Cardiac Output x xx l min Cardiac Index x xx l min m2 Tricuspid Valve Velocity Gradient TVI Time TV Mean x xx m s x x mmHg x xx m xxx ms TV Peak E x xx m s x x mmHg TV Peak A x xx m s x x mmHg E A Ratio TR Peak x xx m s x x mmHg PHT xxx ms TV Diameter x xx cm TV CSA x x...

Страница 200: ...ement is highlighted Click the measurement Click the value HR xx bpm xx bpm Diameter x xx cm x xx cm CSA x xx cm2 x xx cm2 Stroke Volume x x ml x x ml Cardiac Output x xx l min x xx l min Cardiac Index x xx l min m2 x xx l min m2 Qp Qs x xx Qp Qs x xx l min VSD Qp VSD Qs TVI x xx m x xx m HR xx bpm xx bpm Diameter x xx cm x xx cm CSA x xx cm2 x xx cm2 Stroke Volume x x ml x x ml Cardiac Output x x...

Страница 201: ...urements to delete all measurements in the Time Series window Clear 2D Measurements to delete all measurements in the 2D window Clear All to delete all measurements in the 2D and Time Series windows Clear All on the Edit menu deletes all text and measurements in both Image Display windows The Measurement menu lets you clear all measurements made in the specified window 2D or Time Series Measuremen...

Страница 202: ...tudy 1 Inspect the ECG connectors and cables Do not use the ECG function if a connector or cable is damaged 2 Couple the connector from the ECG 3 lead wireset to the ECG cable connector ECG Cable connectors 3 Connect the ECG cable to the dock Connecting ECG 4 Choose a Cardiac exam 5 In the Terason Explorer double click the Patient Info file for the patient This enables the Stress button on the sca...

Страница 203: ... and the Stress Setup window displays the default settings for the selected protocol Stress Setup Window With Settings Loaded The default acquisition type is Quad This records four complete heart cycle loops 8 Select Multi to record more than four heart cycle loops When Multi is selected the software continues to record heart cycles until it reaches 200 or until you stop the acquisition 9 Open the...

Страница 204: ...ntered number of milliseconds 11 When the study settings are correct click OK The Stress Setup window closes 12 Click inside the ROI rectangle or select it with the console drag it to the left ventricle and click again 13 Acquire the Rest loops a Click the Acquire button Acquire Button The software captures loops of the heart cycle and displays them in the Review screen If Multi is selected in the...

Страница 205: ...ts Stress Echo Terason t3000 Echo Ultrasound System User Guide 205 Heart Cycle Loops on Review Screen b Use the Review control panel to control the loop playback See Features of the Stress Echo Review Window on page 210 Review Controls ...

Страница 206: ...cator e Reposition the transducer to scan another view f Repeat steps a through e until all the Rest loops are selected g Click 2D to return to the scanning window The software advances to the Impost loop acquisition phase and the Acquire view indicator displays empty squares 14 Acquire the Impost loops immediate post exercise loops a Click the Acquire button Acquire Button The software captures l...

Страница 207: ...scanning window d Reposition the transducer to scan another view e Repeat steps aa through d until all the Impost loops are selected 15 To change the selected loops a Use the Stage Selector and View Selector buttons on the Stress Echo Scanning window see Stress Echo Scanning Window on page 209 to select the view you want to choose a different loop for b Click Acquire c Click the checkbox in the pa...

Страница 208: ...age server use the Send or Send Sel buttons on the toolbar See Stress Echo Review Window on page 210 Pausing and Resuming a Stress Study You can pause a stress study by clicking the Pause Resume Study button on the scanning window toolbar When the study is paused you can make other examinations and save them Clicking the Pause Resume Study button again resumes the stress study Editing Stress View ...

Страница 209: ...o Ultrasound System User Guide 209 Features of the Stress Echo Scanning Window Stress Echo Scanning Window ECG active indicator Timer indicator Stage selector View selector Pause resume study button Acquire button Stress study information ROI rectangle Stress Button ...

Страница 210: ... specific frames of a loop Playback Navigation Controls Playback Navigation Controls When more than four loops are displayed so that a scroll bar appears the double arrow buttons move back and forth between groups of loops The windowpane button toggles between thumbnail view of all the loops in the study and selected loops or when selecting between the selection and the set of loops already select...

Страница 211: ...r they all start together or end together When they are synchronized loops of different lengths will either start at the same time and shorter loops will pause at their ends until longer loops finish or end at the same time and longer loops will start before shorter ones Display Selection Display Selection Menu This drop down menu lets you view either individually selected loops all the loops in a...

Страница 212: ...pecific ultrasound exam To work with exams you must understand About Exams see page 212 Opening an Exam see page 215 Creating Custom Exams see page 215 Deleting Custom Exams see page 216 About Exams The Terason Ultrasound System provides pre defined exams for all supported transducers Although several transducer models may support the same exam the preset image control parameters are unique to eac...

Страница 213: ...inal Fetal Cardiac Gynecological Nerve Block Obstetrical Obstetrical 3D Prostate Renal 7L3V Arterial Breast Carotid Dialysis Access Musculoskeletal Nerve Block Testes Thyroid Vascular Access Venous 8BP4 t3000 only Prostate 8EC4A Gynecological Obstetrical Obstetrical 3D Prostate 8MC3 t3000 only Arterial Carotid Nerve Block Pelvic Renal Venous 10V5S t3000 only Vascular access 12HL7 Intraoperative Mu...

Страница 214: ...rejection M Mode Sweep Speed Ultrasound cursor position PWD Sweep Speed Velocity display PRF Wall filter Invert Correction angle Sample volume size Gain Compress Noise Rejection Baseline Sound volume Update CD Scan area PRF Wall filter Color Invert Color Gain Color Priority Color Persistence Color Baseline Color Threshold Spatial Resolution and Frame Rate Pwr and DirPwr Scan area PRF Wall filter D...

Страница 215: ... exam using any of these methods Select the exam from the Exam menu the checked exam indicates the open exam Select Exam Open Exam click an exam and click Open Select an exam type from the pull down menu on the 2D Image Control tab Creating Custom Exams In addition to using the provided preset exams you can create custom exams Custom exams include your own specific modifications to the preset imag...

Страница 216: ...computer If you connect a different transducer this new exam is not available Creating Size Specific Versions When you create a custom exam for a specific size a preset exam is created for the size that is selected when the exam is saved To use the parameters you defined in the preset for other sizes you must create customized exams for each size Use the same name for each size you modify when sav...

Страница 217: ...xam Delete Exam The Terason software opens the Delete Exam dialog box Deleting an Exam 2 Click the exam that you want to delete from the list and click Delete The Terason software prompts you to confirm that you want to delete this exam Confirm Delete Dialog Box 3 Click Yes to confirm the deletion 4 Click Close If you select the active exam the following message displays Error Message If Delete Ac...

Страница 218: ...llowing transducers 7L3V 5C2A 8EC4A 12L5V Warning Percutaneous procedures always involve heightened risk to the patient and to the operator handling biopsy needle guides Clinicians using Terason recommended biopsy devices under ultrasound guidance should be trained and must observe proper needle insertion sequencing with the needle guide in order to avoid undue discomfort and unnecessary risk and ...

Страница 219: ...single use item Do not use if the packaging indicates signs of tampering or if the expiration date has passed Warning For needle guides not in sterile packaging Needle Guide Bracket kits are packaged non sterile Sterilize these products prior to their first use Warning If a needle guide becomes contaminated with tissue or fluids of a patient known to have Creutzfeld Jacob disease then the needle g...

Страница 220: ... com or Protek www protekmedical com Starter needle guide kit Replacement needle guide kit Starter needle guide kits contain both disposable and reusable parts that you need to perform a biopsy Replacement needle guide kits contain only disposable parts After the first time you must use a new replacement needle guide kit each time you perform a biopsy Different needle guide kits are required for e...

Страница 221: ...ile L5 9EC single angle bracket 2 5cm Ultra Pro II needle guide CIV Flex cover 14 x 91 5cm 3D 5 Cleaning brushes 5 Civco 610 608 Sterile Ultra Pro II guide with 14x91 5 cm CIV Flex cover 24 Warning Do not attempt to use a needle guide kit until you have read the instructions for selecting the settings and verifying the alignment of the guide lines Improper use of biopsy needles can cause injury to...

Страница 222: ...wrinkles and air bubbles taking care to avoid puncturing the cover 3 Secure the cover with the bands packaged with the cover 4 Inspect the cover to ensure there are no holes or tears 5 Using proper sterile technique snap the unlocked needle guide onto the attachment area of the bracket 6 Push the lock into the locked position 7 Select the appropriate size needle guide insert and slide it into posi...

Страница 223: ...tervals and the distance between the guide lines is fixed at 1 cm 4 If the Target Indicator green circle with an X does not show within the guides select View Needle Guide Display Needle Guide Target Indicator The Terason software adds the Distance to Target value at the top of the image 5 Move the Windows pointer within the lines to highlight the target of the biopsy or other procedure and determ...

Страница 224: ...ent and do not use the Zoom tool The needle guides do not show in zoomed displays To verify the alignment of the transducer and biopsy attachment complete these steps 1 If the needle guides are not visible select View Needle Guide Display Guide Lines The biopsy guides appear in the Image Display window 2 From the Needle Guide menu on the I Q tab select the needle guide that you want to use for the...

Страница 225: ... 2 to 2 Depth 1 mm to 1 mm To change the needle guide error correction values for any transducer except the biplanar transducer complete these steps 1 Click Tools Needle Guide Error Correction The Needle Guide Error Correction dialog box opens Needle Guide Error Correction Dialog Box You can click the Apply button to see the effects of your choices without closing the dialog box click the Default ...

Страница 226: ...Chapter 9 Performing Medical Procedures Cleaning the Transducers and Brackets Terason t3000 Echo Ultrasound System User Guide 226 ...

Страница 227: ...he DICOM menu items are not accessible The DICOM utility starts when the computer is powered on and is added to the controls section of the task bar using this icon Using Images with a DICOM Printer or Server When you send or print a DICOM image the Terason software saves the image in a temporary location on your computer The images are then sent to the server To view log messages about images exp...

Страница 228: ...s to send 4 Select File Send DICOM File s The Terason application sends the files to the configured DICOM server Using DICOM Worklist DICOM Worklist is a function of the Terason Ultrasound software that connects to a DICOM server using a network service and generates a list of patient information sets that meet chosen criteria Worklist finds patient records based on parameters set in the Tools Opt...

Страница 229: ...ltrasound exam for a patient into DICOM and when the scheduled date arrives the Worklist auto query collects the patient info and adds it to the worklist Manual queries can take two forms broad queries and patient based queries Broad queries search all records on the DICOM server using the parameters chosen in the Options window Broad queries are preset groups of parameters They can be used as the...

Страница 230: ...able communication with the DICOM server then opens a message box that says whether the configuration passed or failed the test 6 To make the Query window open whenever the Patient Info screen displays click Auto Popup Worklist so the box is checked 7 Click OK to save the entered values The Options window closes Configuring Broad Queries To configure a query so that it is available in the Broad Qu...

Страница 231: ... AE title of the Terason ultrasound computer in the AE Title field 5 To search for info sets of patients who have not had an ultrasound exam before pull down the Modality menu and choose a different exam type 6 In the Date menu choose All Dates Today or a range of dates to search 7 To make the query repeat at intervals click Auto Query so the box is checked and select a Query Interval using the up...

Страница 232: ...Broad Query menu of the Worklist window Making a Query You can make a broad query that searches all the patient records and returns all the patient info sets that match the criteria or a patient specific query that searches for a specific patient s info set A patient specific query can use the same criteria as a broad query returning only those info sets that match both the criteria in the broad q...

Страница 233: ...to the DICOM server during a previous exam of any type the query will return that information 4 To limit the search to specific dates pull down the Date menu and choose Today or a range of dates to search 5 Click Query Worklist searches the DICOM server and lists the results in the top part of the Worklist window Making a Patient Specific Query To make a patient specific query 1 In the Patient Inf...

Страница 234: ...klist is wider than the Worklist window To see all the categories you must use the scroll bar at the bottom of the list area You can set the left to right listing order of the patient info values to reduce the amount of left to right scrolling required to read information you commonly use See Setting the Value List Order below If a query returns a large number of patient info sets you must use the...

Страница 235: ...and click Move Down until the name is in the desired place 4 Repeat with any other fields you want to move 5 Click OK Worklist displays the values in the patient info sets in the order you specified When you make a new query the worklist displays the values in the order you set with this procedure Sorting the Results To sort the list of results using a specific value type 1 On the Worklist window ...

Страница 236: ...server Stopping the Network Service To stop the network service 1 Right click the network service icon on the Windows status bar at the lower right corner of the screen Network Service Icon A dialog box opens 2 Click Exit in the dialog box The network service stops Checking the Connection Status When you hover the Windows pointer over the network service icon a tooltip appears that describes the n...

Страница 237: ...e Monitor Display When you purchase a laptop from Terason as part of the Terason Ultrasound System the monitor is already adjusted for proper display Gamma refers to the monitor s ability to display accurate colors If you think the colors on your monitor are no longer accurate you can perform the tests in this section to verify that the display is correct The Display Setup window includes four ind...

Страница 238: ... Test 3 From the Display Selection menu select your monitor If you do not see any monitors listed select Default 4 Verify that the gray bars in each column are increasingly difficult to distinguish as you look from right to left 5 Select bwhtest from the Greyscale Test Image Selection menu Greyscale Tests The following figure shows the BWHtest ...

Страница 239: ... Echo Ultrasound System User Guide 239 Gamma Correction Dialog Box BWHTest BWH Brigham and Women s Hospital 6 Verify that the test pattern shows a continuous grayscale image from the center of the pattern You should not see any concentric ring like features 7 Select SMPTE ...

Страница 240: ... squares that represent signal level steps of 5 in the 0 square and 95 in the 100 square You should be able to differentiate the inner square from the larger square that contains it b Verify that the high contrast bar patterns in the test image are distinct simple patterns of black and white bars In each corner and the center of the image inspect the lines from fat to narrow horizontally and verti...

Страница 241: ...ng the Position of the Needle Guides Needle Guide Error Correction in the Tools menu is used exclusively with the biopsy medical procedures options See Correcting Needle Guide Positioning for Biopsies on page 225 for information on correcting the needle guide position Restoring the Default Layout You can easily reset the layout of the toolbars and windows to their default locations To do so comple...

Страница 242: ...window is never hidden beneath another application select Tools Always on Top from the Terason menu bar This menu item shows a check mark when it is selected When Always on Top is selected no other application blocks your view of the Terason application To view a different application window 1 Minimize the Terason window click at the top right of the Terason window Windows adds a button on the tas...

Страница 243: ...essage box Enabling or Disabling the Color Doppler Message The Show Color Doppler Message item in the Tools menu lets you control whether or not the application displays a message when you try to save an image file with a high color persistence setting See Adjusting the Color Persistence on page 123 for information on the color persistence setting You can use the Tools Show Color Doppler Save Mess...

Страница 244: ... its own file format when saving image files and loops You can choose a different format as the default for images or loops When you set a different file type as the default the Terason software changes the Save Image and Save Loop buttons to show the file type that will be used You can select a different default file type for images and loops The following table shows the icons for all file types...

Страница 245: ...ou can replace the Save Image and Save Image Loop buttons on the File toolbar with Send DICOM Image and Send DICOM Loop buttons and the Print button with a Print DICOM button To save an image or loop to your computer in a format other than DICOM or to print to a printer other than the DICOM printer when the DICOM options are selected use the File menu The Toolbar File and Print handling options ar...

Страница 246: ... Choosing Baseline JPEG enables the JPEQ Quality controls Selecting a higher number in the JPEQ Quality fields produces a higher quality image with fewer artifacts and a larger file Selecting a lower number produces a lower quality image and a smaller file The RLE compress local DICOM files checkbox lets you choose whether or not to compress DICOM files when saving them in the Terason Image or Pat...

Страница 247: ... on page 249 Starting the System with TeraVision Off on page 250 Scanning in Non Simultaneous or Simultaneous Mode on page 250 Scaling Curved Transducers This option works with curved array transducers it does not work with linear array transducers You can choose whether the Terason software scales the image when you choose the narrow sector width or expands it to fill the entire available area By...

Страница 248: ...arrow sector image to fill the available space To retain the same scale when you switch sector widths you can set the default to scale the narrow image You can then see the affect of switching sector widths as shown in the following figure Wide Sector vs Scaled Narrow Sector The scales are the same and you can see that the narrow width really is narrower than the wide width However the window cont...

Страница 249: ...following figure shows the difference between unscaled and scaled linear arrays Unscaled Left and Scaled Right Linear Scan Images Setting the Units for Patient Measurements When entering a patient s height and weight you can choose English units feet inches and pounds or metric units meters and kilograms Choosing Color Maps for Exams For Color Doppler mode you can choose whether Color Doppler data...

Страница 250: ...the system starts To change this default so that clicking the I P Filter button on the IQ tab is required for TeraVision to run go to Tools Options Display Mode and uncheck the box next to TeraVision ON by Default then click Apply Setting Measurement Defaults The measurement defaults include the system used to make obstetrical calculations and the COM port used to export obstetrical measurements t...

Страница 251: ... for multiple exams you must add it to each exam To add custom text complete these steps 1 Select Tools Options 2 In the Options window click the Annotation tab Options Annotation Tab 3 From the Choose Exam menu choose the exam for which you want this text to be available 4 Type the text into the Add anatomy field 5 Click Add The Terason software adds the text to the list 6 Repeat steps 3 to 5 for...

Страница 252: ...UM Official Statement of the Clinical Safety of Diagnostic Ultrasound March 1993 Diagnostic ultrasound has been in use since the late 1950s Given its known benefits and recognized efficacy for medical diagnosis including use during human pregnancy the American Institute of Ultrasound in Medicine herein addresses the clinical safety of such use No confirmed biological effects on patients or instrum...

Страница 253: ...e used only with the supplied Medical Grade Power Adapters Surface Heating of Invasive Transducers The average and peak radiated acoustic powers of all Terason transducers are limited by detection circuitry to insure that the surface heating of the transducer array is less than 43ºC To limit the average acoustic power output the maximum pulse repetition frequency PRF is tested in hardware by compa...

Страница 254: ...se for the following transducers Indications for Use 4V2S Transducer see page 256 Indications for Use 4V2A Transducer see page 257 Indications for Use 5C2A Transducer see page 258 Indications for Use 7L3V Transducer see page 259 Indications for Use 8BP4 Transducer see page 260 Indications for Use 8EC4A Transducer see page 261 Indications for Use 8MC3 Transducer see page 262 Indications for Use 8TV...

Страница 255: ... to hospital clinic settings DIAGNOSTIC ULTRASOUND INDICATIONS FOR USE FORM System Terason Ultrasound System Transducer See Comments Intended Use Diagnostic ultrasound imaging or fluid flow analysis of the human body as follows Clinical Application Mode of Operation General Track 1 Only Specific Tracks 1 and 3 B M PWD CWD Color Doppa Comb Modesb Otherc Ophthalmic Ophthalmic Fetal Imaging and Other...

Страница 256: ... hospital clinic settings DIAGNOSTIC ULTRASOUND INDICATIONS FOR USE FORM System Terason Ultrasound System Transducer 4V2S Intended Use Diagnostic ultrasound imaging or fluid flow analysis of the human body as follows Clinical Application Mode of Operation General Track 1 Only Specific Tracks 1 and 3 B M PWD CWD Color Doppa Comb Modesb Otherc Ophthalmic Ophthalmic Fetal Imaging and Other Fetal Xh X...

Страница 257: ... hospital clinic settings DIAGNOSTIC ULTRASOUND INDICATIONS FOR USE FORM System Terason Ultrasound System Transducer 4V2A Intended Use Diagnostic ultrasound imaging or fluid flow analysis of the human body as follows Clinical Application Mode of Operation General Track 1 Only Specific Tracks 1 and 3 B M PWD CWD Color Doppa Comb Modesb Otherc Ophthalmic Ophthalmic Fetal Imaging and Other Fetal Xh X...

Страница 258: ...Prostate Includes uses in military field settings in addition to hospital clinic settings DIAGNOSTIC ULTRASOUND INDICATIONS FOR USE FORM System Terason Ultrasound System Transducer 5C2A Intended Use Diagnostic ultrasound imaging or fluid flow analysis of the human body as follows Clinical Application Mode of Operation General Track 1 Only Specific Tracks 1 and 3 B M PWD Color Doppa Comb Modesb Oth...

Страница 259: ...ed Use Diagnostic ultrasound imaging or fluid flow analysis of the human body as follows Clinical Application Mode of Operation General Track 1 Only Specific Tracks 1 and 3 B M PWD Color Doppa Comb Modesb Otherc Ophthalmic Ophthalmic Fetal Imaging and Other Fetal Abdominalk Xd Xd Xd Xd Xd Xd Intra operativee Intra operative Neuro Laparoscopic Pediatric Xd Xd Xd Xd Xd Xd Small Organ Thyroid Breast ...

Страница 260: ...inic settings DIAGNOSTIC ULTRASOUND INDICATIONS FOR USE FORM System Terason 8BP4 Intended Use Diagnostic ultrasound imaging or fluid flow analysis of the human body as follows Clinical Application Mode of Operation General Track 1 Only Specific Tracks 1 and 3 B M PWD CWD Color Doppa Comb Modesb Otherc Ophthalmic Ophthalmic Fetal Imaging and Other Fetal Abdominal Intra operative Specify Intra opera...

Страница 261: ...ASOUND INDICATIONS FOR USE FORM System Terason Ultrasound System Transducer 8EC4A Intended Use Diagnostic ultrasound imaging or fluid flow analysis of the human body as follows Clinical Application Mode of Operation General Track 1 Only Specific Tracks 1 and 3 B M PWD CWD Color Doppa Comb Modesb Otherc Ophthalmic Ophthalmic Fetal Imaging and Other Fetal X X X X X X Abdominal Intra operative Specif...

Страница 262: ...on Ultrasound System Transducer 8MC3 Intended Use Diagnostic ultrasound imaging or fluid flow analysis of the human body as follows Clinical Application Mode of Operation General Track 1 Only Specific Tracks 1 and 3 B M PWD CWD Color Doppa Comb Modesb Otherc Ophthalmic Ophthalmic Fetal Imaging and Other Fetal Xd Xd Xd Xd Xd Xd Xd Abdominal Intra operative Specify Intra operative Neuro Laparoscopic...

Страница 263: ...ASOUND INDICATIONS FOR USE FORM System Terason Ultrasound System Transducer 8TV4 Intended Use Diagnostic ultrasound imaging or fluid flow analysis of the human body as follows Clinical Application Mode of Operation General Track 1 Only Specific Tracks 1 and 3 B M PWD CWD Color Doppa Comb Modesb Otherc Ophthalmic Ophthalmic Fetal Imaging and Other Fetal X X X X X X Abdominal Intra operative Specify...

Страница 264: ...rasound System Transducer 10V5S Intended Use Diagnostic ultrasound imaging or fluid flow analysis of the human body as follows Clinical Application Mode of Operation General Track 1 Only Specific Tracks 1 and 3 B M PWD Color Doppa Comb Modesb Otherc Ophthalmic Ophthalmic Fetal Imaging and Other Fetal Abdominal Intra operative Vascular Intra operative Neuro Laparoscopic Pediatric Small Organ Thyroi...

Страница 265: ...cer 12HL7 Intended Use Diagnostic ultrasound imaging or fluid flow analysis of the human body as follows Clinical Application Mode of Operation General Track 1 Only Specific Tracks 1 and 3 B M PWD Color Doppa Comb Modesb Otherc Ophthalmic Ophthalmic Fetal Imaging and Other Fetal Abdominal Intra operative Vascular X X X X X X Intra operative Neuro X X X X X X Laparoscopic X X X X X X Pediatric X X ...

Страница 266: ...Intended Use Diagnostic ultrasound imaging or fluid flow analysis of the human body as follows Clinical Application Mode of Operation General Track 1 Only Specific Tracks 1 and 3 B M PWD Color Doppa Comb Modesb Otherc Ophthalmic Ophthalmic Fetal Imaging and Other Fetal Abdominal Xd Xd Xd Xd Xd Xd Intra operative Intra operative Neuro Laparoscopic Pediatric Xd Xd Xd Xd Xd Xd Small Organ Thyroid Bre...

Страница 267: ...E FORM System Terason Ultrasound System Transducer PDOF Intended Use Diagnostic ultrasound imaging or fluid flow analysis of the human body as follows Clinical Application Mode of Operation General Track 1 Only Specific Tracks 1 and 3 B M PWD CWD Color Doppa Comb Modesb Otherc Ophthalmic Ophthalmic Fetal Imaging and Other Fetal Abdominal Intra operative Specify Intra operative Neuro Laparoscopic P...

Страница 268: ... concern Mechanical cavitation or other non thermal mechanical effects or thermal heating of tissue through absorption of the ultrasound energy for all indices an index value less than 1 0 indicates relatively low risk for harm to the patient when the index is applied properly Type of operating mode Generally mechanical effects are a greater concern during 2D only operation while thermal effects a...

Страница 269: ...ode type Relevant for all non 2D only modes in both scanned and non scanned modes Tissue type and location In scanned modes soft tissue at the surface is of concern In non scanned modes heating of soft tissue along the beam axis between the surface and focus is considered Acoustic parameters For scanned modes the associated intensity at the surface is usually related to surface tissue heating For ...

Страница 270: ...ng transcranial scanning General information about the Cranial Thermal Index follows Potential bioeffect Thermal heating of cranial bone with indirect heating of adjacent brain tissue due to absorption of ultrasound by the cranial bone TIC is defined as the ratio of the current transducer power level to the reference power level that would cause a 1ºC steady state temperature rise in cranial bone ...

Страница 271: ...pplications without concern for monitoring and minimizing a displayed MI value However in keeping with ALARA the system should generally be operated in the shallowest depth control setting that yields the desired image quality to minimize the MI value Index Display for Modes Other Than 2D When any mode other than 2D is active the MI display is replaced by a display showing the thermal indices rele...

Страница 272: ...approximately 0 8 Another group of transducers used the Terason Ultrasound System might produce the following thermal index display The display of the Thermal Index labels indicates that the controls for the transducer in use may sometimes be set so that either the TIS the TIB the TIC or any combination may exceed 1 0 cp Control of Acoustic Index Parameters For any transducer used with the Terason...

Страница 273: ...ated on the basis of measured values of acoustic parameters acoustic power intensity pressure etc The accuracy of the indices discussed in the Standard for Real Time Display of Thermal and Mechanical Acoustic Output Indices on Diagnostic Ultrasound Equipment described below refers to accuracy of the measurement of the acoustic parameters and the effect of these errors on the estimated index values...

Страница 274: ...ntensity measurements due to uncertainty in the hydrophone calibration defined as k is approximately where the following are defined The relative error in the spatial peak derated pulse intensity integral defined as SPPA 3 is approximately where the following is defined Cal Calibration error as supplied by the National Physical Laboratory 8 at the frequency range of the transducers tested A Relati...

Страница 275: ...r this transducer set PD Relative error in estimate of pulse duration estimated as 5 prf Relative error in prf estimation for operating condition giving actual peak ISPTA 3 unsc estimated as 1 srf Relative error in estimating srf scan repetition frequency for operating condition giving actual peak ISPTA 3 scan estimated as 1 BOF Relative error in estimating BOF beam overlap factor for operating co...

Страница 276: ...oustic Output Indices on Diagnostic Ultrasound Equipment a series of ten independent measurements on the specified standard test transducer driver combination yielded a relative standard deviation of fc of less than 1 for the sample measurements W01 Relative error in estimating the peak acoustic power from a 1 cm width of the active scanned aperture estimated as 10 Note In accordance with Subsecti...

Страница 277: ...tely where the following is defined The estimated relative errors of the calculated indices are as follows MI 6 4 TISscan 11 2 TISunsc A 1 11 2 Note In accordance with Subsection 6 4 2 Measurement of Precision of Power W of the Standard for Real Time Display of Thermal and Mechanical Acoustic Output Indices on Diagnostic Ultrasound Equipment a series of ten independent measurements on the specifie...

Страница 278: ...hown in reverse video along with the corresponding labels may take on the following values where x indicates the actual calculated index value xCalc Display Precision of TI Values The following table indicates the precision of the display for TI values Display Precision of MI Values The following table indicates the precision of the display for MI values TI Value Precision Range of calculated valu...

Страница 279: ...lues of the index are less than 1 0 when the given index is considered relevant to the operating mode and possible intended use of the transducer 0 5 x 0 7 0 6 0 7 x 0 9 0 8 0 9 x 1 1 1 0 1 1 x 1 3 1 2 1 3 x 1 5 1 4 1 5 x 1 7 1 6 1 7 x 1 9 1 8 x 1 9 1 9 Estimated Display Accuracy Values Display Value MI TISscan TISunsc A 1 TISunscA 1 TIBunsc TIC 0 4 a b a b a b a b a b a b 0 4 0 to 18 0 to 18 0 to...

Страница 280: ...lds 3 5 4 0 14 to 11 14 to 11 14 to 11 14 to 11 14 to 11 a Display Accuracy is not defined for actual index values xActual of zero b xDisplay xActual is always greater than zero c Mechanical Index MI values greater than 1 9 exceed FDA Guideline levels Track 3 Transducer Mode Combination Summary Mode Transducer Model 2D M PWD CWD Color Doppler a a Includes Directional Power Doppler DPD Non Directio...

Страница 281: ...sducer geometry Distance Accuracy Distance accuracy measures are as follows Formula where x1 y1 and x2 y2 are the coordinates of the end points Range 0 20 cm Accuracy For a 20 cm measurement a 1 pixel error is 0 2 mm RMS errors For D 10mm accuracy 9 For D 20mm accuracy 6 For D 50mm accuracy 5 Area Area accuracy measures are as follows Assumptions Circular cross section length of axes 2a 2b Formula...

Страница 282: ...and CRC Press 1976 12 17 Processing Terason Transducers Between Uses Each transducer must be processed between uses according to the type of tissue it will contact during use Non critical applications in which the device contacts only intact skin clean and low level disinfect the transducer Semi critical use such as endocavity applications where the device may contact mucous membranes clean and hi...

Страница 283: ...level disinfectant from the list on page 284 4 To prevent the solution from air drying on the transducer and cable immediately wipe them with a soft cloth moistened with sterile water Warning Never place the electronics casing on the floor when cleaning the transducer The cable connection to the electronics must always be higher than the lowest point of the cable to prevent fluid from flowing down...

Страница 284: ...cles Design Testing and Labeling of Reusable Medical Devices for Reprocessing in Healthcare Facilities A Guide for Manufacturers AAMI Publishing Company 1995 Disinfections and Preservation Block Seymour S Lea and Febiger 1991 Sterilants and High Level Disinfectants Cleared by FDA in a 510 k http www fda gov cdrh ode germlab html Pre Cleaning Immerse the transducer in an enzymatic antiseptic deterg...

Страница 285: ...or Safety CAN CSA C22 2 No 601 1 M90 Medical Electrical Equipment General Requirements for Safety Electromagnetic Compatibility EN60601 1 2 CISPR11 Group 1 Class B Electric Shock IEC 60601 1 Class I Type BF System Warranty The warranty period for the Terason Ultrasound System is twelve 12 months but you can purchase an extended warranty To obtain warranty service U S customers call Terason at 1 86...

Страница 286: ...hese potential problems Cuts cracks or damage to the power cables Dents or cracks in the electronics housing Refer to the laptop manual for information on laptop maintenance Equipment List The Terason Ultrasound System may be shipped with the following hardware Laptop computer with operating system and ultrasound imaging software Refer to the user guide that came with your computer for details abo...

Страница 287: ...vity transducer 8MC3 tightly curved array transducer 8TV4 convex linear endocavity transducer 10V5S transducer 12HL7 linear array transducer 12L5V linear array transducer PDOF single element transducer Warning Using accessories transducers or cables other than those specified with the exception of those sold by the manufacturer as replacement parts for internal components may result in increased e...

Страница 288: ... based on input data rate 124 Hz Maximum Ultrasound Lines Frame 256 Display 15 4 LED backlit wide screen Size Width 14 63 37 2 cm 3 63 9 2 cm Height 2 4 6 cm 2 25 5 7 cm Depth 9 88 25 1 cm 6 5 16 5 cm Weight Weight 11 1 lbs 5 03 kg 1 lbs 0 45 kg Power Adapter Input 100V 250 V Output 18 VDC 5 A Laptop Battery Input Lithium Polymer Battery 73 Whr Leakage Current Primary Breakdown Voltage Safety Stan...

Страница 289: ...d recycling of electronic components in this product For more information contact your local Terason representative Water Resistance Transducer array watertight to the strain relief Operating Altitude Pressure 63 kPa to 101 3 kPa 472 5 to 759 8 mmHg 70 kPa to 106 kPa 525 to 795 mm Hg Storage Temperature 24 to 45o C 13 to 113oF 40 to 75o C 40 to 167oF Humidity 15 90 RH non condensing 95 RH non cond...

Страница 290: ...circuited heat batteries or expose batteries to fire Any of these actions can compromise the structural integrity of a battery Compromising the structural integrity of a battery can result in battery leakage heat generation fire or explosion causing possible personal injury Warning Do not use a battery if it leaks fluid or has changed shape If skin or clothing comes in contact with fluid from the ...

Страница 291: ...onservation For moderate energy conservation when the system is not in use exit the ultrasound system software and place the system in standby status Item Estimated Use Period Handling Instructions lithium manganese dioxide batteries and lithium ion polymer batteries 300 full charge and discharge cycles See also Caring for Batteries on page 290 Warning Observe local state and regional regulations ...

Страница 292: ... ultrasound system software Click the at the top right of the menu bar Select File Exit from the menu bar Activate or exit standby statusa a Standby status will end the imaging session Exit the ultrasound system software before you place the system in standby status Refer to the Windows help menu for instructions to activate or exit standby status Note Unplugging the system from the power outlet f...

Страница 293: ...on Windows see page 295 Windows Terms see page 296 Using the Touchpad or a 2 Button Mouse see page 297 Starting Exiting Programs see page 298 Resizing Windows see page 299 Moving Windows and Toolbars see page 300 The examples use the Terason software but the concepts apply to all programs that run on Windows If you want more help in using Windows you can use the Windows online help or you can purc...

Страница 294: ...sktop Double click an icon to start that application Click Start to open this menu You can start any program or utility from here Where deleted files go Utility shortcuts Double click to view the contents of your computer Click an item to open the submenu when there are no more submenus click the item to launch that program ...

Страница 295: ...u learn a technique for one application you can use it with other applications The following figure shows the Terason application window Application Window Terason Ultrasound System Application title bar when blue this application is active Application menu bar Toolbars with buttons Tabs windows that share the same area Click a tab to make it active Window controls minimize maximize exit ...

Страница 296: ...ng options Field An area of a window where you can type characters for input to the software Hot Key A keyboard shortcut that lets you press keys instead of clicking with the mouse to perform an operation For example if you press Alt F Windows opens the File menu In a menu or button name the hot key is underlined unless the option to view hot keys is turned off Icon A graphic that represents a fil...

Страница 297: ...ndicate it is a shortcut and not the actual object Slider Lets you adjust a setting over a range of possible values from Low to High The slider points to the current value and you can move it up or down or left or right as needed Start button Start menu Button at the bottom left of the desktop used to find files open programs and start any task Also used to shut down the computer Status bar Messag...

Страница 298: ... in procedures Starting Exiting Programs Windows provides several methods to start and exit programs You can use either of these methods to start an application Start button Desktop shortcut You can use either of these methods to exit an application File menu Close button Typically if you have not saved what you were working on the application prompts you to save your work when you try to exit Sta...

Страница 299: ...ur work the application prompts you to do so before it closes Resizing Windows The small buttons in the upper right of an application let you minimize maximize and exit the program When an application displays more than one pane in a window you can usually resize the panes to enlarge or reduce the area used for adjacent panes Enlarging the size of one pane usually reduces the size of another pane ...

Страница 300: ...and you can move the Tools toolbar to below the Playback toolbar Notice that each window and toolbar has a set of double lines along one edge If you click these lines you can drag the window or toolbar to any other location A gray rectangle shows as you move the toolbar Moving a Toolbar Hold the mouse button down and move the Windows pointer to where you want to put the toolbar and release the mou...

Страница 301: ... in 2D Ctrl arrow L R Select a different Image Control tab M Start scanning in M Mode F1 Open Terason online help P Start scanning in PWD mode F2 Freeze imaging C Start scanning in Color Doppler mode F3 Live imaging D Start scanning in DPD mode F4 Copy Image R Start scanning in Power Doppler mode F5 Refresh W Start scanning in CWD mode F8 Save Image H Start scanning in THI mode F9 Save Loop G Togg...

Страница 302: ...ing Images and Loops on page 133 Save Loop As Saves an image loop in a specific file format from pop out menu Saving Images and Loops on page 133 Export Specify a filename location and image format when saving an image or loop Exporting a File on page 135 Send All DICOM File s Sends saved DICOM files to the server Sending Files to a DICOM Server on page 228 Send DICOM Image Exports an image to a D...

Страница 303: ...Using the Patient Info Window on page 57 Copy Image Copies the image in the Image Display window to the computer s clipboard for pasting it into a different application Storing Images and Loops on page 131 Paste At the location of the text cursor inserts the last text cut or copied Using the Patient Info Window on page 57 Delete Deletes the selected text in a text box or text on the Image Display ...

Страница 304: ...5 Image Display Properties Shows or hides guides on the Image Display window Adding Guides to the Image Display on page 77 Needle Guide Display Shows or hides needle guide lines used for biopsies only Selecting a Needle Guide on page 104 Text Size Sets the size of text in the Image Display window Changing the Text Size on page 78 Zoom Enlarges a selected area of the image in the Image Display wind...

Страница 305: ...ype Opens the selected exam lists the Terason provided exams Opening an Exam on page 215 Exam Name Opens the selected custom exam lists the custom exams for the connected transducer 2D Activates 2D scanning and starts a live image 2D Mode on page 23 M Mode Activates M Mode scanning and starts a live image M Mode Motion Mode on page 23 Pulsed Wave Doppler Activates Pulsed Wave Doppler scanning and ...

Страница 306: ...own inverts Inverting Images on page 100 Colorization Opens a submenu used for 2D to choose a color palette Adjusting Colorization on page 101 Smoothing Opens a submenu used for 2D to choose a Smoothing algorithm Adjusting Smoothing on page 102 Persistence Opens a submenu used for 2D to choose a Persistence level Adjusting Persistence on page 102 Map Opens a submenu used for 2D to choose an image ...

Страница 307: ...t of sliders that control gain on lateral segments of the scan display Adjusting Lateral Gain Compensation LGC on page 97 Needle Gauge Error Correction Adjusts the guides for biopsy applications Setting the Error Correction on page 224 Restore Default Window Layout Changes the location and visibility hidden or shown for all windows and toolbars to the default Restoring the Default Layout on page 2...

Страница 308: ...ntacting Terason on page 21 License Opens a dialog box where you can read your licensing information or register if you have not yet registered an evaluation copy of the software Contacting Terason Technical Support on page 320 About Terason Opens a message box that displays the Terason copyright information and the current version of the software Contacting Terason Technical Support on page 320 M...

Страница 309: ...Opens the selected item either a Patient info file or an image file Preparing Patient Info for an Exam on page 60 Finding Stored Images and Loops on page 136 Select All Selects all images in a folder Rename Changes the file name to an edit box where you can type or edit the file name Renaming Files on page 143 Delete Permanently deletes the selected image file does not work with Patient Info files...

Страница 310: ...e Image Display window is live menu chooses the opposite imaging state Freezing Images on page 70 Play If the Image Display window contains a frozen loop or a saved loop runs through the frames in the loop Working with Image Loops on page 70 Set PWD Gate Locks the PWD gate position and switches to the PWD scan mode Setting the PWD Gate Position on page 114 Text Activates the Text tool you can clic...

Страница 311: ...ected DICOM file to the DICOM server Sending Files to a DICOM Server on page 228 Time Series window New Measurement Initiates a measurement of the type selected in the M Measure or PWD Measure tab Measuring in the M Mode Window on page 165 and Measuring in the Spectral Doppler Modes on page 166 Slow Sweep Speed Select the Slow sweep speed for an M Mode or PWD scan Adjusting the Sweep Speed on page...

Страница 312: ...field where you placed the text cursor N A Body Marker Body Marker Show Annotation window with Body Marker tab visible Adding a Body Marker on page 86 Display Indicator Horizontally Show the pink indicator horizontally Changing the Indicator s Direction on page 87 Display Indicator Vertically Show the pink indicator vertically Remove Body Marker Removes the body marker icon Removing the Body Marke...

Страница 313: ...ys in real time a two dimensional image of blood flow overlaid on the B Mode image The hues in the color palette indicate mean flow velocity and the different colors indicate the direction of blood flow Power Doppler displays in real time a two dimensional image of blood flow overlaid on the B Mode image The hues in the color palette indicate the density of red blood cells Brighter hues indicate g...

Страница 314: ...ets you print the current image to a printer toggles between Live and Freeze Live button provides a real time image display Freeze button freezes the image during the scan to allow you to print or save to a file Split screen toggles split screen two current scans displayed in the 2D window on and off Toggle button makes the other screen active in split screen mode Zoom magnifies the selected regio...

Страница 315: ...e 320 If you complete the procedures and the problem persists contact Terason as described in Contacting Terason Technical Support on page 320 Installation Problems When installing the Terason software you cannot have any other applications open on the laptop especially Microsoft Outlook A conflict exists in the InstallShield software the installation utility that installs the Terason software wit...

Страница 316: ...n software 2 Shut down the computer 3 Unplug the transducer 4 Start the computer 5 When the hourglass icon is gone plug in the transducer 6 Wait 15 seconds 7 If you see a Digital Signature not Found or a Found New Hardware message follow the instructions in Installing the FireWire Terason Transducer Driver on page 42 8 If no digital signature message displays start the Terason software Determining...

Страница 317: ...k the Hardware tab System Properties Hardware Tab 5 Click the Device Manager button A window listing all hardware devices connected to the computer opens Device Manager Window 6 Look for an entry named Imaging devices and click the 7 If you do not see Terason 3000 Ultrasound Probe follow the instructions for Installing the FireWire Terason Transducer Driver on page 42 ...

Страница 318: ...printer also affects image quality Photo quality paper produces the best output but is the most expensive Brochure paper produces good output and costs less than photo quality paper Regular laser printer paper is the least expensive but produces low quality output If the printer is low on ink you may have to change the printer cartridge refer to the printer user manual for instructions If you must...

Страница 319: ...t only video output is sent to the VCR you cannot record the audio output of Pulsed Wave Doppler scans CD Writing or Reading Problems If you get errors when writing to a CD check these items Filenames for CDs are restricted to 64 characters however Windows supports filenames with up to 256 characters For any files that you want to archive or move to a CD make sure the filenames do not exceed 64 ch...

Страница 320: ...roblems Terason cannot provide network assistance Only a system administrator at your site can resolve network issues The laptop comes with a network card and internal modem However the required network settings such as IP address are determined by your network system administrator Contacting Terason Technical Support If you have followed the suggestions provided and still cannot resolve your prob...

Страница 321: ...ox License Registration Message Box Copy the serial number then click Continue Ultrasound to close the message box If you call Terason and a support specialist is not available please leave the following information and we will return your call as soon as possible Name Phone number Description of the problem Transducer serial number Terason software version number Operating system Windows 2000 or ...

Страница 322: ...l Weight AC Abdominal Circumference HC Head Circumference FL Femur Length AC mm MA wks AC mm MA wks AC mm MA wks AC mm MA wks AC mm MA wks AC mm MA wks AC mm MA wks AC mm MA wks 51 12 1 93 15 5 135 19 0 177 22 6 219 26 4 261 30 2 304 34 4 346 38 5 52 12 2 94 15 5 136 19 0 178 22 7 220 26 4 262 30 3 305 34 5 347 38 6 53 12 2 95 15 6 137 19 1 179 22 8 221 26 5 263 30 4 306 34 6 348 38 7 54 12 3 96 1...

Страница 323: ...3 24 9 245 28 7 287 32 7 330 36 9 372 41 1 78 14 2 120 17 7 162 21 3 204 25 0 246 28 8 288 32 8 331 37 0 373 41 2 79 14 3 121 17 8 163 21 4 205 25 1 247 28 9 289 32 9 332 37 1 374 41 3 80 14 4 122 17 9 164 21 5 206 25 2 248 29 0 290 33 0 333 37 2 375 41 4 81 14 5 123 17 9 165 21 5 207 25 3 249 29 1 291 33 1 334 37 3 376 41 5 82 14 6 124 18 0 166 21 6 208 25 4 250 29 2 292 33 2 335 37 4 377 41 6 83...

Страница 324: ...9 68 27 4 97 39 7 40 18 1 69 27 7 98 40 2 41 18 4 70 28 1 99 40 6 42 18 7 71 28 5 100 41 1 43 19 0 72 28 9 101 41 6 CRL mm Menstrual Age CRL mm Menstrual Age CRL mm Menstrual Age 2 5 7 42 11 1 82 14 2 3 5 9 43 11 2 83 14 2 4 6 1 44 11 2 84 14 3 5 6 2 45 11 3 85 14 4 6 6 4 46 11 4 86 14 5 7 6 6 47 11 5 87 14 6 8 6 7 48 11 6 88 14 7 9 6 9 49 11 7 89 14 8 10 7 1 50 11 7 90 14 9 11 7 2 51 11 8 91 15 0...

Страница 325: ... 8 118 17 7 39 10 8 79 13 9 119 17 8 40 10 9 80 14 0 120 17 9 41 11 0 81 14 1 121 18 0 FL mm MA weeks FL mm MA weeks FL mm MA weeks 7 12 2 33 20 3 58 30 3 8 12 4 34 20 7 59 30 8 9 12 7 35 21 0 60 31 2 10 13 0 36 21 4 61 31 7 11 13 3 37 21 8 62 32 1 12 13 5 38 22 2 63 32 6 13 13 8 39 22 5 64 33 1 14 14 1 40 22 9 65 33 5 16 14 4 41 23 3 66 34 0 17 14 7 42 23 7 67 34 5 18 15 3 43 24 1 68 34 9 19 15 6...

Страница 326: ...A wks HC mm MA wks HC mm MA wks HC mm MA wks HC mm MA wks HC mm MA wks HC mm MA wks 56 12 0 94 14 3 132 16 8 170 19 6 208 22 9 246 26 7 284 31 2 322 36 4 57 12 1 95 14 3 133 16 8 171 19 7 209 23 0 247 26 8 285 31 3 323 36 5 58 12 2 96 14 4 134 16 9 172 19 8 210 23 1 248 26 9 286 31 4 324 36 7 59 12 2 97 14 5 135 17 0 173 19 9 211 23 2 249 27 0 287 31 5 325 36 8 60 12 3 98 14 5 136 17 1 174 19 9 21...

Страница 327: ... 196 21 8 234 25 4 272 29 7 310 34 6 348 40 4 83 13 6 121 16 0 159 18 8 197 21 9 235 25 5 273 29 8 311 34 8 349 40 6 84 13 7 122 16 1 160 18 8 198 22 0 236 25 6 274 29 9 312 34 9 350 40 7 85 13 7 123 16 2 161 18 9 199 22 1 237 25 8 275 30 0 313 35 1 351 40 9 86 13 8 124 16 2 162 19 0 200 22 2 238 25 9 276 30 2 314 35 2 352 41 1 87 13 9 125 16 3 163 19 1 201 22 3 239 26 0 277 30 3 315 35 3 353 41 2...

Страница 328: ... Echo Ultrasound System User Guide 328 24 17 43 44 26 14 64 37 14 25 17 86 45 26 71 65 37 71 26 18 14 46 27 14 66 38 29 27 18 57 47 27 71 67 38 86 28 19 00 48 28 14 68 39 57 29 19 43 49 28 86 69 40 14 HL mm MA weeks HL mm MA weeks HL mm MA weeks ...

Страница 329: ... EN 60601 1 2 2001 Emissions Test Compliance Electromagnetic Environment Guidance RF Emissions CISPR 11 Group 1 The Terason Ultrasound System uses RF energy only for its internal function Therefore its RF emissions are very low and are not likely to cause any interference in nearby electronic equipment RF Emissions CISPR 11 Group 2 The 10V5S transducer emits electromagnetic energy Nearby electroni...

Страница 330: ...a typical commercial or hospital environment Surge IEC 61000 4 5 1kV Differential 2kV Common 1kV Differential 2kV Common Voltage Dips Dropout IEC 61000 4 11 95 Dip for 0 5 Cycle 60 Dip for 5 Cycles 30 Dip for 25 Cycles 95 Dip for 5 Seconds 95 Dip for 0 5 Cycle 60 Dip for 5 Cycles 30 Dip for 25 Cycles 95 Dip for 5 Seconds Mains power quality should be that of a typical commercial or hospital enviro...

Страница 331: ...o less than the distances calculated listed below Conducted RF IEC 61000 4 6 3 Vrms 150 KHz to 80 MHz V1 3 Vrms Radiated RF IEC 61000 4 3 3 V m 80 MHz to 2 5 GHz E1 3V m 80 to 800 MHz 800 MHz to 2 5 GHz where P is the max power in watts and d is the recommended separation distance in meters Field strengths from fixed transmitters as determined by an electromagnetic site survey should be less than ...

Страница 332: ...erason t3000 Echo Ultrasound System User Guide 332 Note At 80 MHz and 800 MHz the separation distance for the higher frequency range applies Note These guidelines may not apply in all situations Electromagnetic propagation is affected by absorption and reflection from structures objects and people ...

Страница 333: ...d ISPTA must not exceed 720 mW cm2 and the global maximum MI must not exceed 1 9 Ophthalmic use is an exception and has a different requirement the TI max TIS_as TIC and must not exceed 1 0 ISPTA 3 must not exceed 50 mW cm2 and MI must not exceed 0 23 This appendix contains tables that display the Acoustic Output Reporting for Track 3 Tables are shown for the scanning modes for the following trans...

Страница 334: ...cer assembly not intended for transcranial or neonatal cephalic uses 4 Information on MI and TI need not be provided if the equipment meets both exemption clauses given in 51 2 aa and 51 2 dd MI TIS TIB TIC Index Label Scan Non scan Non scan Aapr 1cm2 Aaprt 1cm2 Maximum Index Value 1 39 2 02 3 90 USFDA Track 3 IEC Associated Acoustic Parameter pr 3 pra MPa 2 16 Wo P mW 151 57 225 65 min of W 3 z1 ...

Страница 335: ...ed if the equipment meets both exemption clauses given in 51 2 aa and 51 2 dd MI TIS TIB TIC Index Label Scan Non scan Non scan Aapr 1cm2 Aaprt 1cm2 Maximum Index Value 1 39 1 53 Note 1 0 21 3 38 USFDA Track 3 IEC Associated Acoustic Parameter pr 3 pra MPa 2 16 Wo P mW 118 25 5 19 213 18 min of W 3 z1 ITA 3 z1 Min of P zs Ita zs mW z1 zs cm zbp zbp cm zsp zb cm 3 90 3 80 deq zsp deq zb cm 0 34 fc ...

Страница 336: ... not be provided if the equipment meets both exemption clauses given in 51 2 aa and 51 2 dd MI TIS TIB TIC Index Label Scan Non scan Non scan Aapr 1cm2 Aaprt 1cm2 Maximum Index Value 1 38 2 23 4 26 USFDA Track 3 IEC Associated Acoustic Parameter pr 3 pra MPa 1 94 Wo P mW B M 51 12 CD 113 52 268 78 min of W 3 z1 ITA 3 z1 Min of P zs Ita zs mW z1 zs cm zbp zbp cm zsp zb cm 2 30 deq zsp deq zb cm fc ...

Страница 337: ...TI need not be provided if the equipment meets both exemption clauses given in 51 2 aa and 51 2 dd MI TIS TIB TIC Index Label Scan Non scan Non scan Aapr 1cm2 Aaprt 1cm2 Maximum Index Value 0 09 1 00 3 59 2 56 USFDA Track 3 IEC Associated Acoustic Parameter pr 3 pra MPa 0 12 Wo P mW 104 66 104 66 104 66 min of W 3 z1 ITA 3 z1 Min of P zs Ita zs mW z1 zs cm zbp zbp cm zsp zb cm 3 00 2 85 deq zsp de...

Страница 338: ...provided if the equipment meets both exemption clauses given in 51 2 aa and 51 2 dd MI TIS TIB TIC Index Label Scan Non scan Non scan Aapr 1cm2 Aaprt 1cm2 Maximum Index Value 1 22 1 85 4 32 3 96 USFDA Track 3 IEC Associated Acoustic Parameter pr 3 pra MPa 1 72 Wo P mW 214 39 241 84 min of W 3 z1 ITA 3 z1 Min of P zs Ita zs mW 162 72 z1 zs cm 2 40 zbp zbp cm 2 29 zsp zb cm 3 50 4 90 deq zsp deq zb ...

Страница 339: ... and TI need not be provided if the equipment meets both exemption clauses given in 51 2 aa and 51 2 dd MI TIS TIB TIC Index Label Scan Non scan Non scan Aapr 1cm2 Aaprt 1cm2 Maximum Index Value 1 10 1 04 2 17 USFDA Track 3 IEC Associated Acoustic Parameter pr 3 pra MPa 1 56 Wo P mW 109 81 109 81 min of W 3 z1 ITA 3 z1 Min of P zs Ita zs mW z1 zs cm zbp zbp cm zsp zb cm 4 90 deq zsp deq zb cm fc f...

Страница 340: ...ovided if the equipment meets both exemption clauses given in 51 2 aa and 51 2 dd MI TIS TIB TIC Index Label Scan Non scan Non scan Aapr 1cm2 Aaprt 1cm2 Maximum Index Value 1 10 0 95 0 13 2 10 USFDA Track 3 IEC Associated Acoustic Parameter pr 3 pra MPa 1 56 Wo P mW 116 97 5 85 155 57 min of W 3 z1 ITA 3 z1 Min of P zs Ita zs mW z1 zs cm zbp zbp cm zsp zb cm 4 90 6 40 deq zsp deq zb cm 0 43 fc faw...

Страница 341: ...on MI and TI need not be provided if the equipment meets both exemption clauses given in 51 2 aa and 51 2 dd MI TIS TIB TIC Index Label Scan Non scan Non scan Aapr 1cm2 Aaprt 1cm2 Maximum Index Value 0 92 1 47 2 26 USFDA Track 3 IEC Associated Acoustic Parameter pr 3 pra MPa 1 30 Wo P mW 114 69 114 69 min of W 3 z1 ITA 3 z1 Min of P zs Ita zs mW z1 zs cm zbp zbp cm zsp zb cm 4 90 deq zsp deq zb cm...

Страница 342: ...natal cephalic uses 4 Information on MI and TI need not be provided if the equipment meets both exemption clauses given in 51 2 aa and 51 2 dd MI TIS TIB TIC Index Label Scan Non scan Non scan Aapr 1cm2 Aaprt 1cm2 Maximum Index Value 1 00 1 06 4 02 2 26 USFDA Track 3 IEC Associated Acoustic Parameter pr 3 pra MPa 1 41 Wo P mW 135 51 108 20 min of W 3 z1 ITA 3 z1 Min of P zs Ita zs mW 84 25 z1 zs c...

Страница 343: ...need not be provided if the equipment meets both exemption clauses given in 51 2 aa and 51 2 dd MI TIS TIB TIC Index Label Scan Non scan Non scan Aapr 1cm2 Aaprt 1cm2 Maximum Index Value 0 08 0 87 4 03 2 44 USFDA Track 3 IEC Associated Acoustic Parameter pr 3 pra MPa 0 12 Wo P mW 117 33 117 33 min of W 3 z1 ITA 3 z1 Min of P zs Ita zs mW 91 54 z1 zs cm 1 80 zbp zbp cm 1 80 zsp zb cm 1 80 1 80 deq ...

Страница 344: ...ormation on MI and TI need not be provided if the equipment meets both exemption clauses given in 51 2 aa and 51 2 dd MI TIS TIB TIC Index Label Scan Non scan Non scan Aapr 1cm2 Aaprt 1cm2 Maximum Index Value 0 60 0 62 Note 2 USFDA Track 3 IEC Associated Acoustic Parameter pr 3 pra MPa 0 88 Wo P mW 39 55 min of W 3 z1 ITA 3 z1 Min of P zs Ita zs mW z1 zs cm zbp zbp cm zsp zb cm 4 60 deq zsp deq zb...

Страница 345: ...d not be provided if the equipment meets both exemption clauses given in 51 2 aa and 51 2 dd MI TIS TIB TIC Index Label Scan Non scan Non scan Aapr 1cm2 Aaprt 1cm2 Maximum Index Value 0 60 0 35 Note 1 0 04 Note 2 USFDA Track 3 IEC Associated Acoustic Parameter pr 3 pra MPa 0 88 Wo P mW 30 18 1 23 min of W 3 z1 ITA 3 z1 Min of P zs Ita zs mW z1 zs cm zbp zbp cm zsp zb cm 4 60 4 27 deq zsp deq zb cm...

Страница 346: ...sembly not intended for transcranial or neonatal cephalic uses 4 Information on MI and TI need not be provided if the equipment meets both exemption clauses given in 51 2 aa and 51 2 dd MI TIS TIB TIC Index Label Scan Non scan Non scan Aapr 1cm2 Aaprt 1cm2 Maximum Index Value 0 58 2 17 Note 3 USFDA Track 3 IEC Associated Acoustic Parameter pr 3 pra MPa 0 90 Wo P mW 141 92 min of W 3 z1 ITA 3 z1 Mi...

Страница 347: ...nded for transcranial or neonatal cephalic uses 4 Information on MI and TI need not be provided if the equipment meets both exemption clauses given in 51 2 aa and 51 2 dd MI TIS TIB TIC Index Label Scan Non scan Non scan Aapr 1cm2 Aaprt 1cm2 Maximum Index Value 0 59 1 32 3 51 Note 3 USFDA Track 3 IEC Associated Acoustic Parameter pr 3 pra MPa 0 87 Wo P mW 86 96 99 47 min of W 3 z1 ITA 3 z1 Min of ...

Страница 348: ...MI and TI need not be provided if the equipment meets both exemption clauses given in 51 2 aa and 51 2 dd MI TIS TIB TIC Index Label Scan Non scan Non scan Aapr 1cm2 Aaprt 1cm2 Maximum Index Value 0 43 0 43 0 56 USFDA Track 3 IEC Associated Acoustic Parameter pr 3 pra MPa 0 77 Wo P mW 18 66 18 07 min of W 3 z1 ITA 3 z1 Min of P zs Ita zs mW z1 zs cm zbp zbp cm zsp zb cm 2 73 deq zsp deq zb cm fc f...

Страница 349: ...provided if the equipment meets both exemption clauses given in 51 2 aa and 51 2 dd MI TIS TIB TIC Index Label Scan Non scan Non scan Aapr 1cm2 Aaprt 1cm2 Maximum Index Value 0 43 0 24 0 02 0 35 USFDA Track 3 IEC Associated Acoustic Parameter pr 3 pra MPa 0 77 Wo P mW 12 56 0 29 18 54 min of W 3 z1 ITA 3 z1 Min of P zs Ita zs mW z1 zs cm zbp zbp cm zsp zb cm 2 73 2 58 deq zsp deq zb cm 0 23 fc faw...

Страница 350: ... MI and TI need not be provided if the equipment meets both exemption clauses given in 51 2 aa and 51 2 dd MI TIS TIB TIC Index Label Scan Non scan Non scan Aapr 1cm2 Aaprt 1cm2 Maximum Index Value 0 68 2 48 3 24 USFDA Track 3 IEC Associated Acoustic Parameter pr 3 pra MPa 1 35 Wo P mW 104 39 113 72 min of W 3 z1 ITA 3 z1 Min of P zs Ita zs mW z1 zs cm zbp zbp cm zsp zb cm 2 47 deq zsp deq zb cm f...

Страница 351: ...cranial or neonatal cephalic uses 4 Information on MI and TI need not be provided if the equipment meets both exemption clauses given in 51 2 aa and 51 2 dd MI TIS TIB TIC Index Label Scan Non scan Non scan Aapr 1cm2 Aaprt 1cm2 Maximum Index Value 0 42 2 20 3 33 3 13 USFDA Track 3 IEC Associated Acoustic Parameter pr 3 pra MPa 0 73 Wo P mW 93 14 83 29 45 75 min of W 3 z1 ITA 3 z1 Min of P zs Ita z...

Страница 352: ...e provided if the equipment meets both exemption clauses given in 51 2 aa and 51 2 dd MI TIS TIB TIC Index Label Scan Non scan Non scan Aapr 1cm2 Aaprt 1cm2 Maximum Index Value 0 68 2 15 3 11 3 43 USFDA Track 3 IEC Associated Acoustic Parameter pr 3 pra MPa 1 35 Wo P mW 90 34 77 91 66 78 min of W 3 z1 ITA 3 z1 Min of P zs Ita zs mW z1 zs cm zbp zbp cm zsp zb cm 2 47 3 13 deq zsp deq zb cm 0 29 fc ...

Страница 353: ...s 3 Information on MI and TI need not be provided if the equipment meets both exemption clauses given in 51 2 aa and 51 2 dd MI TIS TIB TIC Index Label Scan Non scan Non scan Aapr 1cm2 Aaprt 1cm2 Maximum Index Value 0 54 0 24 Note 2 USFDA Track 3 IEC Associated Acoustic Parameter pr 3 pra MPa 1 22 Wo P mW 9 71 min of W 3 z1 ITA 3 z1 Min of P zs Ita zs mW z1 zs cm zbp zbp cm zsp zb cm 1 30 deq zsp ...

Страница 354: ... TI need not be provided if the equipment meets both exemption clauses given in 51 2 aa and 51 2 dd MI TIS TIB TIC Index Label Scan Non scan Non scan Aapr 1cm2 Aaprt 1cm2 Maximum Index Value 0 54 0 13 Note 1 0 01 Note 2 USFDA Track 3 IEC Associated Acoustic Parameter pr 3 pra MPa 1 22 Wo P mW 4 42 0 10 min of W 3 z1 ITA 3 z1 Min of P zs Ita zs mW z1 zs cm zbp zbp cm zsp zb cm 1 30 1 30 deq zsp deq...

Страница 355: ...ucer assembly not intended for transcranial or neonatal cephalic uses 4 Information on MI and TI need not be provided if the equipment meets both exemption clauses given in 51 2 aa and 51 2 dd MI TIS TIB TIC Index Label Scan Non scan Non scan Aapr 1cm2 Aaprt 1cm2 Maximum Index Value 0 73 0 90 Note 3 USFDA Track 3 IEC Associated Acoustic Parameter pr 3 pra MPa 1 63 Wo P mW 38 01 min of W 3 z1 ITA 3...

Страница 356: ...n on MI and TI need not be provided if the equipment meets both exemption clauses given in 51 2 aa and 51 2 dd MI TIS TIB TIC Index Label Scan Non scan Non scan Aapr 1cm2 Aaprt 1cm2 Maximum Index Value 0 47 1 15 1 70 Note 2 USFDA Track 3 IEC Associated Acoustic Parameter pr 3 pra MPa 1 05 Wo P mW 40 39 28 23 min of W 3 z1 ITA 3 z1 Min of P zs Ita zs mW z1 zs cm zbp zbp cm zsp zb cm 1 17 1 25 deq z...

Страница 357: ...uses 3 Information on MI and TI need not be provided if the equipment meets both exemption clauses given in 51 2 aa and 51 2 dd MI TIS TIB TIC Index Label Scan Non scan Non scan Aapr 1cm2 Aaprt 1cm2 Maximum Index Value 0 41 0 23 Note 2 USFDA Track 3 IEC Associated Acoustic Parameter pr 3 pra MPa 0 92 Wo P mW 10 03 min of W 3 z1 ITA 3 z1 Min of P zs Ita zs mW z1 zs cm zbp zbp cm zsp zb cm 2 30 deq ...

Страница 358: ... MI and TI need not be provided if the equipment meets both exemption clauses given in 51 2 aa and 51 2 dd MI TIS TIB TIC Index Label Scan Non scan Non scan Aapr 1cm2 Aaprt 1cm2 Maximum Index Value 0 41 0 13 0 01 Note 2 USFDA Track 3 IEC Associated Acoustic Parameter pr 3 pra MPa 0 92 Wo P mW 5 35 0 14 min of W 3 z1 ITA 3 z1 Min of P zs Ita zs mW z1 zs cm zbp zbp cm zsp zb cm 2 30 1 97 deq zsp deq...

Страница 359: ...lic uses 3 Information on MI and TI need not be provided if the equipment meets both exemption clauses given in 51 2 aa and 51 2 dd MI TIS TIB TIC Index Label Scan Non scan Non scan Aapr 1cm2 Aaprt 1cm2 Maximum Index Value 0 45 0 98 Note 2 USFDA Track 3 IEC Associated Acoustic Parameter pr 3 pra MPa 0 91 Wo P mW 41 20 min of W 3 z1 ITA 3 z1 Min of P zs Ita zs mW z1 zs cm zbp zbp cm zsp zb cm 2 00 ...

Страница 360: ... not intended for transcranial or neonatal cephalic uses 4 Information on MI and TI need not be provided if the equipment meets both exemption clauses given in 51 2 aa and 51 2 dd MI TIS TIB TIC Index Label Scan Non scan Non scan Aapr 1cm2 Aaprt 1cm2 Maximum Index Value 0 42 0 76 1 59 Note 3 USFDA Track 3 IEC Associated Acoustic Parameter pr 3 pra MPa 0 84 Wo P mW 31 64 22 49 min of W 3 z1 ITA 3 z...

Страница 361: ...rmation on MI and TI need not be provided if the equipment meets both exemption clauses given in 51 2 aa and 51 2 dd MI TIS TIB TIC Index Label Scan Non scan Non scan Aapr 1cm2 Aaprt 1cm2 Maximum Index Value 0 80 0 59 Note 2 USFDA Track 3 IEC Associated Acoustic Parameter pr 3 pra MPa 1 78 Wo P mW 25 00 min of W 3 z1 ITA 3 z1 Min of P zs Ita zs 525 z1 zs cm zbp zbp cm zsp zb cm 1 40 deq zsp deq zb...

Страница 362: ...need not be provided if the equipment meets both exemption clauses given in 51 2 aa and 51 2 dd MI TIS TIB TIC Index Label Scan Non scan Non scan Aapr 1cm2 Aaprt 1cm2 Maximum Index Value 0 80 0 46 0 04 Note 2 USFDA Track 3 IEC Associated Acoustic Parameter pr 3 pra MPa 1 78 Wo P mW 18 84 0 51 min of W 3 z1 ITA 3 z1 Min of P zs Ita zs mW z1 zs cm zbp zbp cm zsp zb cm 1 40 1 90 deq zsp deq zb cm 0 1...

Страница 363: ... Information on MI and TI need not be provided if the equipment meets both exemption clauses given in 51 2 aa and 51 2 dd MI TIS TIB TIC Index Label Scan Non scan Non scan Aapr 1cm2 Aaprt 1cm2 Maximum Index Value 0 80 0 83 Note 2 USFDA Track 3 IEC Associated Acoustic Parameter pr 3 pra MPa 1 75 Wo P mW 34 75 min of W 3 z1 ITA 3 z1 Min of P zs Ita zs mW z1 zs cm zbp zbp cm zsp zb cm 1 45 deq zsp de...

Страница 364: ...ded for transcranial or neonatal cephalic uses 4 Information on MI and TI need not be provided if the equipment meets both exemption clauses given in 51 2 aa and 51 2 dd MI TIS TIB TIC Index Label Scan Non scan Non scan Aapr 1cm2 Aaprt 1cm2 Maximum Index Value 0 70 0 60 1 71 Note 2 USFDA Track 3 IEC Associated Acoustic Parameter pr 3 pra MPa 1 40 Wo P mW 25 11 19 80 min of W 3 z1 ITA 3 z1 Min of P...

Страница 365: ...MI and TI need not be provided if the equipment meets both exemption clauses given in 51 2 aa and 51 2 dd MI TIS TIB TIC Index Label Scan Non scan Non scan Aapr 1cm2 Aaprt 1cm2 Maximum Index Value 0 55 0 69 0 98 USFDA Track 3 IEC Associated Acoustic Parameter pr 3 pra MPa 0 99 Wo P mW 42 87 42 87 min of W 3 z1 ITA 3 z1 Min of P zs Ita zs mW z1 zs cm zbp zbp cm zsp zb cm 3 18 deq zsp deq zb cm fc f...

Страница 366: ...provided if the equipment meets both exemption clauses given in 51 2 aa and 51 2 dd MI TIS TIB TIC Index Label Scan Non scan Non scan Aapr 1cm2 Aaprt 1cm2 Maximum Index Value 0 55 0 36 0 03 0 53 USFDA Track 3 IEC Associated Acoustic Parameter pr 3 pra MPa 0 99 Wo P mW 22 29 0 68 30 94 min of W 3 z1 ITA 3 z1 Min of P zs Ita zs mW z1 zs cm zbp zbp cm zsp zb cm 3 18 3 30 deq zsp deq zb cm 0 21 fc faw...

Страница 367: ...n MI and TI need not be provided if the equipment meets both exemption clauses given in 51 2 aa and 51 2 dd MI TIS TIB TIC Index Label Scan Non scan Non scan Aapr 1cm2 Aaprt 1cm2 Maximum Index Value 0 48 2 05 3 31 USFDA Track 3 IEC Associated Acoustic Parameter pr 3 pra MPa 0 86 Wo P mW 108 33 94 95 min of W 3 z1 ITA 3 z1 Min of P zs Ita zs mW z1 zs cm zbp zbp cm zsp zb cm 3 18 deq zsp deq zb cm f...

Страница 368: ...cranial or neonatal cephalic uses 4 Information on MI and TI need not be provided if the equipment meets both exemption clauses given in 51 2 aa and 51 2 dd MI TIS TIB TIC Index Label Scan Non scan Non scan Aapr 1cm2 Aaprt 1cm2 Maximum Index Value 0 55 1 50 2 18 2 51 USFDA Track 3 IEC Associated Acoustic Parameter pr 3 pra MPa 0 99 Wo P mW 53 22 39 88 53 23 min of W 3 z1 ITA 3 z1 Min of P zs Ita z...

Страница 369: ...ormation on MI and TI need not be provided if the equipment meets both exemption clauses given in 51 2 aa and 51 2 dd MI TIS TIB TIC Index Label Scan Non scan Non scan Aapr 1cm2 Aaprt 1cm2 Maximum Index Value 0 47 0 36 Note 2 USFDA Track 3 IEC Associated Acoustic Parameter pr 3 pra MPa 0 94 Wo P mW 15 93 min of W 3 z1 ITA 3 z1 Min of P zs Ita zs mW z1 zs cm zbp zbp cm zsp zb cm 2 02 deq zsp deq zb...

Страница 370: ... need not be provided if the equipment meets both exemption clauses given in 51 2 aa and 51 2 dd TIS TIB TIC Index Label MI Scan Non scan Non scan Aapr 1cm2 Aaprt 1cm2 Maximum Index Value 0 47 0 19 0 02 Note 2 USFDA Track 3 IEC Associated Acoustic Parameter pr 3 pra MPa 0 94 Wo P mW 9 63 0 24 min of W 3 z1 ITA 3 z1 Min of P zs Ita zs mW z1 zs cm zbp zbp cm zsp zb cm 2 02 1 87 deq zsp deq zb cm 0 2...

Страница 371: ... Information on MI and TI need not be provided if the equipment meets both exemption clauses given in 51 2 aa and 51 2 dd MI TIS TIB TIC Index Label Scan Non scan Non scan Aapr 1cm2 Aaprt 1cm2 Maximum Index Value 0 41 0 53 Note 2 USFDA Track 3 IEC Associated Acoustic Parameter pr 3 pra MPa 0 81 Wo P mW 23 47 min of W 3 z1 ITA 3 z1 Min of P zs Ita zs mW z1 zs cm zbp zbp cm zsp zb cm 2 02 deq zsp de...

Страница 372: ...ed for transcranial or neonatal cephalic uses 4 Information on MI and TI need not be provided if the equipment meets both exemption clauses given in 51 2 aa and 51 2 dd MI TIS TIB TIC Index Label Scan Non scan Non scan Aapr 1cm2 Aaprt 1cm2 Maximum Index Value 0 47 0 45 1 19 Note 3 USFDA Track 3 IEC Associated Acoustic Parameter pr 3 pra MPa 0 94 Wo P mW 19 73 16 00 min of W 3 z1 ITA 3 z1 Min of P ...

Страница 373: ...ormation on MI and TI need not be provided if the equipment meets both exemption clauses given in 51 2 aa and 51 2 dd MI TIS TIB TIC Index Label Scan Non scan Non scan Aapr 1cm2 Aaprt 1cm2 Maximum Index Value 1 18 1 08 Note 2 USFDA Track 3 IEC Associated Acoustic Parameter pr 3 pra MPa 2 81 Wo P mW 36 19 min of W 3 z1 ITA 3 z1 Min of P zs Ita zs mW z1 zs cm zbp zbp cm zsp zb cm 1 90 deq zsp deq zb...

Страница 374: ...need not be provided if the equipment meets both exemption clauses given in 51 2 aa and 51 2 dd MI TIS TIB TIC Index Label Scan Non scan Non scan Aapr 1cm2 Aaprt 1cm2 Maximum Index Value 1 18 1 08 0 08 Note 2 USFDA Track 3 IEC Associated Acoustic Parameter pr 3 pra MPa 2 81 Wo P mW 35 95 1 21 min of W 3 z1 ITA 3 z1 Min of P zs Ita zs mW z1 zs cm zbp zbp cm zsp zb cm 1 90 1 90 deq zsp deq zb cm 0 1...

Страница 375: ...formation on MI and TI need not be provided if the equipment meets both exemption clauses given in 51 2 aa and 51 2 dd MI TIS TIB TIC Index Label Scan Non scan Non scan Aapr 1cm2 Aaprt 1cm2 Maximum Index Value 1 15 1 22 Note 2 USFDA Track 3 IEC Associated Acoustic Parameter pr 3 pra MPa 2 58 Wo P mW 42 71 min of W 3 z1 ITA 3 z1 Min of P zs Ita zs mW z1 zs cm zbp zbp cm zsp zb cm 1 90 deq zsp deq z...

Страница 376: ...ded for transcranial or neonatal cephalic uses 4 Information on MI and TI need not be provided if the equipment meets both exemption clauses given in 51 2 aa and 51 2 dd MI TIS TIB TIC Index Label Scan Non scan Non scan Aapr 1cm2 Aaprt 1cm2 Maximum Index Value 1 16 1 26 1 64 Note 3 USFDA Track 3 IEC Associated Acoustic Parameter pr 3 pra MPa 2 60 Wo P mW 44 33 19 46 min of W 3 z1 ITA 3 z1 Min of P...

Страница 377: ...formation on MI and TI need not be provided if the equipment meets both exemption clauses given in 51 2 aa and 51 2 dd MI TIS TIB TIC Index Label Scan Non scan Non scan Aapr 1cm2 Aaprt 1cm2 Maximum Index Value 0 40 0 19 Note 2 USFDA Track 3 IEC Associated Acoustic Parameter pr 3 pra MPa 1 11 Wo P mW 5 26 min of W 3 z1 ITA 3 z1 Min of P zs Ita zs mW z1 zs cm zbp zbp cm zsp zb cm 0 95 deq zsp deq zb...

Страница 378: ...ed not be provided if the equipment meets both exemption clauses given in 51 2 aa and 51 2 dd MI TIS TIB TIC Index Label Scan Non scan Non scan Aapr 1cm2 Aaprt 1cm2 Maximum Index Value 0 40 0 14 Note 1 0 01 Note 2 USFDA Track 3 IEC Associated Acoustic Parameter pr 3 pra MPa 1 11 Wo P mW 4 05 0 05 min of W 3 z1 ITA 3 z1 Min of P zs Ita zs mW z1 zs cm zbp zbp cm zsp zb cm 0 95 0 92 deq zsp deq zb cm...

Страница 379: ... Information on MI and TI need not be provided if the equipment meets both exemption clauses given in 51 2 aa and 51 2 dd MI TIS TIB TIC Index Label Scan Non scan Non scan Aapr 1cm2 Aaprt 1cm2 Maximum Index Value 0 55 0 77 Note 2 USFDA Track 3 IEC Associated Acoustic Parameter pr 3 pra MPa 1 43 Wo P mW 24 23 min of W 3 z1 ITA 3 z1 Min of P zs Ita zs mW z1 zs cm zbp zbp cm zsp zb cm 0 75 deq zsp de...

Страница 380: ...ded for transcranial or neonatal cephalic uses 4 Information on MI and TI need not be provided if the equipment meets both exemption clauses given in 51 2 aa and 51 2 dd MI TIS TIB TIC Index Label Scan Non scan Non scan Aapr 1cm2 Aaprt 1cm2 Maximum Index Value 0 37 0 61 1 40 Note 3 USFDA Track 3 IEC Associated Acoustic Parameter pr 3 pra MPa 0 96 Wo P mW 18 99 10 65 min of W 3 z1 ITA 3 z1 Min of P...

Страница 381: ...MI and TI need not be provided if the equipment meets both exemption clauses given in 51 2 aa and 51 2 dd MI TIS TIB TIC Index Label Scan Non scan Non scan Aapr 1cm2 Aaprt 1cm2 Maximum Index Value 0 53 0 55 0 71 USFDA Track 3 IEC Associated Acoustic Parameter pr 3 pra MPa 1 29 Wo P mW 19 35 19 35 min of W 3 z1 ITA 3 z1 Min of P zs Ita zs mW z1 zs cm zbp zbp cm zsp zb cm 1 62 deq zsp deq zb cm fc f...

Страница 382: ...vided if the equipment meets both exemption clauses given in 51 2 aa and 51 2 dd MI TIS TIB TIC Index Label Scan Non scan Non scan Aapr 1cm2 Aaprt 1cm2 Maximum Index Value 0 53 0 07 Note 1 0 06 0 10 USFDA Track 3 IEC Associated Acoustic Parameter pr 3 pra MPa 1 29 Wo P mW 3 91 3 47 3 91 min of W 3 z1 ITA 3 z1 Min of P zs Ita zs mW z1 zs cm zbp zbp cm zsp zb cm 1 62 1 50 deq zsp deq zb cm 0 43 fc f...

Страница 383: ...on MI and TI need not be provided if the equipment meets both exemption clauses given in 51 2 aa and 51 2 dd MI TIS TIB TIC Index Label Scan Non scan Non scan Aapr 1cm2 Aaprt 1cm2 Maximum Index Value 0 68 1 91 2 28 USFDA Track 3 IEC Associated Acoustic Parameter pr 3 pra MPa 1 53 Wo P mW 67 77 67 77 min of W 3 z1 ITA 3 z1 Min of P zs Ita zs mW z1 zs cm zbp zbp cm zsp zb cm 1 18 deq zsp deq zb cm f...

Страница 384: ...cranial or neonatal cephalic uses 4 Information on MI and TI need not be provided if the equipment meets both exemption clauses given in 51 2 aa and 51 2 dd MI TIS TIB TIC Index Label Scan Non scan Non scan Aapr 1cm2 Aaprt 1cm2 Maximum Index Value 0 46 2 01 2 31 2 38 USFDA Track 3 IEC Associated Acoustic Parameter pr 3 pra MPa 1 03 Wo P mW 63 97 49 66 27 29 min of W 3 z1 ITA 3 z1 Min of P zs Ita z...

Страница 385: ... 3 Information on MI and TI need not be provided if the equipment meets both exemption clauses given in 51 2 aa and 51 2 dd MI TIS TIB TIC Index Label Scan Non scan Non scan Aapr 1cm2 Aaprt 1cm2 Maximum Index Value 1 57 2 46 3 98 USFDA Track 3 IEC Associated Acoustic Parameter pr 3 pra MPa 2 62 Wo P mW 157 32 198 30 min of W 3 z1 ITA 3 z1 Min of P zs Ita zs mW z1 zs cm zbp zbp cm zsp zb cm 3 58 de...

Страница 386: ...d if the equipment meets both exemption clauses given in 51 2 aa and 51 2 dd MI TIS TIB TIC Index Label Scan Non scan Non scan Aapr 1cm2 Aaprt 1cm2 Maximum Index Value 1 57 2 38 Note 1 0 41 3 96 USFDA Track 3 IEC Associated Acoustic Parameter pr 3 pra MPa 2 62 Wo P mW 152 22 19 36 249 44 min of W 3 z1 ITA 3 z1 Min of P zs Ita zs mW z1 zs cm zbp zbp cm zsp zb cm 3 58 5 07 deq zsp deq zb cm 0 54 fc ...

Страница 387: ...nded for transcranial or neonatal cephalic uses 4 Information on MI and TI need not be provided if the equipment meets both exemption clauses given in 51 2 aa and 51 2 dd MI TIS TIB TIC Index Label Scan Non scan Non scan Aapr 1cm2 Aaprt 1cm2 Maximum Index Value 1 57 2 18 4 23 USFDA Track 3 IEC Associated Acoustic Parameter pr 3 pra MPa 2 21 Wo P mW 166 69 266 55 min of W 3 z1 ITA 3 z1 Min of P zs ...

Страница 388: ...rovided if the equipment meets both exemption clauses given in 51 2 aa and 51 2 dd MI TIS TIB TIC Index Label Scan Non scan Non scan Aapr 1cm2 Aaprt 1cm2 Maximum Index Value 1 57 1 87 5 06 4 16 USFDA Track 3 IEC Associated Acoustic Parameter pr 3 pra MPa 2 43 Wo P mW 246 16 245 23 min of W 3 z1 ITA 3 z1 Min of P zs Ita zs mW 164 60 z1 zs cm 2 33 zbp zbp cm 2 29 zsp zb cm 3 75 4 93 deq zsp deq zb c...

Страница 389: ...TI need not be provided if the equipment meets both exemption clauses given in 51 2 aa and 51 2 dd MI TIS TIB TIC Index Label Scan Non scan Non scan Aapr 1cm2 Aaprt 1cm2 Maximum Index Value 0 09 1 00 3 62 2 56 USFDA Track 3 IEC Associated Acoustic Parameter pr 3 pra MPa 0 12 Wo P mW 104 66 104 66 104 66 min of W 3 z1 ITA 3 z1 Min of P zs Ita zs mW z1 zs cm zbp zbp cm zsp zb cm 2 98 2 80 deq zsp de...

Страница 390: ...mation on MI and TI need not be provided if the equipment meets both exemption clauses given in 51 2 aa and 51 2 dd MI TIS TIB TIC Index Label Scan Non scan Non scan Aapr 1cm2 Aaprt 1cm2 Maximum Index Value 1 44 1 45 Note 2 USFDA Track 3 IEC Associated Acoustic Parameter pr 3 pra MPa 2 45 Wo P mW 81 87 min of W 3 z1 ITA 3 z1 Min of P zs Ita zs mW z1 zs cm zbp zbp cm zsp zb cm 4 60 deq zsp deq zb c...

Страница 391: ...ot be provided if the equipment meets both exemption clauses given in 51 2 aa and 51 2 dd MI TIS TIB TIC Index Label Scan Non scan Non scan Aapr 1cm2 Aaprt 1cm2 Maximum Index Value 1 44 1 42 Note 1 0 30 Note 2 USFDA Track 3 IEC Associated Acoustic Parameter pr 3 pra MPa 2 45 Wo P mW 81 03 13 94 min of W 3 z1 ITA 3 z1 Min of P zs Ita zs mW z1 zs cm zbp zbp cm zsp zb cm 4 60 5 80 deq zsp deq zb cm 0...

Страница 392: ...embly not intended for transcranial or neonatal cephalic uses 4 Information on MI and TI need not be provided if the equipment meets both exemption clauses given in 51 2 aa and 51 2 dd MI TIS TIB TIC Index Label Scan Non scan Non scan Aapr 1cm2 Aaprt 1cm2 Maximum Index Value 1 44 2 15 Note 3 USFDA Track 3 IEC Associated Acoustic Parameter pr 3 pra MPa 2 43 Wo P mW 142 78 min of W 3 z1 ITA 3 z1 Min...

Страница 393: ...TI need not be provided if the equipment meets both exemption clauses given in 51 2 aa and 51 2 dd MI TIS TIB TIC Index Label Scan Non scan Non scan Aapr 1cm2 Aaprt 1cm2 Maximum Index Value 1 36 1 30 Note 1 3 37 Note 2 USFDA Track 3 IEC Associated Acoustic Parameter pr 3 pra MPa 2 29 Wo P mW 86 20 86 73 min of W 3 z1 ITA 3 z1 Min of P zs Ita zs mW z1 zs cm zbp zbp cm zsp zb cm 4 40 1 30 deq zsp de...

Страница 394: ... and TI need not be provided if the equipment meets both exemption clauses given in 51 2 aa and 51 2 dd MI TIS TIB TIC Index Label Scan Non scan Non scan Aapr 1cm2 Aaprt 1cm2 Maximum Index Value 0 56 0 75 0 98 USFDA Track 3 IEC Associated Acoustic Parameter pr 3 pra MPa 1 23 Wo P mW 32 43 31 44 min of W 3 z1 ITA 3 z1 Min of P zs Ita zs mW z1 zs cm zbp zbp cm zsp zb cm 3 10 deq zsp deq zb cm fc faw...

Страница 395: ...ovided if the equipment meets both exemption clauses given in 51 2 aa and 51 2 dd MI TIS TIB TIC Index Label Scan Non scan Non scan Aapr 1cm2 Aaprt 1cm2 Maximum Index Value 0 56 0 41 0 02 0 58 USFDA Track 3 IEC Associated Acoustic Parameter pr 3 pra MPa 1 23 Wo P mW 21 61 0 44 27 78 min of W 3 z1 ITA 3 z1 Min of P zs Ita zs mW z1 zs cm zbp zbp cm zsp zb cm 3 10 2 58 deq zsp deq zb cm 0 23 fc fawf ...

Страница 396: ...transcranial or neonatal cephalic uses 4 Information on MI and TI need not be provided if the equipment meets both exemption clauses given in 51 2 aa and 51 2 dd MI TIS TIB TIC Index Label Scan Non scan Non scan Aapr 1cm2 Aaprt 1cm2 Maximum Index Value 0 98 2 14 3 75 USFDA Track 3 IEC Associated Acoustic Parameter pr 3 pra MPa 1 96 Wo P mW 112 8 7 87 99 min of W 3 z1 ITA 3 z1 Min of P zs Ita zs mW...

Страница 397: ... neonatal cephalic uses 4 Information on MI and TI need not be provided if the equipment meets both exemption clauses given in 51 2 aa and 51 2 dd MI TIS TIB TIC Index Label Scan Non scan Non scan Aapr 1cm2 Aaprt 1cm2 Maximum Index Value 0 61 1 84 2 38 2 32 USFDA Track 3 IEC Associated Acoustic Parameter pr 3 pra MPa 1 21 Wo P mW 77 92 59 56 33 94 min of W 3 z1 ITA 3 z1 Min of P zs Ita zs mW z1 zs...

Страница 398: ...mation on MI and TI need not be provided if the equipment meets both exemption clauses given in 51 2 aa and 51 2 dd MI TIS TIB TIC Index Label Scan Non scan Non scan Aapr 1cm2 Aaprt 1cm2 Maximum Index Value 1 47 0 60 Note 2 USFDA Track 3 IEC Associated Acoustic Parameter pr 3 pra MPa 3 86 Wo P mW 25 39 min of W 3 z1 ITA 3 z1 Min of P zs Ita zs mW z1 zs cm zbp zbp cm zsp zb cm 1 50 deq zsp deq zb c...

Страница 399: ...not be provided if the equipment meets both exemption clauses given in 51 2 aa and 51 2 dd MI TIS TIB TIC Index Label Scan Non scan Non scan Aapr 1cm2 Aaprt 1cm2 Maximum Index Value 1 47 0 60 Note 1 0 19 Note 2 USFDA Track 3 IEC Associated Acoustic Parameter pr 3 pra MPa 3 86 Wo P mW 25 54 4 10 min of W 3 z1 ITA 3 z1 Min of P zs Ita zs mW z1 zs cm zbp zbp cm zsp zb cm 1 50 1 65 deq zsp deq zb cm 0...

Страница 400: ...nformation on MI and TI need not be provided if the equipment meets both exemption clauses given in 51 2 aa and 51 2 dd MI TIS TIB TIC Index Label Scan Non scan Non scan Aapr 1cm2 Aaprt 1cm2 Maximum Index Value 1 47 0 89 Note 2 USFDA Track 3 IEC Associated Acoustic Parameter pr 3 pra MPa 3 57 Wo P mW 37 41 min of W 3 z1 ITA 3 z1 Min of P zs Ita zs mW z1 zs cm zbp zbp cm zsp zb cm 1 80 deq zsp deq ...

Страница 401: ...ed for transcranial or neonatal cephalic uses 4 Information on MI and TI need not be provided if the equipment meets both exemption clauses given in 51 2 aa and 51 2 dd MI TIS TIB TIC Index Label Scan Non scan Non scan Aapr 1cm2 Aaprt 1cm2 Maximum Index Value 1 46 0 65 1 82 Note 3 USFDA Track 3 IEC Associated Acoustic Parameter pr 3 pra MPa 3 56 Wo P mW 27 32 22 53 min of W 3 z1 ITA 3 z1 Min of P ...

Страница 402: ...rmation on MI and TI need not be provided if the equipment meets both exemption clauses given in 51 2 aa and 51 2 dd MI TIS TIB TIC Index Label Scan Non scan Non scan Aapr 1cm2 Aaprt 1cm2 Maximum Index Value 0 93 0 49 Note 2 USFDA Track 3 IEC Associated Acoustic Parameter pr 3 pra MPa 2 58 Wo P mW 13 32 min of W 3 z1 ITA 3 z1 Min of P zs Ita zs mW z1 zs cm zbp zbp cm zsp zb cm 0 90 deq zsp deq zb ...

Страница 403: ... not be provided if the equipment meets both exemption clauses given in 51 2 aa and 51 2 dd MI TIS TIB TIC Index Label Scan Non scan Non scan Aapr 1cm2 Aaprt 1cm2 Maximum Index Value 0 93 0 35 Note 1 0 02 Note 2 USFDA Track 3 IEC Associated Acoustic Parameter pr 3 pra MPa 2 58 Wo P mW 10 42 0 12 min of W 3 z1 ITA 3 z1 Min of P zs Ita zs mW z1 zs cm zbp zbp cm zsp zb cm 0 90 0 92 deq zsp deq zb cm ...

Страница 404: ...nformation on MI and TI need not be provided if the equipment meets both exemption clauses given in 51 2 aa and 51 2 dd MI TIS TIB TIC Index Label Scan Non scan Non scan Aapr 1cm2 Aaprt 1cm2 Maximum Index Value 1 16 0 77 Note 2 USFDA Track 3 IEC Associated Acoustic Parameter pr 3 pra MPa 3 00 Wo P mW 23 83 min of W 3 z1 ITA 3 z1 Min of P zs Ita zs mW z1 zs cm zbp zbp cm zsp zb cm 0 75 deq zsp deq ...

Страница 405: ...ed for transcranial or neonatal cephalic uses 4 Information on MI and TI need not be provided if the equipment meets both exemption clauses given in 51 2 aa and 51 2 dd MI TIS TIB TIC Index Label Scan Non scan Non scan Aapr 1cm2 Aaprt 1cm2 Maximum Index Value 0 78 0 55 1 20 Note 3 USFDA Track 3 IEC Associated Acoustic Parameter pr 3 pra MPa 2 01 Wo P mW 15 91 12 08 min of W 3 z1 ITA 3 z1 Min of P ...

Страница 406: ...I and TI need not be provided if the equipment meets both exemption clauses given in 51 2 aa and 51 2 dd MI TIS TIB TIC Index Label Scan Non scan Non scan Aapr 1cm2 Aaprt 1cm2 Maximum Index Value 0 77 1 19 1 54 USFDA Track 3 IEC Associated Acoustic Parameter pr 3 pra MPa 1 89 Wo P mW 41 72 41 72 min of W 3 z1 ITA 3 z1 Min of P zs Ita zs mW z1 zs cm zbp zbp cm zsp zb cm 1 62 deq zsp deq zb cm fc fa...

Страница 407: ...ded if the equipment meets both exemption clauses given in 51 2 aa and 51 2 dd MI TIS TIB TIC Index Label Scan Non scan Non scan Aapr 1cm2 Aaprt 1cm2 Maximum Index Value 0 77 0 60 Note 1 0 04 0 84 USFDA Track 3 IEC Associated Acoustic Parameter pr 3 pra MPa 1 89 Wo P mW 21 90 0 42 37 19 min of W 3 z1 ITA 3 z1 Min of P zs Ita zs mW z1 zs cm zbp zbp cm zsp zb cm 1 62 1 57 deq zsp deq zb cm 0 13 fc f...

Страница 408: ...ntended for transcranial or neonatal cephalic uses 4 Information on MI and TI need not be provided if the equipment meets both exemption clauses given in 51 2 aa and 51 2 dd MI TIS TIB TIC Index Label Scan Non scan Non scan Aapr 1cm2 Aaprt 1cm2 Maximum Index Value 1 05 1 90 2 61 USFDA Track 3 IEC Associated Acoustic Parameter pr 3 pra MPa 2 70 Wo P mW 67 17 51 87 min of W 3 z1 ITA 3 z1 Min of P zs...

Страница 409: ...ot be provided if the equipment meets both exemption clauses given in 51 2 aa and 51 2 dd MI TIS TIB TIC Index Label Scan Non scan Non scan Aapr 1cm2 Aaprt 1cm2 Maximum Index Value 0 70 1 98 2 25 2 40 USFDA Track 3 IEC Associated Acoustic Parameter pr 3 pra MPa 2 42 Wo P mW 62 64 51 94 38 18 min of W 3 z1 ITA 3 z1 Min of P zs Ita zs mW z1 zs cm zbp zbp cm zsp zb cm 1 25 1 15 deq zsp deq zb cm 0 32...

Страница 410: ...ot intended for transcranial or neonatal cephalic uses 4 Information on MI and TI need not be provided if the equipment meets both exemption clauses given in 51 2 aa and 51 2 dd MI TIS TIB TIC Index Label Scan Non scan Non scan Aapr 1cm2 Aaprt 1cm2 Maximum Index Value 0 08 0 95 3 54 Note 3 USFDA Track 3 IEC Associated Acoustic Parameter pr 3 pra MPa 0 11 Wo P mW 100 00 100 00 min of W 3 z1 ITA 3 z...

Страница 411: ...ns for Use 256 Label 30 5C2A Transducer 220 Acoustic output 344 345 346 347 390 391 392 393 Biopsy 218 Exams 213 Features 30 Indications for Use 258 7L3V Transducer Acoustic output 348 349 350 351 352 394 395 396 397 Biopsy 218 Exams 213 Features 30 Indications for Use 259 8BP4 Transducer Acoustic output 353 354 355 356 357 358 359 360 Features 30 Indications for Use 260 8EC4A Transducer Acoustic ...

Страница 412: ...olume AVI File icon 137 Image format 132 Opening 136 Playing 70 Saving loops as 132 Setting as default save format 244 Viewing 137 Axillary Artery 168 170 Vein 170 171 B Back button Playback toolbar 71 Backing up files 142 Baseline 116 Adjusting on PWD tab 116 Color 124 Basilic Vein 170 171 Battery Laptop power 63 Recycling 15 Usage and disposal of 15 Biopsy 29 218 2D 30 Civco 220 Cleaning transdu...

Страница 413: ...o 56 59 61 Closing the software 63 Color Baseline 124 Gain 122 Invert 121 Palettes 101 Persistence 123 Priority 123 Reference bar 78 Region of Interest 120 Scale 101 Color Doppler Button 66 67 Color maps 249 Directional Power Doppler with 26 Exam preset values 214 Exam procedure 65 Introduction 25 Needle guide display 220 When to use 89 See also CD tab Color Doppler Save Warning 123 243 Color map ...

Страница 414: ...ions 19 Error correction for needle guides 224 Estimated fetal weight 162 Formula 322 Exam menu 215 Delete Exam 217 Open Exam 215 Save Exam 216 Save Exam As 216 Exams 212 Creating new 216 Custom 215 Deleting 216 File name abbreviations 214 Loading Patient Info 60 Opening 215 Procedure 65 Selecting from menu 215 Selecting on 2D tab 67 Selecting type in 2D tab 215 Size specific versions 216 Workflow...

Страница 415: ... Artery 168 Vein 168 HL measurement label 161 Home cursor See Orientation logo Hospital Site 56 Humerus Length measurement 161 I I Q tab 89 100 Colorization 101 Left Right invert 100 Map 103 Needle guide 104 Persistence 102 Smoothing 102 Up Down invert 100 ICA Internal Carotid Artery 169 172 ICA CCA ratios 172 Icons Body Markers 86 Quick reference 313 Terason application 63 Terason Explorer 136 Se...

Страница 416: ...us message 73 Live Freeze toolbar 32 LMP 160 Location of exam 56 59 Location of vessel 167 Loop acquisition prospective 71 Loop acquisition retrospective 72 Loops 142 Editing 145 Moving through frames 70 Pausing 70 Playing 70 Retrieving 136 Storing 131 LSV measurement label 170 171 LVOT measurement label 169 M M Measure tab 165 Magnifying the image 73 Main Portal Vein 168 Renal Artery 168 Maintena...

Страница 417: ...ment 161 O OB file name 214 Obstetrical Exam 213 Measurements 159 Default setup 250 Estimated fetal weight 162 Gestational sac age 163 Volume 163 Occipital Frontal Diameter measurement 161 Omni Beam 99 Online help 12 Options Measurement defaults 250 Save image format 244 Ordering biopsy kits 220 Orientation logo 78 Outer Orbital Diameter measurement 161 Ovarian Artery 169 P Paste on Edit menu 57 P...

Страница 418: ...Exam preset values 214 Exam Procedure 69 Introduction 27 Sample volume 28 Steering angle 112 Switching to from another scan mode 114 Time Series measurements 166 Time Series window 28 Vessel of interest 114 When to use 89 See also PWD tab PWD See Pulsed Wave Doppler PWD button 68 69 PWD Measure tab 167 Arterial ratios 172 Correction Angle 167 Flow Volume 174 Heart Rate 173 Laterality 167 Location ...

Страница 419: ...6 Space key 301 Speed M Mode 106 Pulsed Wave Doppler 109 Spermatic Artery 170 Splenic Artery 168 Vein 168 Split View toolbar 32 SRA measurement label 169 Starting up the software 63 Status 72 Status bar 32 Hiding 76 Showing 76 Steering angle 112 PWD mode 112 Stenosis Area measurement 152 Calculating area 157 Calculating diameter 157 Measurements 157 Stop playback See Pause button Storing files Bac...

Страница 420: ... 96 Displaying 78 97 Thermal Index TIB and TIS 78 269 THI 98 Needle guide display 220 Thumbnails 139 Large 139 Small 139 Zoom 74 THY file name 214 Thyroid exam 213 Thyroidal Artery 170 TIB 269 Tibia Length measurement 161 TIC 270 TIFF File icon 137 Image format 132 Opening 136 Saving images as 132 Setting as default file format 244 Viewing 137 TIFF Image File status message 73 Time Gain Compensati...

Страница 421: ...Venous exam 213 Verification test 241 Version number 320 Vertebral Artery 169 Vessels Laterality 167 Location 167 PWD measurement 167 View menu 76 Full Screen 75 Image Control Bar 76 Image Display Properties 60 74 77 97 152 155 Large Thumbnail 139 Needle Guide Display 104 222 Refresh 140 Small Thumbnail 139 Status bar 76 Terason Explorer 76 Toolbars 32 76 Zoom 74 Volume Accuracy 282 Calculating 15...

Отзывы: