background image


37 


LAN


IP

192.168.0.10;


Subnet


Mask:


255.255.255.0;


Then


do


as


follows:


1.


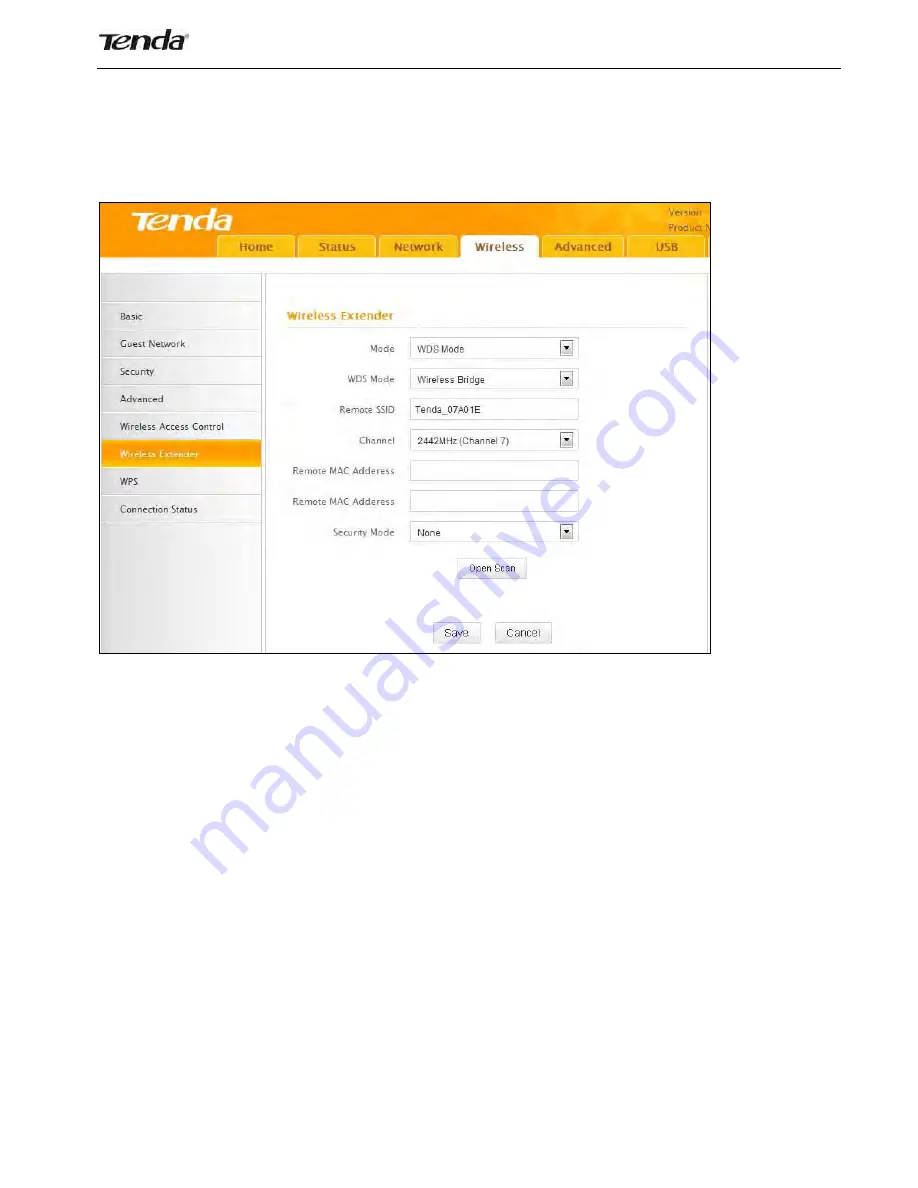
Configure


Router


2:


1)


Wireless


Working


Mode:


Select


WDS


Bridge


Mode.


2)


Click


Open


Scan


to


search


for


Router


1.


3)


Select


the


wireless


network


to


connect


and


click


OK

.


4)


Verify


that


the


SSID,


channel,


and


AP


MAC


address


on


the


page


match


those


of


the


added


wireless


network.


If


not,


manually


correct


them.


5)


Close


Scan


and


click


Save


to


save


your


settings.


6)


Go


to


Wireless


Security


page


and


set


the


wireless


security


settings


exactly


as


they


are


on


the


link


partner


(Router


1).


7)


Go


to


DHCP


Server


to


disable


the


DHCP


on


Router


2.


Now


you


have


finished


all


settings


on


Router


2


required


for


WDS.


2.


Configure


Router


1:


1.


Go


to


wireless


section


on


Router


1


and


specify


WDS


(

or


WDS


Bridge)


as


its


wireless


working


mode.


Содержание F452

Страница 1: ...Wireless N450 Gigabit Router 1...

Страница 2: ...ssed written permission from Shenzhen Tenda Technology Co Ltd any individual or party is not allowed to copy plagiarize reproduce or translate it into other languages All photos and product specificat...

Страница 3: ...tings 12 5 Connect to Device Wirelessly 14 WIN7 OS 14 Windows XP OS 16 Chapter 3 Configurations 18 1 Status 18 1 1 System Status 18 1 2 WAN Status 18 1 3 LAN Status 19 1 4 Wireless Status 19 1 5 Conne...

Страница 4: ...ilter 66 6 4 Remote Web Management 67 6 5 DDOS Defence 68 6 6 SPI Firewall 69 7 Tools 70 7 1 Logs 70 7 2 Traffic Statistics 71 7 3 Time 72 7 4 Change Password 72 7 5 Backup 73 7 6 Restore 74 7 7 Firmw...

Страница 5: ...unctioning correctly SYS Solid Off Indicates the system is functioning incorrectly Blinking Device is performing WPS authentication on a client device WPS Off WPS is disabled or WPS authentication fin...

Страница 6: ...J 45 for connection to PC s NIC or uplink to a hub switch or wireless AP LAN 1 IPTV IPTV port for connection to a network set top box However this port can also function as a LAN port if the IPTV STB...

Страница 7: ...ocation such as a high shelf keeping the number of walls and ceilings between the router and your other devices to a minimum Away from electrical devices that are potential sources of interference suc...

Страница 8: ...ternet Connection Type If you connect to the Internet using a broadband connection that requires a username and a password provided by your ISP please select PPPoE If you can access Internet as soon a...

Страница 9: ...rom the incoming Internet side to the WAN port on the router 3 Internet Connection Setup Configure PC Configure your PC obtain IP address automatically If you are not clear about this please refer to...

Страница 10: ...t Router 10 3 Enter a password in the corresponding field as shown in the window below the default is set to admin Note For security purpose please change the default password after you have logged in...

Страница 11: ...et using a broadband connection that requires a username and a password Enter the user name and password provided by your ISP configure a security key to secure your wireless network and then click OK...

Страница 12: ...n you finish all needed settings on the home page Here you can see the system status and WAN connection status of the device 1 If you find Connected and a WAN IP address displayed there as shown below...

Страница 13: ...displayed on particular occasions for your reference 1 You have connected to Internet successfully 2 You might have entered a wrong user name and or a wrong password Please contact your ISP for the c...

Страница 14: ...u can search the device s wireless network SSID from your wireless devices notebook iPad iPhone etc and enter a security key to connect to it wirelessly Desktop computers should be equipped with wirel...

Страница 15: ...pears it indicates connecting to the network 4 Enter your security key and click OK 5 When displaying Connected you have connected to network successfully Tips If you cannot find the icon at the botto...

Страница 16: ...My Network Places and select Properties 2 Click Local Area Connection and select View Available Wireless Networks 3 Select the SSID you wish to connect such as Tenda_home click Connect enter the secu...

Страница 17: ...17 4 You can access Internet via the device when Connected appears next to the wireless network name you selected...

Страница 18: ...re you can see at a glance of the operating status of the device 1 2 WAN Status This section allows you to view the router s WAN information as noted below Connection Type Displays the current Interne...

Страница 19: ...C address IP Address Displays the current LAN IP address Subnet Mask Displays the current LAN subnet mask 1 4 Wireless Status This section allows you to view the wireless information of 2 4Ghz band Wi...

Страница 20: ...nts if any including IP and MAC addresses etc 2 Network Network menu includes the following nine submenus Clicking any of them enters the corresponding interface for configuration Details are explaine...

Страница 21: ...to log on to the web utility 2 2 WAN There are three types of Internet connection Dynamic IP DHCP Static IP and PPPoE including dual access Dynamic IP Select Dynamic IP DHCP to obtain IP Address infor...

Страница 22: ...ver Enter the Primary and Secondary DNS Server Addresses Consult your local ISP if you are not clear MTU Maximum Transmission Unit The factory default is 1450 PPPoE Select PPPoE Point to Point Protoco...

Страница 23: ...ddress Restore to Factory Default MAC Reset the router s WAN MAC to factory default Clone MAC Clicking this button copies the MAC address of your PC to the MAC Address field in the router Note 1 Norma...

Страница 24: ...DHCP server s IP assignment Lease Time The length of time for the IP address lease Tips 1 The device has enabled the DHCP server by default and it is not advisable to disable it unless necessary 2 To...

Страница 25: ...c DHCP assignment MAC Address Enter the MAC address of a computer to always receive the same IP address you specify Add Click it to add a new IP MAC static assignment entry to list Edit Click it to ch...

Страница 26: ...f time for the IP address lease Tips The IP address configured in DHCP guest network should not be in the same network segment as that of DHCP server s 2 9 Client List Guest Network This list displays...

Страница 27: ...llows you to manage your wireless network You can select your country configure the wireless network name SSID network mode and channel settings etc 2 4GHz Wireless Network Check uncheck to enable dis...

Страница 28: ...ble only in 11b g n mixed mode 3 2 Guest Network The Guest Network feature allows guests to access the Internet and other users on the guest network while disallowing them to access the router s web m...

Страница 29: ...one WEP and WPA PSK WPA2 PSK WEP WEP is intended to provide data confidentiality comparable to that of a traditional wired network Two methods of authentication can be used with WEP Open System authen...

Страница 30: ...the majority of the IEEE 802 11i standard It enhances data encryption through the Temporal Key Integrity Protocol TKIP which is a 128 bit per packet key meaning that it dynamically generates a new key...

Страница 31: ...Advanced Encryption Standard AES instead of TKIP It is more secured than WPA and WEP Cipher Type Select AES advanced encryption standard or TKIP temporary key integrity protocol AES Security Key Enter...

Страница 32: ...nts and interference For normal SOHO it is recommended to keep the default value unchanged otherwise the router performance may be degraded DTIM Interval A DTIM Delivery Traffic Indication Message Int...

Страница 33: ...es at specified MAC addresses to connect to your wireless network Click Add and the screen below will open MAC Address Enter the MAC address of a wireless client Description Briefly describe the new e...

Страница 34: ...below outline how to configure this feature in the 2 4GHz band For example As seen in the figure above PC1 and PC2 access Internet via a wireless connection to Router 1 While PC3 and PC4 are too far t...

Страница 35: ...security settings security mode cipher type security key etc on Router 1 Click Status LAN Status and check the IP address 2 Click Wireless Basic to check the basic settings of Router 1 3 Click Wirele...

Страница 36: ...is enabled on Router 1 Click Network DHCP Server 5 Set the LAN IP address of Router 2 to a different address yet on the same net segment as Router 1 As shown below Router 1 LAN IP 192 168 0 1 Subnet...

Страница 37: ...the page match those of the added wireless network If not manually correct them 5 Close Scan and click Save to save your settings 6 Go to Wireless Security page and set the wireless security settings...

Страница 38: ...38 2 Manually enter Router 2 s MAC address Also you can use the Open Scan option as mentioned above and click Save to finish your settings...

Страница 39: ...39...

Страница 40: ...ter 2 s IP Steps are as follows Take Windows XP OS for example 1 Click Start Run 2 Then the below screen appears and enter cmd 3 Input ping 192 168 0 10 in the screen and press Enter If the folllowing...

Страница 41: ...es on the same IP net segment In addition it is advisable to disable the DHCP server on either device WISP Mode If your router acquires Internet access from a wireless Access Point please select WISP...

Страница 42: ...5 Save the settings and the router will reboot automatically 6 Internet Connection Setup Click Network WAN select Connection Setup such as DHCP and click Save 7 Click Status WAN Status and the connec...

Страница 43: ...ion between two routers do not change this router s SSID settings including SSID channel security mode and security key Universal Repeater In this mode the router will relay data to an associated root...

Страница 44: ...tings and the router will restart automatically 3 7 WPS Wi Fi Protected Setup makes it easy for home users who know little of wireless security to establish a secure wireless home network as well as t...

Страница 45: ...nd means that the PBC encryption method is successfully enabled An authentication routine will be performed between your router and the WPS PBC enabled wireless client device during this time if it su...

Страница 46: ...ollowing 8 submenus Bandwidth Control DDNS Virtual Server DMZ Host UPnP IPTV Routing Table and Static Routing Clicking any of them enters the corresponding interface for configuration Details are expl...

Страница 47: ...term used for the updating in real time of Internet Domain Name System DNS name servers We use a numeric IP address allocated by Internet Service Provider ISP to connect to Internet The address may e...

Страница 48: ...ter the DDNS user name registered with your DDNS service provider Password Enter the DDNS Password registered with your DDNS service provider Domain Name Enter the DDNS domain name with your DDNS serv...

Страница 49: ...e port you will need to enter it manually Example You want to share some large files with your friends who are not in your LAN however it is not convenient to transfer such large files across the netw...

Страница 50: ...need to enter ftp 172 16 102 89 21 in their browsers Note If you include port 80 in this section you must set the port for remote web based management to a different number other than 80 such as 8080...

Отзывы: