1
2
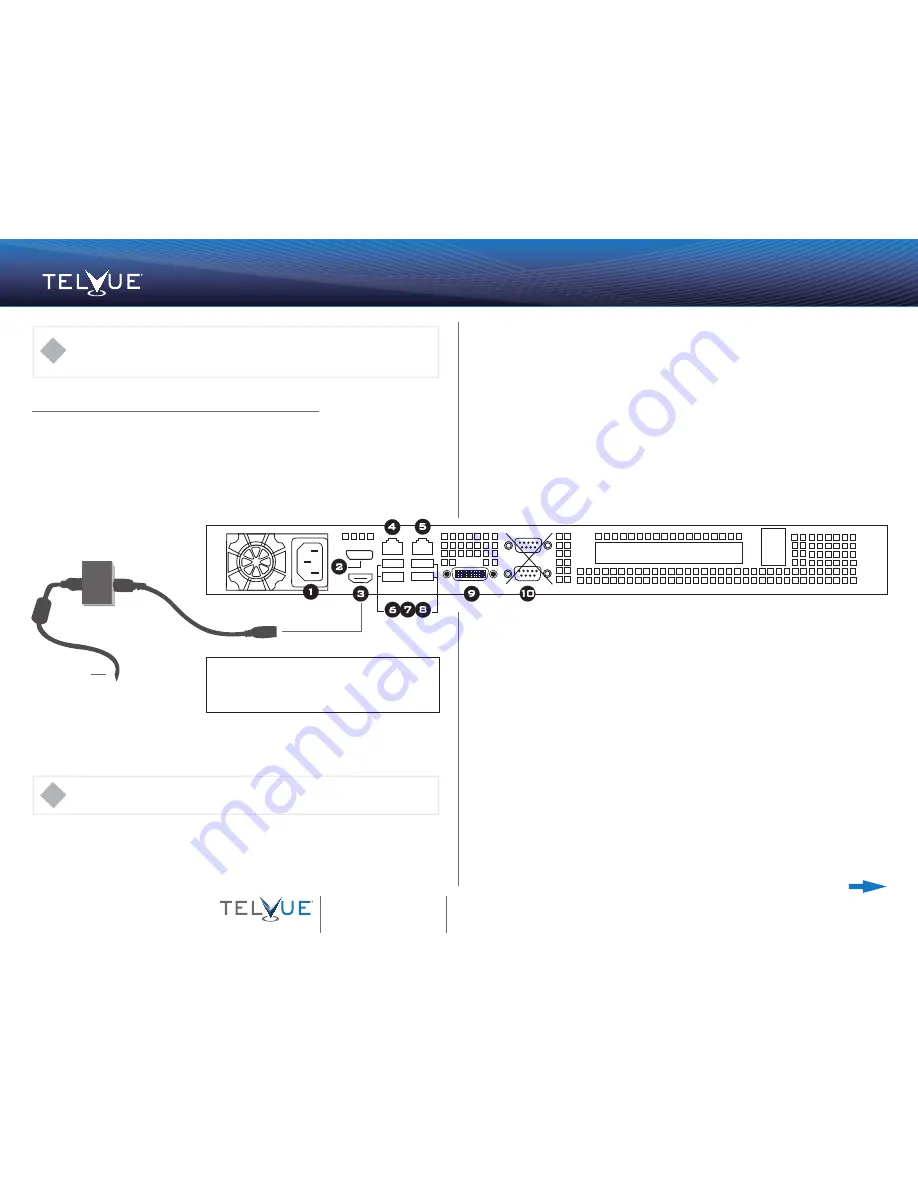
Plug the InfoVue Player Pro HDMI output into the Gefen HDMI Detective Plus HDMI Input as
shown. Then optionally plug the Gefen HDMI Detective Plus HDMI Output into an HDMI
monitor for monitoring purposes.
The Gefen HDMI Detective Plus simulates an HDMI monitor being connected to your InfoVue
player at all times to prevent any interruptions to the IP streaming output when the display used
for monitoring is unplugged or turned off. It also allows you to run the player headless (without
a monitor) and still support the IP streaming output. If you are not using the IP output and are
just using the HDMI output to feed a fixed display or encoder, the Gefen is not required, but
still recommended.
Plug In HDMI
3
Power Up
QSG_InfoVue_01_16_V3
To install the InfoVue Pro Player in a rack, use the ears to bolt the server in place.
Install in a Rack
Power
Display Port
(DP)
HDMI
Ethernet [0]
Ethernet [1]
1.
2.
3.
4.
5.
6.
7.
8.
9.
Mouse
Keyboard
USB
DVI
Serial Ports
(not used)
10.
1
2
3
4
5
6 7 8
10
9
Plugs into HDMI
Gefen HDMI Detective
Plus
Back Side of InfoVue Server
4
Log In & Configure Networking
There are two ways to log in to the InfoVue User Interface:
a. USE PRE-SET IP - requires InfoVue Pro, ethernet cable, and an additional computer.
i. Assign IP address values to a network port on your computer:
1. IP 192.168.0.101
2. Net Mask: 255.255.255.0
ii. Connect ethernet cable between your computer and eth1 port on InfoVue.
iii. Access the Web UI from a web browser, login to InfoVue User Interface:
http://192.168.0.242.
(This is the factory-assigned IP address for your InfoVue box.)
b. SET YOUR OWN IP - requires InfoVue Pro, keyboard & mouse, and HDMI monitor.
i. Attach an HDMI monitor by plugging the HDMI output of the connected Gefen from
Step 2. above into your monitor HDMI input.
ii. Attach keyboard & mouse
1. Press Ctrl+Alt+Del to bring up the Windows login window.
2. Log off the existing login.
3. Log in as user “config” with password “config”.
iii. Assign static IP to eth0 - Management.
1. Double click the desktop icon “Network”:
a. Choose “Change adapter settings” (left side)
b. Double click on eth0 - Management.
c. Select Properties.
d. Choose Internet Protocol Version 4 (TCP/IPv4).
e. Click the properties button.
f. Choose “Use the following IP address” and fill in your network
specific values.
iv. Once IP configuration is completed, press Ctrl+Alt+Del and reboot the InfoVue
player. Your InfoVue Pro Player is now ready to receive content.
v. Now you can access the Web UI from a web browser. Login to the InfoVue User
Interface at: http://(your IP address from previous step).
Refer to the online user instructions on
how to use the Web UI
for other configuration and
encoder streaming settings.
http://www.telvue.com/infovue-pro-configuration-ui/
Plugs into an HDMI
monitor (optional)
Turn the page for additional steps.
The following instructions for launching a TelVue InfoVue system include configuring both the InfoVue
Pro Player and the InfoVue Stick (see back page). The rack-mounted Pro Player is generally for
broadcast and streaming applications, whereas the ultra-compact Stick is generally for individual
monitors, or to fully preview any content and design changes before publishing.
!
Set up the InfoVue Pro Player
16000 Horizon Way
Mount Laurel, NJ 08054
800.885.8886
Email:
Online Resources:
www.telvue.com/products/infovue
We share your vision™
Getting Started
TelVue
®
InfoVue™
!
Please do NOT connect the power supply to the Gefen device. This will cause it to malfunction.
Power up the InfoVue Pro server.


