tell GSM Gate Control Pro 1000 Скачать руководство пользователя страница 14


14 

4.3.3  Steps of remote programming 

To start remote programming of the 

Gate Control Pro

 module, follow the instructions below: 


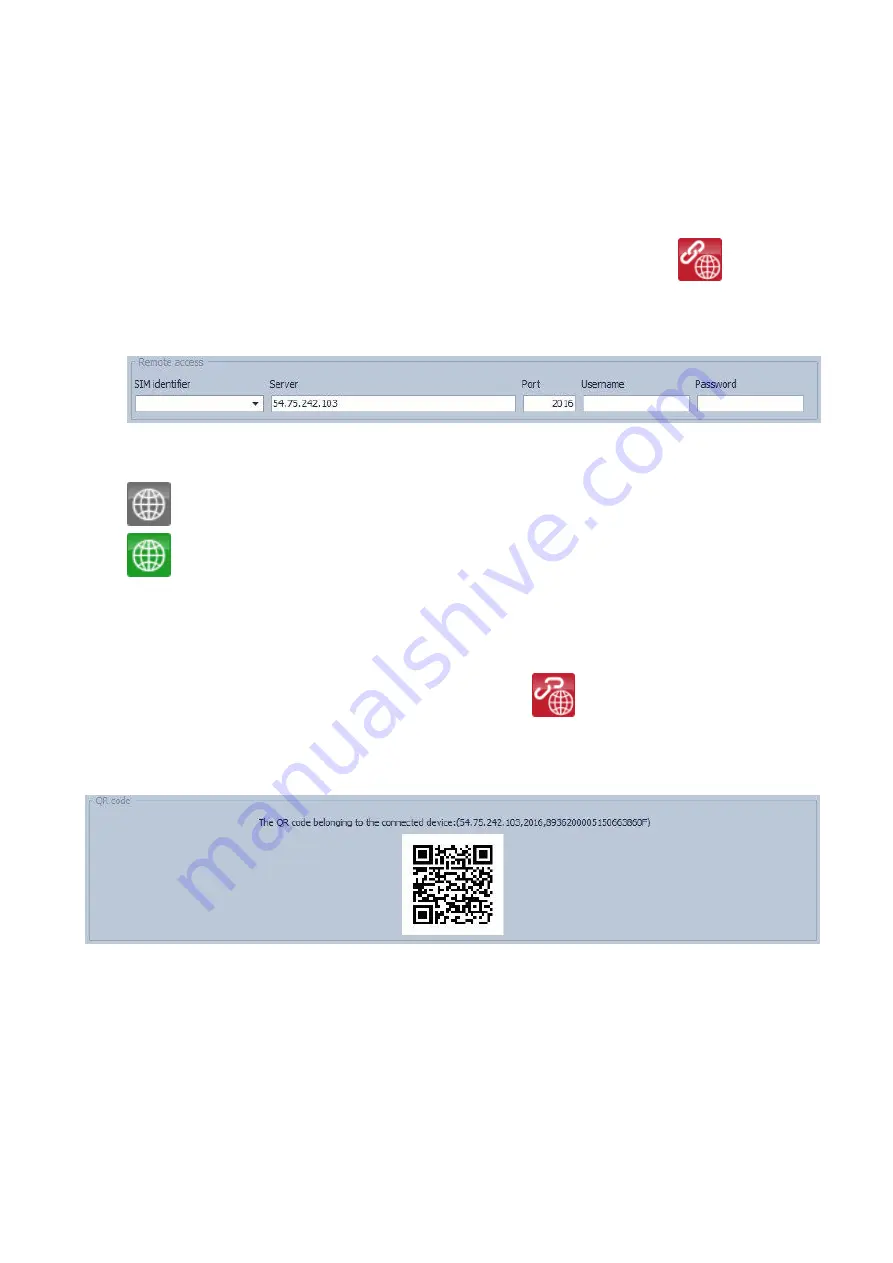
To  establish  the  connection,  go  to  the  programming  software’s  “

Connection

”  menu, 

select  the 

Gate  Control  Pro

  module  you  wish  to  configure  from  the 

SIM  identifier

” 

drop-down menu, or enter the identifier of the SIM card installed into the module, enter 
the  server  IP  address  (54.75.242.103),  the  port  number  (2016),  your  user  name 
registered  in  the 

Gate  Control  Pro

  module  and  the  remote  programming  (client) 

password assigned to your user name

, then click on the “

Connect

” 

 button. You 

can find the SIM identifier printed onto the SIM card or you can read it from the “

SIM 

identifier

” field of the “

Module  status

” menu when the 

Gate  Control  Pro

  module  is 

connected via USB. 


  Connection status is indicat

ed by the Internet status icon placed on the “

Connection

” 

tab: 

 : disconnected (grey) 

 : connected via the Internet (green) 

  After connecting successfully, the settings can be read and changed, the event log can 

be downloaded and the status information can be viewed just like when connected via 
USB.  Of  course,  data  downloading  and  uploading  takes  longer  over  the  Internet 
connection than via USB. 


To close the connection click on the “

Disconnect

” 

 button. 

4.3.4  QR code 


The QR code found in the “

Connection

” menu is used to transfer the connection data easily 

to  the  smart  phone  application.  To  generate  a  QR  code,  connect  the 

Gate  Control  Pro


module to the computer via USB. The software reads the identifier of the SIM card installed 
into the connected module automatically and prepares the QR code that includes the three 
connection data (server IP address, port number and SIM identifier). 
You can read the QR code with your smart device directly from the screen, or from a printed 
sheet  if  it  has  been  printed.  To  print  the  QR  code  click  on  the  QR  code  using  the  right 
mouse button, save to file or copy to clipboard, then paste into a new document (e.g. Word) 
where you can also add usage information, and print from there. 

Содержание GSM Gate Control Pro 1000

Страница 1: ...caller identification 5 different control modes 4 NO NC inputs 2 NO relay outputs 50 configurable access templates Configurable holidays Automatic timed controls 20 and 1000 user variant Reports the s...

Страница 2: ...nfiguring by computer via USB 11 4 3 Configuring by computer over the Internet 11 4 3 1 Adding a client identifier for the programming software 12 4 3 2 Managing SIM identifiers 13 4 3 3 Steps of remo...

Страница 3: ...ent permissions and access periods as well as custom access rules can be assigned The access periods can be configured by access templates which can be assigned to users The system will accept control...

Страница 4: ...while the position limit switch of gate B should be connected to input IN4 In case of control modes 3 4 and 5 the gate s position limit switch should be connected to input IN3 If the position limit s...

Страница 5: ...g on the product type if the supply voltage drops below 8 4 8 2V the module turns off automatically and it turns back on when the supply voltage is at least 11 2 11 4V The minimum supply voltage level...

Страница 6: ...tput OUT1 should be connected to input IN3 If two gates are controlled the position limit switch of the gate controlled by output OUT2 should be connected to input IN4 For control modes 3 4 and 5 the...

Страница 7: ...d 5 Wiring example for control mode 3 The example shows wiring of inputs IN1 and IN2 when configured to normally open and when inputs IN3 and IN4 are configured to normally closed The example shows wi...

Страница 8: ...to open the socket 3 slide the SIM card into the opened part with the contacts facing down as shown in the figure Close back the opened part together with the SIM card Press down carefully the metalli...

Страница 9: ...to the module Check the wires to be connected as instructed in the wiring diagram You can power up the device 9 30 VAC DC Make sure that the power source is sufficient for the operation of the Gate C...

Страница 10: ...of the installation wizard to complete the installation The latest version of the programming software can be downloaded from the manufacturer s website https tell hu en products gsm automation gsm g...

Страница 11: ...d the event log can be downloaded and status information is also available 4 3 Configuring by computer over the Internet For connecting via the Internet the SIM card installed into the Gate Control Pr...

Страница 12: ...entifier window then select the Password for remote programming option in the Client identifier section and enter the new password here The software will ask for this password and the user name of the...

Страница 13: ...dentifiers button In the SIM identifier editor window you can add new SIM identifiers delete existing ones and change the name and identifier number of existing ones Adding a new SIM identifier To add...

Страница 14: ...e Internet green After connecting successfully the settings can be read and changed the event log can be downloaded and the status information can be viewed just like when connected via USB Of course...

Страница 15: ...uptime since the last GSM network connection IP uptime the uptime since the last internet connection GSM operator the name of the GSM operator used actually GSM signal actual GSM signal level Lowest...

Страница 16: ...ent log to file in CSV format Reading the event log from the module When reading the event log you can specify by filtering options the period and event type you wish to download It is also possible t...

Страница 17: ...on Create full system backup You can create a full system backup after clicking on this button The full system backup includes all the settings as well as users database client identifiers templates a...

Страница 18: ...ation for backup GSM calls and for SMS sending during the smart device registration process PIN code if you wish to use PIN code management enter here the PIN code of the SIM card installed into the m...

Страница 19: ...rol call by calling back the given number Callback option can be enabled separately for each user With this setting it can be configured how long the system should ring the user s phone when calling b...

Страница 20: ...the image transfer mode supported by the IP camera Stream video continuous content Picture still picture This function works only with cameras that support the ONVIF standard The manufacturer does not...

Страница 21: ...rnet access and the outgoing e mail account settings Type open the drop down menu and select the report types which you wish to receive by e mail Event log a full event log can be sent daily or weekly...

Страница 22: ...more messages within 24 hours than the number entered here After 24 hours the counter resets automatically thus thereafter incoming messages will be forwarded up to the configured limit number In case...

Страница 23: ...input IN1 IN4 is shorted to V terminal DC power negative Special input functions available when using the system with the smartphone application IN1 doorbell notification function via Push notificatio...

Страница 24: ...SMS and or e mail upon activating the given input Attention The following characters should not be used Position limit switch OUT1 enabling on input IN3 the gate position limit switch installed on th...

Страница 25: ...ing gate A B OUT2 impulse length seconds opening gate B Selective control of outputs OUT1 and OUT2 by using caller identification and by blocking caller ID sending If the caller sends the caller ID ou...

Страница 26: ...for X seconds then after W seconds output OUT2 gives open contact for Y seconds then after 1 second output OUT1 gives again closed contact for Z seconds This control mode can be used if the gate cont...

Страница 27: ...same user during opening process or opened period during X Y period The gate will close when a third call is received from the same user or a new call from a different user This function cannot be use...

Страница 28: ...ed or select it by clicking on the element and then click on the Edit button Enter the element s custom name in the dialog window then click on the Write button Other options export custom names to CS...

Страница 29: ...cessary to write them into the module using the Write button erasing the automatic timed control templates deletes all existing automatic timed control templates from the system erasing the access tem...

Страница 30: ...ays and user custom rules When this option is selected anyone who sends the caller ID may control the system If the user blocks the caller ID the request for control will be rejected except when contr...

Страница 31: ...control modes in case of using control mode 1 or 2 output OUT1 and output OUT2 give permanent closed contact during the interval between the time configured at Open and Close options The automatic ti...

Страница 32: ...e by 1 minute but up to 3 messages only Available options read timed control templates from the module add new timed control template edit the selected timed control template delete the selected timed...

Страница 33: ...ch user when they can access and control the system Out of the configured entry periods the system rejects the given user s request for control except if this is not overridden by global rule or custo...

Страница 34: ...in the configured entry periods and is denied out of the periods If you wish to prohibit entry for a certain day then enter value 00 00 into both time fields of the given day In the Holiday section yo...

Страница 35: ...e g 3630 The system accepts maximum 20 digits Accepted characters are 0 9 only Permission you can choose out of three permission levels User can only control the system Admin can control the system an...

Страница 36: ...w will receive Technical or device error messages by Push notification when input IN2 is activated If this option is disabled then the smart devices of the given user will not receive technical error...

Страница 37: ...y is prohibited for all users except this user who has to work Custom rules are only overridden by the global rule which can be configured in the Admin functions menu Custom rule settings Type None no...

Страница 38: ...r Super admin permission then add the client identifier to this user To add a new client identifier manually click the one New button enter the name of the smart device in the Name section of the Clie...

Страница 39: ...eriod configured in the Holiday section of the access templates and will be prohibited out of the period The entry permission can be overridden with custom or global rules For the automatic timed cont...

Страница 40: ...update the phone number in the settings After replacing the SIM card it is necessary to delete the given module s control button in all smartphone applications assigned and the control button should b...

Отзывы: