* Caller Identification requires Telkom’s Identicall service. Subscription may be required
Страница 1: ...Caller Identification requires Telkom s Identicall service Subscription may be required...
Страница 2: ...line cord 6 5 Mounting the phone 6 6 Setting the telephone 6 7 Setting the Year Month Date and Time 6 8 Set menu 7 Telephone Operations 7 1 Dialing a number 7 2 Receiving incoming calls 7 3 Handsfree...
Страница 3: ...of callers 10 2 Deleting numbers from the calls list 10 3 Dialing a number from the outgoing calls list 10 4 Dialing a number from the callers list 11 Troubleshooting Calller ID System Troubleshooting...
Страница 4: ...er appliance that produces heat 3 Installation precautions Never install telephone wiring during a lightning storm Never touch un insulated telephone wires or terminals unless the telephone line has b...
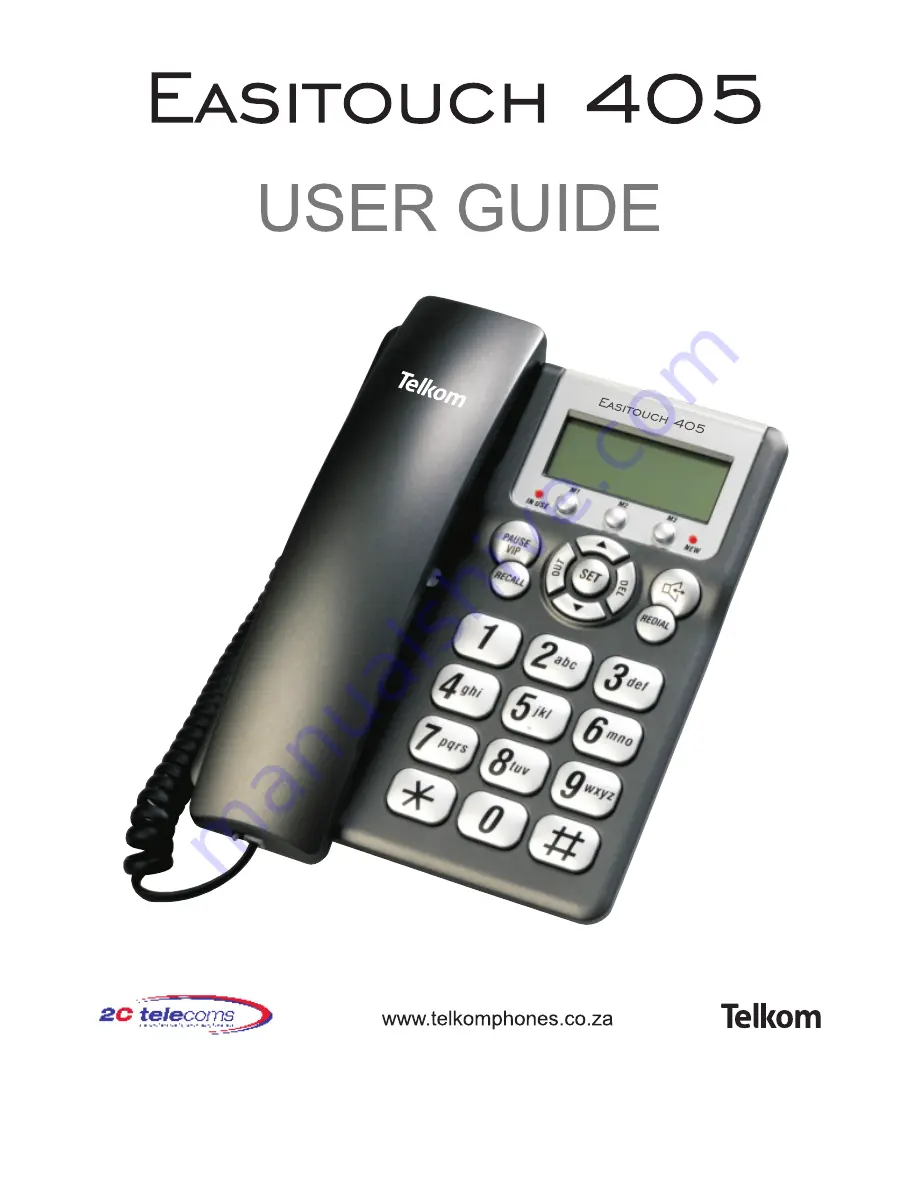
Страница 5: ...on 4 Pause VIP button 5 Hook switch 6 In use indicator 7 M1 M3 memory buttons 8 LCD display 9 New call indicator 10 Up button 11 Speaker button 12 Delete button 13 Redial button 14 Down button 15 Set...
Страница 6: ...5 BOTTOM VIEW 1 Battery compartment 2 Speakerphone volume switch 3 Ringer volume switch BACK VIEW 1 Line jack...
Страница 7: ...t rechargeable batteries NOTICE Please do not insert batteries while the telephone is connected to the telephone line 1 Remove the screw from the battery compartment door Press down on the upper edge...
Страница 8: ...same procedure as to setting the Year Time and Date sequence which are detailed below for clarity 6 5 Mounting the phone You can mount your telephone directly against a wall or place it on a shelf des...
Страница 9: ...switch to SET 2 with digit 2 flashing A choice can now be made to select another mode which may be required by pushing the up and down buttons or to terminate the procedure by briefly lifting the hand...
Страница 10: ...oceed as follows 1 Lift the handset or press the button 2 To end the call replace the handset or press the button 7 3 Handsfree facility button at the start of or during a call You will now hear the d...
Страница 11: ...sturbed by incoming calls 7 6 Using Redial To redial the last number dialed proceed as follows 1 Lift the handset or press the button 2 Press the REDIAL button 7 7 Recall Your telephone supports the C...
Страница 12: ...VIP button 2 Where important incoming numbers are to be safe guarded against accidentally deleting scroll up and down keys to identify the number then press the PAUSE VIP button to safe guard the num...
Страница 13: ...2 Press the SET button The display shows STORE IN 3 Press the desired memory location M1 M2 or M3 4 The number will then automatically be stored NOTE To update the number stored in the one touch memor...
Страница 14: ...b ot e c l res rict ng i s d spl yed t i t P i i a OUT OF AR A E If e name and mbe s n t av lab e e ca ls from road th nu r i o ai l g l ab O is displayed 10 Calling line identification IdentiCall sub...
Страница 15: ...Use the p q buttons to select a number from the incoming list or the OUT button to select a number from the outgoing list that you wish to delete 2 Press the DEL button The display shows the next num...
Страница 16: ...the display press the REDIAL button 10 4 Dialing a number from the callers list The phone can store up to 63 incoming numbers To dial an incoming number proceed as follows 1 Lift the handset and use...
Страница 17: ...activated Call Telkom on 10210 to have the IdentiCall service activated on your telephone line Check your telephone line connections Make sure all connections are secure and connected If you have pic...
Страница 18: ...transmission This is not the fault of your telephone It can only capture and store the data that it received The DEL button must be quickly pressed to erase a single call record To erase all call rec...
Страница 19: ...e Test a different phone in the wall socket and listen for dial tone to check if the line is in order Check the RINGER HI LO OFF switch It may be in the OFF position The phone or another phone connect...
Страница 20: ...hone is guaranteed for a period of 12 calendar months from the date of purchase as indicated on your till slip Keep your till slip in a safe place as it will be required for guarantee repairs It is ho...