background image

NEXUS-IP-G1-US-IOT PC

NEXUS-IP-G1-US-IOT PC recovery and backup options | en

11

Bosch Security Systems, LLC

Installation manual

2020-07 | 03 | F.01U.380.986

5.1

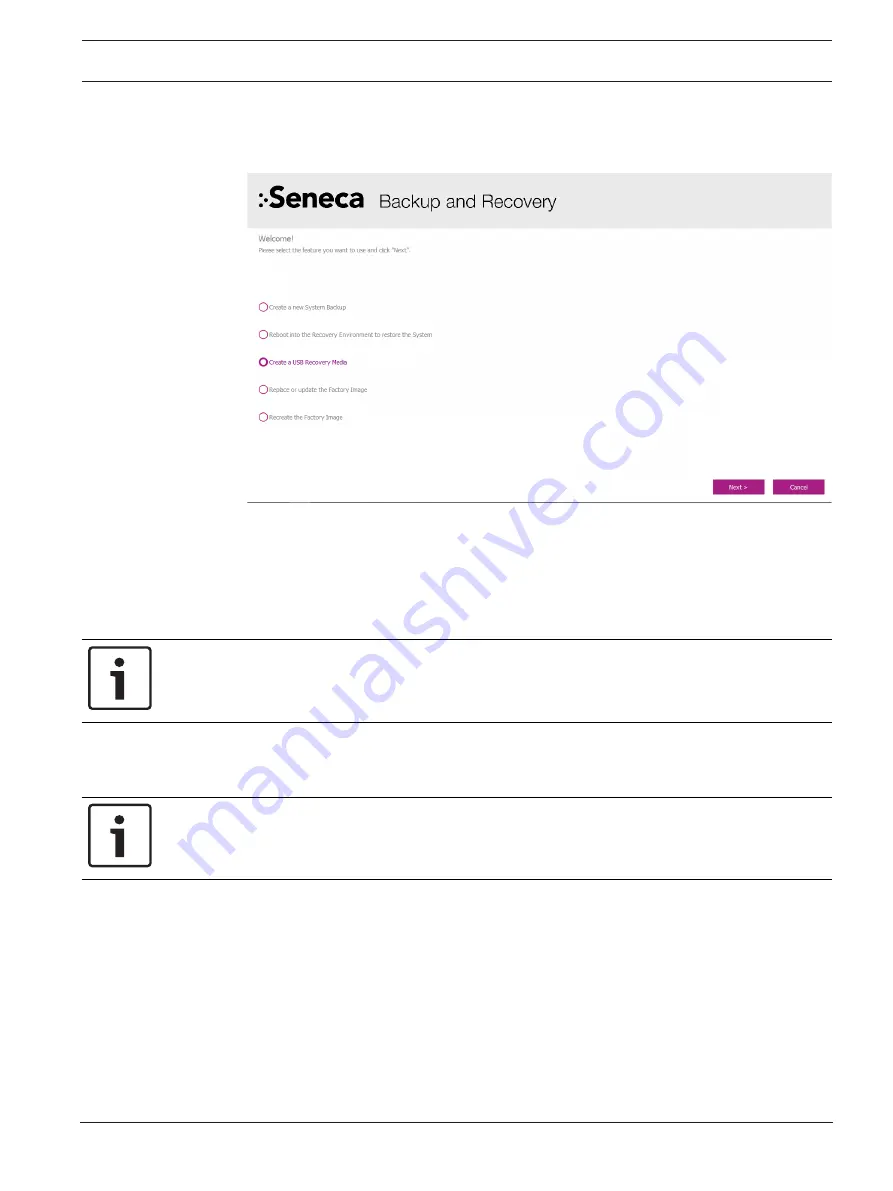
Create a USB recovery media

To 

create a USB recovery

, do the following

1.

Run the 

Seneca Backup and Recovery

 application from the Start menu. 

2.

Select 

Create a USB Recovery Media

.

3.

Press the 

Next 

button.

4.

Insert a 

32 GB (minimum) USB flash drive

 into a USB port when requested.

5.

Press 

OK

.

6.

Remove the 

flash drive

 after successful creation.

7.

Press the 

Finish

 button.

Notice!

Label the flash drive and store it in a safe place. This step will not be required on additional
PC’s in the same series.

5.2

Create a system backup file

Notice!

Complete these steps on each PC.

1.

Perform a 

Check for Windows Updates

.

2.

Install all the security 

updates

.

3.

Reboot the 

PC

.

4.

Check for 

additional updates

, if more updates are required allow them to install.

5.

Repeat 

step 3

 until there are no more updates to install.

6.

Install any 

C-Soft 

updates.

7.

Activate the 

licenses

.

8.

Load 

working C-Soft design files

.

9.

Test 

dispatch positon operations

.

10. Disconnect the 

Ethernet cable

.

Содержание NEXUS-IP-G1-US-IOT

Страница 1: ...NEXUS IP G1 US IOT PC SMALL FORM FACTOR PC IOT en Installation manual ...

Страница 2: ......

Страница 3: ...y Considerations 4 2 Before you start 5 3 Connection ports and controls 6 4 Installation 7 4 1 Mounting 8 4 2 Initial power 9 5 NEXUS IP G1 US IOT PC recovery and backup options 10 5 1 Create a USB recovery media 11 5 2 Create a system backup file 11 5 3 Restore a system from the backup file 12 5 4 Restore a system from a USB flash drive recovery image 14 ...

Страница 4: ...ed PC with up to date IT security software installed and with latest security updates applied User rights should be properly administered using group policies to prevent unauthorized use of USB connected devices If the Dispatch network must connect to other networks install and properly maintain firewalls and intrusion detection systems If Dispatch devices or computers use the Internet to connect ...

Страница 5: ...spatch operations and any associated Dispatch use as described in the Microsoft EULA Your use of this product constitutes acceptance of the Microsoft EULA Packing List 1 NEXUS IP G1 US IOT PC 2 Power Supply 3 Power Cord 4 Mounting Brackets 5 Wireless Keyboard and Mouse 6 Quick Start Guide 7 Microsoft Windows EULA Required not included C Soft License Ethernet Cable Internet access for license activ...

Страница 6: ...on manual Bosch Security Systems LLC 3 Connection ports and controls Figure 3 1 Reference View 1 USB 2 0 2 HDD LED 3 Power LED 4 Power Button 5 Power Connection 6 USB 3 0 7 Display Port 8 HDMI Video Port 9 Ethernet Connections 1 and 2 10 Audio Connections typically not used 11 PC Locking Port ...

Страница 7: ...T PC Follow the instructions included with keyboard mouse kit The dongle can be inserted into any USB port Using an Ethernet cable connect ETH1 to network with access to the Internet Connect monitor to either the HDMI or Display port Connect ADHB 4 USB cable to any USB port Connect power cable to power supply Connect power supply to power connection port Plug power cable into an electrical outlet ...

Страница 8: ...g brackets Figure 4 2 NEXUS IP G1 US IOT PC with Mounting Brackets To mount the PC do the following 1 Attach the brackets to the top of the PC using the supplied screws 2 Hold the PC in the desired mounting position 3 Mark hole positions on the mounting surface 4 Drill the supplied screws in place at the marked positions 5 Attach and slide the PC onto the screws until it fits snugly without moving...

Страница 9: ...the PC power button 3 Select ADMIN at the login screen 4 Enter telex in the password field Notice It is required to change the default admin password after the first login to strengthen the system security Notice Once the device is running it is recommended a backup is created using the included Seneca Backup and Recovery software For more information on creating the backup see Create a system bac...

Страница 10: ...getting a replacement hard drive and as a potential storage location for your system backups Create a System Backup After making changes to your system and after rebooting with no Windows Updates in progress you can create a system backup A system backup is comparable to a snap shot of the system to which the system can be restored if needed The system keeps only the two most current system backup...

Страница 11: ...e flash drive after successful creation 7 Press the Finish button Notice Label the flash drive and store it in a safe place This step will not be required on additional PC s in the same series 5 2 Create a system backup file Notice Complete these steps on each PC 1 Perform a Check for Windows Updates 2 Install all the security updates 3 Reboot the PC 4 Check for additional updates if more updates ...

Страница 12: ...s the captured system configuration 14 Press the Finish button Notice Only two system backups are kept on the D drive When a third backup is created the application erases the first backup 5 3 Restore a system from the backup file To restore the system from the backup file do the following 1 Run the Seneca Backup and Recovery application from the Start menu 2 Select Reboot into the Recovery Enviro...

Страница 13: ... start the recovery Notice You have the option to backup any user data created since the last saved date To save data use a blank USB flash drive of at least 32 GB capacity 6 Select NO if you are not sure what data has been added to the PC This insures the bad data is not saved and reinstalled OR Select YES to open a new screen with a file tree used to select which data to backup 7 Press the Next ...

Страница 14: ...t be modified in BIOS to boot from the USB flash drive before a restore is attempted Contact technical support to obtain the BIOS password and further instructions 1 With the PC turned off plug the USB flash drive with the bootable recovery image into the USB connector on the PC 2 Turn on the PC The application analyzes the files on the USB and D drives 3 Select Factory Image or System Backup 4 Pr...

Страница 15: ...NEXUS IP G1 US IOT PC NEXUS IP G1 US IOT PC recovery and backup options 15 Bosch Security Systems LLC Installation manual 2020 07 03 F 01U 380 986 ...

Страница 16: ...16 NEXUS IP G1 US IOT PC recovery and backup options NEXUS IP G1 US IOT PC 2020 07 03 F 01U 380 986 Installation manual Bosch Security Systems LLC ...

Страница 17: ......

Страница 18: ......

Отзывы: